IMatch File Windows use a range of icons to present metadata and digital asset states. The file collections, the XMP rating and label, category assignments and more.
Sometimes it may be desirable to display additional icons. Maybe you want to indicate images taken at high-ISO settings, which may require extra care during post processing. Or you want to show a warning icon for files which have no keywords or description – as part of your quality management.

Using Custom Templates
The general idea is to use a custom template in your File Window layout. This allows you to display arbitrary variables inside the File Window panels, and also to use some XAML markup to load and display icons.
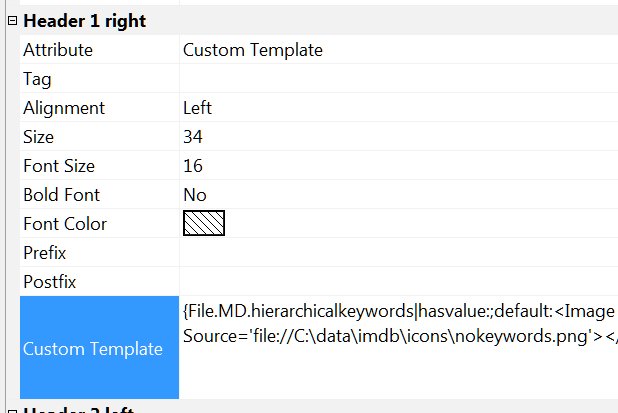
To use a custom template, open the File Window Layout Editor, add a new layout (or clone an existing layout) and switch the Attribute property of the cell you want to use to the Custom Template setting.

Add a ‘No Keywords’ Indicator
For this example, we want to display an icon when a file has no keywords. The variable {File.MD.hierarchicalkeywords} returns all keywords of a file. If it is empty, the file has no keywords. We use this to produce this variable expression for our custom template:
{File.MD.hierarchicalkeywords|hasvalue:;default:No Keywords}
We combine the hasvalue and default functions (see IMatch help on Variables for details) to output the text ‘No Keywords’ if a file has no keywords. To test this, copy and paste the above expression into one of your file window layouts. Or use the Var Toy App in the App Panel to try things out.
Use <Image> to Load Images
To display a custom icon instead of the text ‘No Keywords’, we add a XAML instruction which allows us to render an image. The <Image> tag does the job:
<Image Source='file://c:\data\imdb\nokeywords.png'></Image>
In this example, we load the image file stored in ‘c:\data\imdb\nokeywords.png’. This file is a 32 x 32 pixel PNG file with a transparent background. This size works best for our layout, but you can of course also use smaller or larger icons.
We combine this markup fragment with the custom template created earlier to produce the final custom template:
Write everything in a single line. The line breaks ↵ here are for layout purposes only.
{File.MD.hierarchicalkeywords|hasvalue:;↵
default:<Image Source='file://C:\data\imdb\icons\nokeywords.png'>
</Image>}
We also set the Size of the ‘Header 1’ cell to 34 pixel to make room for the icon. The result in the File Window looks pretty cool:
![]()
This little icon tells us that the file has no keywords yet. Awesome.
Add a ‘Missing Description’ Icon
You can display custom icons in any of the four header and eight footer cells – and you can even display multiple icons per cell. A lot of flexibility here.
To add a second icon which indicates missing descriptions, use this custom template:
{File.MD.description|hasvalue:;default:↵
<Image Source='file://C:\data\imdb\icons\nodesc.png'></Image>}
As before, we test if a given metadata tag (in this case the XMP description) is empty. If this is true, we use an <Image> XAML tag to load and display an icon.
For this example, I have combined both tests and icons into the same ‘Header 1’ cell:
{File.MD.hierarchicalkeywords|hasvalue:;default:↵
<Image Source='file://C:\data\imdb\icons\nokeywords.png'></Image>}↵
{File.MD.description|hasvalue:;default:↵
<Image Source='file://C:\data\imdb\icons\nodesc.png'></Image>}
The result in the File Window looks like this:
![]()
The left file has keywords, but no description. The file in the middle is missing both, and the file on the right has a description but no keywords. You immediately see which files require some additional work.
A Note on ‘Escaping’
IMatch by default escapes variable values to make them safe to use with XAML. This means that special characters like < or > are replaced by their safe counterparts < or > to prevent metadata contents to accidentally break XAML markup in the File Window. This is usually exactly what you want, to be able to safely display all metadata in File Windows.
If the variables you use actually produce XAML, escaping may get in the way, preventing you from displaying images or other markup content. The default: function used above is an exception, because it does not replace unsafe characters. But if you use markup in other functions, you need to use a trick to prevent escaping. This trick involves the pereplace function, which allows you to replace text after IMatch has performed the escaping when processing variables.
In this example we use two steps:
1. Emit the value HV when the file has keywords (hasvalue) and XAML markup for the default: case
2. Replace HV with XAML markup using pereplace.
{File.MD.hierarchicalkeywords|hasvalue:HV;default:<Image Source="C:\temp\checkbox_unchecked.png"/>;pereplace:HV==<Image Source="C:\temp\checkbox.png"/>}
This way, when IMatch performs escaping on the variable, it only sees the safe value HV. Afterwards we replace these placeholders with XAML markup that loads and displays images.
Summary
By using custom templates in file window layouts you can display arbitrary variables in exactly the format you want. By adding a bit of XAML code, you can also load images or use custom colors for text and background. See the IMatch help for more info on XAML markup supported by IMatch.
Use the techniques presented here to add custom indicators for all kinds of purposes. You can improve your digital asset quality management by adding visual clues right into the File Window. When you catalog images, you can use icons to indicate high-ISO files, files taken with specific cameras, by specific photographers. Or you use icons to highlight files with specific keywords or metadata contents.
The code to load and display the icon is always the same. You just vary the variables you use to determine whether or not to display the icon, or which icon.
