The File Window in IMatch offers a wide range of customization options. From simple things like font size or color to custom templates based on IMatch variables, XAML formatting instructions and more. All this is controlled via file window layouts. And you can create custom file window layouts to display exactly the the information you want to see, and how you want to see it.
This article shows you some of the things that can be achieved using custom layouts and IMatch variables. Make sure you read the File Window layouts topic in the IMatch help for general information about how to use File Window layouts.
Displaying A Keyword Counter
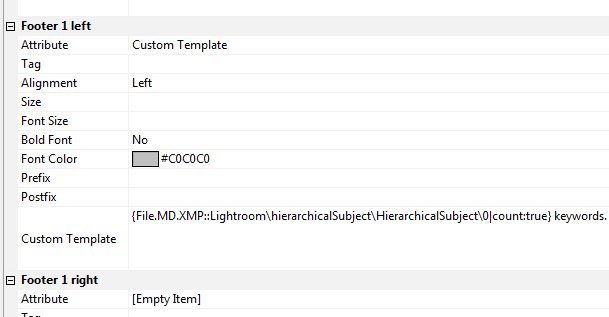
Sometimes it might be useful to see how many keywords you have added to a file right in the File Window. We use a Custom Template for this purpose and fill it from the variable containing the hierarchical XMP keywords of the current file (Click on the … button next to the input field to select the variable):

The Count Formatting Function
The trick is to combine the hierarchicalSubject variable with the count formatting function. This function calculates the number of elements in the variable and returns a number:
{File.MD.XMP::Lightroom\hierarchicalSubject\HierarchicalSubject\0|count:true}
The count formatting function can be used with all repeatable tags to count the number of elements.
The Result
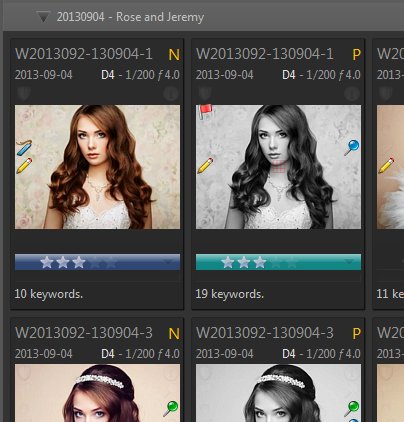
The result of this custom template displays the number of keywords in the left thumbnail panel footer:
Displaying All Keywords
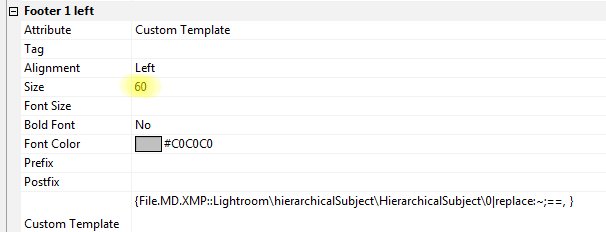
If we want to see the actual keywords instead of a count, we use the same variable. But this time, we use a replace function to replace the single ; character used as the keyword separator keywords with ,<space>. The extra space after the comma allows the File Window to wrap the keywords into multiple lines.
We also increase the Size property of the footer to 60 pixels in order make room for multiple rows of keywords:

The variable we used (for easy copy/paste):
{File.MD.XMP::Lightroom\hierarchicalSubject\HierarchicalSubject\0|replace:~;==, }
Note that ; has a special meaning in IMatch variables so we have to escape it with a leading ~
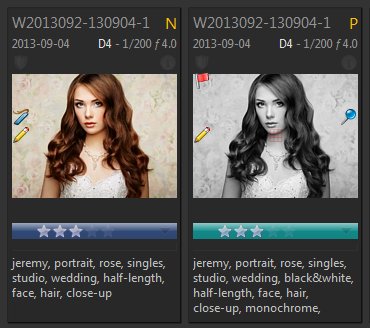
This custom layout now shows all keywords assigned to the file right below the thumbnail:
More Custom Formatting
The file layout above uses some other variables to display more custom information.
The file name is displayed in the top left header, but using a larger font for easier reading.
In the right header we show the first letter of the file extension in upper case. This leaves room for longer file names, but is still sufficient to identify the file format. We achieve this by using a Custom Template together with an IMatch variable:
{File.Ext|substr:0,1;to_upper}
The {File.Ext} variable returns the file extension. We use substr:0,1 to extract the first letter, and to_upper to convert the extension to upper case.
See the IMatch help topic Variables for detailed information about variables and the available formatting functions.
Camera Settings
The bottom right header displays the camera model, shutter speed and aperture used for the photo in a custom format. Again, a mix of variables was used to render this information. We used these variables:
{File.MD.Exif::Main\272\Model\0|replace:NIKON ==}
The Model variable contains the camera name as written by the camera. Since Nikon writes strings like ‘NIKON D4’ into this tag, we use a replace formatting function to strip out the leading ‘NIKON<blank>’. This gives use the model name only: D4.
{File.MD.Composite\ShutterSpeed\ShutterSpeed\0|value:formatted}
By default, the shutter speed variable returns the raw value (e.g. 0.02 for 1/200). By using the value formatting function, we tell IMatch to output the formatted value instead: 1/200.
{File.MD.Composite\Aperture\Aperture\0}
We use the aperture variable as-is, but add a bit of XAML formatting (see the IMatch help for details) to output an italic f in front:
<Italic>f</Italic> {File.MD.Composite\Aperture\Aperture\0}
Summary
You can just use the standard IMatch File Window layouts to display your files. Changing attributes like font size, color etc. is simple. And if you want to display custom information, special metadata tags, maker notes or Attribute data, you can do that by using custom templates in combination with one or more IMatch variables.


