Translating IMatch
![]()
photools.com delivers English and German language versions of IMatch. Translations into other languages are created using computer translation services and the help of volunteers. This document explains how the IMatch Translator works and how you can use it to create or update translations for IMatch.
If you want to help translating IMatch into your language – awesome! THANK YOU!
Everything that’s needed is included in the IMatch Translator App. You just add time and your language skills.
Contact us via the email address listed on the support page. We’ll send you additional information.
The IMatch Translator App
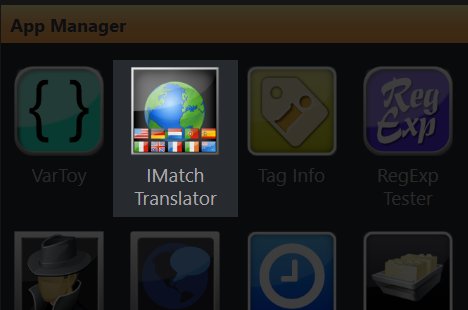
This app is included in IMatch. You start it from the App Manager. IMatch Translator makes creating and updating IMatch translations easy and safe. It even comes with built-in machine translation tools to perform the core translation work automatically – allowing translators to concentrate on reviewing the results produced by machine intelligence and making corrections where needed.
Switching Languages
You can switch the user interface language for IMatch via the Edit > Languages menu.
Alternatively you can use the command line parameter lang=nn to start IMatch with a specific language. This allows you to create multiple desktop shortcuts for IMatch for multiple languages.
For example, create one with the command line argument lang=en for the English user interface language and another with lang=de for the German user interface language.
Quick Start
If you are eager to start, here’s how it works:
- Start IMatch Translator from the App Manager
- Select the language and project in the menu bar at the top
- Click on the orange Next Untranslated button at the bottom or press <Ctrl>+<Enter>
- Enter your translation in the Your Translation input field at the bottom
- Repeat for each resource that needs translation
[font_text icon=”hand-o-up” color=”dark” size=”medium”] Make sure you read the section about special characters and tokens before you start translating.[/font_text]
Table of Contents
- IMatch Resources
- Creating Translations
- The Component Bar
- Beware: Special Characters and Tokens
- Resources with Multiple Parts
- Copy from Default
- Translating Identical Resources in One Go
- The IMatch Translator Mode
- The Built-in Validator
- Validating all Resources
- The Filter Bar
- Finalizing and Versioning
- Machine Translation
- Send Your Translation to Us
IMatch Resources
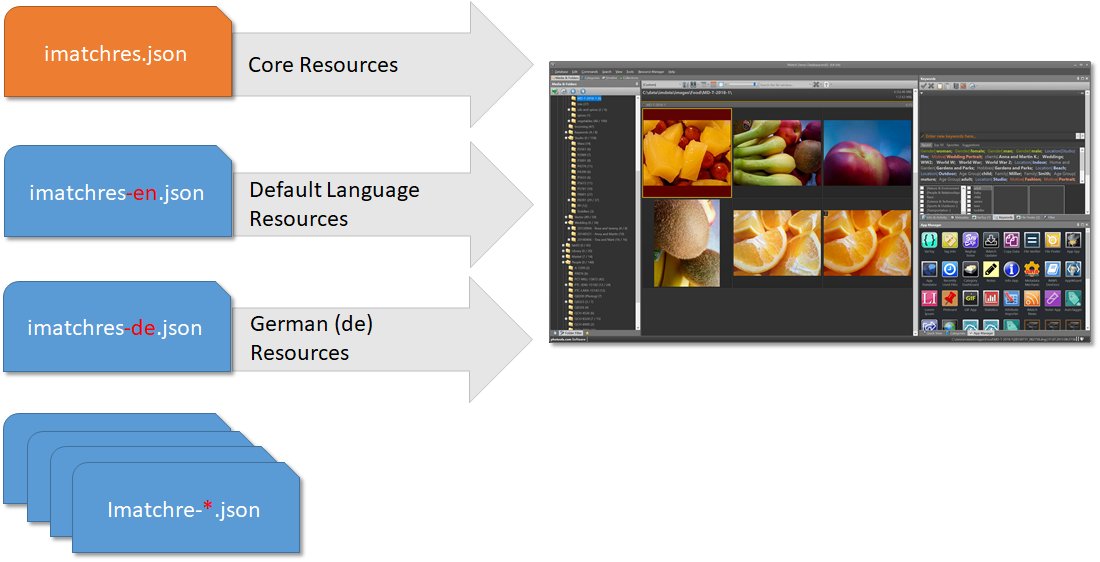
IMatch loads resources like texts, messages, command names, menus, dialog boxes etc. from a set of resource files stored in the C:\ProgramData\photools.com\IMatch6\resources folder on your hard disk.
What Goes Where
- All language-neutral resources are contained in the file named
imatchres.json(You don’t edit this file) - The default English language resources are contained in the file
imatchres-en.json(You don’t edit this file) - Translations for other languages are stored in files named
imatchres-nn.json,wherennstands for the ISO language code (de, nl, pt, es, …).
For example, the fileimatchres-de.jsoncontains the resources for the German language (de = Deutsch).
The following illustration shows how IMatch loads resources for a user with German as the user interface:
IMatch Startup
When you start IMatch, it first loads the core resources from the file imatchres,json and the default resources (in English) from the file imatchres-en.json. Then it looks at the user interface language selected for the IMatch (in the Edit menu) and tries to load the corresponding resource file. For example, if the user has selected Spanish as the user interface language, IMatch tries to load the file imatchres-es.json.
If no translation exists, IMatch uses the resources from the default (English) language file. IMatch also uses English resources if a translation exists is incomplete. This can happen if the translator has not yet translated all resources. If you occasionally see an English text when using IMatch in a non-English language setting, some resources need to be translated. Easy to do, with the IMatch Translator!
Creating and Updating Translations
If you want to help us translating IMatch into other languages: Thank You!
Contact us via the email address listed on the support page and let us know.
Starting IMatch Translator
Fire up IMatch Translator from the App Manager in IMatch and begin.
Open IMatch App Translator in Your Web Browser
Instead of running IMatch Translator in the app dialog it is usually better to run it in your favorite web browser. You can do this by opening this URL in you browser (while IMatch is running):
http://127.0.0.1:50519/imatch/apps/imatch-translator/
Running IMatch Translator in your browser makes useful features like automatic spell checking available.
The IMatch Translator Window
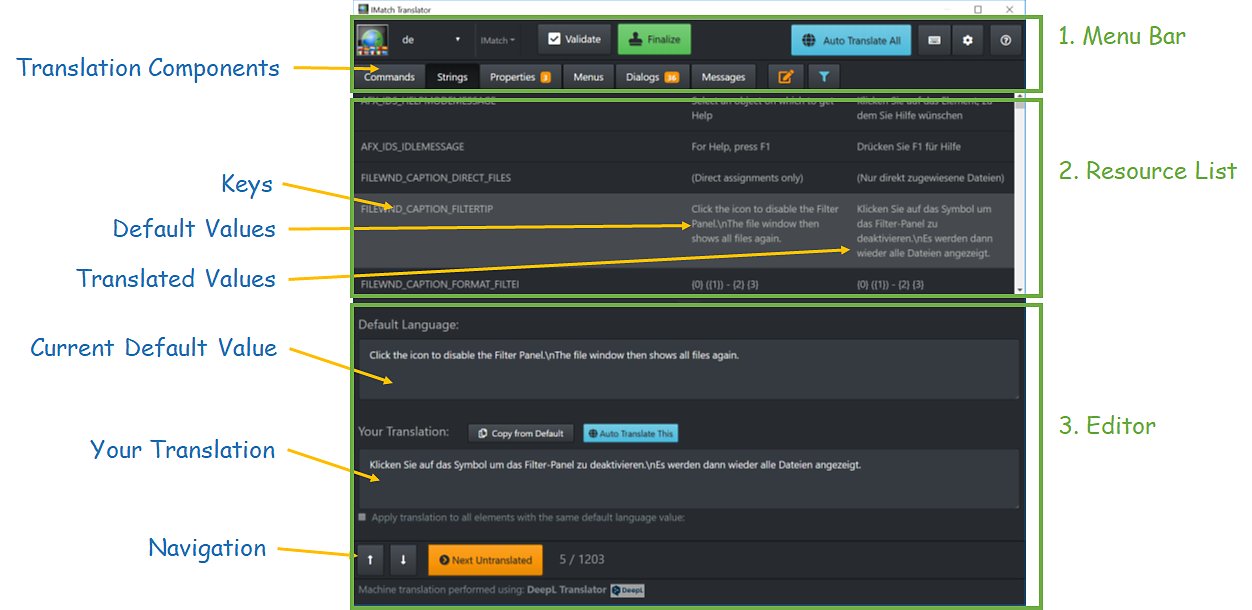
The window is divided into 3 major sections: The menu bar (1) with controls and buttons at the top, the list with all resources to be translated in the middle (2) and the editor (3) where you edit your translation.
Selecting a Language and a Project
When you start IMatch Translator for the first time, a translation language (German – de) and project (IMatch) is selected by default. First select the language of your translation:
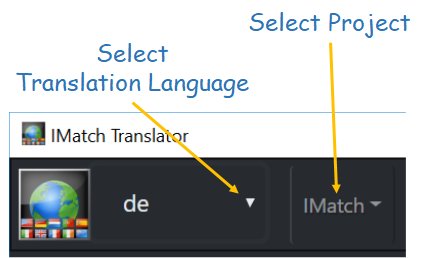
IMatch Translator loads the matching translation for the selected project or creates it when it does not yet exist. Your settings are automatically saved for the next session.
The Component Bar
IMatch uses resources for different things (messages, commands, texts, dialog boxes, menus etc.). The IMatch Translator separates the resources into components to make them easier to handle. The Component Bar at the top tells you which type of resources you are currently working with:

To switch to another component, just click the corresponding button. The orange badge in each button tells you how many resources are left for translation.
The Resource List
Directly below the Component Bar is the list with the resources in the current component. The list has four columns. The first column shows the unique key (or ‘id’) of the resource. The second column holds various icons. The third column shows the default language content for the resource and the fourth column shows your translation.
Adding or Updating a Resource Translation
Click in the resource list to select a resource. When a resource is selected, the editor displays the default language text at the top (read-only) and your translation directly below. To navigate between elements in the list use the mouse, one of the navigation buttons at the bottom or the corresponding keyboard shortcuts.
[font_text icon=”lightbulb-o” color=”dark” size=”medium”] You can change the size of the editor with the drag bar between the editor and the resource list. Us this to adapt IMatch Translator to your screen size.[/font_text]
To translate a resource, type in the translation text in the lower input field. That’s basically all that needs to be done. You navigate from resource to resource and add or update the translation as needed.
[font_text icon=”download” color=”dark” size=”medium”] IMatch Translator automatically saves your work in the background. [/font_text]
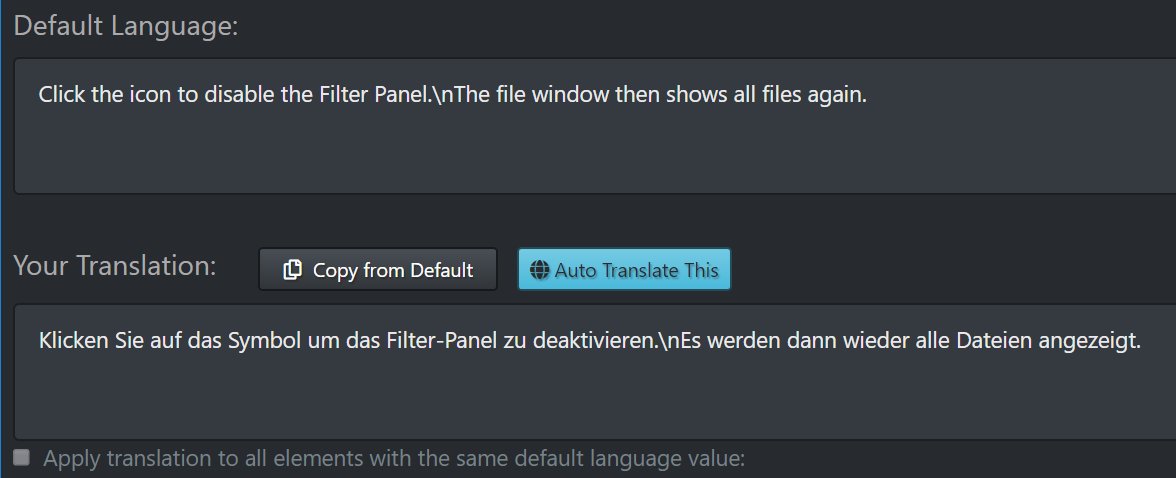
Navigation
Use the cursor keys, <Home> or <End> to navigate the resource list. <Ctrl>+<Enter> jumps to the next untranslated resource, <Ctrl>+<CursorDown> and <Ctrl+CursorUp> navigate to the previous and next resource. You can also use the mouse wheel to scroll the resource list and click on a resource to make it the active resource. Using the keyboard is faster, though.
[font_text icon=”lightbulb-o” color=”dark” size=”medium”] Click the keyboard button in the menu bar to display all keyboard shortcuts [/font_text]
Show Only Untranslated
Click this orange button next to the Component bar to show only items in the current component which require work. This means resources without a translation or resources which have been marked as changed (since the last version).

Undo
You can always undo the last changes (up 20) with the Undo button in the menu bar, or the <Ctrl>+<Z> keyboard shortcut.
[font_text icon=”exclamation-circle” color=”dark” size=”small”] Switching to another component or running a machine translation for all resources clears the Undo. [/font_text]
Stop and Continue
You don’t need to process a translation in one session. You can close IMatch Translator at any time and re-open it later to continue with your translation. This is especially important when you start with a new translation and there is lots to do.
[font_text icon=”lightbulb-o” color=”dark” size=”medium”] Use the Next Untranslated button after loading a translation to find the next resource to translate.[/font_text]
Backup!
It is highly recommended that you make frequent backups of your translation. To do this, just copy the resource file you are working on to a separate folder, maybe renaming it to keep multiple versions around. This way you can easily restore your translation if something bad happens or if you want to start over from a previous version.
To backup your translation, copy the file C:\ProgramData\photools.com\IMatch6\resources\imatchres-nn.json to another folder. nn stands for the language you are translating, e.g. pt for Portuguese: C:\ProgramData\photools.com\IMatch6\resources\imatchres-pt.json.
Also backup the configuration file IMatch Translator maintains for your translation. The name of the file is the same as the resource file for your language, but with the tag -config appended: imatchres-pt-config.json.
The Auto Backup
When you start the IMatch Translator, it saves the current version of the translation in a file with the extension .bak, If the file already exists it is overwritten. If you don’t do backups yourself (you must!) you can revert to the previous version by replacing your translation with the .bak version.
Beware: Special Characters and Tokens
Resources sometimes contain special characters or tokens which have to be copied unmodified into your translation. When IMatch Translator detects one of these special characters or tokens, it notifies you with an orange Sensitive Content badge:
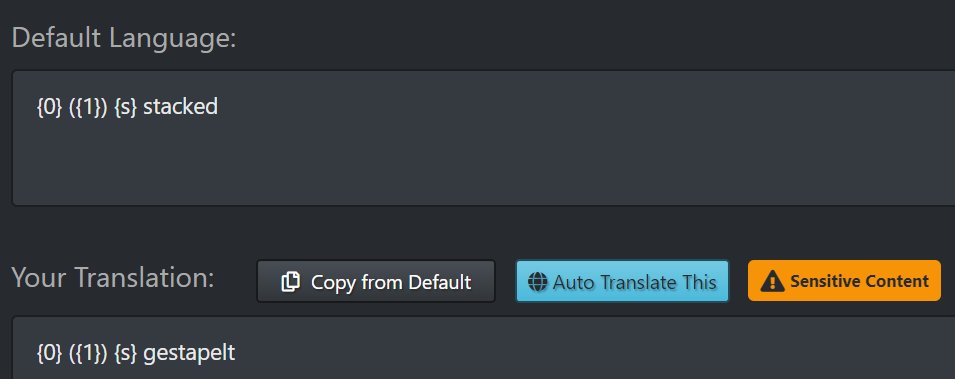
If you see this orange badge, the resource contains something special and you have to pay special attention.
XAML and HTML Tags
Some resources contain XAML or HTML markup enclosed in <> (e.g., <Bold> ,<TextBlock> or similar).
Make sure to put same tags in the appropriate place in your translations. These tags control formatting e.g., in messages or panels. Removing tags accidentally may cause problems when IMatch is using these resources.
This is an example or a (fairly complex) resource with a lot of XAML markup (the special codes in the < and >) and {variables} and {placeholders}:

The only part of this that needs to be translated is the word Paused near the end of the resource. All the stuff inside the < and > and the variables and placeholders wrapped in { and } needs to be left unchanged.
Tip: You can use the Copy from Default button (see below) to copy the entire text from the default resources into your translation. Then just translate what is safe to translate.
[font_text icon=”question-circle” color=”dark” size=”medium”] If in doubt, leave the resource untranslated and contact us via the Translators board in the IMatch community or via our support page. [/font_text]
<LineBreak/>
This tag appears sometimes in strings or other resources. It has the same meaning as \n, but is used to introduce a line wrap in markup strings. Use it when you want your text to break into multiple lines. Note the spelling, with the single /> at the end.
Variables and Placeholders
Some resources include variables in parentheses, like {File.Modified} or {File.MD.title}. Or placeholders like {f1} or {0} or {source}. Make sure you include these variables and placeholders untranslated in the appropriate place in your translation.
[font_text icon=”exclamation-triangle” color=”dark” size=”medium”] Never translate contents enclosed in {} or <> [/font_text]
The Ampersand &
Commands and dialog resources often include the ampersand character. For example: &Open Folder... or Got&o Link. The & is interpreted as the keyboard hotkey for the corresponding menu entry or dialog control. Windows displays the character following & underlined in menus and dialog boxes and the user can use it to access the corresponding command or control.
When you translate, include the & at the appropriate place in your translation. This must not necessarily be the same position as in the default resource! For example, the English &Open... is often translated into Ö&ffnen... for Germany. The & must be placed before the ‘best’ character in your translation.
&
Ampersands & have a special meaning when used in XAML or HTML. You will often see the & escape used in translation resources (Pro & Contra). Make sure to keep this token intact in your translation.
Backslash Codes
Sometimes resources contain special characters starting with a backslash: \n or \r\n . These special codes are interpreted as ‘newlines’ and cause the resource text to wrap into a new line in a dialog box or message. In most cases you need to place the same character into the corresponding spot in your translation.
For example: “Attention:\r\nYou need to make sure that…” This resource will be displayed with the word Attention in the first line, and the You need to make extra sure that… in a second line. When you translate this resource, you should also split your translation into two lines by adding a \r\n where the appropriate.
Keyboard Shortcuts
Resources in the Commands component with keys ending in :K (for example,ID_CMD_COLLECTION_PASTE:K) are keyboard shortcuts (hotkeys) for the command. Do not translate these. You may adjust the keyboard shortcut to better match your translation, but the key names like Ctrl Alt Shift need to remain unchanged.
[font_text icon=”hand-o-up” color=”dark” size=”medium”] When you use machine-translation, keyboard shortcuts are automatically excluded from the translation. [/font_text]
: D :T :H
Some resources consist of multiple parts. For example, a command consists of the name of the command and an optional tooltip text or help text:
"ID_CMD_COLLECTION_DOT_TOGGLE":"Toggle &Dot",
"ID_CMD_COLLECTION_DOT_TOGGLE:H":"Toggle the dot for the current selection"
Here, the :H indicates the help text for the command. The help text is used for things like the tooltip (if the command is used for a toolbar button) or the help text shown in the IMatch status bar.
Properties consist of 3 parts: The property name, the description and the group in which the property appears. For example:
"app.translatormode":"Translator Mode",
"app.translatormode:D":"This option enables additional commands and menus for translators.",
"app.translatormode:G":"Settings",
Here the description of the property is in the 😀 string and the group in which this property appears in Edit > Preferences > Application is in the :G string.
Copy from Default
This handy button allows you to copy the text from the default resource into your translation.
This is very useful when the resource contains XAML markup, variables or placeholders. You copy the original and then just change what needs to be translated.

Translating Multiple Identical Resources in One Go
Sometimes the same text is used by different resources. This is especially common when you are translating the Dialog component and there are five, ten or more resources with the same text. IMatch Translator indicates when a resource text appears multiple times and allows you to translate all resources in step. This will save you time.
Look at this example: The default language text is &Name and IMatch Translator has detected that this text is used by 9 resources in the current component:
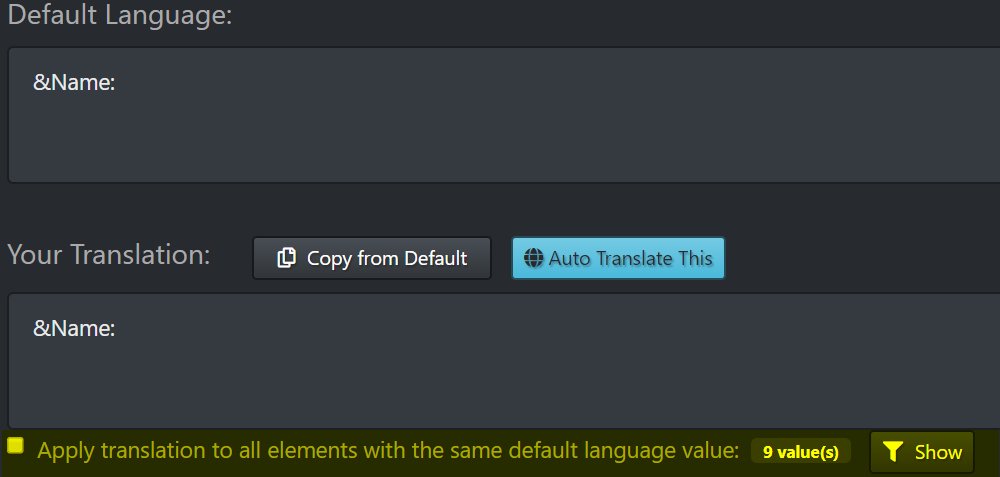
If you tick the box in front of Apply translation…, IMatch Translator applies whatever text you enter for your translation to all resources with the default language text &Name. If you want to check what would be translated, you can click on the Show button to enable the Filter Bar and show you all affected resources.
The Validator
IMatch Translator has a built-in validator which analyzes the translated text and checks it for common errors. The Validator is always active and when it find something, it displays a message directly below the input field:
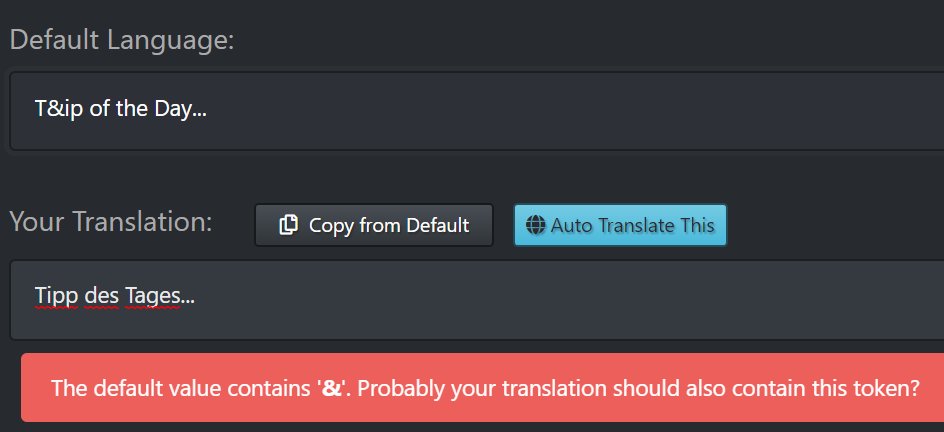
In this case, the validator has found a & in the default resource, but none in your translation. This often needs fixing, but not always. Consider the following example:

The English name is Media & Folders View, but the German name is Verzeichnisansicht. There is no & contained in the translation, but this is correct and you can safely ignore the warning.
Pay Special Attention to { and }
Pay special attention when the Validator reports a missing { or }, because this may mean that your translation contains an incomplete variable or placeholder. This can have dire consequences when IMatch is formatting the translated text, replacing variables or placeholders.
Other Validation Errors
If the Validator reports a missing \n \r\n or <LineBreak/>: this can be OK. Maybe you don’t want your text to wrap into multiple lines. This is not entirely uncommon for translations into other languages. In such cases, just ignore the Validator warning.
Automatic XAML Validation
Errors in XAML are hard to spot and happen quickly while translating. Since an invalid XAML markup string may cause an error message or dialog to become unreadable, invalid markup is undesirable.
The Validator supports you by automatically performing XAML validation for translations which look like they contain XAML markup. For example, if the translation contains tags like <StackPanel>, <TextBlock> or <Border>, the Validator sends your translation to IMatch for inspection. If this results in a problem, you will see a validator error message like this:

The important bit is at the front: “End Element was missing the character >”. The problem is that the final <TextBlock> in the translation is missing the closing > at the end. If you add it, the problem will be fixed.
In general: When you see a XAML error message, compare your translation carefully with the default language text. Somewhere a < or > is missing, or maybe you have accidentally removed a " or ' or = of one of the attributes.
Validating All Resources
This is something you should do when you take over an existing translation or you have used the machine translation feature. You can use this command at any time.
The Validate All command checks each resource in the current component and if a problem is found, marks the resource with a warning icon:
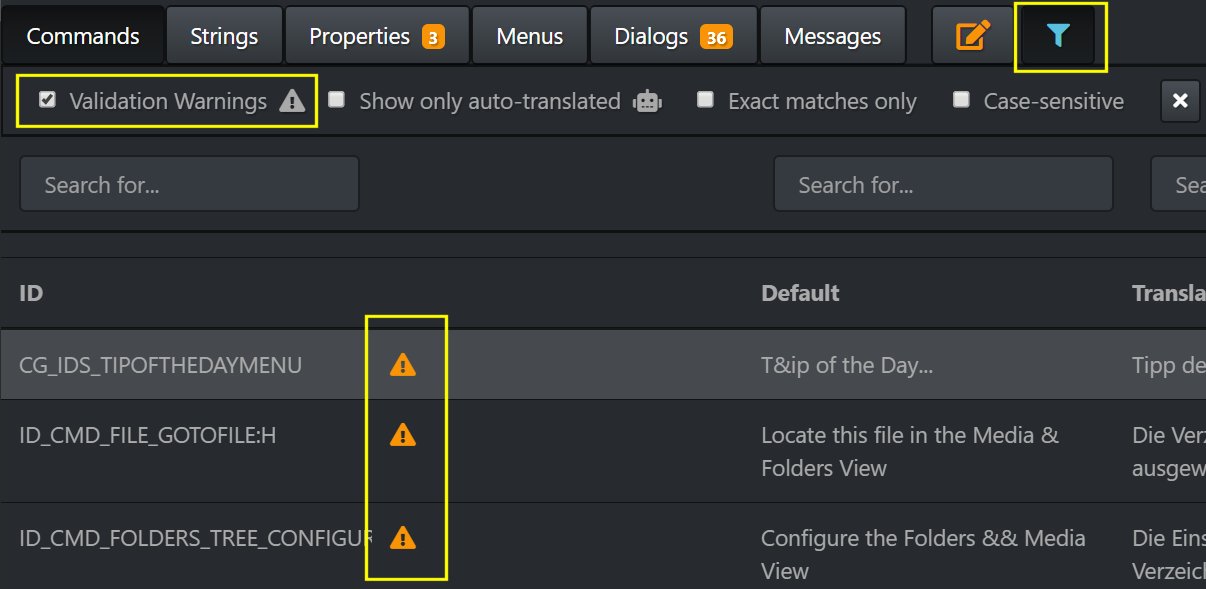
In this screen shot the Filter Bar is open and the option to show only resources with validation errors is enabled.
IMatch Translator saves the result of a Validate All in the (*config.json file) and shows you the validation errors whenever you work with your translation.
[notification type=”warning”] Make it a habit to run it once before finalizing your translation and after installing a new IMatch version.
Maybe you have overlooked something or the Validator has improved and finds more problem. [/notification]
Ignoring Validation Warnings
You can just ignore validation errors shown while you work on a resource. For validation errors found during a Validate All, the warning icon will stick unless you edit the resource or you explicitly ignore the warning. IMatch Translator displays a special button for resources with a validation warning:

If you click this button, the warning for the current resource will be cleared and IMatch Translator records this ein the config file.
The Filter Bar
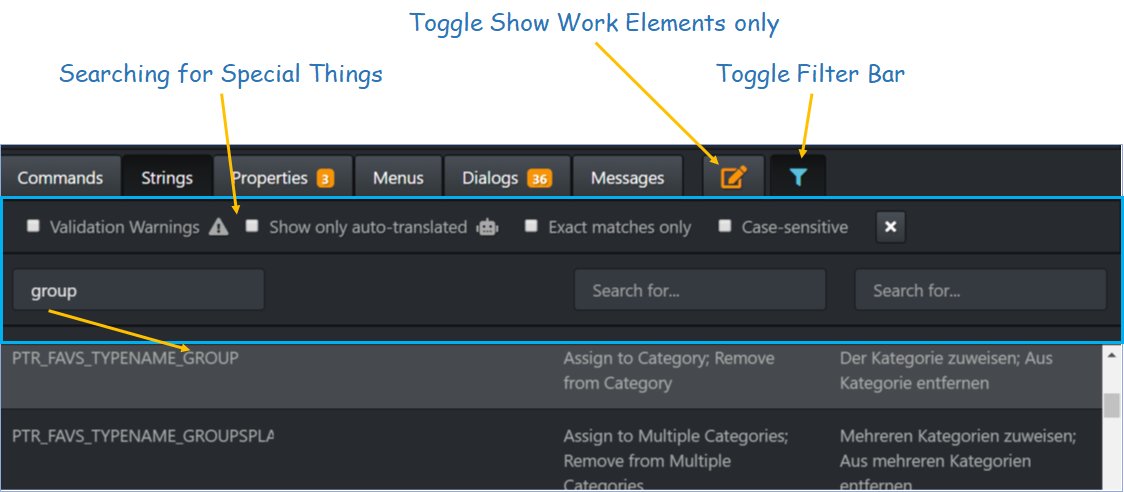
Click on the funnel button in the Component Bar to open the Filter Bar. It enables you to search the resource id, default language text and your translations. This is very helpful when you spot a wrong or missing translation while working with IMatch and you need to find it in the resource file.
The Filter Bar offers some additional specialized filters, e.g. for showing only resources with validation warnings or machine-translated content.
Validation Warnings
If you run the Validate command on a component, IMatch Translator validates all resources in the current component and marks resources with a problem with a warning icon. The Validate All command automatically activates the Filter Bar and sets it to display only resources with warnings. If you later want to see all warnings again (to fix the problem or mark it as ignored), open the Filter Bar and enable the corresponding checkbox.
Show Only Auto-Translated
When you use the Auto Translate All command for a component, IMatch translates all resources via machine intelligence and marks each translated resource with the auto-translated symbol. This allows you to tell if a component has been automatically translated and may need review.

To see all auto-translated resources, enable the corresponding option in the Filter Bar.
[font_text icon=”hand-o-up” color=”dark” size=”medium”] IMatch Translator only remembers the auto-translated resources from the last run of the Auto Translate All command. [/font_text]
IMatch Translator Mode
IMatch loads resources when it starts. This means that changes you do to the translation can only be seen after you have restarted IMatch.
If you enable the special Translator Mode via Edit menu > Preferences > Application (search for translator on that page) you activate a special menu named Resource Manager in the main menu bar. This menu offers a command named Toggle Translator Mode. If you enable this option, you get access to some additional hidden features.
Reload Resource File
This command reloads the resource file for the current language without restarting IMatch. Not all resources can be ‘swapped’ at runtime (e.g. menus, toolbars and certain texts) but this command will show changes done to dialog boxes or messages immediately. Very helpful when you are translating messages and you want to see if the translated text fits and looks nice.
Dialog Boxes
In Translator Mode, dialog boxes show the name of the corresponding resource set in the caption bar:
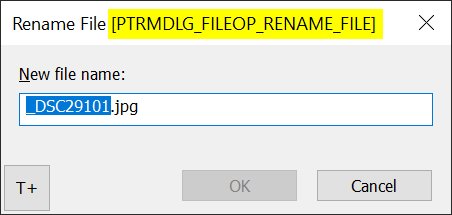
The T+ button copies the resource key of the dialog into the Windows clipboard. Copy it from there to the Filter Bar in IMatch Translator to quickly locate the dialog resources in the Dialog Component.
Message Boxes
When IMatch opens a Message Box (error messages, info, questions, …) while Translator Mode is active, the resource key of the message is copied into the Windows clipboard. You can use this to find the message in IMatch Translator quickly via the Filter Bar.
The History
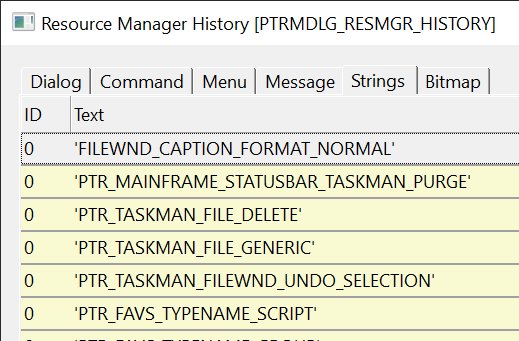
The History… command in the Resource Manager menu opens a dialog box that shows the keys of the all recently used resources. This can be helpful if you are looking for a specific resource used for a specific feature or command. You’ll find the corresponding resource via its key in the matching Component in IMatch Translator.
Initial Translation and Maintenance
The initial translation of IMatch into a new language requires some work. IMatch is a large application and has a few thousand resources. Luckily you can rely on machine translation to perform the grunt work of translating everything. See below for more information.
When the initial translation into a new language is complete, the follow-up maintenance work is minimal. New IMatch versions usually add a few new texts, commands and maybe some new messages or dialog boxes. With the help of the IMatch Translator, updating an existing translation to incorporate changes can be done in a couple minutes in most cases.
Finalizing and Versioning
Identifying New and Deleted Resources
When IMatch Translator opens a translation, it compares it with the default resource file. This way it can detect new resources (which are only in the default file yet) and resources which have been deleted. Deleted resources are automatically deleted from your resource file. New and modified resources are indicate with special icons in the resource list:

This way you can easily see which resources you need to work on. The icons are removed when you edit the text of your translation. Use the Next Untranslated button or the Filter Bar to quickly locate new and modified resources.
Identifying Modified Resources
Finding new and modified resources is easy. But what about resources that have changed since your last translation?
For example, you have translated a resource for IMatch version 2019.1.2 and in the later version 2019.2.2 the text of some default resources was changed because it was wrong or no longer matched how IMatch works? How will you notice this change in order to check and maybe update your translation?
This is done by a process called versioning This process works as follows:
When a new IMatch version is released, a copy the imatchres-en.json file is copied into the special history folder and shipped with IMatch. The file is renamed to include the version number, for example imr-20190104.json or imr-20190202.json. This is all part of the build process and you don’t need to do anything.
Finalizing
When you have finished a translation, you click on the Finalize button in the menu bar. This stamps the resource file for your language with the current IMatch version number.
Versioning
When IMatch Translator opens a translation, it checks the resource file for the version stamp. For example, it finds the file is stamped with version number 2019.1.2.
It now compares this version number with the current IMatch version. Which is, for example, 2019.2.2. This version number is higher than the version you have last translated. IMatch Translator now uses the version files in the history folder and compares the resources of version 2019.1.2 (last version you translated) with 2019.2.2 (current version). If there are differences between the two files, IMatch marks the corresponding resources as changed (pen icon) and you can see them in the resource list. Easy.
If you skipped some versions (for example, the last version you have translated is 2019.1.2 and the current version is 2019.4.6) IMatch Translator compares all versions in-between and finds all changes done between all the versions.
All this is fully automatic and you don’t need to do anything (except Finalizing). Just check your translation for new or modified resources and you immediately see what needs to be translated or checked.
[font_text icon=”lightbulb-o” color=”dark” size=”medium”] Use the quick filter button next to the Component Bar to see only new or modified resources. [/font_text]
Machine Translation
IMatch Translator has built-in support for machine translation (using either the Microsoft or DeepL machine translation services). This means that you can let the machine do the translation work and then just control what the machine translation has produced.
Machine translation is far from perfect at this time.
Still, it can be a big help with starting a translation into a new language. Experience shows that it is much faster to review and correct machine-made translations than to do the translations manually from scratch.
Required Access Privileges
By default, machine-based translation is not available. photools.com has to pay fees to the machine translation companies, spending money for each character (!) translated. We need to control who gets access to this technology. If you want to start a new translation or take over an existing but abandoned translation, please contact us via our support email. Please include your email and IMatch license key (or MyCommerce order number for your IMatch purchase). We’ll provide you with access credentials and a monthly quota for machine translation.
Entering Your Credentials
When you first click on the blue Translate This or Translate All buttons, IMatch Translator prompts you for an email address and license key with access to machine translation. Please enter the email and credentials supplied to you by photools.com and pick the correct translation service (Microsoft or DeepL), depending on your account. We provide you with this information.
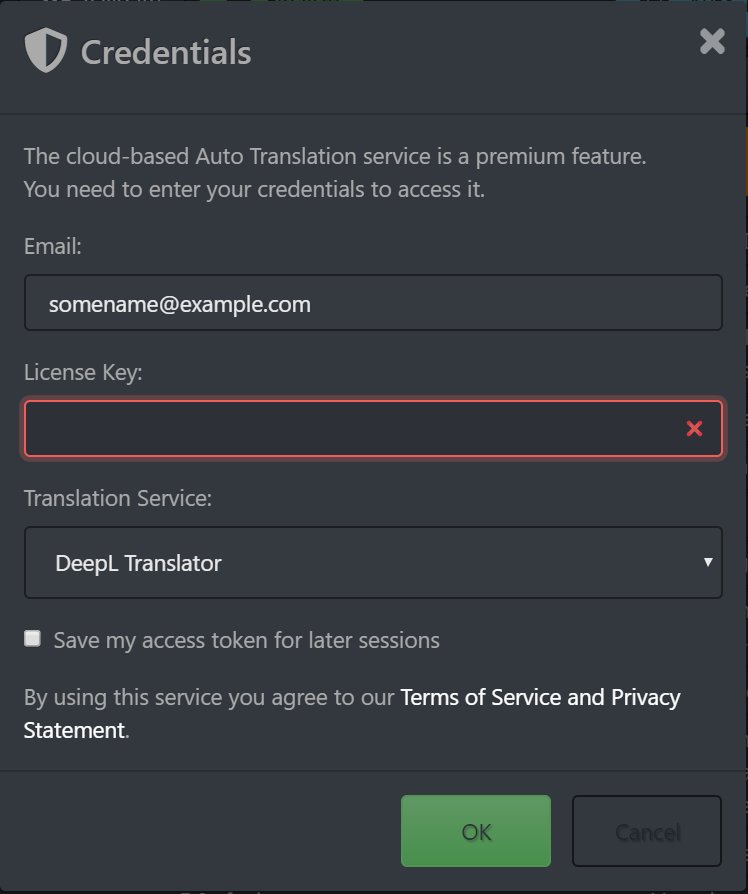
IMatch Translator then verifies your access via our servers and saves your access token (make sure to tick the corresponding box in the dialog) on your local machine. You don’t need to enter the credentials again if you enable this option.
[font_text icon=”hand-o-up” color=”dark” size=”medium”] In case you need to reset your credentials or you want to switch to another translation service (if we tell you to) you can press <Ctrl>+<F11> to bring up this dialog box again. [/font_text]
Translating the Current Resource
The Auto Translate This button directly above the Your Translation input field translates the current default language text and stores the result in the Your Translation input field.
Auto Translate All
This command translates either all untranslated resources (preferred) or all resources in the current component in one operation.
This is great when you start a new translation or when there are a lot of untranslated resources to deal with. When you click the Auto Translate All button in the menu bar at the top, it displays this dialog box:
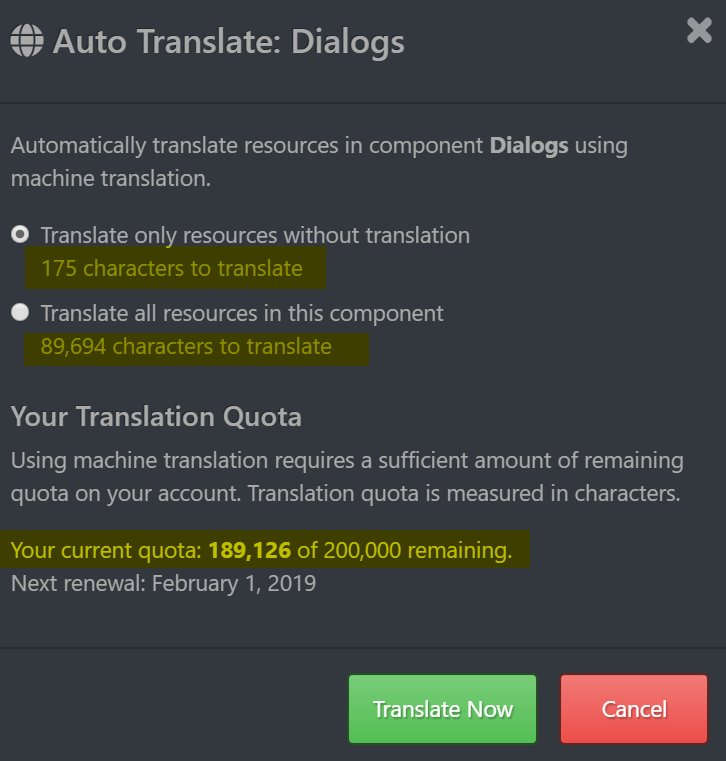
The dialog lists the component you are translating (Dialogs in this case) and you can choose whether to translate only untranslated resources or all resources in this component.
The dialog also shows you how many characters are to translate and if you have sufficient translation quota left. Your quote is usually more than sufficient to translate even large chunks of resources. Your quota is replenished automatically every month.
[notification type=”stop”] Use this feature sparingly. photools.com has to pay real money for each character you translate.[/notification]
Click on the Translate Now button to start the automatic translation. Depending on the number of resources to translate this can take a while.
[notification type=”stop”] Make sure you have a recent backup of your resource file.
In case something goes wrong you can revert back to your unmodified translation and start over. [/notification]
After the translation has completed, IMatch Translator indicates all machine-translated resources with a blue icon:
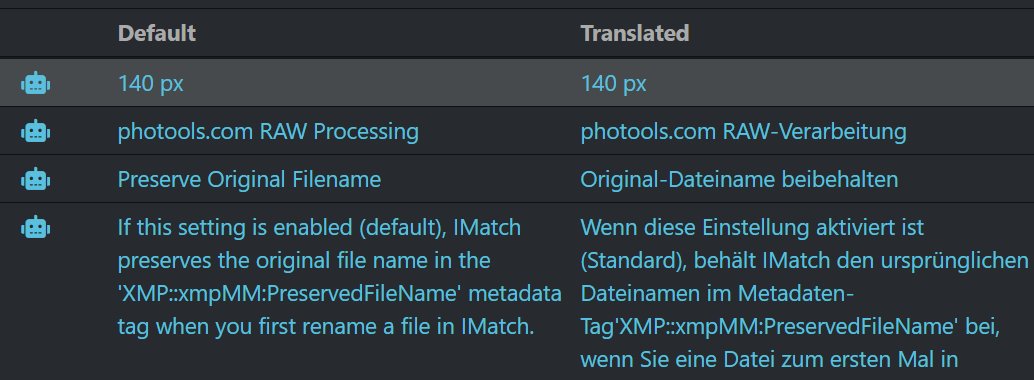
You can now start reviewing the machine translation and to make necessary corrections.
Excluded Resources
Machine-translation automatically excludes resources with keys ending in :K (for example,ID_CMD_COLLECTION_PASTE:K). These resources are keyboard shortcuts and translating them would make them most likely invalid.
Beware: Common Machine Translation Pitfalls!
- Machine translation may break XAML markup. Make sure you check for validation errors after running Translate All
- Machine translation may strip & characters used for indicating hot keys in commands or menu entries
- An & in a default language string may cause translation problems. Pay special attention to resources containing
&
(Tip: Use the Find Bar to search the default resources for&to find potential problem cases) \ror\r\nmay be stripped from translated resources or cause invalid translations.
(Tip: Use the Find Bar to search the default resources for\to find potential problem cases)- Machine translation may produce absolute nonsense sometimes. Make sure you review each machine-translated resource
Test Your Translation
Always review and test your translation by starting IMatch. Use whatever features you have translated, look at messages, menus etc. This will help you to quickly spot missing translations or text that needs some tweaking.
Check the IMatch Logfile for warnings and error messages after IMatch has loaded (Search for W> and E>). If there are problems with loading some resources, invalid hotkeys etc. you will see this reported in the logfile.
Send Your Translation to Us
When you have completed your translation, please send us the translation resource file and the translation config file. Just ZIP the two files up and send us an email to our support address.
The files are in the C:\ProgramData\photools.com\IMatch6\resources folder on your computer. The file names are:
imatchres-nn.json and imatchres-nn-config.json, where nn standards for the country id of your translation. For example, for the German translation the files are named imatchres-de.json and imatchres-de-config.json.
We will integrate your translation and ship it with the next IMatch release. If you update a translation after a new IMatch release comes out, use the same workflow.
