The Category Builder allows you to quickly combine categories via drag-and-drop and display the result in the special @Builder category.
The Category Builder allows you to quickly combine categories via drag-and-drop and display the result in the special @Builder category. You use the Category @Builder to temporarily combine multiple categories or to create a formula interactively with drag-and-drop.
To combine multiple categories via the OR operator you can just select them in the Category View and see the result in the File Window. But what if you want to use a Boolean AND operation to see only files contained in all selected categories? Or you want to use NOT to exclude files? Without the Category @Builder you have to resort to setting up a new category and adding a formula. This may be too complicated or intricate if you need the formula only temporarily.
To work with the Category Builder, switch to the Category View and make sure the Properties Panel is visible. In this panel, switch to the Builder tab.
The Builder panel is divided into two parts. The upper part shows a list of all categories you have dropped onto the Builder panel; the lower area shows the resulting category formula.
To add a category to the Builder, select the category (or multiple categories) in the category tree and drag them to the upper area of the Builder panel.
For each dropped category, the Builder panel adds a new row. The row shows the fully qualified category name and also a set of buttons that control how the categories are combined.
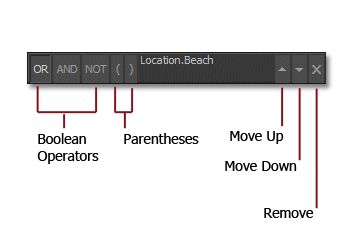
By default, new categories are inserted using the Boolean OR operator. You can switch to the AND or NOT operators by clicking the corresponding buttons.
See Category Formulas for more information about combining categories.
If you want to wrap one or more categories in parentheses, click on the ( and ) buttons. The ( button inserts parentheses in front of the category of that row, the ) button inserts parentheses after that category. You can insert up to 5 pairs of parentheses, which is sufficient for even very deeply nested expressions.
Using parentheses may be required to override the standard left-to-right operator processing in category formulas.
By clicking on the Up and Down buttons, you can move the category up and down in the list and thus left or right in the formula.
You cannot move the first row up or the last row down. The first row also has no OR/AND/NOT buttons because the first row always is the first category in the formula.
The X button removes the category from the Builder panel and from the formula.
Whenever you make a change to a panel, the category formula in the bottom area is updated to show the current output from the panel. This control is read-only. You cannot type in text or delete parts of the formula by hand.
You can select and copy the formula or parts of it into the Windows clipboard and then paste it into the formula property of another category or into the Category Formula Editor dialog box.
The following example assumes that you have a category set up with a top-level category "Location" and below that categories named "Beach", "Mountain", "Studio" and so on.
@All
|-Location
|-Beach
|-Mountain
|-Studio
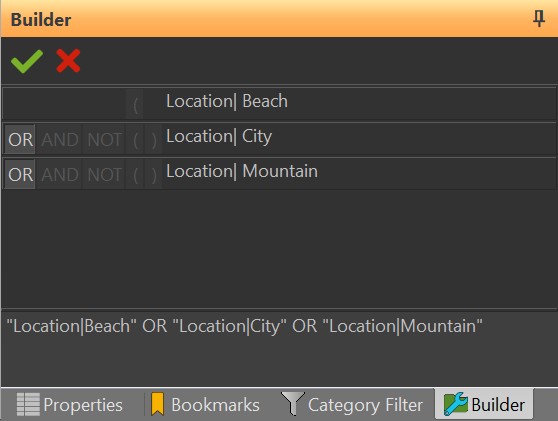
|-CityYou select the categories Beach and Mountain and drag them onto the Builder panel.

The resulting formula is:
"Location|Beach" OR "Location|Mountain"
and this formula is shown in the Formula area below the panel. The results of this formula are all files either in the "Location.Beach" or the "Location.Mountain" category.
If you click on the AND button in the row for "Location.Mountain", the formula changes accordingly to:
"Location|Beach" AND "Location|Mountain"
returning all files in both the "Location|Beach" and the "Location|Mountain" category.
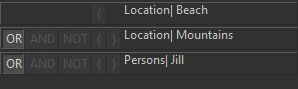
We now drag another category "Persons|Jill" into the Builder panel. We drop it below the "Location|Mountain" category:
Watch the insertion lines and arrows displayed when you drag categories onto the Builder panel. They indicate where the new category will be inserted.
The resulting formula is:
"Location|Beach" OR "Location|Mountain" OR "Persons|Jill"
This formula is not correct yet. We want all images taken either on the Beach or in the Mountains which also are in the "Persons.Jill" category. To make that clear, we need to change the panel as follows to wrap the two locations in parentheses:
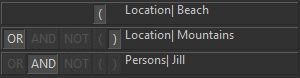
resulting in this formula:
("Location|Beach" OR "Location|Mountain") AND "Persons|Jill"
This formula first finds all files which are either in the "Location|Beach" or the "Location|Mountain" category. Then it combines these files with the files assigned to "Persons|Jill" via the AND Boolean operator. This removes all files not in "Persons.Jill", which gives us the final result.
So far we have only dropped categories and changed options to produce a category formula. But how can we see the actual results of that formula? That's where the special @Builder category comes into play.
In order to see the result of the @Builder panel, you need to update the @Builder category by clicking on the corresponding toolbar button in the toolbar of the @Builder panel, or by pressing F5 while the Builder panel has the focus. This transfers the formula from the @Builder panel to the @Builder category and makes this category the active category in the Category View. The File Window shows the result of the @Builder category.
Whenever you change something in the @Builder panel, press F5 or the corresponding toolbar button to update the @Builder category.
You can Ctrl+drag the @Builder category like any other category to create a copy of it under a different parent. This allows you to create 'real' categories from the temporary results of the Category @Builder. The new category created this way will have the formula currently set for the @Builder category. It will keep that formula also when you later change @Builder again.
Alternatively, you can just copy the formula from the formula control in the @Builder panel to the Windows clipboard, and then paste it into the Formula property of another category or into the Category Formula Editor.
The general idea behind the Category Builder is to give you a tool where you can temporarily combine categories via drag-and-drop quickly and see the result without the need to change one of your existing categories.
Remember: You can also just select multiple categories in the category tree (with Ctrl+click) when all you need is a simple combination via the OR operator.
But if you need AND or NOT combinations, selecting multiple categories will not work. In this case, use the @Builder. Drag the categories you want to combine, set the operators and parentheses as you need them and press F5 to see the result in the special @Builder category.
If you want to create a category from the results, just Ctrl+drag the @Builder category to another category. A new child category will be created, containing the formula currently visible in the @Builder.
The Builder panel and the @Builder category are automatically emptied when you close the database.