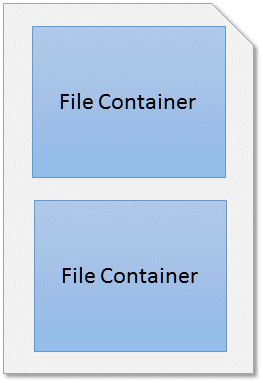
Example group page with two file containers.
Dynamic templates are a unique and powerful feature of IMatch Printing. Using this template type enables you to create templates with flexible layouts that work with any number of files later. This kind of templates is ideal for portfolios, contact sheets, reports, label prints and similar document types.
Please see IMatch Printing for the main Printing help topic.
A Dynamic Template consists of at least one page - the so-called group page. It contains one or more file containers:

Example group page with two file containers.
You create and design this page in the Designer, exactly like you would for Standard Templates. You will notice one difference, though: The Designer does not show the thumbnail panel at the bottom. This is because Dynamic Templates are not designed for a specific set of files, they are designed to work with any set of files.
Which files from your database are printed with a Dynamic Template is determined at print time, not at design time.
While designing a Dynamic Template, you work with a set of files. This allows you to preview your template in the Preview View and to check the result. But you can run your template later with different sets of files, and it will work the same.
The following schema makes this more clear:
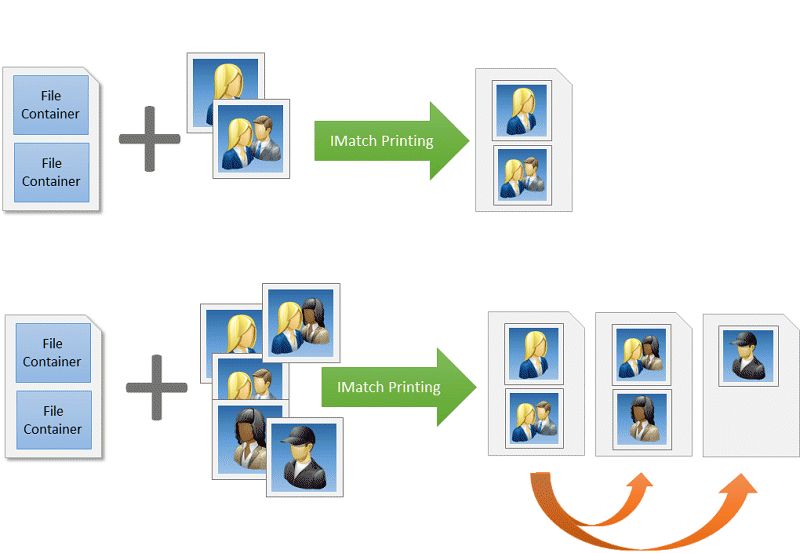
In the first example, two files are printed. IMatch uses the group page from the template, which has two file containers. IMatch fills each container with one of the files to print, and outputs one page to the printer.
In the second example, the user prints five files. IMatch again uses the group page from the template. In order to print all 5 files, it replicates (duplicates, copies) the group page 3 times. This allows it to print each file (2 containers per page). The last page contains only one file, because there are only 5 files in total.
Dynamic Templates create new pages automatically by duplicating the group page in the template as often as needed.
Although the Dynamic Template has only one page, it is able to process any number of files. Whether you print 1, 10 or 100 files, the template will automatically adapt.
A Dynamic Template consists of up to 5 different page types. The only mandatory page types are group pages, and you only need one of them.
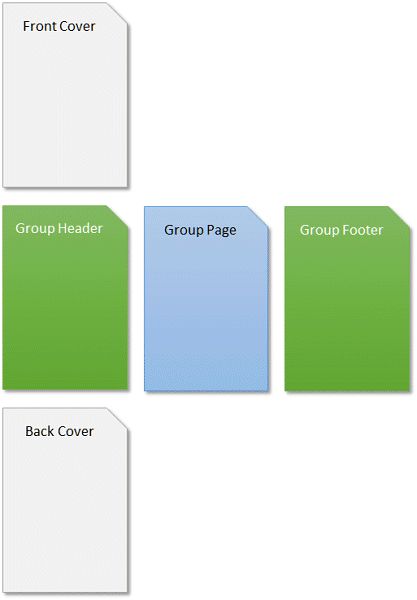
Available page types in a Dynamic Template.
Front Cover | Optional. These pages are printed at the start of the document. You can use this page type to add a real 'book' cover or lead sheets or similar. The Front Cover can have any number of pages. |
Group Header | Optional. Group headers are printed at the start of each group. Group headers can have any number of pages. |
Group Page | Mandatory. Every Dynamic Template needs at least one group page with at least one consuming container (a File container, usually). This page controls how the files are printed. IMatch duplicates the group page(s) as often as needed to print all files in the current group. |
Group Footer | Optional. Group footers are printed at the end of each group. Group footers can have any number of pages. |
Back Cover | Optional. These pages are printed after all groups have been processed. You can add any number of pages here which you want to print at the end of the document. |
When you drop files, folders, categories or collections on the Print module, it works differently, depending on which template type is selected and the kind of objects you have dropped.
If you work with Standard Templates, the Print module just looks at the files you have dropped. If you drop a folder or category, it retrieves the files in that object. Standard templates always work with a simple list of files. The selected files are presented in the thumbnail panel at the bottom of the Designer. From there you place each file into a container to print it. This is an entirely manual process.
Dynamic templates are not linked with a specific set of files. Whatever set of files you later use with the template, the template adapts automatically. To give you even more flexibility, Dynamic Templates put files into so-called groups.
The term group as used by Dynamic Templates just means 'A set of files'.
Think about these groups as chapters in a regular book. The files in a group are similar to the pages in a chapter.
The following screen shot shows a category hierarchy with the parent category "Fruit" and it's four child categories 'Fruit Basket', 'Green Fruit', 'Orange Fruit' and 'Red Fruit'.
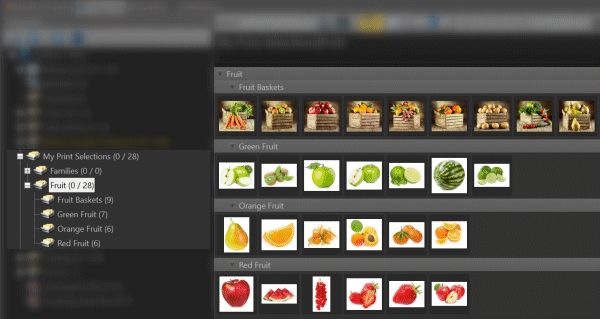
A Category hierarchy with two levels, grouping images of fruit into different categories.
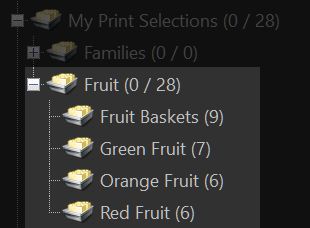
The Category Hierarchy
When you drop the "Fruit" parent category on the Print module, it creates a separate group for each of the child categories. The parent category has no files, and is not processed. Each of these four groups contains the same files as the original category.
Let's create a Dynamic Template and add a group page. Right-click on the Group Pages node in the Document tree on the left and choose Add Page. We used the standard 2 x 3 (six File containers) page layout from the New Page dialog:
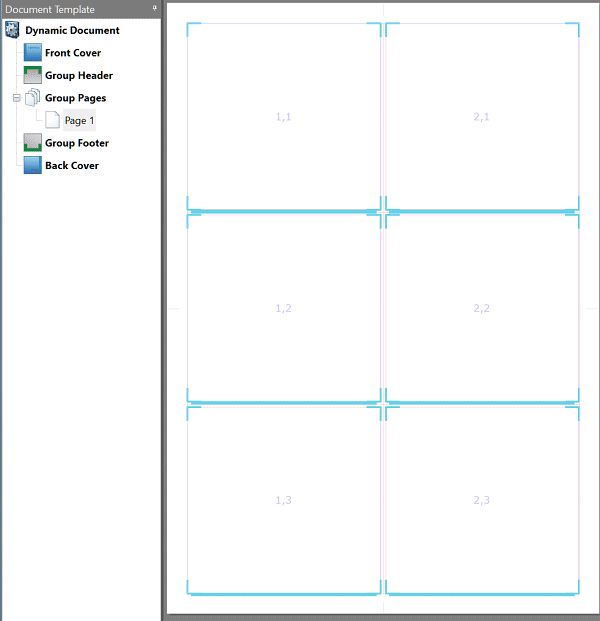
The group page with 6 file containers.
We switch to the Preview View and switch it to show 2 rows with 4 pages each. This way we can see all 28 files at once, and how IMatch distributes them between the pages:
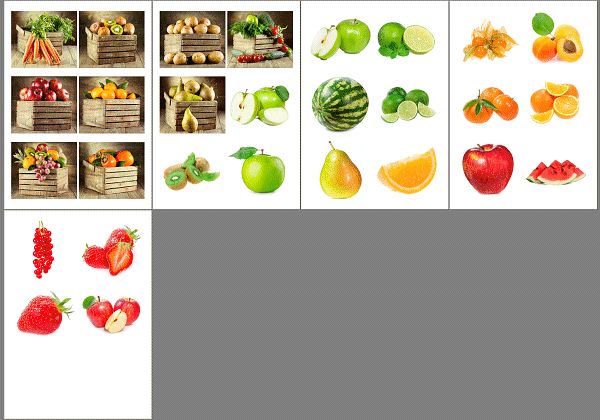
The resulting document in the Preview View
As you can see, IMatch duplicated the group page 4 times to create 5 pages in total. On each page all six file containers are filled, except for the last page, which prints the remaining four files.
If you would run this template with 100 files instead of 28, the resulting document would contain 17 pages. 16 pages with 6 files and one page with 4 files.
Now comes the interesting part: We change the page flow. The page flows tells IMatch how to handle groups. So far we did nothing special, and IMatch Printing processed all four groups as one single set of files.
Switch to the Document properties and change the Page Flow value of Group Page to Start on next page:
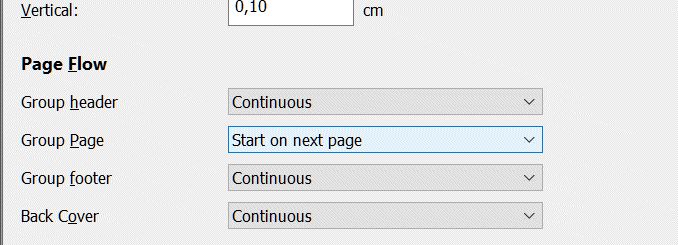
Changing the page flow for group pages.
This tells IMatch that each group should start on a new page. We save the changes and switch back to the Preview View. The resulting document looks a bit different:
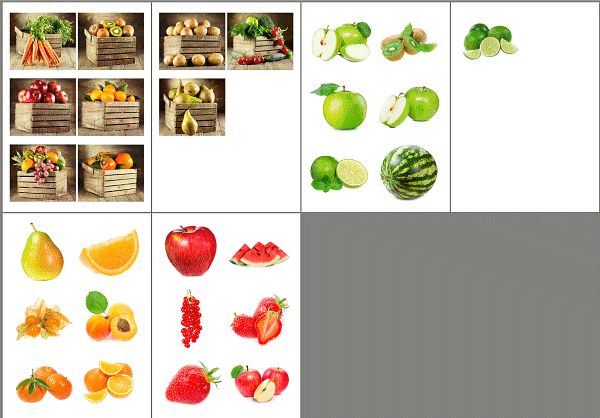
After changing the page flow, each group starts on a separate page.
The first group ("Fruit Baskets") has 9 files and fills one and a half pages. Instead of continuing on that page with the files from the next group, IMatch now creates a new page and continues printing on that page with the first file of the "Green Fruit" group.
This group has 7 files and thus on the second page of that group (physical page number four) only one file is printed. The next group again starts on a new page. This group has six files and fills exactly one page. As does the last group ("Red Fruit").
Setting the page flow for group pages to 'Start on next page' causes each group to start on a new page.
The following options for page flow are supported:
Continuous | This is the default setting. IMatch considers all groups as one big set of files and prints them continuously. |
Start on next page | If all files in the current group have been processed, IMatch continues on a new page with the files from the next group. |
Start on next odd page | IMatch continues printing the files of the next group on the next odd page (3,5,7,...). If needed, it inserts an empty copy of the current group page. Using this page flow option allows you to start new groups always on the right hand page in typical book/magazine layouts. |
Start on next even page | IMatch continues printing the files of the next group on the next even page (2,4,6,...). If needed, it inserts an empty copy of the current group page. |
These options are applicable to group headers, group footers, group pages and the back cover. The front cover naturally always starts on page 1.
Group headers and footers are an easy way to add features like chapters, lead-in pages, intro texts, separator pages or similar to your Dynamic Template. IMatch automatically inserts group headers before each group and group footers after each group. You don't need add them both, it's perfectly okay to have only a header or a footer. You can add any number of header and footer pages. IMatch prints them all before printing the group pages.
Let's add a group header page and a footer page:
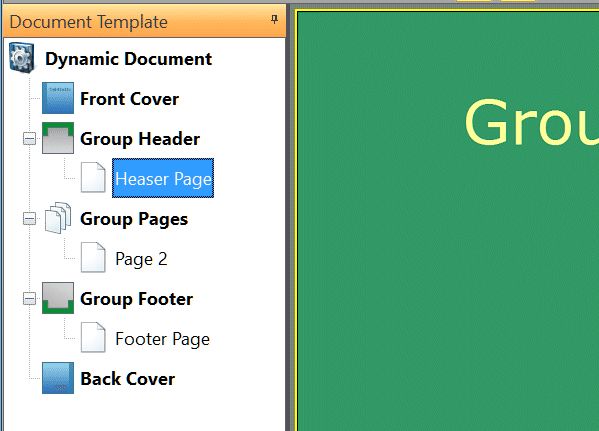
After adding a group header and group footer page.
Group headers are printed before each group, and group footers after each group. We used a light green background color for the header page, and a dark green color for the footer page in this example. Each header/footer uses a text container to announce the type of the page. Usually you would print something more useful, of course.
After switching to the Preview, the result looks like this:
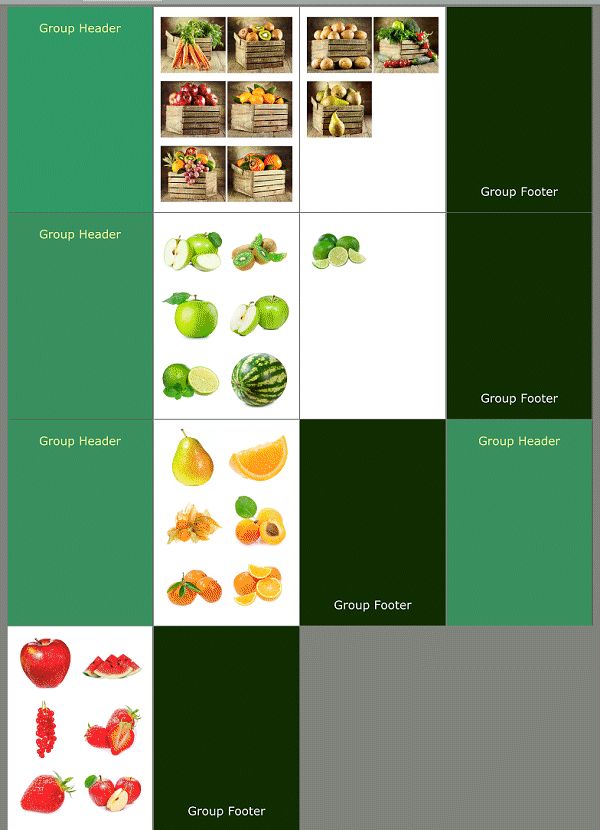
Each group is now printed with a group header (light green) and a group footer (dark green).
Note: We switched the preview to show 4 rows with 4 pages to see it all.
It is important to understand that whether a group has 4 files or 200, IMatch prints the header page(s), then all required group pages, then the footer page(s). The the next group begins again with the header.
We make this example a bit more realistic by setting the contents of the Text Container in the group header to the variable
{Print.Group.Name}This special print variable returns the name of the currently printed group. This produces the following result:
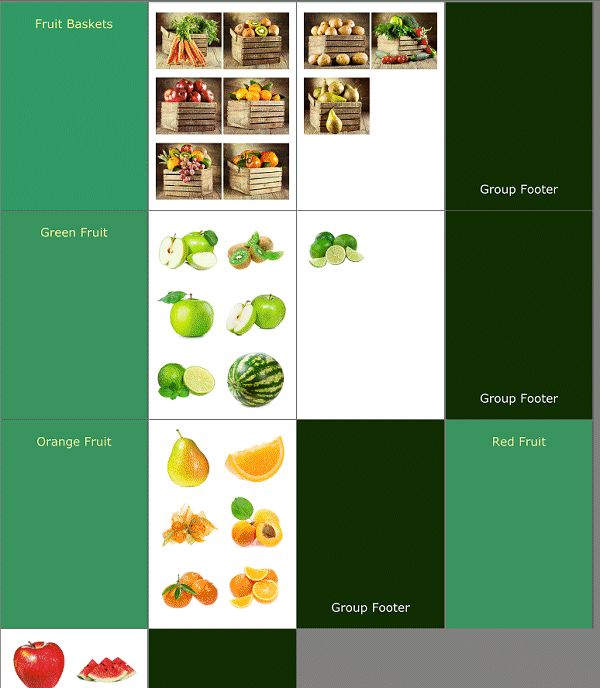
The Text container in the group header now displays the name of the group. Awesome.
There are many other variables available for printing. Please see the IMatch Print Variables topic for an overview.
The Hidden property of pages enables you to show or hide pages based on a variable. You can use this as an additional tool to make your template more flexible.
For example, if you want to use different group headers or footers for different groups, you can use the variable {Print.Group.Index} to determine which group is currently being printed. If you prepare multiple group header or footer pages, and then conditionally hide them using the variable, your template can print different headers / footers for different groups.
If you set the Hidden property of a page to a variable like this:
{Print.Group.Index|numcomp:eq,1,false,true}then the page is hidden unless the printed group is group 1.
The same technique can of also be applied to normal group pages or even individual containers.
You can add any number of group pages to your template. IMatch processes them in turn, and then starts over with the first group page.
Each group page can use a different layout and a different number of file containers (and other containers of course). IMatch starts with the first group page and processes it. If there are files left in the current group, it uses the second group page and so on.
Multiple group pages allow you to deal with certain requirements. For example in wedding photography it's often desirable to print the same photo in two sizes: A full page spread for the bride & groom, and two smaller copies of the same image for the families. This layout is also often used for event or party photography.
Consider the following four bridal portraits:

We want to create a template which prints each image full-page on the left side, and then again in two half-page containers on the left. And this should work for any number of files of course. We add two group pages and set up this layout:
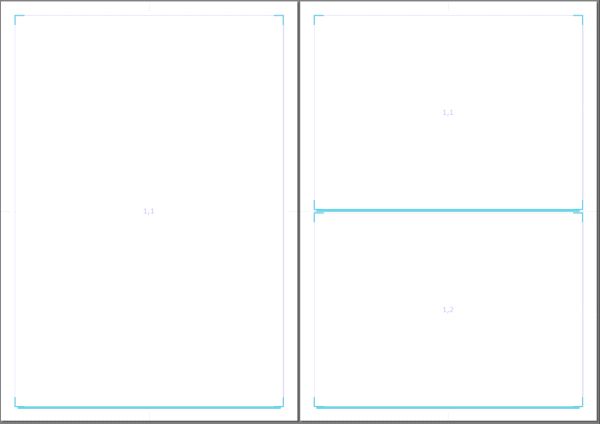
Margins: 1 cm all around,
Left page: 1 File container,
Right page: 2 file containers
In the preview, we now see this result:

IMatch used the first page to print the first file. Then the second page two print files 2 and 3. For the fourth file it started over again with the first page. So far, so good. It shows nicely, how IMatch iterates over all group pages in the template. First group page, second group page, then back again to the first group page.
But for this example we want to print the same image multiple times. Once on the left page, and two times on the right page.
By default, each File container consumes a file. This means it 'uses up' one file from the list of files to print. This way IMatch moves the current file along when it prints pages. If a page has four file containers, four files are consumed. The next page then starts printing with file number 5.
To print the same file more than once, you need to tell IMatch that a container prints a file, but does not consume it. This way the same file is used again for the next container. To tell a container that it should not consume a file, you just deactivate the Consumes file option in the container properties:
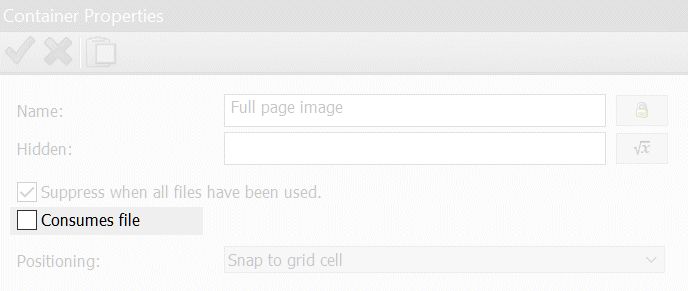
Setting the Consumes File option.
We reset this option for the File container on the left page, and also for the upper File container on the right page. The lower File container needs this flag set, else no file will be consumed and IMatch will not print anything.
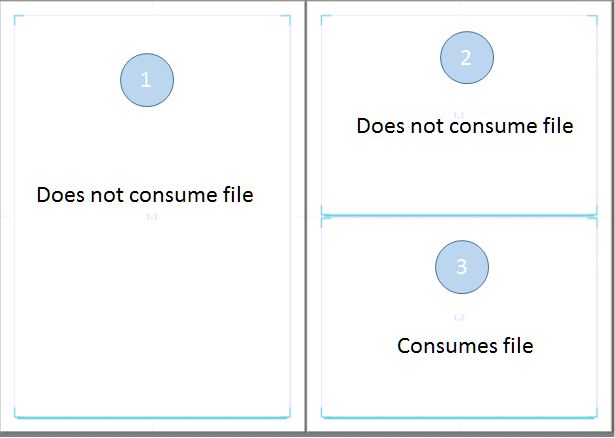
How to print the same file multiple times using the Consumes File option.
The consumes file option tells IMatch if a File container 'uses up' a file or not. If the file is not consumed, the next file container uses the same file. This makes it possible to print the same file multiple times, even on multiple pages!
With these settings, the same image is used for the File container on the left page, and the two File containers on the right page. The second File container on the right page consumes the file, and so the next page starts with the next file.
The Preview View shows us the final result. We show all 8 pages produced by this template (2 pages per file):
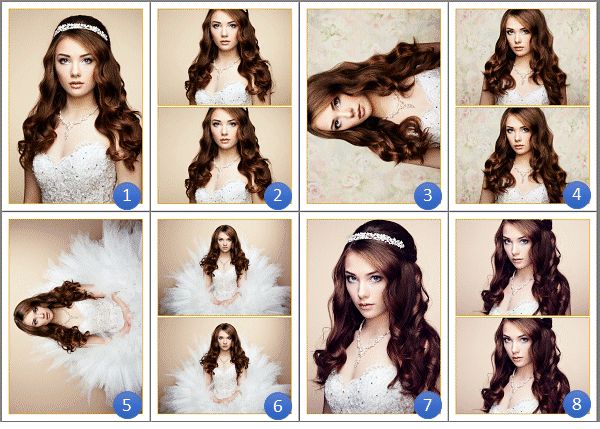
Each image is printed 3 times, on two pages. Note the auto-rotate setting used for the Fit Mode for the right container. It ensures that images are rotated to match the orientation of the container. The image of the bride is rotated on pages 3 and 5.
We use a Fit mode for each container which fills the entire container space. This produces an even look without any extra white space around the images. But also may cause some cropping. If you don't want this, change the container to use the Fit and auto-rotate mode. This avoids cropping but may leave some white areas around the images:

The same template, but the containers have been set to use the 'Fit and auto-rotate' Fit mode to prevent cropping.
Use Categories to Structure Photo Books
The way IMatch printing creates groups from folders, categories and collections allows you to set up the chapter and page structure of photo books using IMatch categories. Folders and Collections too, but most of the time you will use categories because they are easiest to use.
Set up an empty (no files) top-level category. Below that, add child categories to create 'chapters' in your photo book. Use only one child category level - nested chapters are not supported.
You can use this structure later with any Dynamic Template. And your can set up other categories for other photo book projects, and use them with the same template.
Now would be a good time to create a Dynamic Template and play with all the available options. You can also load one of the System templates in the Template View and use it as the base for your own templates.
This is a smart feature that is only available in Dynamic Templates. You can configure a container to replicate (copy, clone, duplicate) itself down, to the right or in both directions. This makes it possible to print any number of files with just one container! The replication is performed when IMatch prints the document.
The following graphic illustrates this:
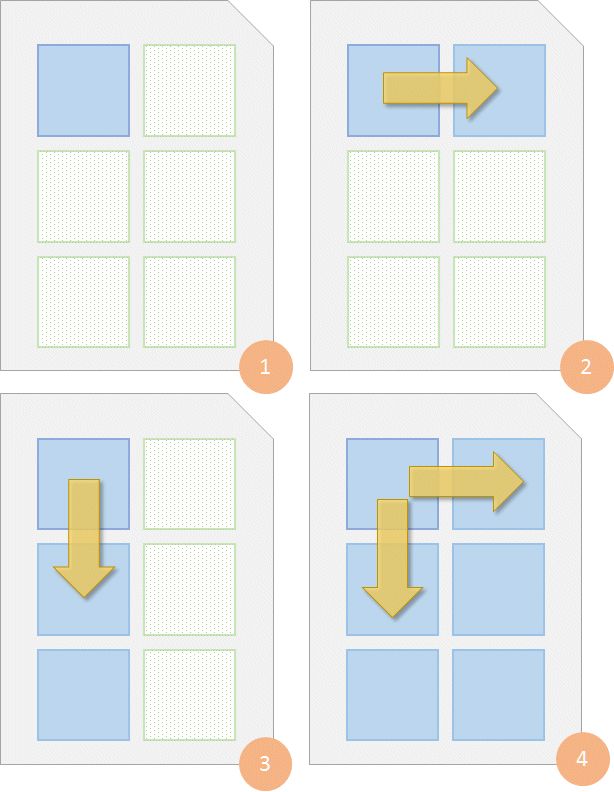
A container can replicate itself down, to the right or in both directions.
The key idea of using this feature is to save work. If you work with replicating containers, you only need to configure and style one container. All changes you make to this container are automatically applied on all the clones it creates while replicating.
You control this behavior via the Positioning Mode property of the container. The following additional modes are available exclusively for Dynamic Templates:
Snap and replicate to the right | The container is aligned to a grid cell and automatically replicates itself to each other grid cell to the right (in the same row). |
Snap and replicate down | The container is aligned to a grid cell and automatically replicates itself to each other grid cell below it (in the same column). |
Snap and replicate to the right | The container is aligned to a grid cell and automatically replicates itself to each other grid cell to the right and below. If the container is in cell 1,1, it fills all cells in the grid and on the page! |
When you enable one of these modes for a container, the container visualizes that in the Designer by drawing the resulting clones:
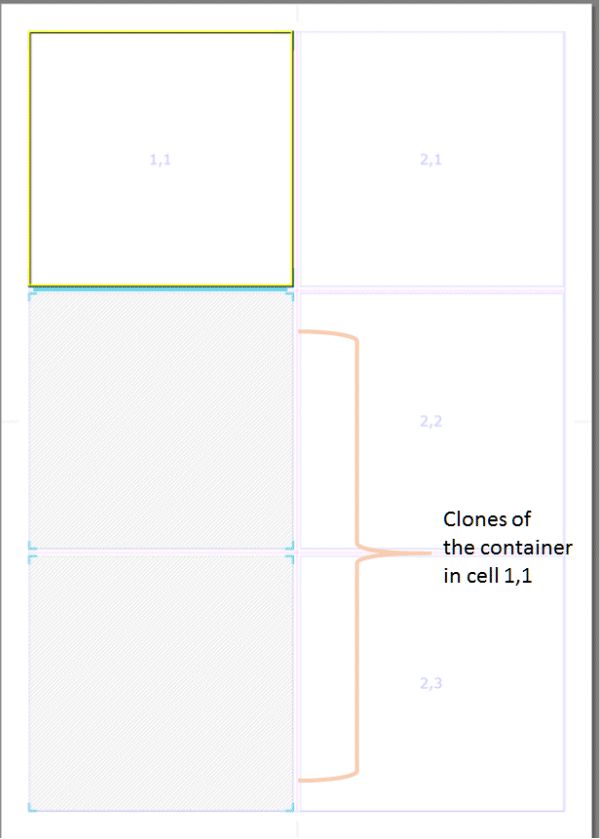
The container replicates down.
Its clones are displayed in a special way in the Designer.
You cannot select or modify these clones. All modifications are performed on the original container.
In this example we use a single group page with a 2 x 3 grid. We place a File container in cell 1,1 and configure it as needed. In this case, we simply add a thick green border.
For the Positioning Mode we selected Snap and replicate to the right and down. The container fills all remaining 5 cells of the grid with clones of itself. When we now switch to the Preview View, we get this result:
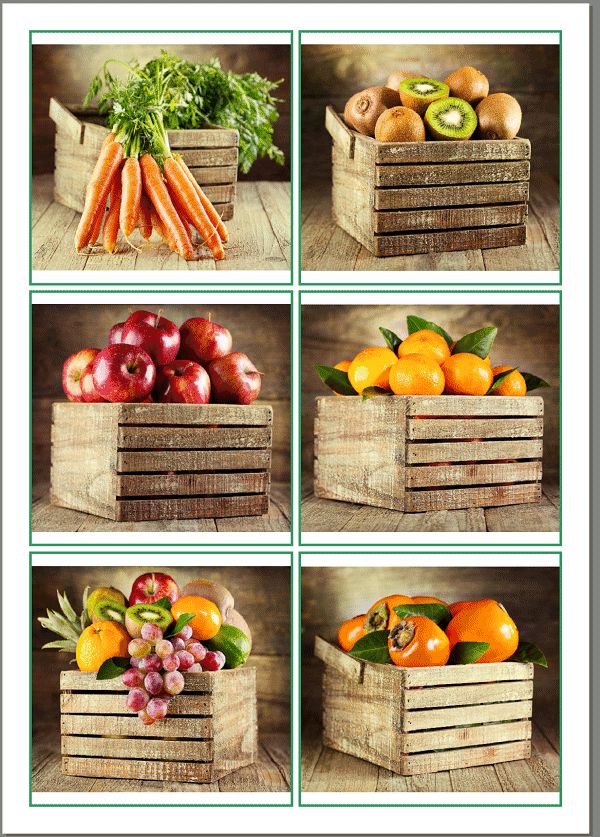
The resulting page in the Preview View.
Although we have placed only one container on the page, each grid cell has been filled in the resulting output. The clones of the container inherit all settings of their original container, but use different files. The original and cloned containers all consume a file.
Replicating containers enable you to produce contact sheets and similar documents with a lot less effort.
You only need to add and configure one container, and then enable the automatic replication to fill all cells in the column, row or even all cells in the grid. All changes you make to the original container are automatically applied to the clones. And since the container snaps to the grid cell, it works with any number of rows and columns!
For the next example, we only changed the grid settings of the page from a 2 x 3 grid to a 4 x 6 grid. This minor results in a quite different output. The replicating container in cell 1,1 created 23 clones of itself, in order to fill all the 24 cell grid:
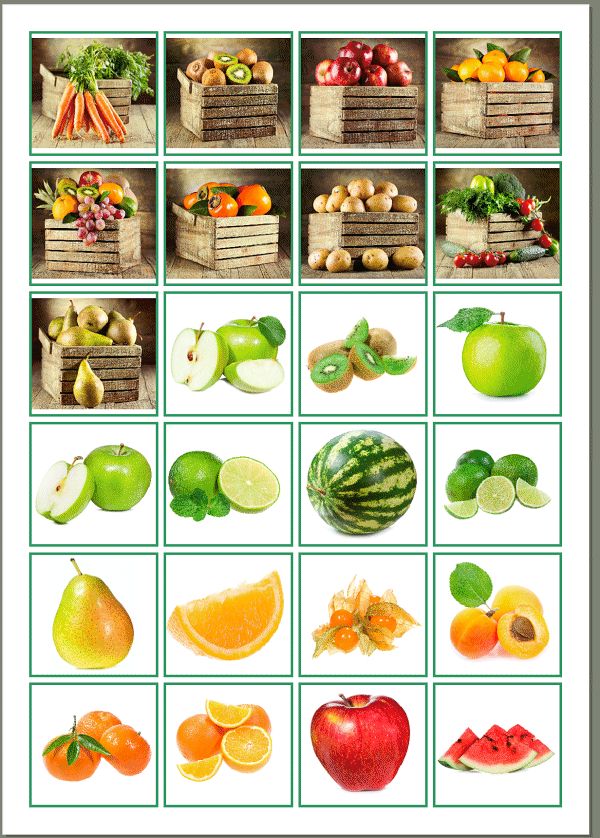
The same template. Still only one container, but this time filling a 4 x 6 grid.
A typical contact sheet does not only print the images, but usually also some text, e.g. the file name, title, a description etc. This can be easily achieved by combining several replicating containers.
In the following example we create a layout with 3 x 3 images per page (9 cells). Above the image we print the file name, and below the image the XMP description. This requires three containers per cell: one Text container for the file name, the File container, and another Text container for the description. We fit all these containers into one cell so we can configure all containers to replicate. What we want to create is this:
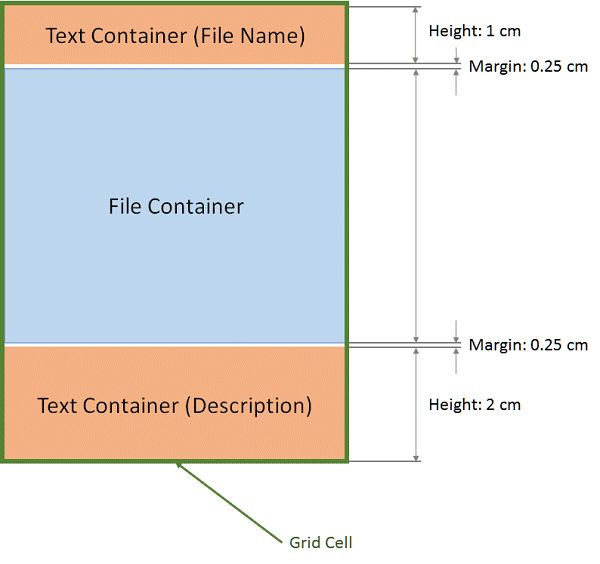
Three containers within one grid cell.
The following table lists the main settings for each container. We used metric units (cm) this time. If you are used to measurements in inches: 1 inch = 2.54 cm.
| Upper Text Container | Height within cell: 1 cm Vertical Alignment: Top Font Size: 11pt, Bold, medium gray Content: {File.Name} Positioning: Snap and replicate to the right and down |
| File Container | Margin Top: 1.25 cm Margin Bottom: 2.25 cm Positioning: Snap and replicate to the right and down |
| Lower Text Container | Height within cell: 2 cm Vertical Alignment: Bottom Font Size: 9pt Text Alignment: Justify Content: {File.MD.description|limitstr:100,...} Positioning: Snap and replicate to the right and down We use the handy limitstr variable function to ensure that the text fits into the box. |
The Z-Order controls which file container is used as the data source for the two text containers. We thus need to make sure that the File container has a lower Z-Order than the two Text containers: File container (1), upper Text container (2), lower Text container (3).
You can set the Z-Order using Ctrl+I.
This is how these containers look in the Designer:
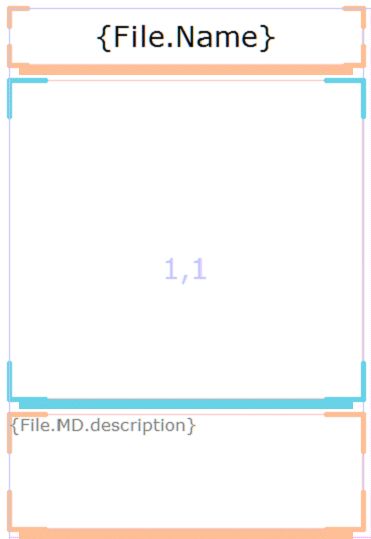
The grid cell with 3 containers.
The following animation shows the output for various grid settings. As you can see, the layout adapts when the number of rows or columns are changed, and the containers automatically replicate as needed:
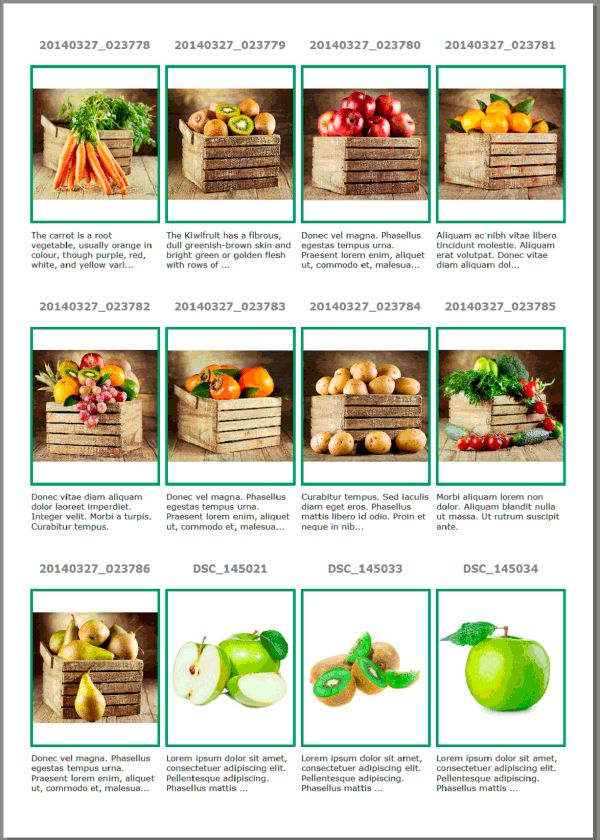
The same container layout but with different page grid settings. When cells are added or removed, the replicating containers automatically adapt.
The Add a Page dialog includes several example page templates which use one or more replicating containers. Add a new page to a Dynamic Template and check out the containers and how they have been configured.
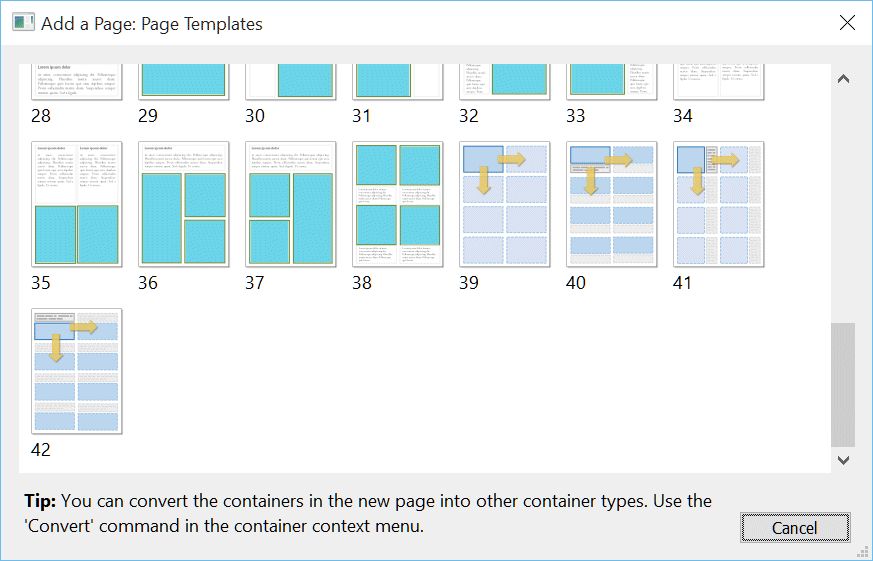
The example pages with replicating containers in the Add a Page dialog box.
Self-replicating containers copy/clone themselves into every grid cell to the right, below or in both directions. This allows you to fill all cells in the grid by adding only one replicating container. Changes done to the container are automatically applied to all clones.
By combining multiple replicating containers within the same grid cell you can create fully adaptive layouts which work with any number of files, any number of cells and any page size.
See Printing Variables for an overview of all variables available in IMatch Printing.
These special variables allow you to access files and containers in the current group or on the current page via an numerical or literal index. This can be very useful if you want to print an image of the current group also in a group header. Or if you want to list the names of the files in the current group or on the current page using text containers. Or ...
These variables determine the file consumed by a container. This means that this container must have already been printed or else IMatch does not know which file it has consumed. The container in which you use these variables has to be higher in the Z-Order than the container which you address.
This variable accesses a file in the current group. Which file is specified by the <Index>. After the <Index> follows a period (.) and then the normal File. variable name. These variables are only available for Dynamic Templates.
Only variables of type File (starting with File.) are supported.
| Index | Meaning |
|---|---|
| first | The first file in the current group. Example: {Group:first.File.FullName}
{Group:first.File.DateTime} |
| last | The last file in the current group. Example: {Group:last.File.MD.description} |
| Number (1 to n) | Access a specific file in the current group using a numerical index. If the index smaller than 1 or larger than the largest file number, the variable returns an empty string. Example: {Group:1.File.MD.description}
{Group:3.File.FileName}
{Group:5.File.MD.title} |
This variable accesses a file on the current page via the <Index>. These variables are only available for Dynamic Templates.
| Index | Meaning |
|---|---|
| first | The first file on the current page. Example: {Page:first.File.FullName} |
| last | The last file on the current page. Example: {Page:last.File.MD.description} |
| previous | This method returns the file printed before the current file. If there is no previous file, the variable returns an empty string. Example: {Page:next.File.Name} |
| next | This method returns the file printed after the current file. If there is no next file, the variable returns an empty string. |
| Number (1 to n) | Access a specific file on the current page using a numerical index. If the number smaller than 1 or larger than the largest file number, the variable returns an empty string. |
This variable access the file consumed by a specific container on the current page via the <Index>. All variables return an empty string if the <Index> cannot be resolved because the indexed container does not exist.
This variable can only be used inside a container, e.g., a Text or QR-Code container.
| Index | Meaning |
|---|---|
| first | The first container. Example: {Container:first.File.FullName} |
| last | The last container. |
| previous | The previous container, in Z-Order. |
| next | The next container, in Z-Order. |
| above | The container above the current container, in the same grid column. |
| below | The container below the current container, in the same grid column. |
| left | The container left of the current container, in the same grid row. |
| right | The container right of the current container, in the same grid row. |
| rowfirst | The container in the first row and in the same grid column as the current container. |
| rowlast | The container in the last row and in the same grid column as the current container. |
| colfirst | The container in the first column and in the same grid row as the current container. |
| collast | The container in the last column and in the same grid row as the current container. |
| Number (1 to n) | Access a specific container on the current page using a numerical index. |
This variable accesses the file consumed by a specific named container anywhere in the template via its <Name>.
The variable first searches on the current page for a container with the given <Name>. If none is found, it searches all containers in the template, starting on the first page. The first consuming container with a matching name is used.
Apply this syntax if you want to access data or metadata for the file consumed by a specific File container on the same or on another page.
A typical example would be a template which prints a file on the front of a page, and metadata for that file on the backside. Or you create a two-page spread layout, with a File container on the left page and one or more Text containers on the right page. If you name the File container uniquely, you can access the file data on the other page.
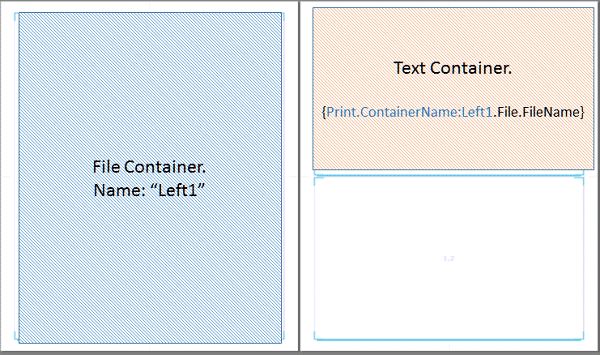
Accessing data for the file in the container on the left page using the Print.ContainerName: syntax.
This variable can only be used inside a container, e.g., a Text or QR-Code container. The container which you address must print before the container in which you use the variable (the Text container must have a higher Z-Order or on a higher page).
You can create Favorites for Dynamic Templates. This allows you to print selected files, the files from one or more folders or categories by just a simple drag & drop operation.
If you click on a Favorite, it uses the files currently selected in the active file window for the template. You can also drag folders, categories or collections to Printing Favorites to print them with the associated template.
Combining a Favorite with a Dynamic template allows you to start a print job by a simple drag & drop operation.
Printing Tips & Tricks
A selection of useful tips & tricks for IMatch printing.