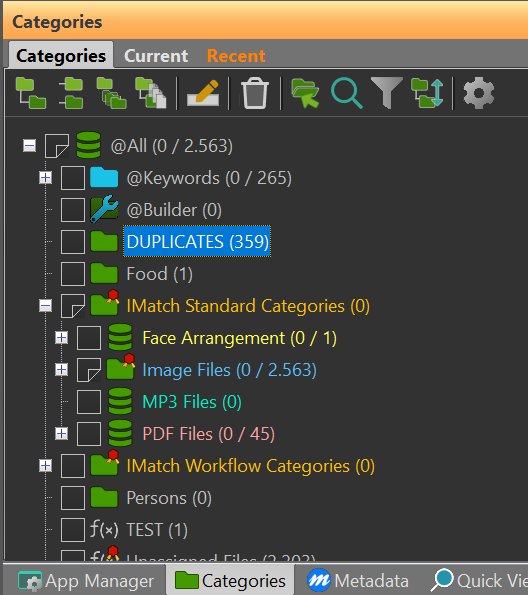
The Categories Panel gives you access to your category hierarchy and the most frequently used category commands in every view .
The Categories Panel gives you access to your category hierarchy and the most frequently used category commands in every view. You usually keep it open so you can quickly add or remove files to and from categories.
This panel is the main feature for assigning files to categories and for creating, renaming, and deleting categories outside the Category View.
If the Categories Panel is not visible, you can show it with F9, C or View > Panels > Categories.
Categories | This tab shows all categories in your database. This is the same view you see in the Category View. |
Current | This tab lists the categories assigned to one or more of the currently selected files. |
Recent | This tab shows recently assigned categories and images with recently changed categories. |
The Categories Panel works on the currently selected set of files in the File Window. If there is no selection, it works with the focused file. To assign all selected files to a category, just click on the check box in front of the category name to check it. To unassign, uncheck the box.
If the current selection consists of multiple files and these files are assigned to different categories, the Categories Panel uses a special kind of intermediate check box.
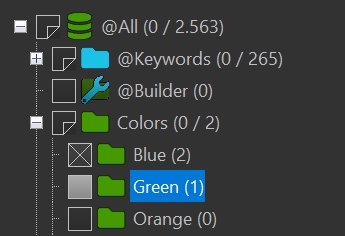
Multiple files selected, with different categories.
In the image above, multiple files are selected.
All selected files are assigned to the Colors|Blue category, but only some are assigned to the Colors|Green category. The check box in front of Colors|Green uses a gray state to indicate this. If you click it, all selected files will be assigned to Colors|Green, or unassigned if you click again.
Via the toolbar buttons above the category tree, you can perform the most frequently used category commands. These and more commands are also accessible via the context menu.
See the Category topic for details on these commands.
This command (available in the toolbar and also in the right-click menu) allows you to create a child category below the currently selected category and assign all selected files to it in one step.
This toolbar button allows you to jump right to the category in the Category View from any other view.
This toolbar button opens a search bar, allowing you to find categories by name. This is especially useful if you work with larger category hierarchies.
By clicking the Filter toolbar button (or pressing Shift+Ctrl+F), you can open the filter bar. This bar allows you to filter the category tree by name, to show only categories containing a specific word or phrase. Very convenient when you work with very large category hierarchies.
This feature works the same as the Filter available in the Category View.
If this toolbar button is enabled, the category tree automatically follows the current selection. It brings the first category of the first selected file into view, by scrolling and expanding the tree as needed.
IMatch by default loads only the minimum number of categories required to fill the tree. Collapsed entries are not loaded until the user expands them. This allows IMatch to avoid loading most of the categories, which speeds up the Categories Panel especially for large category sets.
If you enable the Follow Selection option, IMatch needs to load all categories, whether collapsed or not. The Categories Panel may take a bit longer to load, depending on the number of categories in your database.
| Command | Description |
|---|---|
| Ins | Create a new child below the currently selected category. |
| Ctrl+Shift+Ins | Create multiple categories at once. |
| Ctrl+Ins | Create a new category on the same level as the selected category. |
| F2 | Rename the focused category. |
| Del | Delete the selected category. |
| Ctrl+F | Opens the search toolbar. |
| Shift+Ctrl+F | Opens the filter toolbar. |
| Ctrl+G | Go to the selected category in the Category View. You can also just Ctrl + double-click the category name in the category tree or double-click an entry in the Current list for the same effect. |
| Expanding and Collapsing | |
| NumPad + | Expand the currently selected category. |
| NumPad - | Collapse the currently selected category. |
| NumPad * | Expand the currently selected category, including all subfolders, recursively. |
| NumPad Ctrl+* | Collapse all subfolders of the currently selected category. |
| Cursor right | Expands the currently selected category if not expanded, else goes to the first child category. |
| Cursor left | Collapses the currently selected category if expanded, else goes to the parent. |
This tab shows all categories of all currently selected files.
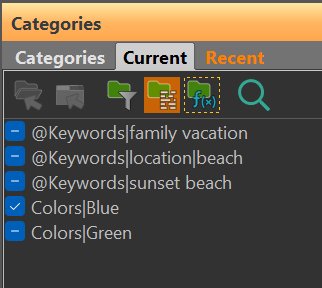
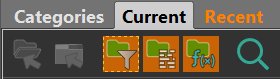
Via the toolbar you can control whether you want to see only direct assigned categories or if you also want to see data-driven categories, @Keywords categories, and formula-based categories. This gives you a very flexible view of the categories belonging to the currently selected set of files.
Including formula-based categories can be very slow when many files are selected.
You can remove files from any of these categories by clicking the check box in front of the name. If multiple files are selected and these files are members of different categories, intermediate check boxes will be used. Categories that contain all selected files will use a normal check mark, and categories to which only some of the selected files are assigned use the intermediate state. Click these once to assign all files to these categories. The intermediate state will change to the normal check mark. Clicking again will remove all files from the clicked category.
The separate File Categories Panel shows the same information as the 'Current' tab, but is independent from the Categories Panel. This allows you to both edit categories and see the categories of the selected file(s) if you want. To open the File Categories Panel, go to View menu > Panels or press F9, D.
This tab shows the last 20 categories used in the Categories Panel, and the last 20 files used for assignments or unassignments. The purpose of this tab is to speed up your workflow while you categorize related files, e.g. in a File Window or the Viewer.
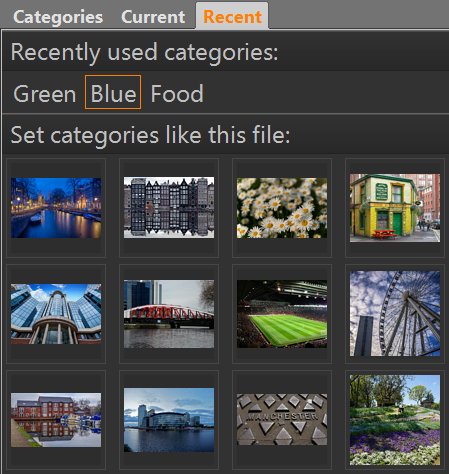
At the top you see the last 20 used categories, and below that the last 20 files as thumbnails. This tab only considers assignments performed via the Categories Panel. It updates automatically while you work with the Categories Panel.
Child categories of the @Keywords category are displayed in italic. This makes it easier to tell which entries are keywords.
As usual, assignments and unassignments are performed on all currently selected files in the active File Window.
To assign a category, click its name in the upper list. To unassign, Shift+click the category name.
To add all categories of a recently used file to all selected files, click on its thumbnail in the lower list. This adds all categories of that file, including @Keywords but excluding data-driven categories.
To replace all categories of the currently selected files with the categories of a file in this list, Shift+click the thumbnail of that file.
The Recent tab uses borders to indicate the categories assigned to the current file. If more than one file is selected and not all selected files share the same categories, IMatch uses borders in different colors to show the categories assigned to all and only some files.
The ability to add additional tabs to the Categories Panel makes it much easier to work with large category trees. You can add up to 10 additional tabs, each tab presenting a separate view on your category hierarchy. This enables you to show different sections of your category tree, for quicker assignments. Even if you have thousands of categories, splitting them up into separate tabs makes them easy to access.
To add or remove additional category tabs, press the Configure toolbar button in the Categories tab. This opens the Configure dialog box.
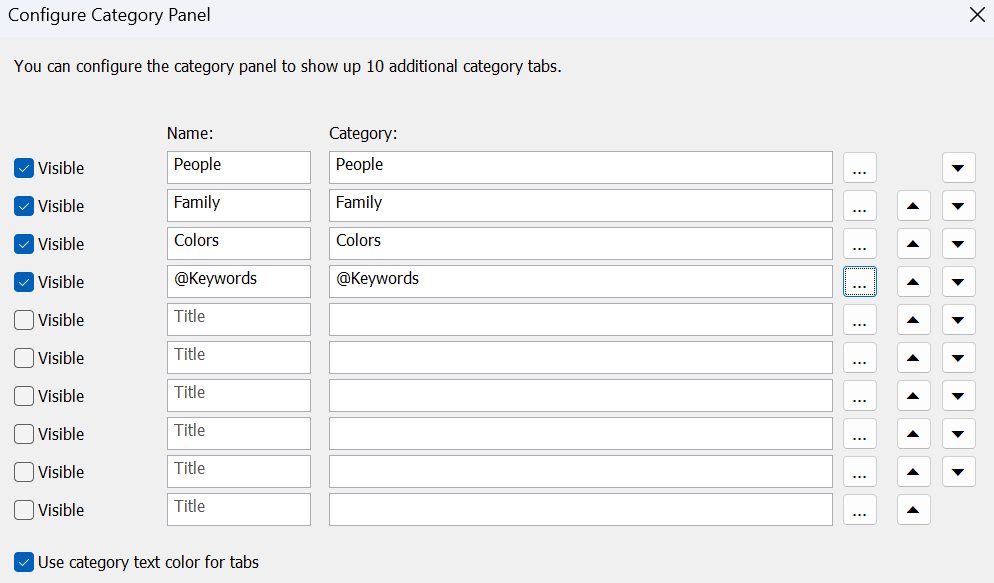
Each entry can be individually enabled and disabled. You can enter a Name and select a root category to use for this tab. For quicker access you usually don't include the full category tree in these tabs, but instead use smaller sections of your category hierarchy. You can also reorder the sequence in which the tabs appear in the panel in this dialog box.
If you want, you can use the text color of the category also for the tabs in the panel. Enable the Use category text color... option in this case.
In our example database we have some extra tabs to quickly access People, Family, Colors, and @Keywords categories. This is how it looks in the Categories Panel afterwards:
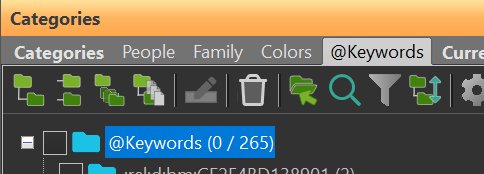
The Projects tab shows only the Projects category and its child categories. The @Keywords tab shows the special @Keywords category and all its children.
Using additional category tabs allows you to quickly access different sections of your category hierarchy. Especially if you work with large genealogy or taxonomy hierarchies, this is a real time saver because you don't need to search and scroll the category tree all the time.