Various Viewer modes.
The viewer is the main feature in IMatch for displaying images, for reviewing, culling, rating and similar tasks which require a full view of images at...
The viewer is the main feature in IMatch for displaying images, for reviewing, culling, rating and similar tasks which require a full view of images at various zoom levels.
Various Viewer modes.
You can configure Viewer settings under Edit > Preferences > Application: Viewer.
Double-click | Toggle between fit-to-window and 100% zoom. |
Left-click | Dive zoom: when in fit-to-window mode, this zoom the image to 100% until you release the mouse button again. |
Holding Alt and moving the mouse left or right | Zoom in and out. The mouse cursor position controls the center of the zoom. |
Ctrl + mouse wheel | Zoom in and out. |
Cursor right / Cursor left | Next / previous image. |
Mouse wheel down / up | Next / previous image. |
See Navigation below for more keyboard commands and mouse actions.
The Viewer renders images on screen using current DirectX technologies (the same technology used by modern computer games). This means it can display even large images very fast, and the output quality is excellent at any zoom level. Zooms are instantaneous between 10% and 800%.
The Viewer utilizes the memory on your graphic card to pre-load images in the background. This makes switching between images very fast. The number of images the Viewer can cache depends on the size of the images you use and the amount of video memory on your graphic card. The Viewer manages this automatically.
The maximum image size which can be displayed in the Viewer depends on the graphic card, but is usually between 8,192 and 16,384 pixels in either dimension. If you try to display larger files (e.g., 30,000 pixel panoramas), the Viewer automatically scales the image down to the supported display size.
If you work with large 48 or 80 Megapixel files, it may not be possible or slow to display 16 files at the same time. Switch to a layout with one or two files in that case.
Some computer types (e.g. low-end Office computers or small tablet computers) use on-board graphic cards with very little memory. Instead the RAM of the computer is used to store graphic data - which may collide with the use of this memory by IMatch and other applications. If you run IMatch on such low-end hardware and the computer has only 2 GB RAM, you may experience issues in the Viewer.
Usually it helps to reduce the number of files displayed in parallel. If you display 4 or more images, switch to a layout which shows only 1 or two files at once in the Viewer. If this does not help, there is really very little video memory available.
In that case, go to Edit > Preferences > Application: Viewer and disable background pre-loading. This reduces the memory required by IMatch for rendering graphics considerably. Switching between files in the Viewer or the Quick View panel will be much slower, but zooming and panning will still be fast.
The Viewer supports four different display modes. You can switch between these modes using the keyboard shortcuts given in the table below, via the View menu in the main menu bar or via the context menu in the Viewer.
| Mode | Keyboard | Description |
|---|---|---|
| Full screen Mode | F12, F | When in Window Mode you can switch the Viewer to full-screen mode to let it occupy the entire screen space, including the area reserved for the task bar. |
| Panel Mode | F12, P | In this mode, the Viewer is displayed as a dock-able panel inside the IMatch application window. You can dock this panel to any side of the application window and resize it freely. |
| Maximize Mode | F12, M | In this mode the Viewer fills the entire application window and none of the other Views are visible. This mode is ideal if you work on smaller monitors or laptops. |
| Window Mode | F12, W | In Window Mode the Viewer uses an independent window. You can resize and move this window in any way you like, even to a secondary monitor. |
| Closing the Viewer | F12 or X or ESC | This closes the viewer. The current settings and layout are automatically saved.This closes the viewer. The current settings and layout are automatically saved. |
When you work with multiple monitors you can move the viewer window to the second monitor while in Window Mode. If you switch to full-screen mode, the viewer will use the monitor on which it was used last in full-screen mode or on which you positioned the viewer window.
The Viewer configuration is part of the Application settings available under Edit > Preferences > Application: Viewer.
The Viewer works with a set of files you send to it by pressing Enter in a File Window. We refer to this as the current selection in this text.
If only one file is selected, the Viewer loads all files in the active File Window and sets the current file to the file currently focused in the File Window.
This behavior can be configured under Edit > Preferences > Application: Viewer.
If the Viewer is not already open when you send files, it automatically opens using the last Viewer Mode and position. You can send any number of files to the viewer at any time by just pressing Enter. The viewer replaces the current selection with the new set of files you send to it. The files in the viewer have the same order as the files you send, unless you use the Promotion feature.
The file currently having the focus in the File Window (the one with the special border) will also become the focused file in the Viewer. The Viewer automatically scrolls the selection to bring the focused file into view. If you select multiple files to send to the Viewer, select the file you want to see initially as the last file.
When you use Shift + Enter to send files to the viewer it receives the keyboard focus too and you can immediately 4ate with the keyboard.
This will also bring the Viewer window to the top if it is hidden by another window.
If only one file is selected, and this file is the top of a collapsed stack, the Viewer opens all files in the stack.
If only one file is selected and this file is a master and the version stack is collapsed, the Viewer opens the master and all versions.
This behavior allows you to quickly open all files in a stack in the Viewer. If you don't want this behavior, you can disable it under Edit > Preferences > Application: Viewer.
The layout determines how many images you see and which additional panels and overlays are visible in the Viewer.
The Viewer manages separate layouts for each of the View Modes. You can have different settings for each mode.
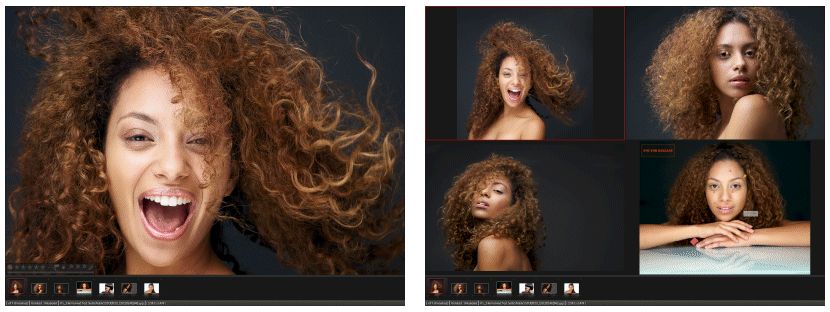
When you run the viewer for the first time it displays one image, occupying the entire viewer window. The area where the images are shown is named the grid - because it contains one or more images in a tiled grid layout.
The viewer showing only a single image in a 1 x 1 grid.
Also visible: The film strip panel and the collection overlay.
The viewer can display between 1 and 16 images at once in the grid. You switch between these modes by pressing L following by a number between 1 and 9, plus A and B for the 12 and 16 grid mode.
Displaying many images at once requires a lot of memory and may slow down the system and look-ahead caching quite a bit, especially if you work with large 50 to 80 MP files.
The overall performance also depends on the type of your graphic card (GPU) and available memory on the card. If you experience excessive memory usage and sluggish performance, reduce the number of images displayed in parallel.
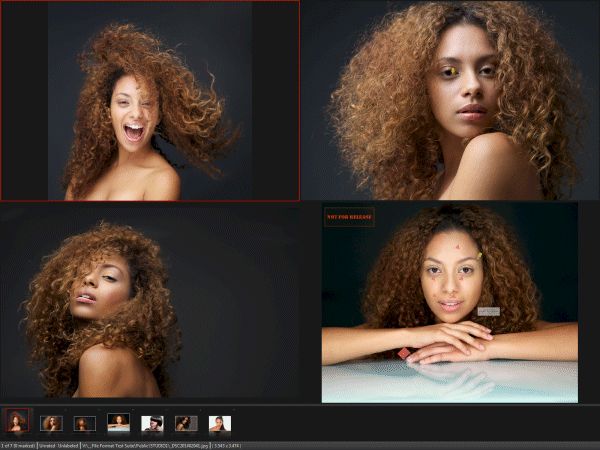
Displaying four images in a 2 x 2 grid.
Press Z to toggle between 100% and fit-to-window mode for all images at once.
The Viewer supports two different orientations for the layouts with 2 and 3 files: vertically or horizontally.
Depending on whether you work with landscape or portrait images, one of the two orientations gives you a better view. By pressing L 2 or L 3 several times you can switch between the two available orientations.

Displaying 2 images in either horizontal or vertical orientation
When you select multiple files in the Film Strip Panel, the number of displayed files automatically adapts to the number of selected files. When you reset the selection and only one file is selected in the Film Strip, the Viewer returns to the number of side-by-side files configured here.
If you send more than one file to the viewer you can navigate this file set using either the mouse wheel or one of the following keyboard shortcuts:
| Home | First Image |
| End | Last Image |
| Cursor left | Previous Image |
| Cursor right | Next Image |
| Ctrl + Cursor Up | First image in grid |
| Ctrl + Cursor Down | Last image in grid |
| Page Up | One page up. A page equals the number of images in the grid. |
| Page Down | One page down |
| Mouse Wheel | |
|---|---|
| Wheel up | Previous Image |
| Wheel down | Next Image |
| Shift + Ctrl + Wheel up | One page up |
| Shift + Ctrl + Wheel down | One page down |
If this option is enabled under Edit > Preferences > Application: Viewer, the cursor keys automatically skip marked images. This is also the case for mouse wheel navigation. If you want to select a file with the delete mark, either click on it in the film strip or use the Alt key together with the cursor keys or the mouse wheel.
See The Delete Action for more information.
Most of the time you will work in fit-to-window mode, using the mouse dive zoom as needed to check details in your images.
Use these keyboard shortcuts or the corresponding commands in the context menu of the Viewer to control the zoom level:
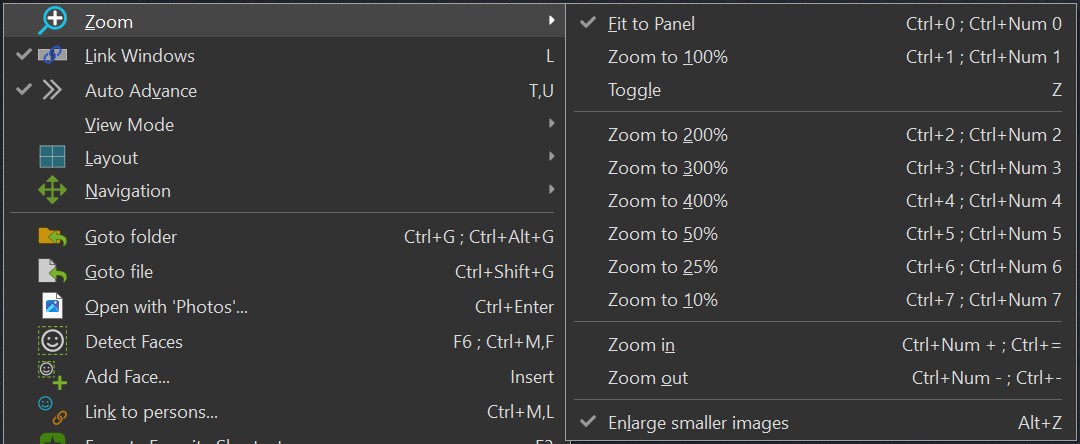
The Viewer context menu with the available Zoom options.
| Z | Toggle between fit-to-window mode and 100% view. |
| Ctrl + 0 | Fit image in grid (fit-to-window mode) In this mode the Viewer can enlarge images smaller than the available screen (Viewer panel size) to fit either height or width, depending on the image orientation. This allows you to utilize the available screen space. |
| Ctrl + 1 | Display image at 100%. |
| Ctrl + 2 | Display image at 200%. |
| Ctrl + 3 | Display image at 300%. |
| Ctrl + 4 | Display image at 400%. |
| Ctrl + 5 | Display image at 50%. |
| Ctrl + 6 | Display image at 25%. |
| Ctrl + 7 | Display image at 10%. |
| Ctrl + + | Zoom in |
| Ctrl + - | Zoom out |
| Alt + Z | Enlarge smaller images |
These commands work on all displayed images at the same time when linking is enabled. You can simultaneously zoom in and out all images in the grid. You can toggle linking on and off by pressing L on the keyboard.
If this option is enabled, the Viewer enlarges images smaller than the available screen or panel size to fill the panel. Use this to always display images at screen-size, even if some of your images are smaller. This avoids black borders at the top/bottom or left/right and can be useful if you look at older (smaller) images on a 4K or 8K monitor.
If an image is displayed at a zoom ratio larger than 100%, the Viewer displays an indicator in the bottom-right corner:

You can disable this 100%+ icon overlay via Edit menu > Preferences > Application: Show 100%+ indicator. (Search for 100%+ to find it quickly).
| Left-click | Dive Zoom. When in fit-to-window mode, this zooms the image to 100%, centering the image around the clicked location. |
| Left-click and move the mouse | Pan. When the image is larger than the panel, this pans the image (moves the image around) |
| Shift + left-click and move the mouse | Fast Pan. Hold down Shift while moving the mouse to pan faster. This is useful if the image is much larger than the panel. |
| Alt + left-click and move the mouse | Alt-Zoom. See below. |
| Ctrl + left-click | Dive out Zoom. When the image is displayed at a scale > 100% and the image is larger than the panel, this zooms back to 100%. You can still pan while holding down Ctrl. This is a great way to quickly look at the 100% image while you look at details. |
This is probably the most intuitive zoom mode. It works perfectly smooth between 10% and 800%.
This interactively zooms the image in and out while you move the mouse. Using this simple technique you can zoom into any area in your image. The zoom range is 10% to 800%.
If an image is larger than the available space in the panel you can pan it by left-clicking with the mouse and then dragging the mouse to pan the image.
If you hold down the Shift key while panning, the Viewer switches into an fast panning mode. This allows you to pan even very large images with ergonomic mouse movements.
By default, operations like zoom and pan are synchronized between all panels. This means when you display 4 images at the same time, zooming into one image will also zoom into all other images. This way you can effectively compare details in all images at once.
To unlink the panels and to zoom and pan each image individually, press the L key. It toggles between linked and un-linked panels.
The Auto Advance option can speed up your workflow considerably when you have to apply ratings, labels, bookmarks or mark many files. If enabled, the Viewer automatically advances to the next file (or next page) when you apply a rating, label, bookmark or mark a file for later deletion.
You can toggle the Auto Advance modus via the context menu in the Viewer or the T,U keyboard shortcut.
When you display multiple files at a time and you rate/label/bookmark/Del the last file on a page, IMatch advances an entire page and places the focus on the first file on that page. This allows for a more fluid and fast workflow in multi-image mode.
The Viewer by default does not show the visual proxy you have configured for an original file via versioning. The idea is that the viewer shows the original file for review purposes. You can toggle the display of the visual proxy via the T,X keyboard shortcut or the corresponding menu command.
Some operations are not available when you display visual proxies, e.g. you cannot display or edit Annotations in this mode.
You can copy files and selected annotations into the Windows clipboard using the standard Copy command. To paste Annotations or attributes, use the commands available in the context menu.
Using Copy / Paste Attributes makes it easy to copy attributes like Categories, Rating, Label, Collections or Metadata between files while you are working with them in the Viewer.
The context menu of the film strip panel offers a Copy command. This command copies the clicked file into the Windows clipboard. You can use it to paste that file into another application, or to copy various data items between this file and the file currently selected in the Viewer. Depending on your workflow, this can be a great time saver.
The quickest way to change settings, show or hide panels and overlays (see below) is the Smart Menu
Press the S key to open or close the Smart Menu. ESC also closes the Smart Menu.
The Smart Menu opens at the bottom of the Viewer window. It is divided into large buttons, easy to hit with the mouse or by touch:
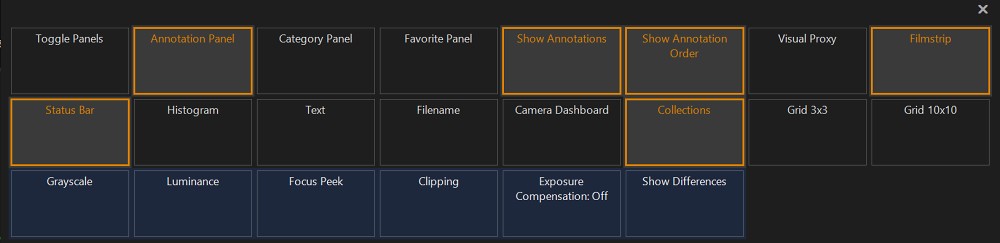
When you hover the mouse cursor over a button, the Smart Menu displays the corresponding keyboard shortcut.
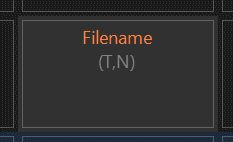
The keyboard shortcut to toggle the File Name overlay is T , N
Toggle Panels | Show or hide all panels, like the Category Panel or the Annotations Panel. Use this button to temporarily show or hide panels, without changing their individual visible/hidden status. |
Annotation Panel | Show or hide this panel. |
Show Annotations | Show or hide Annotations. |
Show Annotations Order | Show or hide the annotation order number. |
Visual Proxy | Switch between displaying the visual proxy or the original image. |
Filmstrip | Toggle the position of the film strip between bottom, right, top, left or off. |
Status Bar | Show or hide the status bar at the bottom of the Viewer window. |
Histogram | Toggle the Histogram overlay. |
Text | Toggle the Text overlay. |
Filename | Toggle the Filename overlay beween name only, full path and off. |
Camera Dashboard | Toggle the Camera Dashboard. |
Collections | Toggle the Collections overlay (rating, label, ...). |
Grid 3x3 | Display a 3 x 3 grid. |
Grid 10x10 | Display a 10 x 10 grid. |
Grayscale | Show all images in grayscale mode. This can be useful for a quick impression on how the image would look in a black & white version 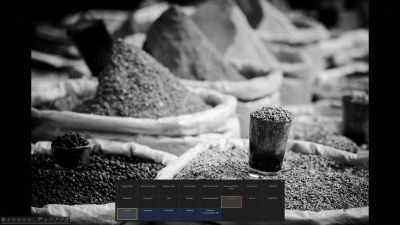 |
Luminance | In this mode, the Viewer displays the luminance of the image instead of the color values. This mode allows you to quickly check for the lightest and darkest areas and overall luminance distribution. 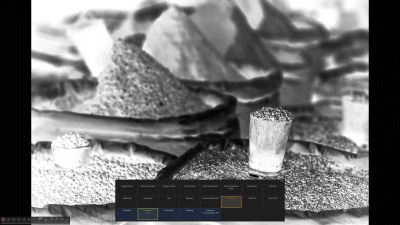 |
Focus Peek | If this mode is enabled, the Viewer highlights the areas with the the highest contrast in the image. The auto-focus of your camera locks onto these areas to focus and track objects. 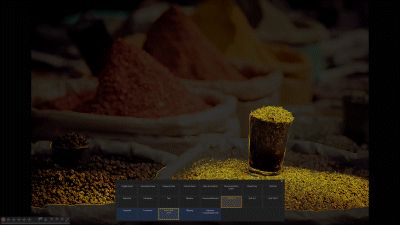 |
Clipping | If this mode is enabled, the Viewer gives an impression of clipped shadows (blue) and highlights (red). The Viewer uses the cache image produced by IMatch, which is for RAW files either the embedded preview image or a rendition of the RAW sensor data. This means that clipped areas shown by the Viewer don't necessarily represent the results you get from your RAW processor. Modern RAW processors are very good at recovering clipped areas in an image. Only judge images after developing and optimizing them in your RAW processor. 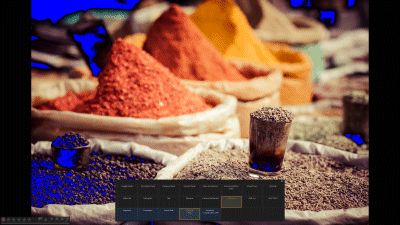 |
Exposure Compensation | This button toggles exposure simulation between -2 and +2 stops. This can give you q quick impression of how the image would look after dialing in exposure compensation in your camera or RAW processor. 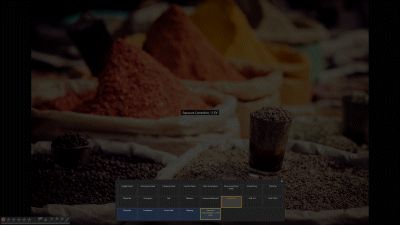 When you enable the exposure compensation simulation, the Viewer displays an info tip when you open the Viewer:  This is to remind you that the image you see does not represent the actual cache image. |
Show Differences | This button toggles the Difference mode. When enabled, the Viewer compares the pixels of the first visible image with the pixels of all other visible images and highlights the differences in the other images. In the screenshot below the Viewer shows the differences between the original image (left) and the edited version (right). Modified sections of the image are clearly visible.  This feature also works great when you use burst mode with your camera and you struggle to see the differences between nearby shots. |
The Viewer remembers the settings you make in the Smart Menu and restores them when you open it the next time.
The Viewer supports a range of overlays which can be used to display additional information or to show and modify metadata.
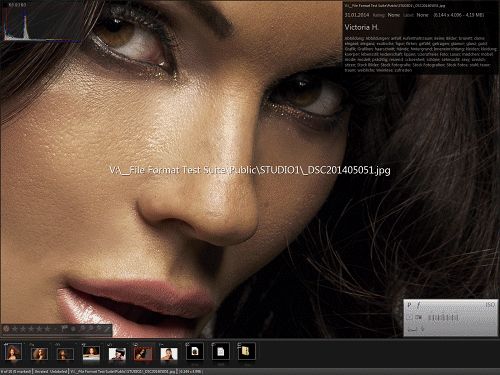
Viewer with multiple overlays enabled: Histogram, Text, Collection, Dashboard, File Name.
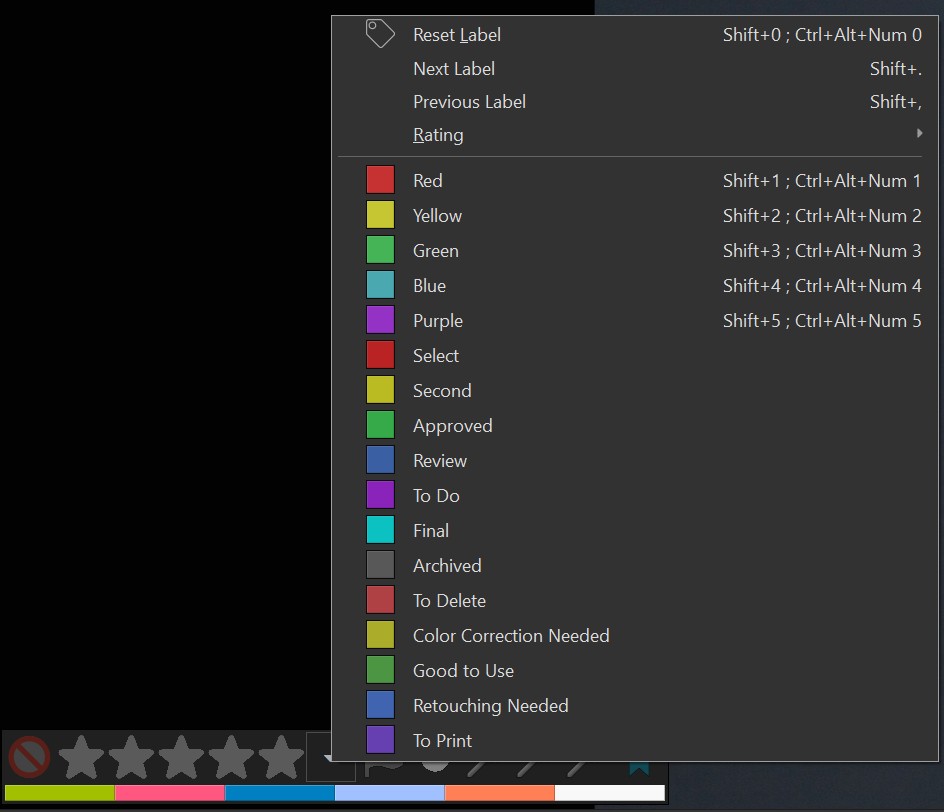
To toggle the collection overlay, press T, C on the keyboard or choose the corresponding command from the context menu of the viewer.
The Collection overlay displays the rating, label, collections and category color codes for a file. You can directly modify these attributes via the overlay.
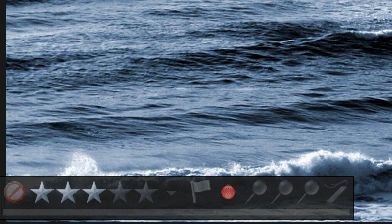
The Viewer supports the same keyboard shortcuts for rating and label as the File Window. Use the mouse to change any of the other collections. The little arrow next to the rating icons opens a menu from which you can directly set a rating and label for the focused file.
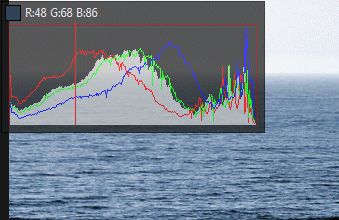
To toggle the Histogram overlay, press T, H on the keyboard or choose the corresponding command from the context menu of the viewer.
The histogram overlay displays a R,G,B and lightness histogram. The color of the pixel under the mouse cursor is displayed both in the histogram and as a text readout at the top of the overlay.
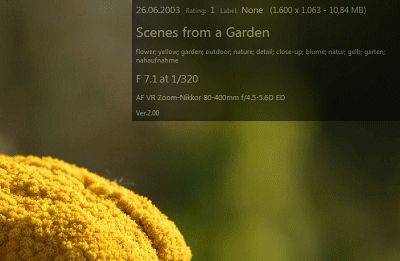
To toggle the Text overlay, press T, T on the keyboard or choose the corresponding command from the context menu of the viewer.
The text overlay displays the same contents as the File Window Tip you can configure under Edit > Preferences > File Window Tip. This allows you to see the same info in the viewer and the File Window.
You can control the transparency of the overlay under Edit > Preferences > Application: Viewer.
To toggle the Info overlay, press T, D(T, followed by D) on the keyboard or choose the corresponding command from the context menu of the viewer.
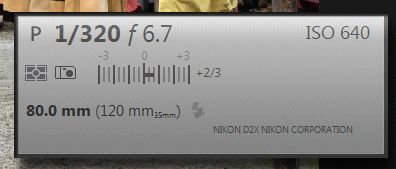
The camera dashboard is mostly used for images created with digital cameras. Depending on the camera model and the richness of the available metadata, the camera dashboard displays important shooting data like exposure, shutter speed, ISO, exposure correction, flash info, lens data etc.
The keyboard shortcut T, N toggles the three modes of the File Name Overlay: Off, File Name only, File Name with Path.
The file name overlay displays either the file name or the file name with the fully qualified path in the center of the image. The name/path is automatically shortened to fit within the available screen space.

The Viewer can overlay a 3 x 3 and a 10x10 grid on top of the image. The keyboard shortcut G,G toggles the grid between Off, 3x3 and 10x10, respectively.
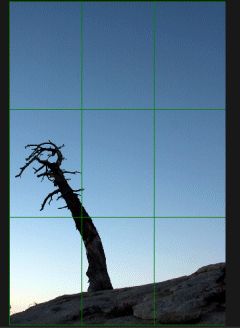
A 3 x 3 (Rule of Thirds) grid
The 3 x 3 grid allows you to check image composition easily using the Rule of Thirds method. The 10 x 10 grid includes row and column indicators, which are ideal for scientific or architectural purposes. You can identify 100 distinct areas in the image and refer to these areas in your comments, annotations or other metadata.
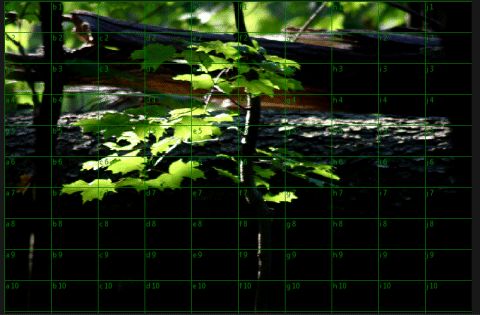
A 10 x 10 grid with row and column indicators
The Viewer stores the current settings per Viewer Mode. This includes panel sizes and visibility, the overlays enabled etc.
This allows you to use different panels and overlays for different Viewer Modes.
The Viewer can optionally display panels for categories and favorites and a film strip panel for easy navigation.
To switch between panels, use Ctrl+Tab and Shift+Ctrl+Tab or click the panel with the mouse.
To display the status bar, press T, B on the keyboard or choose the corresponding command from the context menu of the viewer.
The status bar is displayed at the bottom of the viewer window. It shows the index of the current file, the total number of files in the viewer, rating and label color, the file name and some additional information depending on the format of the focused file.

The status bar also displays the number of files marked for deletion.
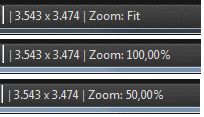
The current zoom factor used by the Viewer is displayed in the status bar:
This option positions the viewer window above all other windows and locks it there. To toggle this option, press T, P on the keyboard or choose the corresponding command from the context menu of the viewer. No other application, including IMatch, can overlap the viewer window in this mode. This is especially useful if you keep the viewer window on a second monitor and you continue to use other applications. You can continue to work with IMatch, and send new files to the viewer as needed.
To display the film strip panel, press T, S on the keyboard or choose the corresponding command from the context menu of the viewer. Pressing T, S multiple times toggles the position of the film strip panel between bottom, right, top, left and off.
This panel displays thumbnails for all files currently loaded into the Viewer. To resize the panel, use the grab bar between the image grid and the panel. Using this panel you can quickly navigate within all files currently selected for the Viewer.
You can also navigate using the keyboard and the mouse when the Film Strip panel is not visible.
See Navigation for more details.
To focus an image, left click on the thumbnail. The image grid will automatically adjust to bring the clicked image into view. To scroll the film strip, use the cursor keys or left-click and pan the film strip with the mouse.
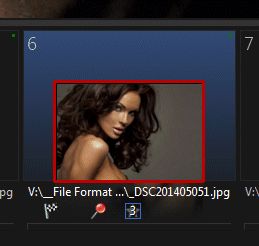
Files already viewed show a green hook in the film strip.
The Viewer can display up to 16 files side-by-side.
When you click a file in the Film Strip Panel, the Viewer displays this as the first file. If you have configured the Viewer to display multiple files, the files following the clicked file are loaded and displayed.
In addition to this mode of operation, you can select multiple files in the Film Strip by holding down the Shift or Ctrl key while clicking.

If you hold down Shift, the Film Strip selects all files between the currently selected file and the file you click. If you hold down Ctrl, you can select multiple files anywhere on the film strip.
This way you can select up to 16 individual files and the Viewer automatically adapts the layout to display all selected files. When you again click a file in the Film Strip without pressing Ctrl or Shift, the Viewer returns to the initial number of images displayed side-by-side.
This feature is ideal when you try to find the best shots in a series of images.
If you select multiple files with Ctrl+click, the order in which these files are shown is determined by the order in which the files appear on the film strip, not the order in which you clicked the files.
The film strip uses kinetic scrolling, which means that you can flick the film strip with the mouse by left clicking, pan and release the mouse. The faster you pan the more the film strip will scroll. To flick the film strip without changing the focused image make sure you click below the thumbnail.
A little red icon at the bottom of the film strip panel indicates the current position within the current set of files.
If you prefer to use a standard scroll bar enable it via the T, S key or the context menu of the film strip panel.
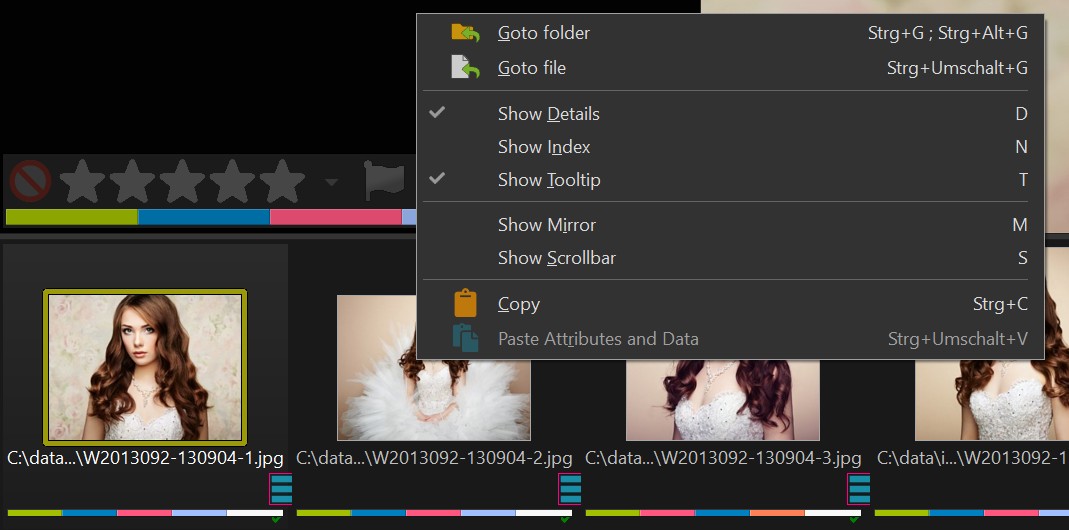
The film strip panel can display additional information. You can either use one of the keyboard shortcuts below or choose the corresponding command from the context menu of the film strip panel.
The film strip window showing index and details
| D | Show Details The film strip displays the full file name, rating, label, collections and category colors for each thumbnail. The background area of the thumbnail is filled with the label color. |
| N | Show Index Each thumbnail shows the index of the file within the current set of files. |
| T | Show Tooltip Displays the File Window Info Tip when you move the mouse cursor inside the thumbnail. |
| M | Show Mirror A nice visual effect. |
| S | Show Scrollbar By default the File Window does not display a scroll bar. You can toggle the scroll bar with this shortcut. |
| Ctrl + G | Goto Folder This command focuses the image represented by the thumbnail in the Media & Folders view. The viewer window stays open unless you have configured the keep on top mode and the viewer window and the IMatch main window are on the same monitor. In this case the viewer is automatically closed. |
| Alt + Ctrl + G | Goto Folder, Close Viewer This command focuses the image represented by the thumbnail in the Media & Folders view and closes the Viewer window. If you have enabled the option to automatically go to the selected file under Edit > Preferences > Application: Viewer you can also just close the viewer. |
| Shift + Ctrl + G | Goto File This command switches to the View and File Window from which the selected file was sent to the Viewer and selects the file. The viewer window stays open unless you have configured the keep on top mode and the viewer window and the IMatch main window are on the same monitor. In this case the viewer is automatically closed. |
| Ctrl + F12 | Open in Slide Show Opens the current set of files in the slide show. The currently active/focused file is used as the starting point for the slide show. The Viewer automatically closes to conserve memory resources and to give the slide show the maximum amount of memory for read-ahead caching. |
| Ctrl + Enter | Open with name of associated application Opens the active file with the associated application. The Viewer automatically closes to conserve memory resources unless you disable this Edit > Preferences > Application: Viewer. |
These keyboard commands can be used when the film strip panel has the input focus. Click somewhere in the film strip panel to set the input focus to the panel.
The category panel gives you full access to the categories in your database right in the Viewer window. To display this panel, press T, E on the keyboard or choose the associated command from the context menu of the Viewer.

This panel works with the currently focused image in the grid. It offers the same options as the Category Panel you know from the File Window.
The Favorites panel in the Viewer offers the same functions as the global Favorites panel. It works with the currently focused image in the grid. To display this panel, press T, V on the keyboard or choose the associated command from the context menu of the Viewer.
Via the Favorites panel in the Viewer you can copy and move files, add or remove categories, apply metadata templates and so on. In conjunction with the Collections Overlay this gives you all the tools you usually need for review and culling.
This panel gives you access to the unique Annotation feature in IMatch. To display this panel, press T, A on the keyboard or choose the associated command from the context menu of the Viewer.
Please see the help topics on Annotations for detailed information on annotations and their use.
The Del key has a special meaning in the Viewer.
The key is used to mark files for later deletion or other actions ('delete mark'). When you press Del, the image is darkened and a red X is placed over the image and the corresponding thumbnail. This is the visual clue for images marked for deletion.
To remove the mark, just press Del again.
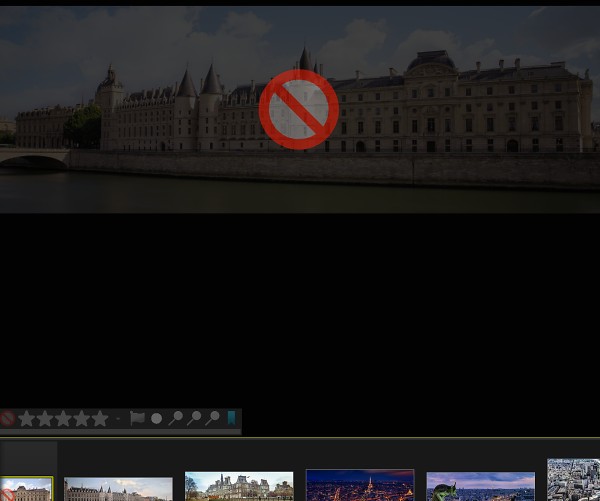
An image marked for deletion
When you have enabled the option to skip over files marked for deletion, you have to hold down the Alt key when navigating with the cursor keys or wheel in order to select marked files.
In multi-image mode, the Viewer hides files marked for deletion automatically. When you mark a file with Del, it is removed from view and the free image window is filled with the next file in sequence. To reach files marked for deletion, click on them in the film strip while holding the Alt key, or navigate with the standard keys while pressing Alt.
This feature makes it every comfortable to cull files and to reduce the files you have loaded into the Viewer to the set of files you want to keep.
When you close the viewer or you send a new set of files and there are files with a delete mark, the Viewer displays a prompt where you can choose the action to perform on the marked files:
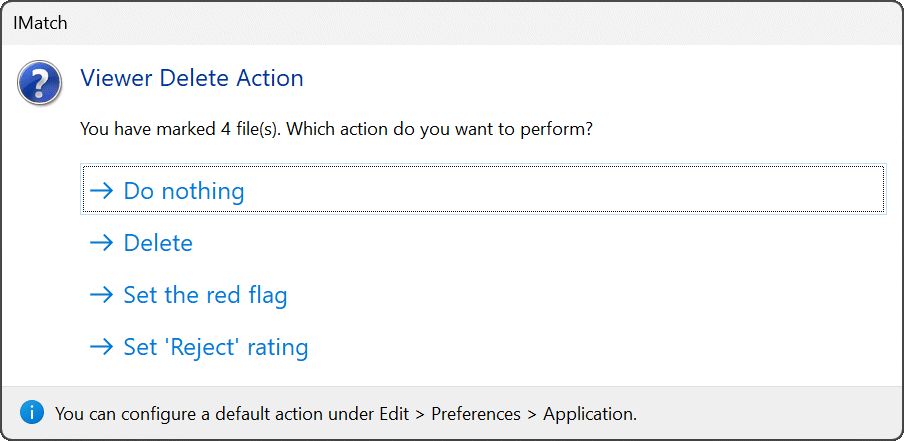
Choosing what to do with marked images.
If you don't want to see this prompt every time you mark files for deletion and close the Viewer, configure a default action under Edit > Preferences > Application: Viewer.
This feature allows you to reorder images within the viewer using the + and - keys on the numeric keypad or alternatively Shift + Ctrl + U / D. If you promote an image, it is sorted nearer to the beginning of the current file set. If you demote an image, it is sorted towards the end of the file set (higher index).
This feature resembles the work with a classic light table. Here you shuffle transparencies around to bring the best images together and move the losers to the side. The same can be done in the Viewer by using the promotion keys. Use this feature to bring the best images together and to the top when you review and cull files in the Viewer.
The modified order is only applied within the Viewer, but can be persistent as a custom sort order.
When you close the Viewer or you send a new set of files, the Viewer displays a prompt:
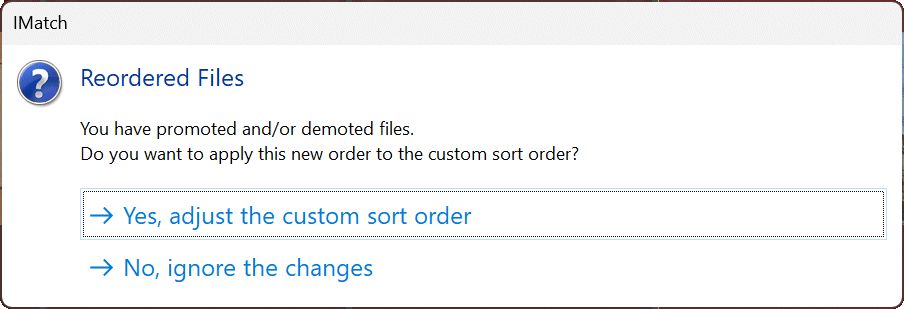
Choose the appropriate response if you want to transfer the new order to the custom sort order in the File Window. Switch the sort preset in the File Window to the special "Custom" preset to see the custom sort order afterwards.
This option is only available if the Viewer can determine a scope for the custom sort order. Folders, categories, the time line, events and people allow for custom sort orders.
If you display files from another type of scope (e.g., a collection or a Result Window), the custom sort order exists only while the Viewer shows the files.
The Viewer and the Panels support separate sets of keyboard shortcuts. Set the focus to the grid or the panel before you use the shortcuts associated with that window.
This table lists all standard keyboard shortcuts available in the Viewer and the panels. The keyboard shortcuts available in the Category and Favorites panel are not listed because they are the same as usual.
Menus list the available keyboard shortcuts for each command. You can always look them up there if you can't remember them.
| Controlling the Viewer Mode | |
|---|---|
| F12+P | Display as Panel |
| F12+M | Display Maximized |
| F12+W | Display as Window |
| F12+F | Display in Full-screen Mode |
| X or Ctrl+F4 | Close the Viewer (if in Window or Maximize mode) |
| L+1 , L+2 ... L+B | Choose the number of images to display |
| Navigation | |
| Home | First Image |
| End | Last Image |
| Cursor Left | Previous Image. If the option to skip files marked for deletion is enabled, the next valid image is selected. Hold down the Alt key to select marked images. |
| Cursor Right | Next Image If the option to skip files marked for deletion is enabled, the next valid image is selected. Hold down the Alt key to select marked images. |
| Ctrl + Cursor Left | First image in grid |
| Ctrl + Cursor Right | Last image in grid |
| Page Up | One page up. A page is the number of images in the grid. |
| Page Down | One page down |
| Zooming | |
| Ctrl + 0 | Fit image in grid (fit-to-window mode) |
| Ctrl + 1 | Display image at 100%. |
| Ctrl + 2 | Display image at 200%. |
| Ctrl + 3 | Display image at 300%. |
| Ctrl + 4 | Display image at 400%. |
| Ctrl + 5 | Display image at 50%. |
| Ctrl + 6 | Display image at 25%. |
| Ctrl + 7 | Display image at 10%. |
| Ctrl + + | Zoom in |
| Ctrl + - | Zoom out |
| L | Link or un-link panels. If panels are linked, zoom and pan affects all panels. |
| Film Strip Panel | |
| D | Show Details |
| N | Show Index |
| M | Show Mirror |
| S | Show Scrollbar |
| Ctrl + G | Goto Folder |
| Home | First Image |
| End | Last Image |
| Cursor Left | Previous Image |
| Cursor Right | Next Image |
| Page Up | One page up |
| Page Down | One page down |
| Panels & Overlays | |
| T, R | Grayscale Preview |
| T, Y or Backspace | Toggle all Panels and Overlays This allows you to show/hide all panels with a single keystroke. The individual on/off state of each panel is remembered. Use this for an unobstructed view on the image. |
| T, A | Annotations |
| Shift + G, G | Toggle grid overlay: Off, 3x3 and 10x10 |
| Shift + G, R | 3x3 Grid Overlay |
| Shift + G, T | 10x10 Grid Overlay |
| Shift + G, 0 | Grid Overlay Off |
| T, H | Histogram |
| T, T | Text Info |
| T, C | Collections |
| T, N | Toggle file name: Off, File Name, File Name and Path |
| T, D | Dashboard |
| T, V | Favorites |
| T, E | Categories |
| T, X | Visual Proxy |
| T, S | Toggle Film Strip, switch between edges |
| T, B | Status Bar |
| Annotations | |
| Tab | Focus/select next annotation object |
| Shift+Tab | Focus/select previous annotation object |
| A, E | Show or hide annotation objects |
The viewer has only a few options which you can configure under Edit > Preferences > Application: Viewer.
The following section contains some background technical information which may be helpful for performance tuning.
The Viewer uses an intelligent background preloading mechanism to speed up image display. While you look at one or more images, the Viewer loads the images you most likely want to look at next in the background and prepares them for display (applying color profiles, sharpen, etc. as needed).
This works usually very well, unless you jump 'wide' distances in the file list, or you switch between backward and forward moves a lot. In that case the Viewer may need a second or three to catch up and you will see a "Loading..." message displayed during that time.
The Viewer works with the global IMatch disk cache. If an image is not in the cache, it will be loaded from the original file. Depending on how you have configured the caching in IMatch these cached images are retained only for the current session or are stored in the disk cache for later use.
The best performance is achieved when you always enable disk caching and let IMatch produce the cache files in advance. This is the default setting.