The Map Panel with a section of the London Map (OpenStreetMap)
The Map Panel enables you to display your files on a dynamic map, using the GPS coordinates stored in the metadata.
If the Map Panel is not visible, you can show it via View > Panels > Map or the associated keyboard shortcut F9, P.
The Map Panel only works when your PC is connected to the Internet.
Privacy Notice
When using the Map Panel or the reverse geocoding features, IMatch sends data to a remote server and retrieves data from these servers. The data sent includes GPS coordinates and may include other potentially private data like your user name/API key (when you use the GeoNames or Google/Bing/HERE services). As with all Internet-related operations, the IP address of your computer is transmitted to the receiving server. IMatch sends only data required to use a specific service. Make sure you have read and understood the terms of service and privacy settings of Google, Bing, GeoNames.org, and other providers before using their services.
IMatch gives you choices and does not force you to use one specific map vendor.
See the photools.com privacy settings for additional information.
The Map Panel in IMatch is based on the OpenLayers framework and can use a wide range of maps from different providers. For Google Maps, the Map Panel uses a separate implementation based on the current Google Maps API. When your PC is connected to the Internet, IMatch can download and display maps and other geographic data in the Map Panel.
The Map Panel with a section of the London Map (OpenStreetMap)
If you have ever worked with one of the popular mapping applications like OpenStreetMap, Google Maps or Microsoft Bing Maps, you will find the Map Panel familiar to use.
The IMatch Map Panel is very powerful and provides all the tools you need when you work with GPS coordinates and location data. These are the features provided by the Map Panel:
IMatch supports several map providers:
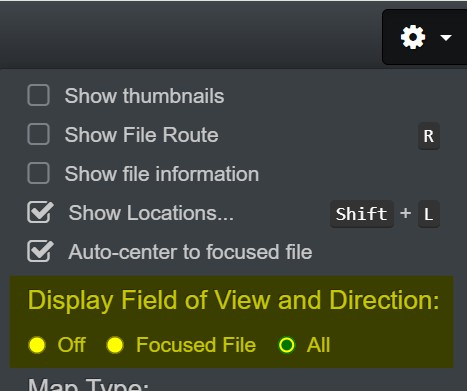
You can freely choose which provider you use. IMatch also supports different map types for some providers, e.g., street maps or satellite maps. You select the map provider and map type in the settings menu via the gear icon in the Map Panel ribbon:
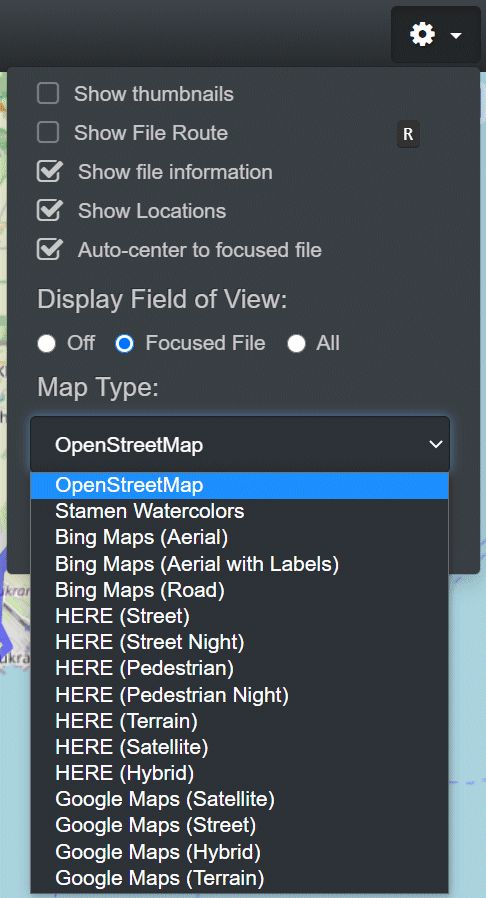
The Settings menu in the Map Panel
In order to use Google, HERE and Bing Maps you need to get an API key and enter it under Edit > Preferences > Geo & Maps in IMatch. Since 2016, both Google and Microsoft require a personal or corporate API key to grant access to mapping functionality. For private and low-volume use these API keys are free of charge.
See API Keys for more details about where to get your own API keys.
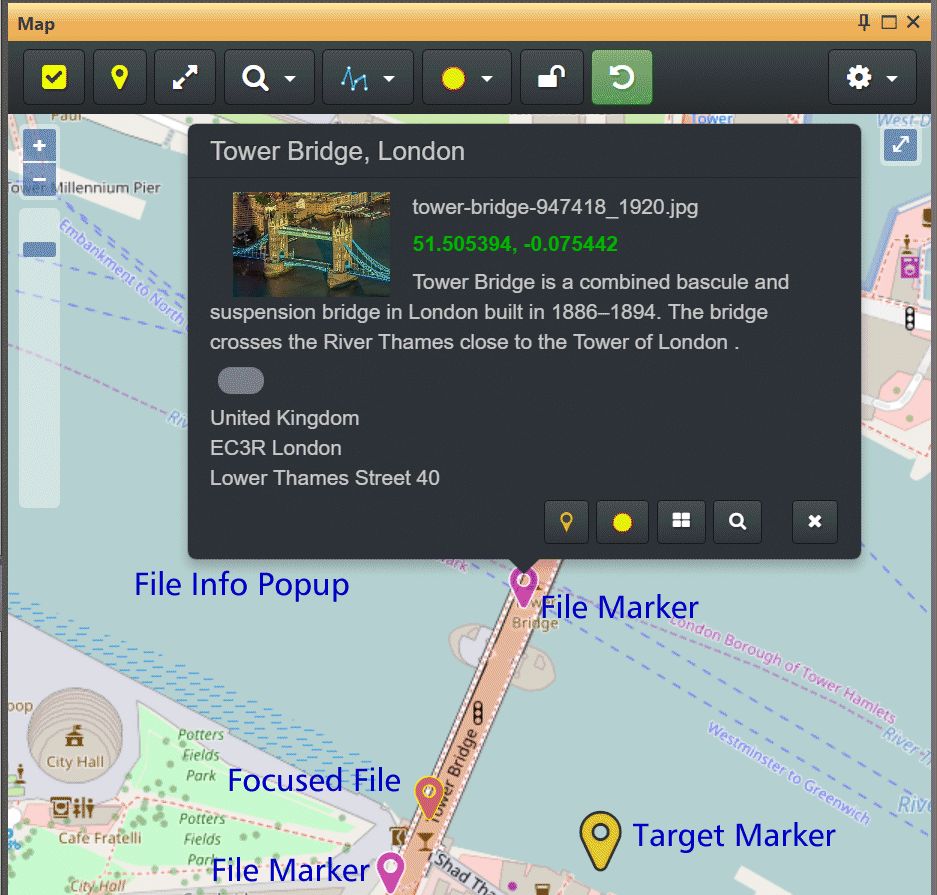
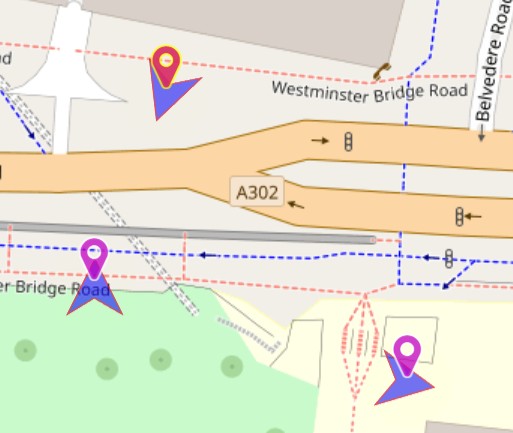
To display files on the map, just select the files in the File Window while the Map Panel is open. Each file with GPS coordinates is displayed with a location marker on the map. If multiple files are selected, the focused file is displayed with a different color (top left):
Only files with valid GPS coordinates can be displayed on the map. If you select a mix of files with and without GPS coordinates, the files without coordinates will be omitted from the map. If you apply a Location or the Target Marker, all selected files will be updated - whether or not they are shown on the map.
When you left-click a location marker, the Map Panel makes this the focused file in the active File Window. This is especially useful when you have other panels open, like the Quick View Panel. Clicking on a file in the Map Panel then updates the preview automatically.
To assign GPS coordinates to files, you can either:
Dragging files into the Map Panel to assign coordinates (left) or using the Target Marker (right).
Which method you prefer is up to you. Using the target marker has advantages when you plan to assign different sets of files to the same location. You place the target marker at that location, select some files and apply the target marker. Then select a different set of files (even in another folder) and again apply the target marker.
The drag and drop method is more intuitive, but can be less precise.
When you have enabled automatic reverse geocoding, IMatch automatically looks up and assigns country, city, and other location metadata to the files. It can even automatically add keywords based on the location. See Reverse Geocoding below for more information.
If you frequently work with files taken at the same location or venue, you can speed up your workflow by creating and using IMatch Locations.
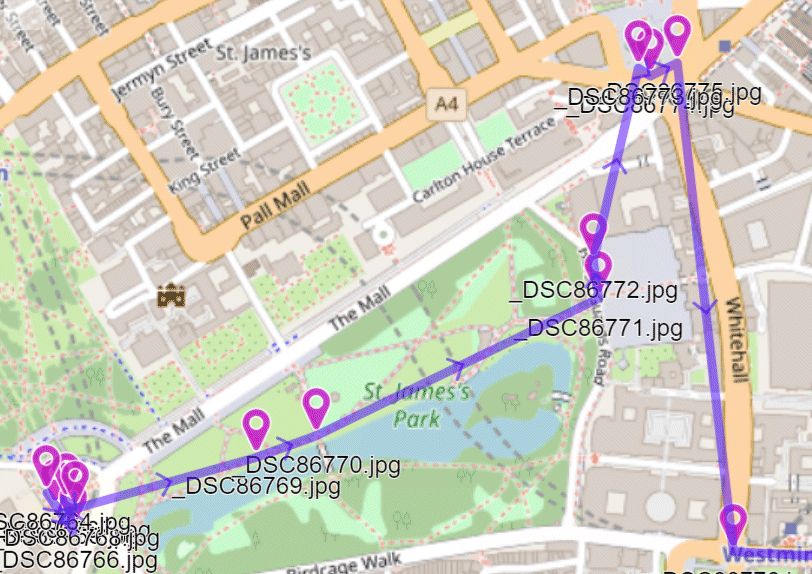
If you enable this option via the Gear menu or by pressing R, IMatch displays the route for all selected files with valid GPS coordinates. The files are sorted by their creation timestamp and then IMatch plots a line connecting the individual files. The sequence in which the files were taken is indicated by little arrows along the route.
This makes it easy to see your route while creating the images. Especially helpful for users who do travel or sightseeing photography.
Typically, files have one set of GPS coordinates. These coordinates have been added by the camera at the time the image was taken, or later using an external application like the IMatch Map Panel. These coordinates represent the location of the camera at the time the image was taken.
The EXIF metadata standard (and the corresponding tags in XMP) also support a destination set of GPS coordinates (Location Shown). These coordinates are usually filled manually by the user in a specialized application. They represent the location the camera was looking at.
If a file has two sets of coordinates, the Map Panel displays the file as follows:
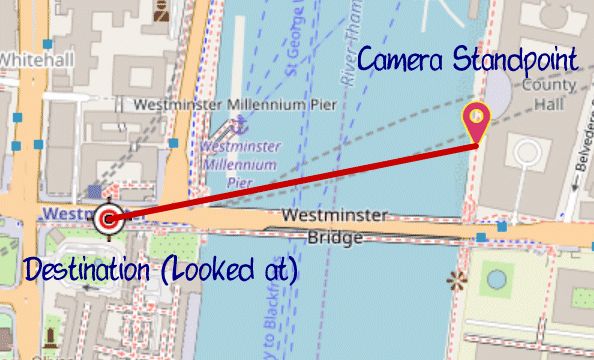
A file with two sets of GPS coordinates in the Map Panel
Here, the photographer was taking a photo of Big Ben while standing on the other side of the Thames.
To add a destination coordinate to a file with an existing GPS coordinate, right-click the file and then click on the corresponding button in the context menu:
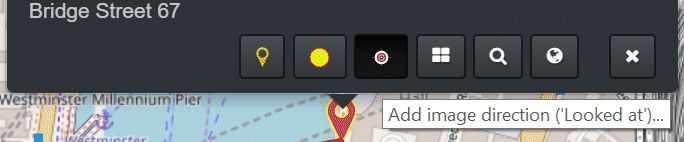
This adds a destination coordinate pair, with a default distance and orientation. You can now move the destination marker by left-clicking and dragging to the desired location.
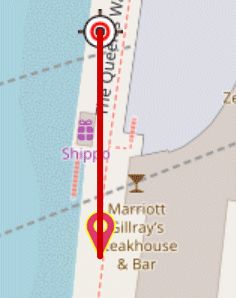
The default distance of new destination coordinates is about 50m to the North of the 'created' coordinate. You might need to zoom into the map to see it after it has been created.
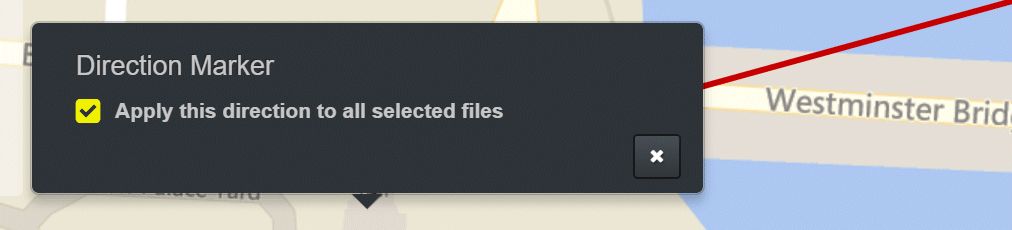
The right-click context menu of direction markers allows you to assign the destination coordinate to all currently selected files.
Remember to unlock the Map Panel if you want to move the destination marker or the file marker. 
In the rare case that you need to remove a destination coordinate you have created, you can just delete the destination coordinates in the Metadata Panel.
GPS Dest Latitude and GPS Dest Longitude tags.Location Shown * tags were filled by you or by the reverse geocoding, clear these tags too.Save your changes. This removes the destination coordinate and also the target marker from the map.
You can pan the map by left-clicking somewhere on the map and, while holding down the left mouse button, move the map around. The map pan is ballistic so you can flick the map to pan it. Depending on the speed of your Internet connection and the load on the map server, it may take a while for the map to refresh. Please note that this is not under the control of IMatch.
The panning behavior differs slightly between the different map providers.
To zoom the map in and out, use the zoom pane visible on the map. The number of available zoom steps depends on the selected map and map type.
You can also double-click the map to zoom in or use the scroll wheel on your mouse. If you work on touch devices, you can use the standard touch gestures.
Like all panels, the Map Panel can be resized or undocked to float it freely in a separate window. You can make the Map Panel as large as your screen or even move it to a second monitor.
Using a large panel makes it easier to do detail work, e.g., when you have to deal with many files in small areas.
If the map becomes tangled for some reason, or not all parts are loaded, use the Reload Map command in the Settings menu.
Keep in mind that the contents you see in the Map Panel are downloaded from remote servers which are not under the control of IMatch or photools.com.
If your network link is shaky or your Internet connection is slow, you may experience effects like missing map tiles (white or pink areas), sluggish response times and the like. In most cases, reloading the map solves these problems.
Otherwise, try another map provider. Especially the free OpenStreetMap servers are often overloaded and exhibit slower response times.
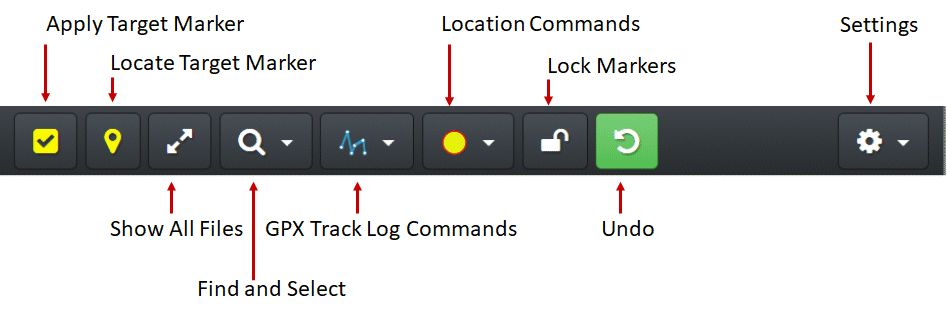
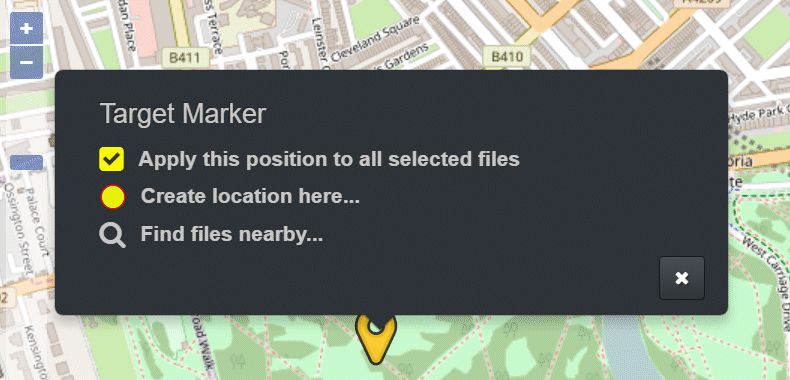
This command applies the coordinates of the target marker to all selected files. You add GPS coordinates to files by first left-clicking the map to place the target marker. Then you click this button to apply the target marker coordinates to all selected files in the active File Window.
You can also use the command available in the pop-up menu of the target marker. Right-click the target marker to open the menu:
When automatic reverse geocoding is disabled (see Geo & Maps), assigning a coordinate in the Map Panel only sets the latitude and longitude, but no altitude or other location data like country or city.
To update existing GPS coordinates in a file, use the same procedure as described above. Assigning the target marker adds and replaces GPS coordinates.
Click this button to pan the map to show the current position of the target marker.
You can left-click and drag file markers on the map. This will not only move the marker, but also change the GPS data of the corresponding file.
If you make a mistake or you move a file marker accidentally, press the Undo button in the Map Panel menu.
If the lock is enabled, markers and locations cannot be dragged or resized anymore. This avoids accidentally moving a marker or a location while you pan the map.
This command zooms the map out to reveal all currently selected files with GPS coordinates.
Click on the Find button or press the associated keyboard shortcut to open the Find panel:
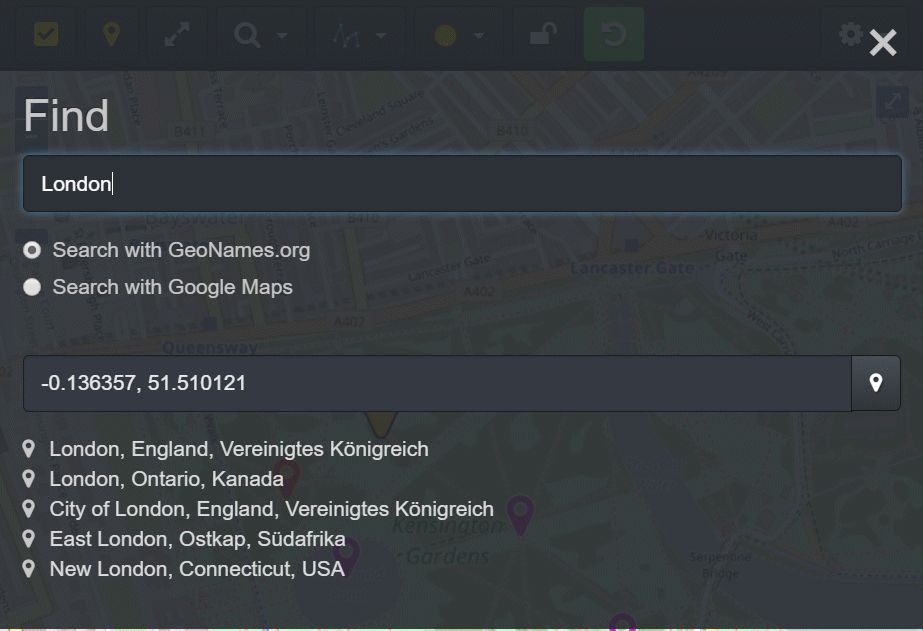
Finding locations and coordinates in the Map Panel
Type the name of a city or location. The syntax and built-in intelligence of this command varies between GeoNames.org and Google.
The results of your search are displayed at the bottom of the panel. Left-click an entry to place the target marker at the corresponding location.
You can also search by decimal coordinates in this panel. This is useful if you want to look up a specific coordinate you've got from somewhere.
To close the panel, press ESC or click on the X button in the upper right corner.
The process of finding an address or location for a given set of coordinates is called reverse geocoding. IMatch supports automatic reverse geocoding in the Map Panel and also offers a separate command in the Map Panel ribbon.
See the Reverse Geocoding help topic for more information.
If you enable automatic reverse geocoding in the Geo & Maps configuration settings, IMatch automatically fills in or updates the address data when you add or update GPS coordinates for one or more files. This only works if your PC is connected to the Internet.
You can use the Find files nearby... commands available in the Target Marker and File Marker pop-up menus. These commands allow you to find all files near the marker.
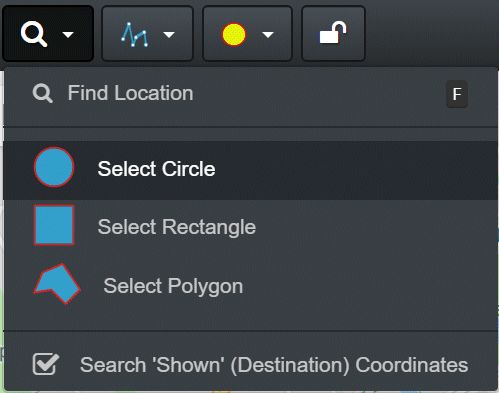
To find all files in a specific area (circle or polygon) you can use the corresponding commands in the Find menu.
For example, select the Circle command. The Map Panel displays a circle shape on the map. You can now move and resize this circle until it covers the area that you want to search for files:
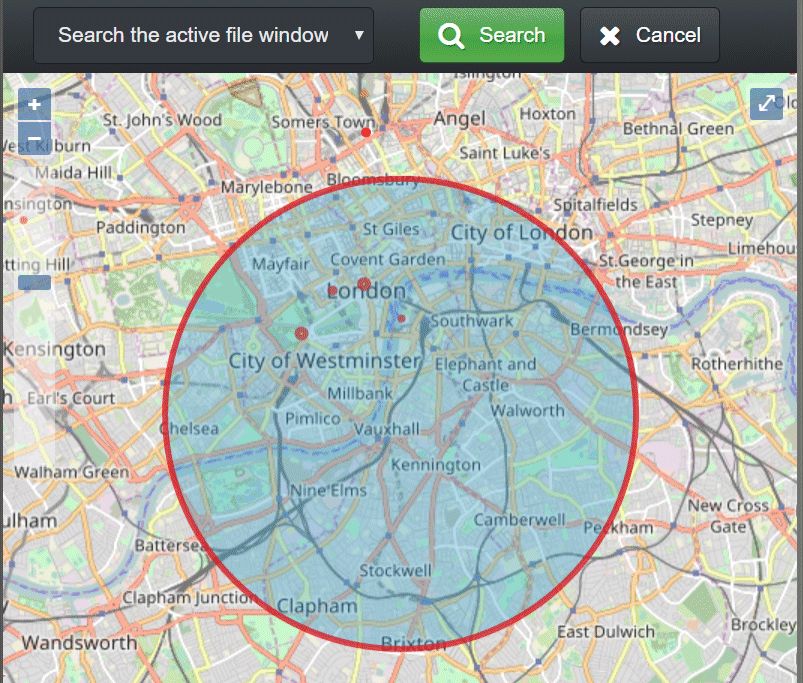
Finding all files in the area covered by the circle.
Now select whether you want to search in the active File Window or the entire database. If you search in the active File Window, all files within the selected area will be selected and displayed on the map. If you search the entire database, the Map Panel uses a Result Window to show the matching files.
Depending on the activated map provider, the Map Panel offers different selection types (Circle, Polygon, Rectangle).
If you use 'Location Shown' (destination) coordinates for your files to indicate the direction the camera was pointing, you can enable this option to use this coordinate pair for the search.
This allows you to select files based on the actual subject, not the camera standpoint.
If a file has no 'Location Shown' coordinates, the standard 'Location Created' coordinates are used.
When you right-click a file marker, it displays a tooltip with information about the location and the file:
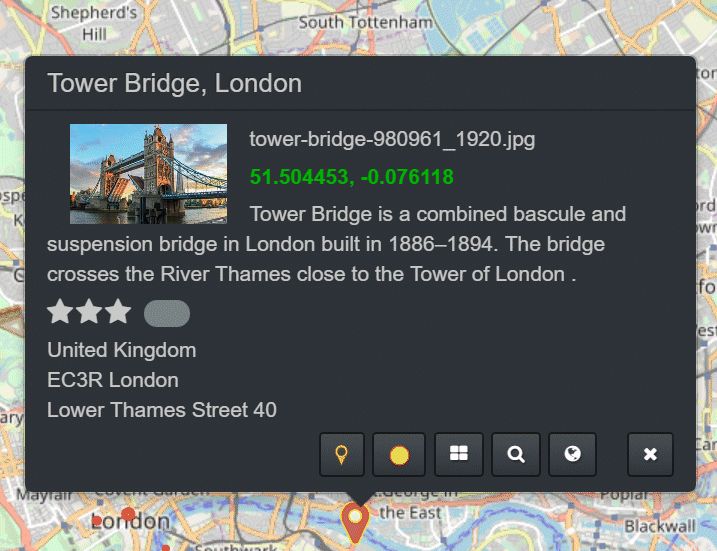
The pop-up gives you access to several commands:
Target Marker here | This command positions the target marker at the same coordinates as the file represented by this marker. You can use this e.g. to assign the same coordinates to other files via the target marker. |
Create Location | This command creates a location for the coordinates represented by the marker. |
Locate File in File Window | This command locates the file in the current File Window. |
Find files nearby... | Searches your database for files nearby the clicked file. A dialog box allows you to control the radius for the search. |
Reverse Geocode... | Opens the Reverse Geocode dialog box for the file. |
If your images have both a created and a destination GPS coordinate, these coordinate pairs create an image direction. The Map Panel can tell where the camera was and where it was pointing.
The XMP/EXIF image direction tag (XMP::exif\GPSImgDirection\GPSImgDirection) holds the image direction in degrees, with 0° being North.
When you manipulate the 'created' or 'destination' coordinates in the Map Panel, IMatch automatically creates or updates the image direction tag.
When you enable the Field of View display via the Map Panel Settings menu,
the Map Panel shows you the actual or estimated field of view for the focused file or all images currently displayed in the Map Panel:

This detail can be very helpful to judge the coverage of your photography or when describing what is displayed in the image.
In order to accurately display the FOV, IMatch needs to know the focal length of the lens used and the crop factor of your camera. These metrics determine the angle of the FOV and thus the area included in the image. The crop factor is calculated from the size of the sensor used by your camera, on the basis of the original 35mm film format. A full-frame camera thus has a crop factor of 1.0, while typical DSLR cameras have varying crop factors between 1.2 and 7 or more (smartphone sensors).
There are no reliable metadata tags available which allow IMatch to tell the sensor size or crop factor. photools.com therefore maintains a camera database which stores the crop factor for hundreds of camera models.
The Map Panel automatically queries this database to retrieve the crop factor for your camera model. This data is then cached locally on your PC.
Your PC has to be connected to the Internet to use the camera database, but it must be online to use the Map Panel anyway.
If your camera model is not in the database, IMatch assumes a crop factor of 1 (full-frame) and displays the FOV accordingly. It also displays this prompt:

To add your camera model to the photools.com Camera Database, click on the link in this prompt and follow the instructions. The Map Panel allows you to send an email to photools.com support with details about your camera model. photools.com will then add your camera model to the camera database at the next opportunity.
IMatch fills the image direction tag when you add a target marker (shown coordinate pair).
If your files don't have both a created and shown coordinate, but the XMP::exif\GPSImgDirection\GPSImgDirection tag is filled, the Map Panel displays a direction indicator:
Direction Markers (OpenStreetMap)
The direction field is the angle at which the camera was positioned when the image was captured, measured in degrees from 0° (north). Many modern smartphones automatically add this information as a metadata tag.
To manually specify the direction tag, you can add XMP::exif::GPSImgDirection to a Metadata Panel Layout and enter a value between 0 and 359. This will record the approximate direction in which your camera was pointed at capture time.
If sufficient lens metadata is available, ExifTool calculates a field of view on-the-fly in the Composite\Exif-FOV\FOV metadata tag. IMatch uses this as the fallback when only one pair of coordinates is available and the XMP::exif\GPSImgDirection\GPSImgDirection is filled.
This allows IMatch to display a FOV funnel on the map even for files which have only one coordinate pair, but a direction and a ExifTool-generated FOV value.
IMatch implements a feature called Locations which allows you to store frequently used GPS coordinates with their corresponding address information. Locations are similar to Metadata Templates, but aimed at working with GPS coordinates and address data.
See the Locations help topic for more information.
The features in this menu enable you to import track log files in standard GPX format. IMatch supports single and multiple tracks, routes, and waypoints, as long as all points have a timestamp and are in GPX format.
You can display the imported tracks on the map and use the track log to assign GPS coordinates to your files.
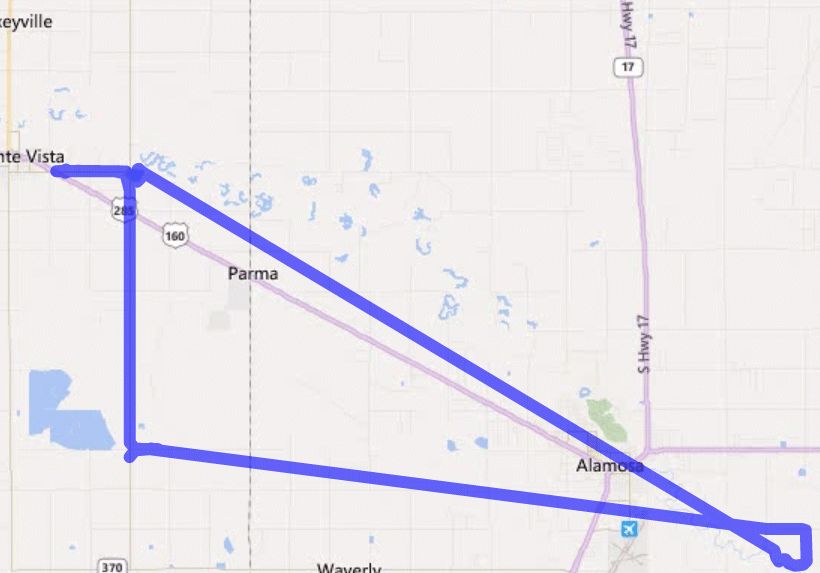
Displaying a track on the map
This command processes all GPX files in the folder you select and maps the selected files to the best matching track point. This is the most convenient way, especially if your tracking device, camera, or smartphone splits track logs into multiple individual GPX files.
This command allows you to pick a specific track log file for import. This can be helpful in situations where you have multiple GPX track log files with varying quality of log data. Or when you just want to import/map some files.
IMatch by default uses the folder of the first selected file to initialize the folder/GPX file selection dialog box. If you use a dedicated folder to store your GPX track log files, you can enable the option to remember the folder in the Track Log Import settings.
After the tracks have been imported, the Map Panel tells you how many of the currently selected files could be mapped via the track log GPS coordinates.
If some or all files could be mapped, adjust the track log settings to correct for time differences between the track log and your files.
The most important setting is the time zone offset. GPX files record timestamps in UTC (Coordinated Universal Time).
In order to match your track log with your files, IMatch compares the GPX timestamps with the 'created' timestamps in your files (EXIF datetime created, if this does not exist, EXIF datetime digitized). See here for more info about EXIF dates and times.
If these don't match, IMatch cannot assign coordinates from the track log to files. If your camera was not set to use UTC time or the clock was off or set incorrectly, you can compensate for this by adjusting the time offset for the GPX track log.
To adjust the time zone to match your files and track log data, open the Settings panel from the GPX drop-down menu.
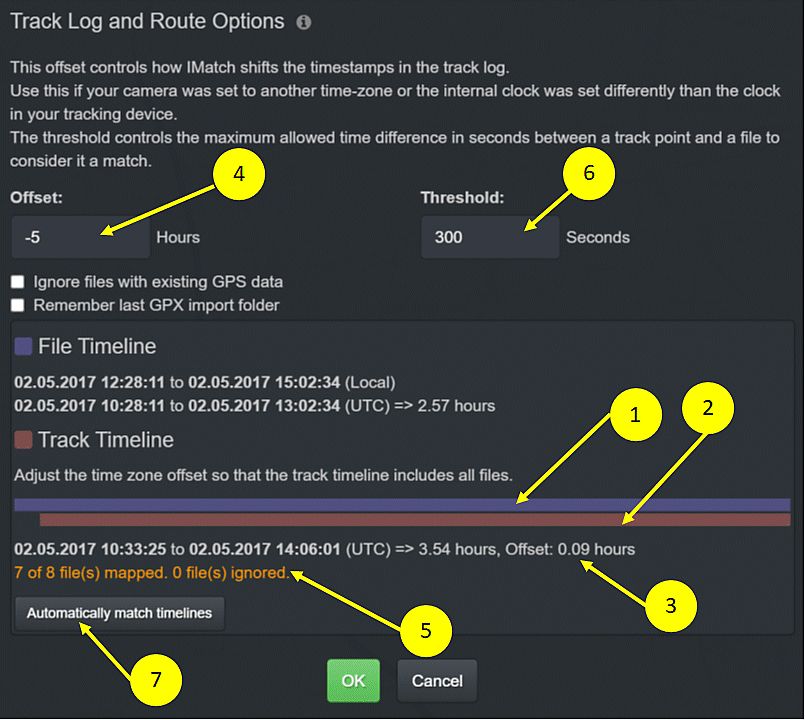
Example: If your camera clock is set to UTC +02:00 hours, you need to shift the track log timestamps by +2 hours to synchronize it with the file timestamps.
In the image above we adjusted the track timeline by -5 hours to synchronize the track times with the times of the files in the current scope.
Often the camera clock uses an offset to UTC and the time range of the selected files does not necessarily match the time range of the track log. The track log may not cover all the files currently selected, or not all files matching timestamps of the track log are selected. Use the visual feedback at the bottom of the dialog box to find the optimal time zone offset to use for a particular track log, camera and file selection.
If you use the Map Panel on a Notebook or on a PC with little screen height, you can reduce the height of the Settings dialog box by clicking the icon next to the headline. This hides the instructions and reduces the dialog box height.
| 1 | The timeline gathered from all images in the current scope (selected files in the active File Window). |
| 2 | The timeline gathered from the currently loaded GPX track log. These two must be matched so the Map Panel can assign GPS data to images by comparing their timestamps with the timestamps in the track log. |
| 3 | The length of the track log timeline and the current offset to the start time of the image timeline. This number helps you quickly adjust the track log timestamps to match the image timestamps. |
| 4 | Here you enter a positive or negative adjustment to match the two timelines. |
| 5 | The number of files currently matched to the coordinates in the track log Ideally, the track log contains coordinates for all files in the current scope. If there are some files taken before the start time of the track log or after the end time of the track log, they cannot be matched. When files with existing GPS coordinates are ignored, their number is listed here and they are removed from the files to match. |
| 6 | This threshold determines the maximum time difference between a track point and a file. Only files with a timestamp within +/- threshold seconds are considered a match for a track point. If your GPS device stops tracking for some time due to bad reception, you might be a mile or more away from the last point logged when the GPS starts logging again 20 minutes later. What happens with the images taken during this period? If you set a very high threshold, IMatch will more likely find a matching point in the log, but it might be wrong. If you use a lower threshold, IMatch may not find a track log entry for the file, leaving the file without GPS coordinates. But that might be better than the 'wrong' coordinate being assigned. The default threshold is 300 seconds (5 minutes). If there is no track log entry within 5 minutes distance of the file date & time, no coordinates are assigned. |
| 7 | Click this button to automatically match the track timeline and the file timeline. This smart feature determines the first entry in the track log and the first (earliest) file in the current selection and then calculates the time required to shift the track log timeline to match the file timeline. |
If IMatch is unable to map all or some files, double-check the Time Zone Offset.
The Ignore files with existing GPS data allows you to include or exclude files with GPS data from the mapping. Disable this option if you want to replace existing GPS data in your files with coordinates from the track log.
After setting the options, close the Settings dialog box with OK. The mapped files show on the map:
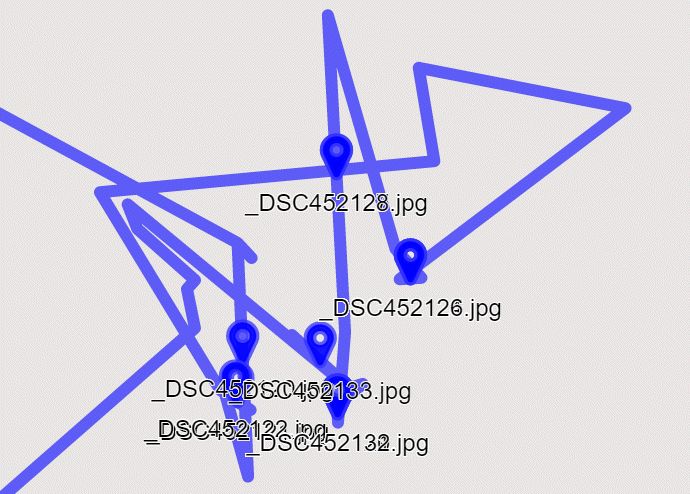
The track on the map. Files which could be mapped are indicated by blue markers.
If you are satisfied with the results, use the Apply Track Log Data... command to transfer the track log GPS data to the matching files. This effectively geocodes your files.
If you have enabled automatic reverse geocoding, IMatch will use the new coordinates to fill in data like country, city and location.
Before enabling and using any of the commercial services (Google, Bing, GeoNames) you have to read and accept their terms of service, license agreement or similar. If a service requires an API key, password or similar, you need to request or license this from the service provider, usually via their website. See this help page on the photools.com website for more information:
See API Keys for more details about where to get your own API keys.
All commercial services must be explicitly enabled by the user. By enabling and using any of these services in IMatch you state that you have read and understood the terms of usage of the map provider for your respective country. Ask your lawyer if in doubt. License fees may apply if you use one of the commercial services. Services may be changed or discontinued at any time. Unless you have a valid legal contract with the service provider, it can refuse to offer you the service or lock you out.