Stacking images is a great way to reduce the number of images you have to look at in file windows. Just stack related images to clean up the file window.
The stacking feature in IMatch allows you to group similar images together and choose one of the images as the pick or stack top image. When you collapse the stack, IMatch hides all images in the stack except the top image. This allows you to fold series of images together, cleaning up the file window by showing only the best shot of each series.
You can manually combine files into stacks directly in the file window via the context menu. And you can use the Auto-Stacking feature in IMatch to stack images based on their EXIF or GPS timestamp, GPS coordinates and other criteria.
Creating a stack is easy: Just select two or more files and press Shift+S to combine these files into a stack. The focused file (usually the file which you have selected last) will become the top of the stack.
If you select files which are already part of a stack, these files will be removed from that stack and added to the new stack. To add files to an existing stack, select the files you want to include and also the stack top of the stack you want to add the files to.
A file can only be in one stack.
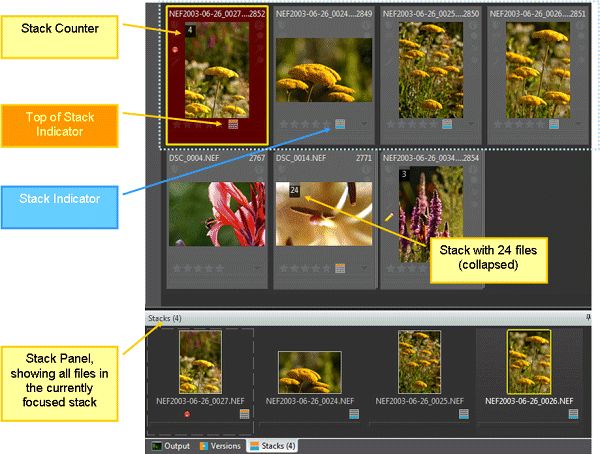
The following image shows the user interface elements for stacking. The file window uses specific icons to indicate stacks and stack elements. The Stack Panel shows all files in the currently focused stack, even if these files are in folders currently not visible.

Files which are part of a stack display a special stack indicator.

Stack Top (left) and Stack Member (right)
This icon indicates whether the file is a stack member or the stack top. The stack top has the top segment filled in Orange. Stack members have the bottom segment filled in Turquoise. If you have enabled color-coding for the relation definition that created the stack, the stack icons will be outlined with that color.
The stack top file additionally displays the Stack Counter with the number of files contained in the stack.
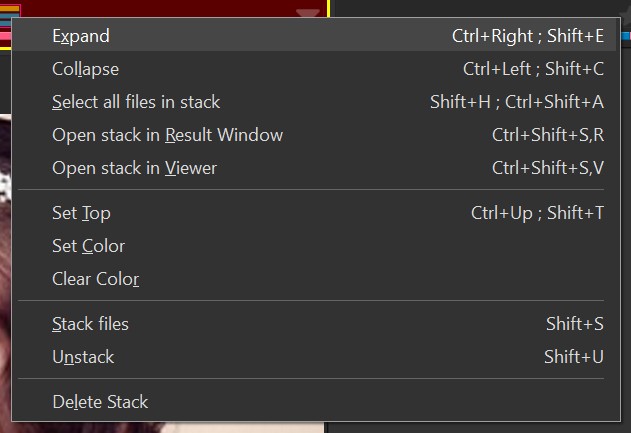
When you click on the stack indicator or the stack counter, IMatch opens a menu with all frequently used stack commands:
When you point the mouse cursor at a stack icon, IMatch displays a thumbnail tooltip with the first n files in the stack:

A thumbnail tooltip displaying the files in the stack.
See Thumbnail Tooltips for more information.
To collapse or expand a stack, you first select at least one file in the stack or the stack top. Then press Shift+C to collapse (fold) the stack or Shift+E to expand (unfold) the stack.
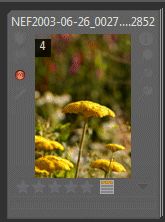
Stack Top of a collapsed stack
When a stack is collapsed, only the top image is shown in the file window. The thumbnail panel of a collapsed stack looks different to indicate the state of the stack. Note the upper left corner and the right edge of the panel.
Via the Stack button in the File Window toolbar you can reveal all files which would normally be hidden because they are in a collapsed stack (version and regular stacks):

Click this button to reveal all files hidden by collapsed stacks. This does not change the collapsed state of the stacks. It just shows all files as if the stacks were expanded. Click the button again to hide files in collapsed stacks.
The following commands are available via the normal context menu in the File Window. You can also open a specific context menu by clicking on the stack indicator icon or the stack counter.
| Stack Files | Shift+S | Create stack from currently selected files. |
| Unstack Files | Shift+U | Remove the selected files from their stack. If the selection includes the top, IMatch deletes the stack. |
| Expand | Shift+E | Expand a stack. To expand a stack, select at least one file which is part of the stack. |
| Collapse | Shift+C | Collapse a stack. To collapse a stack, select at least one file which is part of the stack. |
| Select all files in stack | Select all files in the stack | |
| Set Top | Shift+T | Makes the selected/focused file the stack top |
| Set Color | Select a color for the stack. This color is displayed as a border around the stack indicator icon. | |
| Clear Color | Clear the color of the stack | |
| Delete Stack | Delete the stack. This deletes only the stack, not the files contained in the stack. | |
| Open stack in result window | Shift+Ctrl+S,R | Available for stack tops. Opens all files in the stack in a new result window. |
| Show files hidden by stacks | Shift+Ctrl+T | Temporarily show files in the File Window which would normally hidden by collapsed stacks. |
In addition to stacking files manually, you can let IMatch stack your files automatically. To do this, run Commands > Relations > Auto-stack Files or from the context menu in the file window. If you use the command from the Commands menu, IMatch will automatically stack all files in the currently selected folder, category, collection or time line. To auto-stack selected files in the file window, use the command from the context menu of the file window.
The Auto-stacking command displays this dialog:
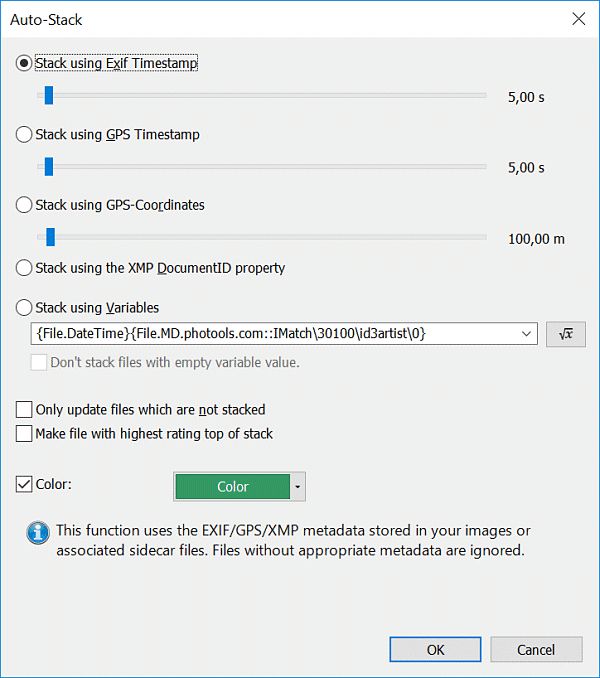
Choose one of the auto-stacking modes:
| Stack using Exif Timestamp | This mode looks at the Exif Timestamp of your image files and stacks all files taken within the time range you specify. This mode is ideal to stack files shot sequentially or within a bracket sequence. |
| Stack using GPS Timestamp | This mode works similarly to the one above, but uses the GPS timestamp recorded in the image by your GPS device. |
| Stack using GPS-Coordinates | This mode looks at the location of the image and stacks all images shot within the radius you specify. Use this mode if you want to stack images taken at the same location. |
| Stack using XMP DocumentID property | This mode uses the XMP DocumentID recorded in the file by some applications. This mode can be useful to stack files together which have been created from the same original file (versions). |
| Stack using Variables | This mode allows you to enter a free combination of IMatch variables and text to form the control expression for auto-stacking. This basically allows you to auto-stack files based on all available metadatam, Attributes and other variables maintained by IMatch. All variable functions and features can be used, which gives you powerful tools to modify the metadata before it is evaluated for stacking. When stacking based on variables, IMatch evaluates the variable expression for each file in the current selection. All files with the same value for the variable expression are stacked together. If you don't want to stack files for which the variable returns an empty value, set the corresponding option in the dialog. This allows you to create stacks only for files for which the variable expression produces an actual result. All other files remain unstacked. Examples for auto-stacking based on variables are: file name, file format, collections, camera model or make, lens, ISO, MP3 artist or album, author, etc. You can force the stacking of files by a specific metadata value or even one or more IMatch Attributes. Just select the variable corresponding to the Attribute you want to use for stacking. Use formatting functions to modify the variable output before using it for stacking. For example, if you use file names with a specific naming convention, you may want to use only a part of the file name for stacking. |
| The Auto-stacking dialog offers some additional options which allow you to control how the auto-stacking works: | |
|---|---|
| Only update files which are not stacked | This option spares files which are already part of a stack. If this option is not enabled, images already part of a stack will be removed from their old stack when they become part of a new stack |
| Make file with highest rating top of stack | Use this option if you have already rated the images you want to auto-stack. If this is enabled, IMatch uses the file with the highest rating as the stack top. If there is no file with a rating or all files have the same rating, the first image becomes the stack top. |
| Recursive | This option makes the auto-stacking recursive. Depending on where you run the auto-stacking this means that sub-folders, sub-categories etc. are included in the process. |
| Color | You can define that the resulting stack uses a specific color. This color will be used for the stack icon frame in the file window, making it easier to tell stacks apart. |
If you want to create stacks based on Attributes, you can easily achieve that by stacking using the corresponding variables. Each Attribute is available as a variable and thus can also be used for Auto-stacking files.
Remember that you have many formatting functions for Variables available. This allows you to create values suitable for stacking even in complex cases.
If this panel is not visible you can show it via View > Panels > Stacks or by pressing F9,S.
The Stack panel shows the stack top and elements in the currently focused stack. To focus a stack, click on one of the images in that stack.
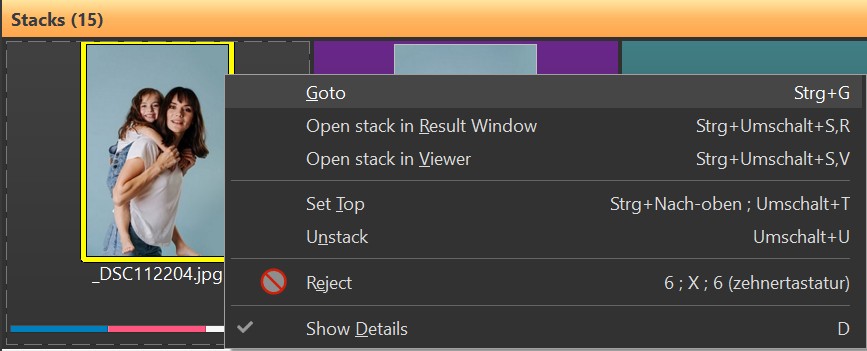
Stack Panel
The first image, with a dashed border, is always the top of the stack. Then the other elements in the stack are displayed. When you right-click on any of the files in the stack panel you can open a context menu with additional commands. The stack panel can be scrolled via a scroll bar or by using kinetic scrolling. The stack panel uses the same sort order as the file window.
With the Goto command you can locate the corresponding file in the Media & Folders view at any time. This is especially useful if you are currently in a different view or your stack contains files from multiple folders.
To see the File Window Tip for any of the files in the stack panel, move the mouse cursor in the upper-right corner of the thumbnail.
The Quick View panel follows the current selection you make in the Stack panel. When you click one of the thumbnails, the Quick View panel displays the corresponding file.
You can also browse the files in a stack using the Quick View Panel directly, without the Stack panel. See the Quick View Panel help topic for more info.