With Attributes, you can define and maintain custom data for each of your files.
Attributes are stored in the IMatch database and are independent of file formats and metadata standards. You can use attributes for many different purposes.
To configure Attributes, go to Edit > Preferences > Edit Attributes.
To open the Attribute Panel to view and edit Attributes, press F9, A or go to View > Panels > Attributes.
Attributes are an exclusive IMatch concept. Attributes are stored in the IMatch database, not in form of metadata in your files. Attributes work for all file formats and are not restricted by the fields and properties available in metadata standards like IPTC or XMP.
You have complete control over the names, data types, and number of attributes you use in your database. And because attribute data is stored in your IMatch database, the data is never exposed to third-party applications or the public.
IMatch contains export features which allow you to export Attribute data into other applications via the Windows clipboard or CSV text files. This makes Attributes ideal to define your own metadata and to keep this data private, unless you want to share it with it in other applications.
With the CSV Importer you can fill attributes (and metadata) from data contained in CSV files (e.g. produced by Microsoft Excel or other databases). And since Attributes are easily accessible via IMatch variables, you can use them in any feature that works with variables.
IMatch fully supports standard Metadata formats like IPTC, EXIF, XMP or ID3. These formats are designed to exchange data between applications and to keep the data inside the image file. Attributes are ideal to keep data protected inside the database or to store data that does not fit into standard metadata fields.
For most professional or enthusiast photographers, the use of standard metadata like IPTC and XMP is obligatory. The keywords, captions, titles, copyright, etc., information you store with IMatch in XMP and IPTC enables you to exchange this data with image editing applications, clients, and stock photo web sites. IMatch Attributes can be used in addition to store more private information, like shooting notes, customer records and submission tracking data in your database.
If you work with file formats which do not natively support any of the standard metadata formats (IMatch will maintain XMP metadata for these files), or you work in a corporate environment, Attributes give you an easy way to store arbitrary data for each of your files, and to export this data to your Office application or back office database as needed.
Attributes are defined by a name, a data type and additional properties and combined into Attribute Sets.
Attribute Sets can contain any number of attributes and you can have any number of Attribute sets in your database.
If you have worked with a spreadsheet application before: Attribute Sets resemble workbooks and attributes the columns in a workbook. In a relational database, Attribute Sets would be tables and Attributes the columns in such a table.
This Attribute Set stores information about a person:
Attribute Set Person
  First Name    : Text
  Last Name     : Text
  Date of Birth : Date
  Age           : Integer
  Email         : Hyperlink
  ...
This Attribute Set could be used to store arbitrary notes for a file. This set contains only one Attribute, which is perfectly okay:
Attribute Set Notes
  Note          : Text
Using Attributes and Sets you define which information you want to store in your database. To view and edit Attributes you use the Attributes Panel.
IMatch supports two types of Attribute Sets:
For this example, we assume you want to store a Title and a Comment for each of the files in your database. For this you'll have to:
Attributes and Attribute Sets are managed via Edit > Preferences > Edit Attributes.
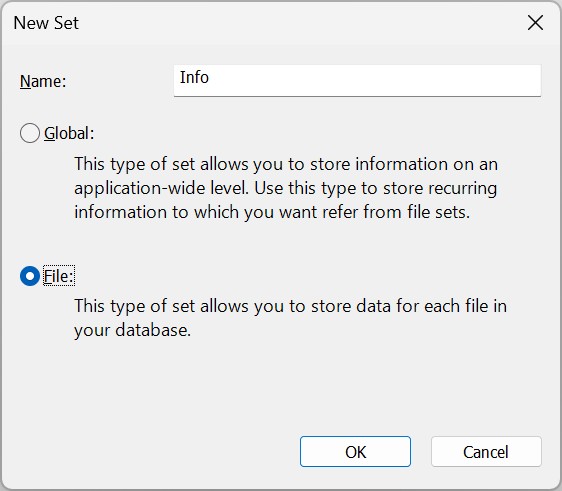
After opening the Edit > Preferences > Edit Attributes dialog box, click on the New Set... button to create a new Attribute Set. This opens a dialog box where you can enter the name and type for the new Set:

We enter the name Info and choose the File Attribute Set type because we want to store data per file.
Attribute Set names and Attribute names must be composed of digits, letters, space, - or _
After clicking OK, IMatch creates the new Attribute Set in the database. We now can add the Attributes to the new Set.
Make sure the Info set is selected in the Sets drop-down list and then click on New Attribute to create a new attribute in this Set.
We first create the 'Title' attribute with data type set to Text:

and then the 'Description' attribute in the same way. Both attributes are automatically added to the Attributes list:
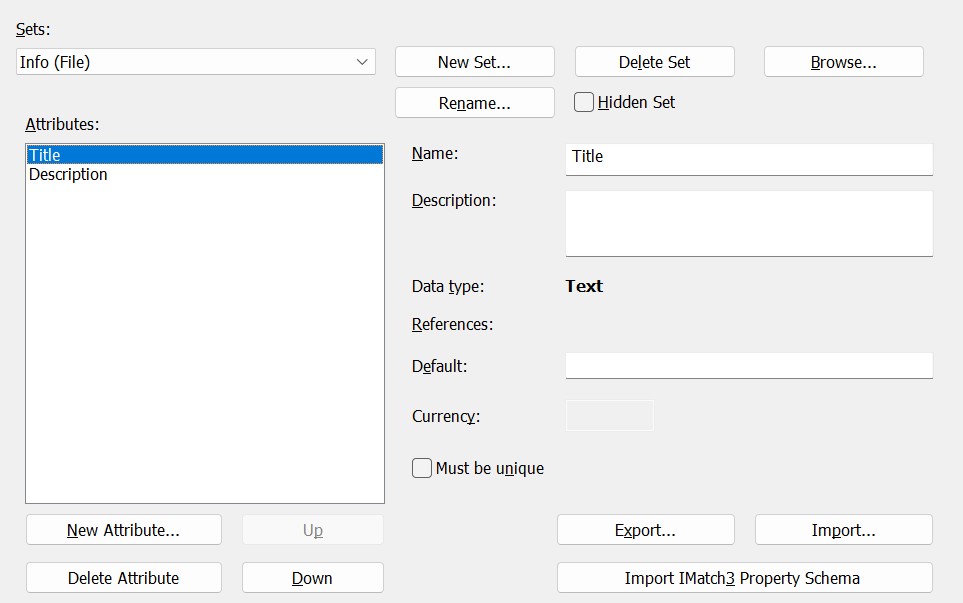
The new Attribute Set with two Attributes.
This is all we have to do for now. Click OK to close the Preferences dialog box and to return to IMatch.
If you enable the option Hidden Set, the Attribute Set will be invisible in the Attributes Panel. This option is sometimes used for Attribute Sets created by IMatch Apps.
Changes made to Attribute Sets are stored immediately. Even if you close the Preferences dialog with Cancel, changes made to Attributes will persist.
If the Attributes Panel is not visible, you can show it with F9, A or View > Panels > Attributes.
The Attributes panel allows you to view and edit the Attribute data for the currently selected file(s). The toolbar presents the most frequently used commands. You can also open a context menu with the right mouse button.
The Attributes panel uses a grid to display Attribute data, similar to spreadsheet applications. The grid uses one column for each Attribute in the selected Set. In our example, the Attribute Set has two Attributes, which results in two columns in the grid. The name of the Attribute is displayed in the column header.
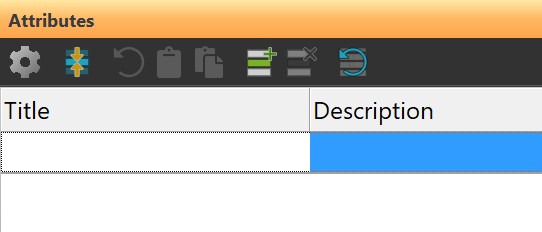
Since we have not yet entered any data, the grid is empty and shows the text no items.

The Attributes panel showing our new Info attributes set. Since we have not yet entered any data, the grid is empty and shows only the attribute names.
Make sure the Attribute panel has the focus (click on it) and then press Ctrl+PageDown to add a new item (aka record) to the set. Alternatively use the corresponding toolbar button or right-click somewhere in the panel to open the context menu and choose the Append command from there.
A new row is inserted in the grid and you can start to enter information for the new item. The data is stored for the currently selected file.
Match automatically saves the data when you switch to another image or the Attributes panel loses the input focus because you click elsewhere.
You can add any number of items to an Attribute Set by using the Append command or Ctrl+PageDown and you can edit or remove items at any time.

Adding a new item to the Attribute Set for an image.
If you enter a longer text, the Attribute panel wraps the text automatically in the available space, increasing the row height as needed. UseCtrl+Return to insert a manual line break.
Select the item or items you want to delete and then press Ctrl+Del. Alternatively, use the corresponding commands from the context menu or the toolbar.

Marking an item as deleted
When you delete an item, IMatch does not immediately remove it from the database. Instead it marks the item as deleted as shown in the screen shot above. To undo the deletion, press Ctrl+Del again. The delete mark is removed.
As soon as you move to another image or use a command which reloads the Attribute panel, items marked as deleted are removed from the database. This operation cannot be undone. If you accidentally delete an item, un-delete it immediately by pressing Ctrl+Del again.
To undo changes done to the currently visible Attributes click on the Undo button in the toolbar or press Ctrl+Z.
Note: When you set the focus to another file or switch to another Attribute Set, undo is no longer possible.
You can copy and paste attributes within the same file or different files. Use the standard Windows clipboard keyboard shortcuts like Ctrl+C or the context menu in the Attribute panel.
If you work with multiple Attribute Sets, data can only be copied within the same Set.
When you copy data into the clipboard, IMatch copies an internal format and a tab-delimited format at the same time. This makes it easy to paste attributes into other applications, like your word processor or spreadsheet application.
You can sort the items of an Attribute by clicking the column of that attribute. Clicking a column multiple times allows you to switch the sort order between ascending and descending. The Attribute panel stores the selected order per Attribute Set and restores it automatically.
The sort order of items in the Attributes panel does not affect the order of items when returned by Variables. Variables ensure a reliable sequence by sorting Attribute values by their actual contents. See the section on variables for more information.
You can change the order of the Attributes displayed in the Attributes panel by dragging the columns with the mouse. The Attribute panel stores the order per Attribute Set and restores it automatically.
IMatch makes the contents of Attributes available as Attribute Variables.
This allows you to use their contents for display in, e.g., the File Window Info Tip, Viewer, Slide Show, Text Export and everywhere else where Variables can be used.
In this section we will:
So far we've covered how to create a File Attribute Set and how to insert, edit and delete data. Now we look into the usage of multiple Attribute Sets and also set up a Global Attribute Set.
In this real-life example we assume that you submit your image files to one or more stock photo web sites to sell them. The same setup could also be used if you upload your files to photo sharing web sites and you want to keep track which photo was uploaded where and when.
We start by creating a new Global Attribute Set. Global Sets store data independently from specific files in your database. This Global set will be used to store the names, website links, contact emails and notes for the sites you upload to. We need to store all this information only once, and then refer to it from the Attribute Sets of individual files.
Go to Edit > Preferences: Edit Attributes to create the new Attribute Set. We name it 'Sites' and add four attributes to it:
| Attribute Name | Data Type | Comment |
|---|---|---|
| Name | Text | This is the name of the stock photo web site |
| URL | Hyperlink | The address (URL) of the web site or a direct link to the uploaded image. |
| Contact | Hyperlink | The email address of the support desk. |
| Note | Text | A place to keep some notes about the site. |

Create the new Global Set 'Sites'

After adding the four Attributes
Data in Global Attribute Sets is not associated with specific files in the database. To add, edit and remove data from Global Attribute Sets you use the Attribute Set Browser. The Attributes panel is used to edit per-file Attributes data.
Make sure the Attribute Set you want to work with is selected in the Sets: drop-down list and then click the Browse... button.

This opens the Attribute Browser dialog box:

Attribute Set Browser for the 'Sites' with some data filled in.
The Attributes Browser dialog uses the same grid and functionality as the Attribute Panel, but it allows you to edit data in global Attribute Sets.
We use the Attribute Set 'Sites' in the remainder of this topic, assuming these are the sites we sell photos to. In the same way you could setup a global Attribute Set for customers, contacts etc.
Before we create the Sales Tracking Attribute Set, we need to explain the other options available in the Attribute editor dialog box.
| Parameter | Description |
|---|---|
| Name | The name of the Attribute. You can change the name of an Attribute by typing in a new, unique name. If you use Attribute Variables, changing the name of an Attribute requires you to change the corresponding variable name wherever you used it. |
| Description | An optional description for the Attribute. The description is displayed in the Attributes panel when the user points at one of the column headers. The description can be used to store usage tips or fill-in instructions, for example. |
| Data type | The data type of the Attribute. It cannot be changed once the Attribute has been created. |
| References | If this is a Reference Attribute, the referred Attribute Set and Attribute. This option allows you to link Attributes from one Set to other sets. |
| Default | You can optionally enter a Default value for an Attribute. When you later create a new item in the Attributes panel (or the Attribute Set Browser), the default values given here are filled in for new items automatically. Use default values only where needed. IMatch does not use database space for empty Attributes and also does not include them in the search index. If you use default values for all your Attributes you're not only wasting space in the database but also may slow down searching and filtering. |
| Currency | For Attributes of type Currency this parameter specifies the currency symbol to use, e.g., $ or € |
| Must be unique | If you enable the option Must be unique, IMatch ensures that only one item can be created for each value. If you would set this option for the 'Name' Attribute in our sample, you cannot add two items with the same Name. Each item must use a unique value for that Attribute. Unique constraints can be used to prevent wrong inputs and to improve data quality. If you enable the Must be unique option after data has been added to the Attribute Set, duplicate data will remain in the set, even if it violates the unique constraint. |
You can change the order of Attributes with the corresponding buttons in this dialog. This order is applied as the default in the Attributes panel.
IMatch supports different data types for Attributes. The data type controls the type of information you can store in an Attribute and also tells IMatch how to format and sort the Attributes.
| Data Type | Description | ||||||||||||
|---|---|---|---|---|---|---|---|---|---|---|---|---|---|
Text | Attributes of type Text can store any length of text. Text Attributes are automatically indexed by the Search Engine. | ||||||||||||
Hyperlink | This data type is used to store links to web sites, email addresses or links to files in the local file system. There are also special links to IMatch objects like files, folders or categories. IMatch displays Hyperlinks with a special style and color and makes them clickable. You can open the target of the link by double-clicking the link in the Attributes Panel. Hyperlink Attributes are automatically indexed by the Search Engine. You can copy the name of a file, folder or file to the Windows clipboard using the Copy commands available in the context menu of these objects, or via Ctrl+C. Then paste the text into Attributes. Special Hyperlinks:You can use the special protocols immfile://, imcat:// and imfolder:// to link to specific IMatch objects. Just add these prefixes to the folder, file or category names you paste from the clipboard. This can be very useful if you want Attributes which contain references to other files, folders or categories in the database. Something that allows you to tell yourself or others 'Also look at this file' or 'look in this category for similar files'.
| ||||||||||||
Yes/No | This data type stores a Boolean Yes/No value. In the Attributes panel, Attributes of this type are represented by a check box. | ||||||||||||
Date | Stores a date (day, month and year with century). Example: 24.12.2012 2012/12/24 | ||||||||||||
Time | Stores a time (hours, minutes, seconds). Example: 14:30:10 2:30:10 PM | ||||||||||||
Date and time | Stores a date and a time. The display format uses the local settings for the current user. | ||||||||||||
Integer | Stores a 64 bit integer value, in the range -9,223,372,036,854,775,808 to 9,223,372,036,854,775,807. Example: 1 180 -10 | ||||||||||||
Real | Floating point number with decimals in the range 1.7E +/- 308 (15 digits). Example: 3.14 108.25 -89.87 | ||||||||||||
Currency | Stores a currency value. Currency values are internally stored as Real and can have a currency symbol. Example: 120,00 € US$ 89.99 | ||||||||||||
Reference | This special Attribute type is used to link a File Attribute Set to a Global Attribute Set. | ||||||||||||
IMatch formats date, time and numbers using the regional settings of the current user.
IMatch allows you to link attributes in File and Global Attribute Sets to attributes in Global Attribute Sets. This feature is used to avoid storing redundant data, and to create lookup facilities.
In this example we set up a submission tracking system. For each file in the database you can store to which client a file was sold, or to which web sites a file was submitted. Instead of typing the customer name or web site name every time, we use a Global Attribute Set named 'Sites' which stores the name, web site address and contact details for each customer once.
In the per-file Attribute Set 'Submissions' we use an Attribute of type Reference and link to the 'Name' Attribute in the Global Set:
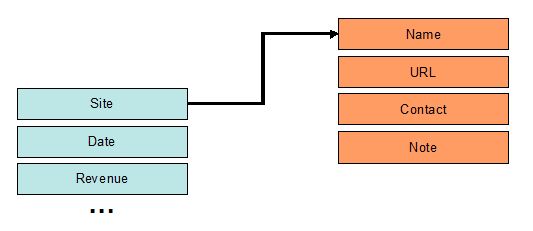
The Site attribute of the Submission Attribute Set references the attribute Name of the Sites Attribute Set.
In short: Submission:Site refers to Sites:Name.
The Site Attribute in the Submissions Set gets its contents from the global Sites Set. In the Attribute panel, IMatch displays a drop-down control for the Site Attribute. For each item in the Sites Attribute Set, the value of the Name Attribute is displayed and can be selected:
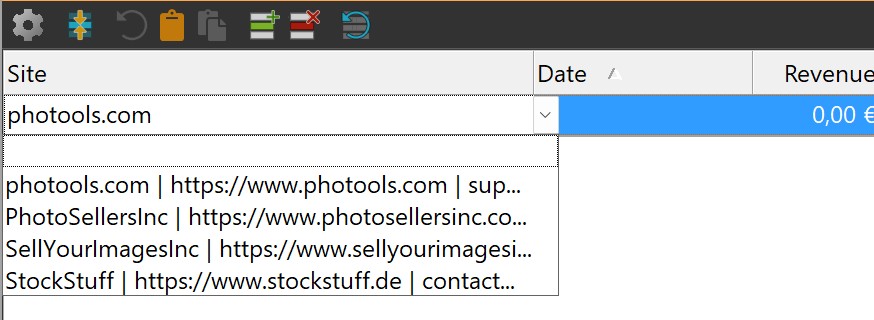
By using a reference to a Global Attribute Set, you can just select one of the available values instead of typing them in for each and every sale. Reference attributes cannot be edited manually; you can only choose one of the values from the list. This restricts the available choices to the contents of the corresponding reference Attribute Set.
When you click on the drop-down arrow button and the choices appear, increase the column width to allow it to hold at least the shortest of the referenced entries.
If you find a new customer, you just add its name and details to the Sites Set. The customer is then available in the Attribute panel and can be selected from the list.
If the name of the customer changes, you only need to change it once, in the global Sites Set. References to this customer will be updated automatically, using the new name. All files will show the new name automatically.
You can delete Sets and Attributes at any time (if the database is not read-only). If you delete an Attribute Set, all contained Attributes and all associated data is also deleted. If you delete individual Attributes, only the data associated with these Attributes is removed from the database.
Deleting Attributes and Attribute Sets cannot be undone.
You can export the data to an XML file using the built-in Export feature to create a backup before deleting attributes. Or create a backup of the database file before you perform delete operations. Just in case.
You can rename an Attribute by entering a new (unique) name into the Name edit field. To rename an Attribute Set, click the corresponding button.
Renaming Attributes or Attribute Sets can break variables referring to the Attribute or Set by name, custom sort profiles and other IMatch objects and features which refer to Attributes by name. If you use Attribute variables somewhere, make sure you update the variable after renaming the Attribute or Set.
This File Attribute Set will store information about every submission or sale we make, per file.
Create a new File Attribute Set and name it 'Submissions'. Add the following Attributes:
| Attribute Name | Data Type |
|---|---|
| Site | Reference. Refer to the Name Attribute of the Sites Attribute Set. |
| Date | Date. Here we store the date of the submission or sale. |
| Revenue | Currency. How much did we make from sale? Also enter a currency symbol of your choice in the Currency field. |
| Exclusive | Yes/No. This field allows us to record if a file was sold exclusively. |
| Tracking Number | Integer. Some sort of internal tracking number, e.g. to interface with your billing system or another database. |
| Note | Text. This Attribute can be used to keep some notes about the submission or sale. |
The final result in the Attribute editor should look like this:

When you close the Attribute editor and switch back to IMatch you will notice that the Attributes panel has changed. Since you now have two File Attribute Sets (Info and Submissions) the Attributes panel displays two tabs, one for each set:

You can switch between the two Attribute Sets by clicking on the corresponding tab.
Now enter a new item for the Submissions Attribute Set. Select a file in the File Window, click in the Attributes panel to make it active and press Ctrl+PageDown to add a new item:

Add some more items and fill in some data to get used to how Attributes work. Edit and delete some of the items you have created. Add data to other files as well.
Using a combination of two Attribute Sets allows you to track sales or submissions for your files. Similar setups can be used for leasing objects, scientific purposes, object tracking, archival and many other purposes.
Attributes give you an easy and flexible way to work with custom metadata, without the restrictions implied by standard metadata formats like IPTC or XMP. Attributes are stored safely in your database and cannot be accessed by other applications directly. This makes attributes ideal for internal purposes or private data.
The Attribute panel displays all attributes for the currently selected files. Switching to the Info Attribute Set from above, the Attribute Panel shows different attribute values, depending on which file we select:
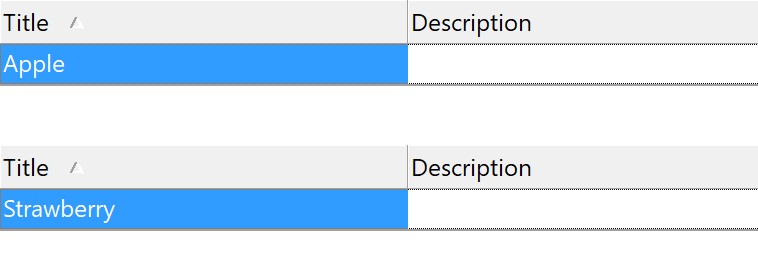
The first file has the value Apple for the Title, the second file has Strawberry.
When you select both files, IMatch merges the Attributes of both files for display purposes. IMatch can only merge identical Attributes and displays a warning message when the selected files have different Attributes or number of items (as in this case):

Or, consider these two files. The first file has one attribute entry, the second file has two:

When you select both files, the Attribute Panel, the panel can only merge the first record, because it is identical for both files. You can modify the attribute value for all selected files at the same time.
Since the first file has a second record, the Attribute Panel tells you that not all data can be displayed in this situation.

Only the Strawberry attribute value is shown, because both files have that value in an attribute entry.
If IMatch would just show all the data from all selected files, you would be unable to tell which data comes from which file. So, the general rule for multiple selections is:
When you select multiple files, the Attribute panel shows only the data which is common for all selected files. If all of the files have different data, the Attribute panel is empty!
Again, because it may be a bit confusing at first:
When you add new Attribute items, these items are added to all selected files.
For example, you want to add a new Note to multiple files. You first select these files in the File Window. Then you add an item to the Info Attribute Set with Ctrl+PageDown. This new note will be added to all selected files, even if the files have different data otherwise.
When multiple files are selected, you see only the data that is identical for all selected files. When you edit one of these values, IMatch updates the data for all selected files.
When multiple files are selected, you see only the items which are identical for all selected files. When you delete one of these items, it is deleted for all selected files.
So far we have used the Attribute panel in the default Merge Mode. In this mode, IMatch merges the Attribute data for all selected files. It shows only the data identical for all selected files.
This mode allows you to add, edit and remove data for any number of files at the same time.
When you switch to Single Mode with the toolbar button (yellow arrow in the screen shot), the Attribute panel adds a new column in front. This column shows the name of the file to which the data in that row belongs. In Single mode, the Attributes panel no longer merges data from selected files. Instead it shows all data for all selected files, and the file name in front allows you to tell which data comes from which file.

This screen shot shows the Attribute data of three selected files. Single Mode is active. The first column now shows the file name and the other columns the data of that file. The first file has two attribute entries (rows), the two other files have one entry each, with different values for the Title and Description attributes.
The Single mode is ideal for comparing data of the currently selected files, or to edit data of individual files despite them being all selected.
If you insert a new entry in Single mode, the entry will be added to only one file. The file is determined from the currently selected row in the grid. In the image above, the currently selected row belongs to the 20140329_028564.jpg image. If you add a new entry, the entry will be associated with this same file. To add an entry to a specific file, make sure a row belonging to that file is selected before you use the Append command.
The Single mode is ideal for transferring data to other applications via the Windows clipboard or by using the Export to CSV command.
In single mode you can change Attributes for multiple files, even if these files have different values for that Attribute. You do this as follows:
With these steps you can set any number of files to the same value for any given Attribute.
This menu gives you access to Attribute panel options and commands:

| Configure | Opens Edit > Preferences > Edit Attributes. |
| Show complete file name | Switches between fully qualified file names (with path) and file name only in Single mode. |
| Reset Layout | This command resets the grid settings back to the default Attribute sequence and also sets all column widths back to defaults. You may need to use this command when you add or remove Attributes in the Attribute Editor. |
| Increase and decrease font size | These commands allow you to change the font size used for the grid. If you use a large monitor with small default fonts, this allows you to adjust the font size for optimal readability. This font size setting also affects the font sizes used by the Metadata Panel and the Keyword Editor. |
| Export CSV file | This command exports the selected rows into a CSV text file. This command is only enabled if at least one row is selected. |
This command exports all or selected rows into a CSV (comma separated values) file. This file format can be imported by almost all spreadsheet applications and by many other applications too.
Switch to Single mode if you want to include the file names in the resulting CSV file. Otherwise you only get the merged data.
IMatch uses the default list separator as configured in Windows (usually semicolon or comma) to separate the columns in the file. The first exported row are the column headers (Attribute names) and each row is delimited with a Carriage Return / Linefeed pair (0x0d, 0x0a).
Attributes of type Text and Hyperlink are searchable via the File Window Search Bar if you enable the Search in Attributes option:

Including Attributes when searching in the File Window Search Bar.
A dedicated Attribute filter is available in the Filter Panel. This filter allows you to filter using Attribute data and offers a variety of methods, including regular expressions.
IMatch makes all File Attributes available as Variables. This enables you to include Attribute data wherever IMatch variables are used, e.g., in the Slide Show, Batch Processor, Renamer, File Window Info Tip, etc. You can also use Attribute data when you do a text export via the Text Export module.
See Variables for more information about IMatch Variables. See Filters for more information about filters.
Via Edit > Preferences: Edit Attributes you can export and import Attribute schema and data. This allows you to
IMatch uses an open XML-based file format to export and import Attributes. This makes the data accessible over a wide range of applications, for both import and export.
To export Attributes, click on the Export... button in the Attributes Editor.
A dialog box opens where you can select what to export and the output file name:
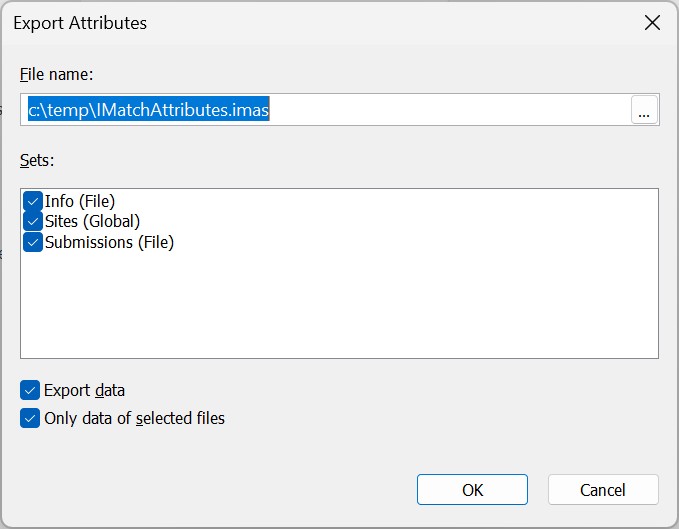
The dialog shows all Global and File Attribute Sets in your database. You have to check at least one of the Sets to enable the OK button.
If you don't enable the Export Data option, IMatch only exports the Attribute Schema. The schema allows IMatch to re-import the Attributes into other databases and to re-create all Attribute Sets and Attributes.
If you enable the option to export data, IMatch also includes the actual Attribute contents into the file. This allows you to re-import Attribute schemas and the data into other databases. Use this to make a backup of your Attributes or to exchange Attribute schemas and data with other applications.
By default, IMatch exports data for all files if you export at least one File Attribute Set. If you want to export only the data from the currently selected files, enable the corresponding option. IMatch uses the currently active File Window and the selection within this File Window to determine what to export in this case.
To import attributes from a file, click on the Import... button in the Attribute Editor. Select the file you want to import via the ... button next to the File name: input field.
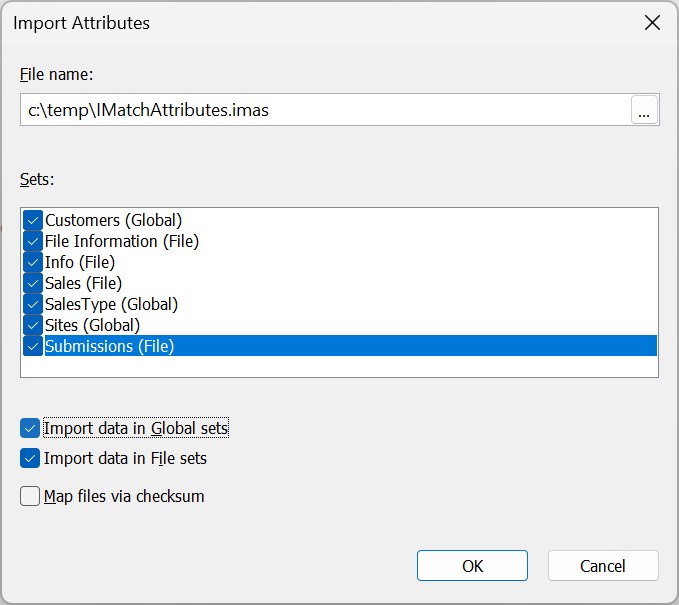
IMatch analyzes the file and loads all found Attribute Sets into the Sets list. There you can check the sets you want to import.
If the import file has data for either the Global or File Sets, the corresponding check boxes become enabled. If you want to import data as well, make sure you activate the corresponding options.
If you import an Attribute Set and the Database already has an Attribute Set with the same name, the existing Attribute Set and all associated data will be deleted and replaced with the imported Set and data.
By default IMatch maps data from the import file to the files in the database via the fully qualified file name recorded in the import file. It also records the media serial number in the XML file. This allows restoring and mapping data when you work with removable media because IMatch can identify the media by the serial number.
If you have created the import file from another database or you have moved or renamed files between the import and export, IMatch may be unable to map the file name from the import schema file to the database because the file names in the import file and the file names in the database do not match. This is also the case if the files are on another disk, even if the path and file names have not changed.
In this case you can use the CRC checksum-based mapping method. If this is enabled, IMatch uses the checksums recorded in the import schema file to find all matching files in the database. The file name or location is not important when this option is used.
To import an IMatch 3 property schema (.imps or .xml files) into Attributes, click on the corresponding button in the dialog. In the file selector box, select the IMatch 3 property schema file you want to import.
When you export a property schema in IMatch 3, make a note of the file name. This is the file you then select for import into IMatch.
The importer displays a dialog box where you can choose whether you want to map files via their file name or CRC. See above for details about these mapping modes.
The importer imports all property schemas into your database, converting them to global and per-file Attribute Sets and Attributes automatically. IMatch automatically maps numerical property types of type int and unsigned int into the corresponding larger 64-Bit integer and unsigned integer Attribute types. All other property types have direct mappings to Attribute data types.
If an Attribute Set with the same name as an imported property set already exists, the imported property set is renamed to a unique name by appending a consecutive number. If the property schema file contains data, this data is automatically imported into the new global or per-file sets.