Edit Menu > Preferences > Cache
This dialog box allows you to configure how IMatch creates and maintains cache images.
See The Cache for detailed information about the cache.
By default, IMatch creates cache images with the same dimensions (100%) as the original image (or embedded preview, see below). If the original image has 3000 x 2000 pixels, the cache file has the same dimensions. With only a few gigabytes of cheap disk space, IMatch can cache tens of thousands of images. Having the cache image ready allows IMatch to display images very fast even at 100% size. For almost all database sizes and usage scenarios, leaving the cache at the default size is best.
Unless you have very good reasons, you should not set the cache to use a smaller size.
Switching the cache to on-demand is usually the better solution when you are concerned about disk space usage.
If you need to conserve disk space you can choose a smaller percentage of the original size (e.g. 50%) or even dial in a specific maximum width and height for the cache files. The latter option allows you to match the size of the cache files with your screen size.
The Viewer, the Slide Show and the Quick Preview Panel display files through cache files only. You cannot zoom in to 100% if the cache file has been created at only 50% of the original size. The size of the generated cache file determines how large IMatch can display the file in these features.
Many RAW formats contain an embedded preview image at 100% of the original RAW size. This preview is generated by the camera and usually applies the 'best' settings considered by the camera. Loading an embedded previews is also up to 50 times faster than loading and developing the full RAW data. If your RAW files contain these previews, enable the corresponding option for the cache.
If you have RAW files in your collection which contain only small embedded previews, you can use the Minimal Size option to control at which size IMatch switches to loading the full RAW data.
For example, if your RAW files only contain previews with 1280 pixels, but you want the cache images to be 100% of the original size, set the Minimal Size option to something like 2000 pixels. IMatch will then use the embedded preview only when it is at least 2000 pixels. This usually means that it loads the full RAW file and ignores the embedded preview, unless the preview is a full-size preview. Typical preview sizes found in RAW files are 1024, 1280, 1600, 1920 (HD) and full-size (100%).
If you can control the size of the embedded preview in your camera or the software from your camera vendor, go to 100% for optimal performance and quality in IMatch.
Keep in mind that, since IMatch always uses cache images (temporary or persistent), the size of the cache image affects features like the Viewer, the Quick View Panel and the Slide Show.
The Batch Processor uses cache images by default, but offers an option to process the original file.
By default, IMatch creates the cache image when a file is indexed. This ensures that the cache is always ready and that you can display the file quickly.
You can also set the cache to work in an on-demand mode. In this mode IMatch creates cache images the first time they are needed, e.g., when you want to look at an image in the Quick Preview panel or the Slide Show. Depending on the file format used you may notice a short delay when you first display or use an image. Once the cache image has been created, display will be fast.
Under some conditions (e.g., computers with very small hard disks) you can disable the cache completely. In this mode, IMatch creates cache images on-demand when they are needed and keeps them in a special folder on your disk. When you close IMatch, these temporary cache images are automatically deleted to free up disk space.
If you work mostly with files in JPEG format and you keep your files online all the time (e.g., on your hard disk) you can set this option to conserve disk space. If this option is on, IMatch does not create cache images from JPEG files anymore. Instead it accesses the original image when the image is displayed somewhere in IMatch.
Since IMatch cache images are by default 100% copies of the original image in JPEG format, it often makes no sense to produce cache images for JPEG files.
If you store your images on a network server or another slow storage medium you may want to create cache images even for JPEG files for better performance. Another exception is when you take files offline often. IMatch cannot display an image when the image file is offline and there is no cache image.
This setting allow to ignore files above a maximum size. IMatch will add these files to the database, but it will not calculate checksums, thumbnail images or cache images for files exceeding the size specified here. This can save a lot of time during the indexing phase if you work with image files with several hundred megabytes or even gigabytes.
The files are represented with the icon of the associated application throughout IMatch. Functions which use the checksum (e.g. find binary duplicates) will not work for files skipped by this option.
Set this to 0 to index all files. This is also the default.
IMatch organizes the cache as a series of files on your hard disk. Under the cache root folder you select in this dialog box, IMatch creates a subfolder for each database you use. The subfolder name is the unique database GUID IMatch assigns to each database.
The cache folder is a per-computer setting (IMatch.6.24 and later). This is important if you use your database on more than one computer and the cache folders are located on different disks or in different folders on these computers.
The cache folder used for a database is displayed in the Info & Activity Panel, in the Cache Folder property.
You can change the location of the cache folder in this dialog box. If you do that, e.g. to move the cache from the default location to a disk with more space, IMatch uses the new cache folder from then on. It will not, however, copy the existing cache folder to the new location. If you want that, you can copy the old folder yourself in Windows Explorer.
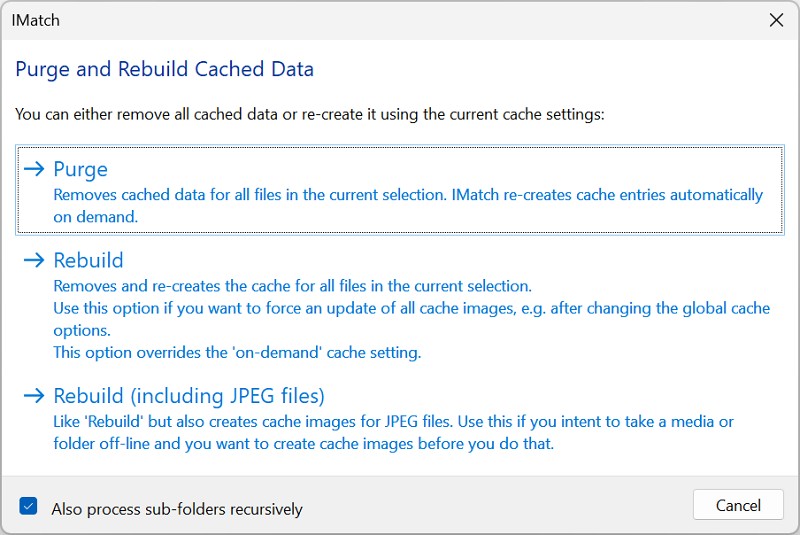
If you plan to take a folder offline and you want to be able to view the files, use the Cache command in the folder context menu to build/update the cache for that folder. This allows you to build the cache for all files, optionally including JPEG files.