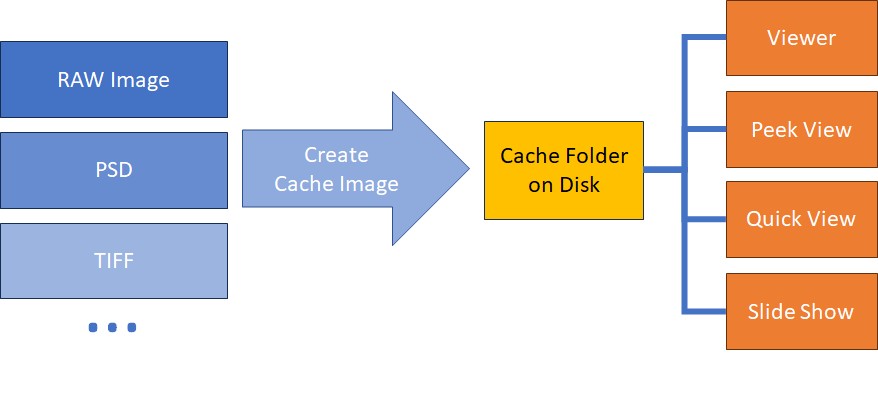
For best performance when displaying image files, IMatch maintains a cache on disk and in memory. This topic explains how the cache works and how you can configure and use it.
Loading large RAW, PSD or TIF files can be a slow operation. Depending on the file format several seconds may pass (and more, for some RAW formats) before IMatch has loaded the image and is ready to display it.
This is caused by the data volume to process and the complexity of most RAW formats. If you work with PSD or TIFF files containing multiple layers, the data volume to load from disk in order to display the file may be 20, 50, 200 MB or more.
IMatch features which display images like Peek View, the Viewer or the Quick Preview Panel would feel slow.
In order to give you snappy, sub-second preview times in the Peek View and Viewer, IMatch performs the time-consuming processing of RAW and other files only once. The resulting image is then stored in a special folder IMatch maintains on your hard disk. A cache file usually requires only 10% or less of the original image size on disk. This means IMatch can keep a large number of cache images on your disk without using up too much disk space.

IMatch can load images from the cache folder very fast. The adaptive preloader used in the Viewer and other display functions utilizes the cache and can load images in advance, which means very fast scrolling and navigating.
You can control how the cache in IMatch works via the corresponding Cache Preferences, from the cache folder used, the size and quality of the cache files and automatic purging of cache files not used for a long time.
You can configure caching under Edit > Preferences > Cache.
The default settings create cache files automatically at the time a file is added to the database (or updated when it has been changed externally). This default setting works very well for almost all cases. It guarantees the best possible viewing performance with a minimum effort.
If you switch the cache to on-demand, IMatch creates a cache image the first time it displays an image. This mode conserves disk space because cache images are only created for images you actually look at. On the downside, you will have to wait for the image to display when you look at it for the first time. IMatch has to create the cache image first and store it in the cache folder. Once the cache image has been created IMatch can access it very fast.
If you disable caching completely IMatch will always access the original image when you want to look at it. IMatch then stores the cache image, once created, in a special temporary cache folder. This folder is maintained while IMatch is running, and cleared when you close IMatch.
IMatch by default produces cache images at 100% size of the original image (or the embedded preview, see below). If a RAW file or other image has 3000 x 2000 pixels, the cache file will have the same dimensions. This allows you to view files in the Viewer, the Slide Show and the Quick View Panel in full size. This is the recommended setting for most usage scenarios.
The Viewer, the Slide Show and the Quick Preview Panel display files through cache files only. You cannot zoom in to 100% if the cache file has been created at only 50% of the original size. The size of the generated cache file determines how large IMatch can display the file in these features.
If you need to conserve disk space, you can restrict the size of the generated cache files by specifying a smaller percentage (e.g. 50%) or by specifying the maximum width and height in pixels. The later option enables you to produce cache files which match the size of your screen. You control size dimensions of the cache files via the cache settings.
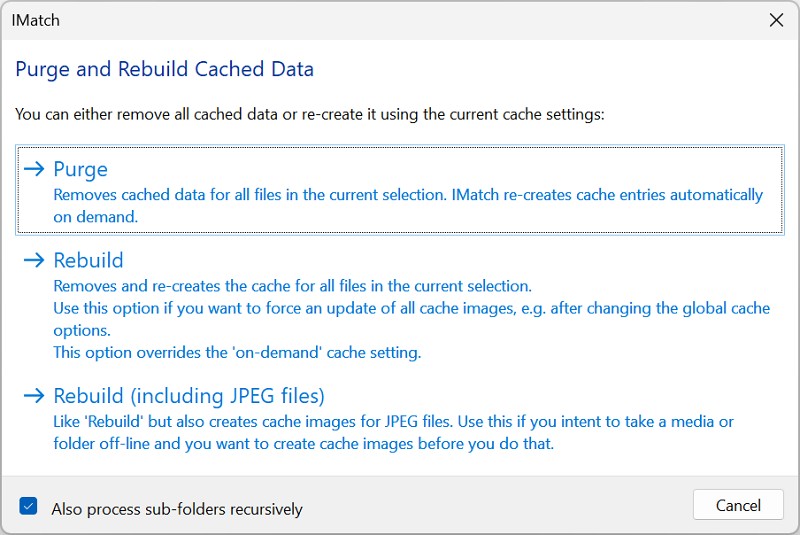
You can remove and re-create cache files for entire folders using the Cache command from the context menu in the Media & Folders View. To re-create cache files for a selection of images (e.g. after changing cache settings), select the files in a file window and then press Ctrl+Shift+F5. In the dialog, choose Update Cache only.
The cache settings allow you to instruct IMatch to use preview images which are embedded in most modern RAW formats (including DNG). Using these preview images is up to 10 times faster than loading the full RAW data during cache image generation. If your RAW files have embedded previews with the same size as the RAW (100% previews), you have ideal conditions for both performance and display quality.
If (some) of your RAW files contain only small embedded previews, e.g. 1600 pixels instead of the true 4000+ pixels of the RAW file, you may want to ignore the embedded preview and let IMatch load the full RAW data. Even if this takes longer while ingesting images, the 100% cache image allows for much better quality in features like the Viewer, the Slide Show, or the Batch Processor.
You can use the Minimum Size property of the Cache to fall back to using the RAW data if the embedded previews are too small.
The number of images in the cache and the amount of disk space allocated is displayed in the Info & Activity Panel.
IMatch supports about 100 image file formats and variants. For file types not directly supported or which are not images (Affinity file formats, Office documents, ...) IMatch relies on shell thumbnail handlers installed by the applications creating these file formats.
For example, to create thumbnails and previews for files in the .AFPHOTO or .AFDESIGN formats (Affinity Photo and Designer), IMatch uses Windows functions which use the shell thumbnail handler installed by the Affinity products. This creates previews with a maximum size of 512 pixels.
For Office documents, IMatch uses the same procedure. If you have Office documents which don't show previews in IMatch, make sure you have have configured Office to save a preview with the documents. You can enable this via File > Info > Properties > Advanced Properties. in Microsoft Office.
Under some conditions you may want to use on-demand caching or even cache-off for your database, but still produce cache images for one or more folders, media or disks. This may be the case if you intend to take a folder or a medium off-line (shelve the DVD or un-plug the disk or network). IMatch cannot display off-line images if the source image is off-line and no cache image exists.
Or you may want to explicitly purge the cache (delete all cached data) for a folder or media because you need to free disk space and you know you won't look at the images in that folder for a long time.
Changing cache settings only affects cache images created after changing these settings. To apply the settings to already existing cache images you need to re-create them.
The Cache command available in the Media & Folders view allows you to do exactly that. You can purge the cache for a folder, media or even an entire disk. You can also force IMatch to create or re-create cache images for the selected folder, media or disk.

To re-create cache files for a selection of files (e.g. after changing cache settings), select the files in a File Window and press Ctrl+Shift+F5. In the dialog, choose Update Cache only.
The variable {File.CacheFileName} shows the name of the cache file for a given image. The variable returns an empty string if the file is not cached.
You can display this variable e.g. in the VarToy app or in a custom file window layout.