
The Batch Processor dialog box
The Batch Processor is a flexible tool for converting images to other formats and dimensions, preparing images for external printing and uploading, adding...
The Batch Processor is a flexible tool for converting images to other formats and dimensions, preparing images for external printing and uploading, adding text, watermarks, QR codes, and more.
If the Import & Export Panel is not visible, make it visible by pressing F9,X or via the View menu in the main menu bar.
To run the Batch Processor, just drag one or more files to the Batch Processor module in the Import & Export Panel.
If the Import & Export Panel is not visible, make it visible by pressing F9,X or via the View menu in the main menu bar.
The user interface of the Batch Processor is divided into two panes: The left pane shows the different settings groups, the right pane the options and attributes of the currently selected group.
The Batch Processor dialog box
This is the first group. Here you select a preset to run or edit and also manage existing presets.
To run a preset with the selection of files you have dropped, select the preset you want to use and click on OK.
To edit a preset, select the preset you want to edit and then click on one of the groups on the left to open the corresponding options and settings. Changes made to presets are automatically saved.
The name of the currently selected preset is displayed in the title bar at the top of the dialog box.
The Manager... button opens the standard Preset Manager dialog box. Here you can add new presets, rename and delete existing presets and save the current preset under a different name to duplicate it.
Depending on how you use the Batch Processor you may need only one or two presets. If you produce outputs for different clients or websites, or you print your images using multiple print services, you can create individual presets for each of these purposes.
You can add Batch Processor Presets to the Favorites Panel.
This way you have your most often-used Batch Processor Presets accessible via a single mouse click.
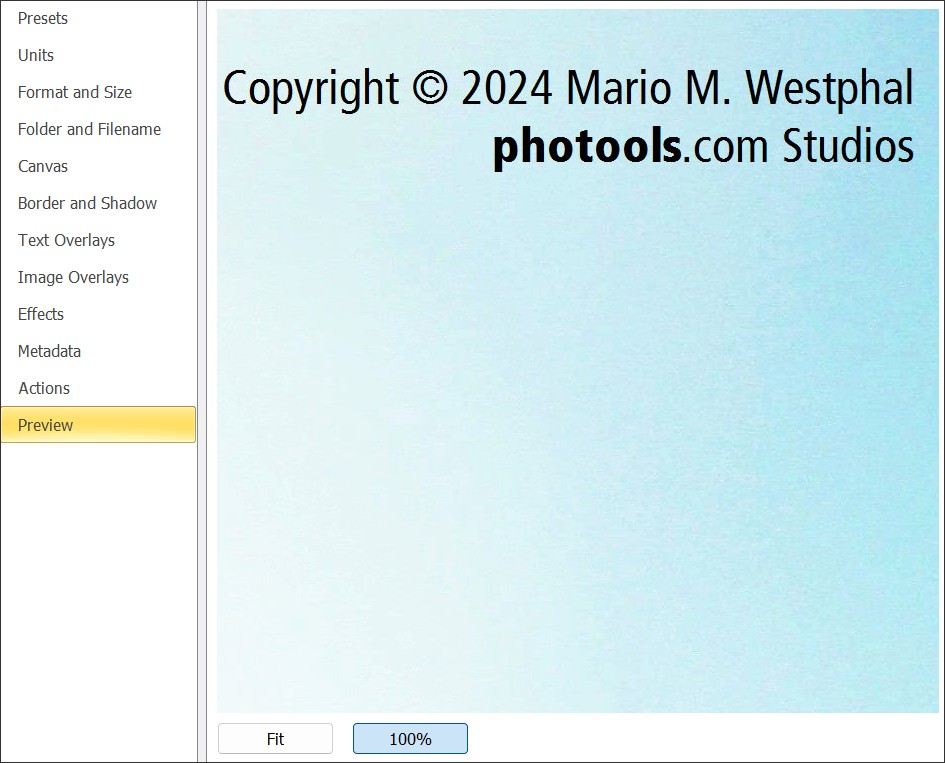
The Preview tab applies the current settings to the first selected file and displays the result. Use this tab to preview the results of your settings before running the entire batch.
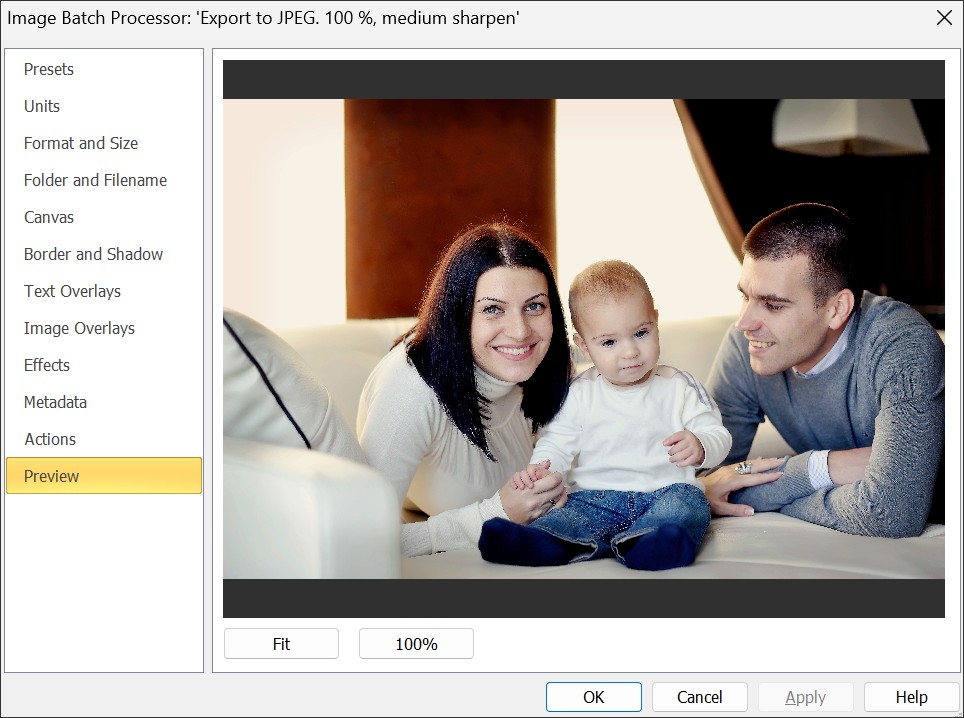
When you click on the Preview tab, there may be a small delay while IMatch is processing the file. If you switch between tabs without making changes, the Preview tab will not regenerate the image and thus open quickly.
IMatch uses the same unit and resolution for all settings in the Batch Processor.
If you produce output for screen or websites, you usually stick to the standard unit pixel and the resolution of 72 dots per inch (DPI). If you produce output for print you may find it more convenient to switch to inches or centimeters and use the resolution of your target device. This makes it easier to dial in measures and export images at standard paper sizes like 5" by 7" and 300 DPI.
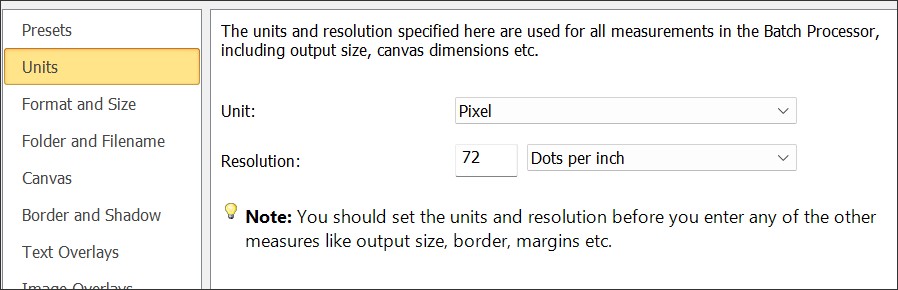
You should set the unit and resolution before you set other settings in the Batch Processor.
IMatch automatically converts existing settings when you change the unit or resolution, but there may be rounding errors which you can avoid when you set the unit and resolution before you configure your preset.
IMatch will use the resolution specified here to fill in the corresponding EXIF resolution metadata fields (if you export at least EXIF minimal metadata). Applications and services using the exported image can utilize this information to determine the suggested output size.
When you are a bit confused about these units and resolution, continue reading. Else feel free to skip to the next headline.
Internally, IMatch always works with pixels. But how many pixels are there, exactly?
Consider an image that has a width of 800 and a height of 600 pixels. This image will fit nicely on your computer monitor, even when you use a very small notebook. A typical computer screen in early days had a resolution of 72 pixels per inch. Modern flat screens may even display 96 or more pixels per inch. Traditionally, 72 DPI is still the assumed resolution for monitors.
If you now take this image and send it to your printer, the resulting image will be quite small, about 3" by 2" inches only. Here we assume the typical desktop printer resolution of 300 dots per inch. 240 DPI or 300 DPI is also the standard resolution for most online printing services. Newspapers or large posters are often printed at lower resolutions of 160 to 200 DPI. High-quality fine art printers work at resolutions of 600 DPI or more. On such a printer, your 800 x 600 pixel image would print at the size of a thumbnail.
All this only means that you need different image dimensions or numbers of pixels for different output targets. Less pixels for screen use, more pixels for print use. The higher the resolution of the target is, the more pixels you'll need.
The freely adjustable units and resolution system in the Batch Processor allow you to deal with all that comfortably. If you produce output for screen or web, use pixel as the unit and a resolution of 72 dots per inch. When you then specify an output size of 800 x 600 pixels, you get exactly that number of pixels. The DPI setting is irrelevant if you work with pixel units.
If you export images for printing, choose inches (or centimeters) and the resolution of your target device, e.g. 240 DPI. If you then set an output size of for example 5" by 7" the resulting images will have the 1200 x 1680 pixels (5 * 240 x 7 * 240). To print an image of the same size on a high-end printer with 600 DPI you will need to export the image at 3000 x 4200 pixels.
The following table shows some typical measures:
| Resolution | Unit | Dimensions | Pixel Dimensions |
|---|---|---|---|
| 72 DPI | Pixels | 800 x 600 | 800 x 600 |
| 240 DPI | Inches | 10" x 10" | 2400 x 2400 |
| 240 DPI | Centimeters | 10 x 10 cm | 955 x 955 |
| 300 DPI | Inches | 13" x 19" | 3120 x 4560 |
| 300 DPI | Centimeters | 20 x 30 cm | 2362 x 3543 |
You set the unit and resolution and let the Batch Processor figure out the number of pixels for the output image.
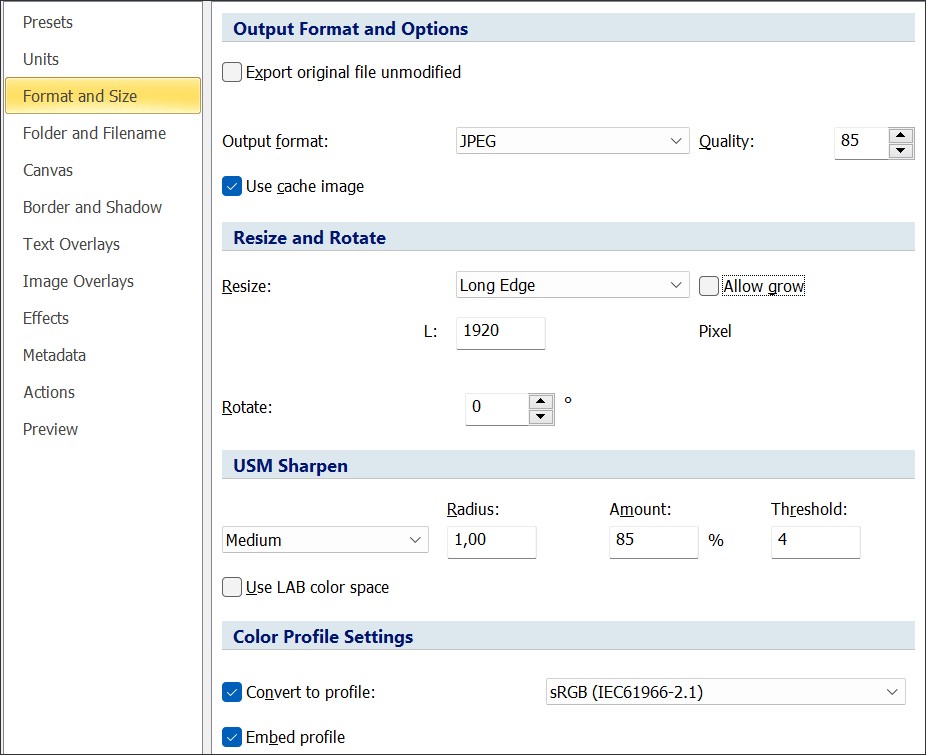
This group contains all the settings which control the output format, quality, sharpen and color profile options.
This option is designed to export the original images unmodified to a different folder structure. This option disables all features and options which would process and manipulate the original image. Options for output folder, file naming and metadata processing remain available.
Use this mode for operations like:
If you deliver images to friends or clients, or you need to prepare files for uploading to a website or service, the Batch Processor can do the grunt work for you automatically with this option.
When Export Original File Unmodified is enabled, the original file is copied as-is, including all metadata it contains.
In this case, to remove all metadata from the output file for privacy reasons, optionally enable the Trim Metadata option. This may be desirable when you plan to upload the output file to a website or a social network.
Also enable Trim Metadata if you copy selected metadata via the options available on the Metadata page. IMatch in this case first removes the metadata from the output file and then copies selected metadata from the original file. This gives you precise control over which metadata you keep in the output.
For some formats, ExifTool cannot delete certain metadata segments. These elements are then retained in the output file.
When you process files which use XMP data in sidecar files, the XMP file is not copied when trimming is enabled.
If you configure individual XMP tags or groups on the Metadata page, only these tags are copied from the original XMP file to the output XMP file.
Here you set the output format and quality. The following formats are supported:
| JPEG | Standard JPEG format. You can control the file size via the Quality control. Values of 80 and higher give very good quality at moderate file sizes. The default is 85. JPEG is the preferred format for almost all website usage. Many online printing services also use this format as their standard upload format and color profiles. |
| TIFF | Uncompressed TIFF file. Results in very large files, use only when absolutely required or you store the files to a compressed disk volume. Lossless. Supports transparency and color profiles. |
| TIFF (LZW compressed) | Compressed using the standard and widely supported LZW compression schema. Lossless. Supports transparency and color profiles. This is the often preferred format for delivering files to printers and clients requesting TIF files. |
| TIFF (ZIP compressed) | Uncompressed 24 Bits per pixel format. Lossless. Supports transparency and color profiles. Compressed using the ZIP compression method. Not as widely supported as LZW. |
| PSD | Standard Photoshop Format. Lossless. Supports transparency and color profiles. |
| PNG | Portable Network Graphics format. Lossless. Supports transparency and color profiles. Useful format for website usage or icons. |
| GIF (89a) | 256 color format. IMatch reduces the colors in the image to the standard 216 color web-safe palette using an error diffusion algorithm. The resulting files can be smaller than JPEG if you work with graphics like icons or screenshots with only a limited number of colors. |
This option tells IMatch whether to use an existing cache image or to load the original file. Loading the cache image is much faster than loading the original file, especially when you work with large input files or RAW images.
You should always set this option if you have 100% cache images for your files or the cache image dimensions are sufficient for the desired output size. If you have caching set to on-demand caching, IMatch automatically creates cache images as required. If caching is disabled, IMatch creates temporary cache files instead.
If the input files have transparencies (alpha channel), don't use this option.
Cache images cannot contain transparencies. If IMatch creates a cache image for a file with transparencies (alpha channel), it replaces all transparent areas in the image with a checkerboard pattern instead. In this case, don't use cache images as input for the Batch Processor.
If you allow the use of cache images, IMatch checks if there is a version of type "for conversion" available. If this is the case, this file is used as the input file for the Batch Processor. If no for conversion image is found, the visual proxy version is used. If this also does not exist, the original file is used.
These options give you full control over the dimensions of the resulting output file. IMatch supports several methods to define the dimensions of the output image file.
Don't resize | Choose this if you want to keep the original image dimensions as loaded, e.g. when you only want to convert the input file into a different file format. | ||||||||
Percentage | This method resizes image using a percentage. If you want to shrink an image by half, select this method and enter 50% into the Percentage field. If you enter a value greater than 100% but the Allow Grow option is not enabled, the image is not resized. | ||||||||
Width and Height | This method allows you to specify a width and height in units for the output file. This is the most often used method. You can specify an output width and height and IMatch will resize the input image to meet this size. This method is orientation sensitive and the width and height you enter are applied to the actual width and height of the input image. If you specify width and height as 800 x 600, you get these results:
By using width and height you ensure that the resulting image never exceeds either of the two dimensions. | ||||||||
Dimensions | This resize method works very similar to Width and Height, but does not care for image orientation. You use this method if you want to specify a maximum width and height in units regardless of the orientation (portrait or landscape) of the input image.
This method ensures that the output image is never wider than width or higher than height, regardless of the orientation. If the width and height of the input image are smaller than the specified dimensions, it will not be resized unless you enable the Allow Grow option. | ||||||||
Long EdgeShort Edge | These resize methods take only one dimension in units. This allows you to specify the maximal size for the short or long edge. Use this method if you only want to limit one dimension but don't care about the other. | ||||||||
Fill | The various Fill resize methods allow you to fill a given width/height. The fill methods are ideal when you want to produce images with the exact dimensions of a device, e.g. an HD TV set, a smartphone or tablet. For example, to create output images that fill an HD TV set, dial in 1920 x 1080 pixels as the output size, and IMatch produces an output image with exactly these dimensions. It resizes the input image as needed to fill the width/height and crops the other edges if required. Depending on the size and aspect ratio of the input image, IMatch may need to crop the image on either the horizontal or vertical edge. The Fill method has various sub-types which allow you to position the output image at each of the corners as needed. Center, Top/Center or Bottom/Center usually work best. This allows you to specify where IMatch applies the crops. You can choose any of the 8 edges or the center point to control how the image (blue box) is cropped and aligned to match the specified output size (in this example represented by the gray box): 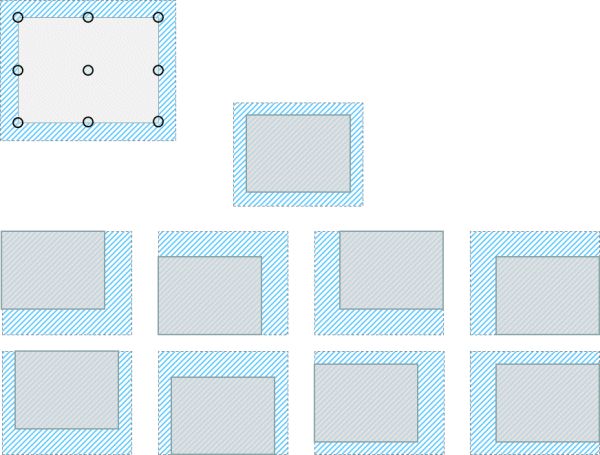
The Best Fit OptionEnable this option to automatically 'rotate' the dimensions to best fit the dimensions of the input image.For example, if you set the dimensions to 1920 x 1080, the output image will be in landscape orientation. If the input image is in portrait orientation, IMatch swaps the height and width, producing a 1280 x 1920 portrait image instead. The Smart Fit OptionSmart fit tries to keep the most relevant section of the image centered while cropping by looking at the face annotations. If the image contains faces, IMatch will try to avoid cropping the faces by shifting the image accordingly. You usually enable Best Fit to automatically match the aspect ratios of the input image to the aspect ratio of the dimensions you use for the fill resize. | ||||||||
Megapixel | This resize method allows you to resize an image to meet (as precisely as possible) the specified number of megapixels. IMatch will calculate the width and height of the output image to meet the given number of pixels while maintaining the original aspect ratio and orientation of the input image. Use this method if your client or upload site requests images at specific megapixel sizes. This resize method is especially handy when you have to deliver files at different resolutions for your stock photo websites. |
This setting allows you to rotate the input image between 1° and 359°. You can use this to correct a wrong orientation in the input image or to align your image with the canvas bitmap when you use pre-built backdrops or stationery.
These options allow you to sharpen the output image. Usually you want to add a bit of sharpen whenever you resize an image, to undo the softness introduced by the resize operation.
Use the Off setting to disable the sharpen operation. Select one of the pre-defined variations from the drop-down list or enter your own Unsharp Mask values.
The best values for USM sharpen depend on the type of images you work with and the resize ratio between the original image and the output image. The pre-defined variations cover a wide range of typical sharpen scenarios. Try different values until you like the result. The values are automatically saved together with the preset. You can use different USM parameters for different presets.
If you produce output for printing you can usually apply a lot more sharpen than for on-screen or website usage.
The LAB color space is a special feature in IMatch. If this is enabled, IMatch applies the USM sharpen operation to the lightness channel only. This avoids most of the color halos introduced by strong USM sharpen and thus allows you to sharpen images more aggressively. It is slower than the standard USM method, though. LAB color space sharpen can only be applied to 24-bit (8 bits per channel) images; images with higher bit depths are currently not supported.
By default, IMatch keeps the color profile of the original image intact and creates the output image using the same color profile (if the original image has an embedded color profile).
If you work with a high gamut color space like AdobeRGB or ProPhotoRGB in your images you will usually need to convert the color space into the sRGB color space when you upload your files to websites or send them to online print services.
The Batch Processor will do that for you when you enable the Convert to profile option. The sRGB color space is preferred for optimal compatibility with websites, browsers and print services. You can also convert to the AdobeRGB color space if this is a requirement for your workflow.
The option to embed the color profile should be enabled, unless your priority is to create the smallest possible files. Embedding the color profile will not add much to the file size but will allow the target application to determine the color space of your image. This is usually more important than saving a few bytes.
Most applications and browsers default to the sRGB color space if no color profile is embedded in an image. You may get away without embedding a profile. But in general it is smarter to include the color profile.
The Batch Processor can load all file formats supported by IMatch itself. It will use the same bit depth (8 bits per pixel, 16 bits per pixel) for the output image that is used by the input image unless you perform some processing, e.g. adding a canvas or working with text and image overlays or LAB sharpen. In this case IMatch will always produce 24-bit (8 bits per channel) images.
Images in the CMYK color space will be automatically converted to RGB colors using the embedded profile or a default profile (if no profile is embedded).
The result dialog box indicates these special cases with a special icon and status message.
This group combines options to control the output file name and folder, how to handle existing files and for adding output files to the database.
The Batch Processor processes files in the same order they come in. If you select a set of files in a File Window and then drag this selection to the Batch Processor, the files will be processed in exactly the same order as they appear in the File Window. If you drag a folder or a category, the sort order may not be what you expect, especially when subfolders or child categories are included.
To control the order in which the files are processed, select one of your sort profiles in the drop-down list. Select the empty entry to keep the original sort order of the files.
The Batch Processor maintains a sequential number which is incremented by one for each successfully written output file. The sequence number can be used to produce unique file names with consecutive numbers by including the special {seq} token in the file name definition (see below for details). The Digits drop-down list allows you to specify how many digits you want to output for the sequence number.
For each Batch Processor run the sequence starts at the value given in the Sequence field. If you enable the Remember sequence option, the preset remembers the last used sequence number and starts from that number when you run the preset again. This allows you to create a unique sequence number between Batch Processor runs.
These options control the file name for the output file. If you want to keep the original file name (with the extension switched to match the selected output format) enable the Keep file name option. You can do that if you direct the output files into a different folder.
To specify a different file name, use the File name input field. Here you can use a free mix of literal text, variables, the {seq} sequence token and one or more of the special file name tokens to produce individual file names.
For a list of available file name tokens and some frequently used patterns, click the little arrow in the Variables button next to the file name input field.
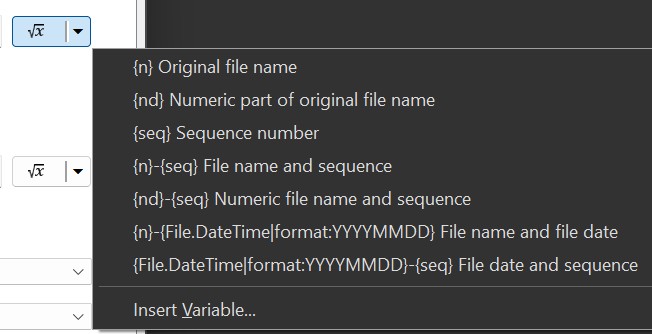
You can use variables to produce output file names from the metadata stored in the file, e.g., camera model, shooting date or any other metadata value. The {seq} token inserts the current sequence number into the file name.
The following examples assume an original file name of _DSC12345.RAW. The file extension is automatically added, depending on the output format selected for the preset.
| Pattern | Resulting file name |
|---|---|
| {n} | _DSC12345 |
| {nd} | 12345 |
| {seq} | 0001 |
| {n}_{seq} | _DSC12345_0001 |
| {n}_{File.DateTime|format:YYYYMMDD} | _DSC12345_20120603 |
These options allow you to specify the output folder for the produced files. You can use a combination of literal text, folder patterns and variables.
If you want to store the output files in the same folder as the input files, enable the option Output to same folder. You can do this if you produce unique file names or at least file names different from the input file names.
The Batch Processor will never overwrite input files with output files. If there is a name collision, it automatically generates a unique file name to protect the input file.
You can open the Variables dialog box by clicking on the Variables button next to the output folder field. By clicking the little drop-down arrow you can open a context menu with additional options.
If you want to direct the output files into a dedicated folder, you can just browse for a folder on your disk:
f:\prints
If you want to save the output files into a subfolder of the original folder, e.g. when you batch process images to be used on your website, you can just combine the folder pattern {p} with the name of the subfolder you want to use, separated with a \
{p0}\webThis pattern stores the output images in the subfolder web under the folder containing the input file. If the web folder does not exist it will be created automatically.
You can also create multiple folder levels at the same time:
{p0}\outputs\webYou can combine a fixed output folder name with a folder pattern, e.g.
f:\prints\{d0}If the folder containing the input file is named "beach", this pattern with {d0} will result in:
f:\prints\beach
By adding other folder patterns, text or variables you can use all kinds of information to produce custom folder names, e.g.
f:\data\output\web\{File.DateTime|format:YYYY}\{File.DateTime|format:MM}to create folders per year and below that per month automatically. If you process files from April 2012 and June 2011, you get these folder names from the above pattern:
f:\data\output\web\2011\06
f:\data\output\web\2012\04
The Batch Processor will create the required folders automatically.
The Batch Processor supports several strategies to deal with duplicate file names. When the Batch Processor attempts to save an output file and a file with the same name already exists in the output folder, it performs one of these actions:
| Create unique file name | Creates a unique file name by appending a number to the output file name. This is the safest strategy because it will never overwrite existing data. |
| Ask what to do | Displays a dialog box where you can decide what to do |
| Replace existing file | Overwrites the existing file without further warning. |
| Skip | Skip the file; don't write an output file if there is a name collision. |
This option tells IMatch to delete all files and subfolders of the output folder before processing the current Batch. You may want to enable this option if you reuse the same output folder for different sets of files.
IMatch cleans each output folder only once per Batch Processor run. But if you work with folder patterns or variables and you accidentally produce folder names 'higher up' the hierarchy during the processing, this option may cause IMatch to delete files produced earlier in the same run.
Here you can control whether IMatch includes the output folder in the database or not. You can either only add the bottom level or the entire path, top to bottom.
The Batch Processor adds only the folders touched by the output and will not add other folders recursively.
If IMatch runs into a problem while reading or writing a file, it by default just records that error and continues with the next file. If you want to stop processing instead, enable this option.
The canvas allows you to render the input image on a background, filled with a solid color or a bitmap. This can be used to add a margin around the input image or to arrange the input image on a pre-painted background or studio stationery etc.
To use the canvas, enable the Enable canvas option.
You can either specify an absolute width and height for the canvas, or specify the margin to add to each side of the input image.
Specifying an absolute width and height allows you to produce a fixed output size, even if the size of the input images varies.
In this mode, the position of the input image on the canvas can be controlled via the Image alignment on canvas drop-down controls. If preferred you can choose the Manual alignment option and position the image at an exact position on the canvas. The position is specified in units.
If you use pre-drawn backdrops or stationery background bitmaps, positioning the image on the canvas allows you to exactly fit the image to your background.
In this mode you specify margins (in units) for the left, top, right and bottom borders. This allows you to set up a canvas which resizes dynamically with the input image. In this mode the size of the canvas is calculated from the width and height of the input image plus the corresponding left/right and top/bottom margins.
You can fill the canvas either with a solid color or with a bitmap.
To fill the canvas with a solid color, select the corresponding option and choose a color in the Color drop-down control.
If you choose the no color option the canvas will not be filled and rendered transparent in the output image. This allows you to put a transparent area "behind" your image, e.g. to prepare it for placement or stock photo websites.
The fill bitmap can be centered, stretched or tiled to fill the entire canvas. You can either browse for a file via the Variables button next to the bitmap file name field or specify a file name by combining free text and variables to form the file name.
If you use an orientation-sensitive canvas, e.g. pre-painted studio templates or holiday greeting backdrops, you can tell the Batch Processor to rotate this background bitmap to match the orientation of the input image. This allows you to use your background bitmaps for both portrait and landscape images.
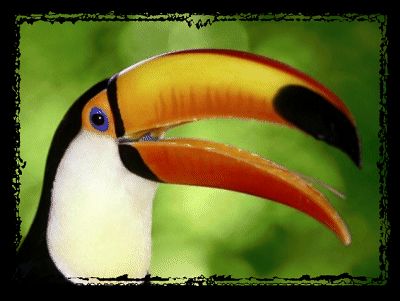
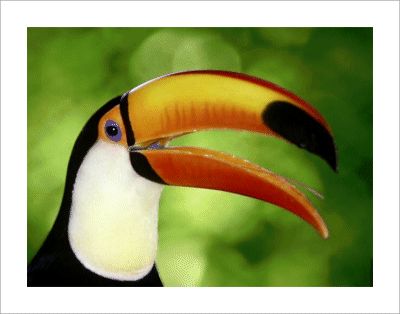
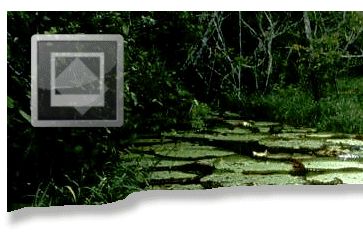
The following images show a few examples of what can be done with the canvas feature. In combination with other features like borders, image overlays and text overlays you can achieve stylish results for both screen and print usage.
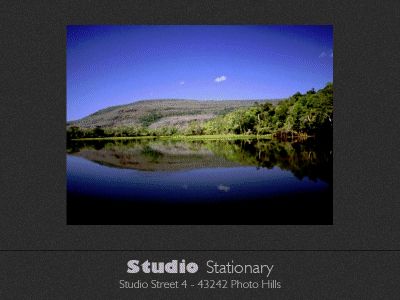 | 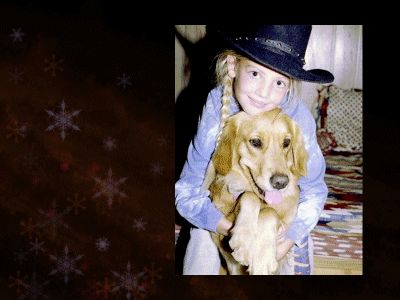 |
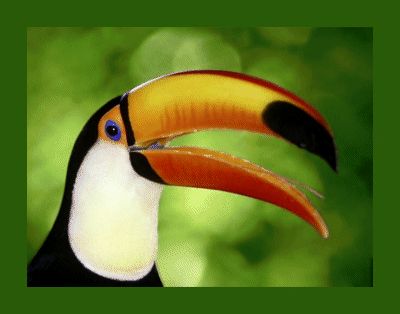 |  |
The options and settings in this group allow you to add a solid or bitmap border to your image. If you use a canvas, you can also include a drop shadow to make your image pop out.
The solid border uses the given Color and Thickness to draw a border around the image.
A 5 pixel border in red
The Bitmap border style allows you to surround your image with a bitmap border. You can use any bitmap to produce a border. Either create your own borders or download one of the thousands of free border bitmaps from the internet.
IMatch uses the alpha channel information in the border bitmap to determine which parts of the image are visible.
The border bitmap file format must support transparency via alpha channel. Suitable formats are PSD, TIFF and PNG.
The border is automatically sized and positioned to match the size and position of the image. Using the Match image orientation option you can make IMatch automatically rotate the border bitmap to match the orientation of the image. This allows you to use the same border bitmap for both portrait and landscape images.

Bitmap border
IMatch can optionally use the Color value to fill the non-transparent areas of the border bitmap. This allows you to use the same border bitmap for different styles or canvas colors. If you don't want this, just select the no color setting in the Color drop-down control when you use a bitmap border.
This image uses the same bitmap border as the image above,
but this time filled with black color.
By default IMatch automatically sizes and positions the border (bitmap) to match the size and position of the image. If you want to size and align the border with the canvas instead, enable this option. This way you can draw a border around the canvas, or use special effect borders to make the canvas look like old paper or similar.
Classic: Gray border for a white canvas
A soft drop shadow is a frequently used style to make the image pop a bit, especially if you use a contrast color canvas or a canvas filled with a bitmap.
The options available give you control over the direction (position), size, softness, visibility and color of the shadow. Experiment with these values to find settings you like. The defaults work well for small to medium-sized images. Use a bigger size and softness if you produce output images for print or work at higher resolutions.
If you align the border to the canvas you cannot use a shadow. The shadow would display outside the canvas, which is impossible.
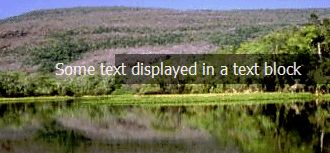
Text overlays allow you to display up to five text blocks on your image or canvas. A text block can contain literal text, metadata and Attributes via variables.
IMatch uses XAML markup for text overlays. This allows you to control fonts, font sizes, colors and much more directly in the text overlay by inserting XAML formatting tags. The text is wrapped in a <TextBlock> element, which allows you to use tags like <Run>, <Bold> and the like.
See the section on XAML markup for more information.
Since the text overlay is interpreted as XAML markup, you are not allowed to use & < and > directly in the text. You have to encode these characters with their XAML markup equivalents:
| To get this in your text | You write: |
|---|---|
| & | & |
| < | < |
| > | > |
For more information, please see the XAML markup topic.
When you use variables in text overlays, IMatch automatically replaces special characters in variable values before inserting them into the text overlay.
You cannot use advanced syntax elements like <TextBlock>, <StackPanel> or <Border> in the markup for text overlays. A text overlay is always a <TextBlock> and it cannot contain any of the advanced elements. If your variable contains multiple rows of text, separated by carriage-return/line-feed, don't wrap the variable with <Run> because this will break the markup.
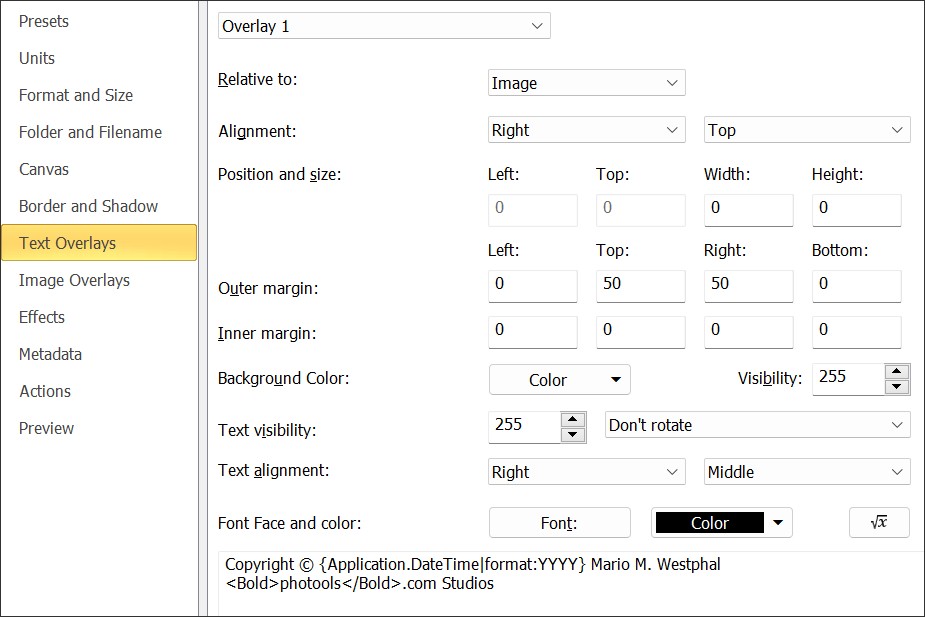
Sample Text Overlay
The drop-down control at the top allows you to select the text overlay you want to edit. You can use up to five text overlays per preset. Overlays without text content are not displayed.
You can use this fact to automatically hide text overlays for variables without content, e.g. when you use variables to fill the text block and the variable is empty.
A text block can be aligned relative to either the image or the canvas. A position (origin) of 0,0 represents the upper-left corner of the image, or the upper-left corner of the canvas when you align the text block to the canvas.
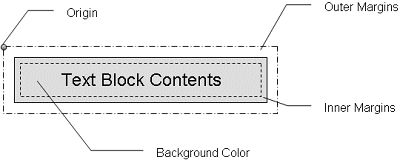
Anatomy of a text overlay
You can automatically align the text block within the image/canvas or use one of the manual modes to specify an absolute vertical and/or horizontal position in units. This gives you very fine control over the position of the text overlays.
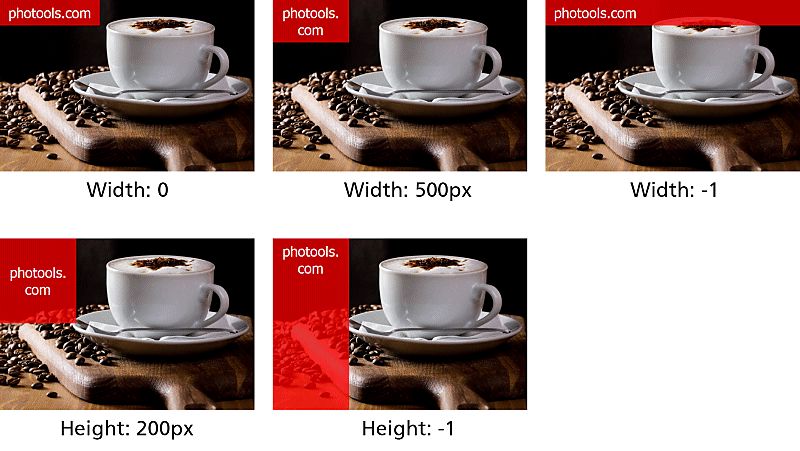
The Width and Height attributes allow you to control the width and height of the text overlay.
The value for width has a special meaning, for compatibility and flexibility:
| Width | Result |
|---|---|
0 | The text overlay fits to the size of the text. |
Number | The text overlay width in units. |
-1 | The text overlay fills the image / canvas width. |
| Height | Result |
|---|---|
0 | The text overlay fits to the height of the text. |
Number | The text overlay height in units. |
-1 | The text overlay fills the image / canvas height. |
This gives you a lot of freedom for positioning and sizing text overlays, with or without background colors. The alignment left|center|right and top|middle|bottom work with all widths/heights.
The inner margins control the distance between the text and the outer borders of the text overlay. You can use them to add some extra padding around the text, especially when you fill the background with a color.
The outer margins control the distance between the text block and the image or canvas borders (depending on the alignment). Use them to keep some space around the text block.

A filled text block aligned right and bottom. A right and bottom margin of 10 pixels is used to put some distance between the text block and the image borders.
You can optionally fill the text overlay with a background color and use the Visibility control to specify the transparency between 0 (invisible) and 255 (fully visible). The image above fills the text block with the color black and uses a visibility of 192 to make the text block slightly transparent.
The image below shows how you can improve the readability of text overlays by using a partially transparent fill.
Using a black background at 128 visibility to improve readability (right) Less readable without a background (left)
This control allows you to set the visibility of the text inside the text overlay. This setting is independent from the visibility of the fill color, which gives you very fine control over how prominent you make the text.
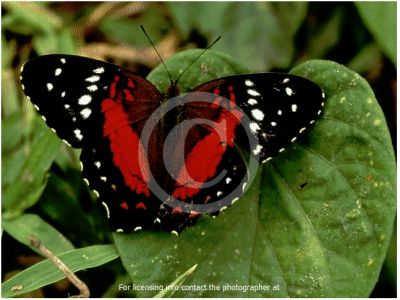
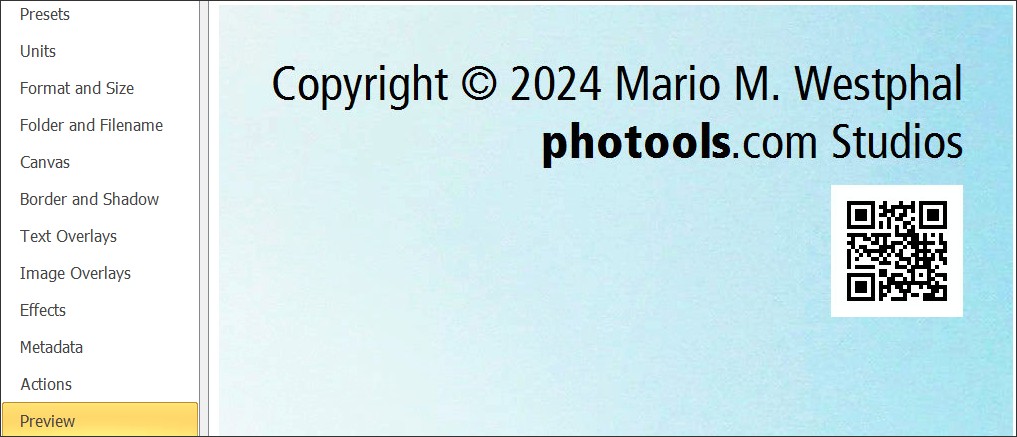
The following example uses a text block centered in the middle of the image. A large font was used to show the © copyright symbol in white and a text visibility of 64 was used to make it only slightly visible. This results in a pretty good watermark for web or stock photo site usage. A second text overlay was used to print the contact info at the bottom.
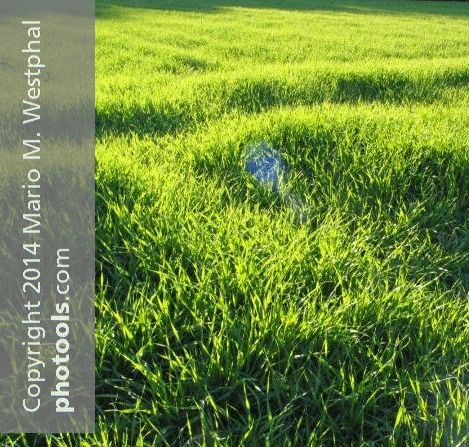
You can rotate text overlays 90° to the left or right. This enables you to align text on the left and right edges properly. Combining rotated text with a partially visible background yields cool results, for example:
These options allow you to control the alignment of text inside the text overlay. The global alignment options control the position of the text overlay inside the image or canvas, these options control how the text is aligned within the overlay.
Click the Font button to select a font family, font size, font style. The font color can be controlled via the Color button next to it.
IMatch uses XAML markup to render text overlays. The XAML language does not support all font weight variants available for some fonts. IMatch automatically translates the selected font weight into the font weights supported by XAML.
The text input field at the bottom allows you to enter a free mix of literal text and variables. This gives you access to all the metadata IMatch maintains in the database. You can easily display IPTC captions or descriptions, print out camera data from the EXIF record or display the keywords assigned to the image.
If you leave the text content field empty, the text overlay is not displayed on the image. This is also the case if you use a variable and this variable has no value. This allows you to automatically hide text blocks for which there is no data in the database.
You can use formatting tags to customize attributes like font family, font color, font size, down to individual characters if you like.
See Custom Formatting for details.
Image overlays allow you to paint bitmaps on top or even below the image, or canvas. Use this to overlay your studio logo, family crest, copyright notice or other graphical information. By rendering an image overlay under the image you can achieve interesting results like shadow effects, halos or similar.
Image overlays work very similar to text overlays. Most of what was said about text overlays above also applies to image overlays.
You can use the Width and Height controls to specify the size in which the overlay should be rendered. IMatch enlarges or shrinks the overlay image to match the settings you enter. If you only enter one of the values and leave the other to 0, IMatch uses the given value and maintains the aspect ratio. If you enter both values you can flexible size the overlay image to meet exactly the given size.
Use -1 for width and/or height to match the size of the overlay to the output image (or the canvas, depending on the mode you have chosen). This is especially useful if you prepare some sort of border overlays or similar. You can stretch the border overlay to the output image automatically with this trick.
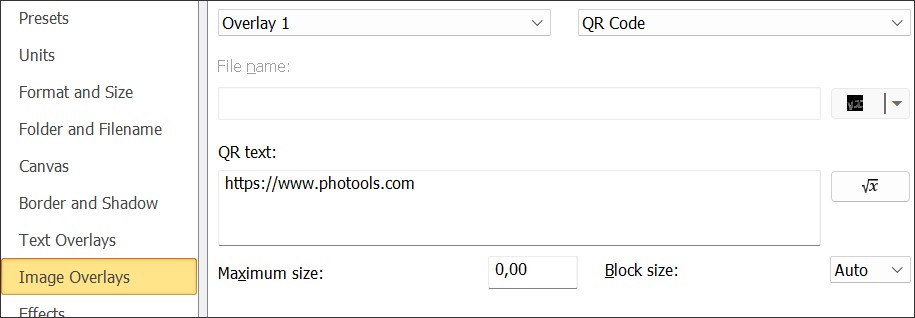
A special kind of image overlay is a QR code. QR codes allow you to include textual information, email addresses or website addresses in your image or canvas. This information can be easily scanned with any mobile phone with an installed QR code reader.

A QR Code with a link to the photools.com website.
Adding QR codes to your Batch Processor output allows you to include image information, your email address or a link to your website right in the image. Whether the image is displayed on a monitor or used as a print, a quick scan with a smartphone and the information travels from the image to the smartphone. If you include your email address, the smartphone opens the email application. If you put a QR code with a website link on your image, the smartphone will open the web browser.
Of course IMatch allows you to use variables in the text you feed into the QR code. This allows you to include metadata straight from the database in the QR code, e.g. the image description, a copyright notice, photographer name or keywords.
Wikipedia Article about QR Codes
See below for more information about QR codes.
IMatch first renders image overlays and then text overlays. Text overlays hence will appear above image overlays.
The name of the bitmap to use for the overlay is specified in the File name input field. Click on the Variables button to browse for a file or construct the file name from a mix of text and variables.
The overlay can be aligned Relative to the image or the canvas and you can either let the Batch Processor align the bitmap or specify the position of the bitmap manually.
A QR code overlay and a text overlay.
The outer margin allows you to specify some extra space around the overlay. This is useful if you want to indent the overlay when you use one of the automatic left/right top/bottom alignments, or to add some distance between the overlay and the image.
Using the Alignment, Position and size and Outer margin options you get a very detailed control over the position of the overlay.
Unless you specify a value other than 0 for Width and Height, the bitmap will be displayed at its original size. Use width and height to resize it as needed. The Batch Processor will always respect the original aspect ratio when it scales the overlay bitmap.
The Visibility control sets the opacity of the overlay between 0 (invisible) and 255 (fully visible). This allows you to display any bitmap as a watermark on top of the image.
If you enable the Draw below image option the overlay will be rendered directly on the canvas, below the image. This can be useful if your image has transparencies and you want to render overlays on the canvas which then show 'through' the actual image.
The IMatch logo as an image overlay
The Batch Processor renders image overlays before it renders text overlays. This allows for some interesting effects, e.g. by positioning a text overlay "on top" of an image overlay. The yellow note is an image overlay but the text on it is rendered dynamically, and may change with every image.
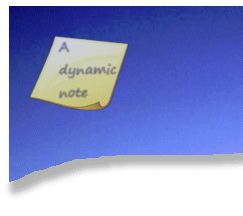
Combining an image overlay and a text overlay
If you switch to the QR Code setting, you can type in the text you want to include in your QR code. For QR codes, the rule is always: Keep it short. Older QR Code readers have problems with texts longer than 200 characters, so be as brief as possible. You can add multiple QR codes as overlays if you need to include multiple bits of information.

The size of a QR code depends on the amount of text you encode. The more text, the larger the QR code will become. The Block Size option allows you to control the size of the 'checker board' that makes up the QR code. Use smaller values to produce smaller QR code overlays and for shorter texts. Use larger block sizes for longer texts, or if you want to produce a large QR code that can be read from a distance. A good size also depends on the resolution you use for your output (e.g. if you produce output for screen at 72 DPI or for print at 300 DPI). The Auto setting selects a block size between 2 and 8 depending on the length of the input text. This usually works quite well.
The Maximum size option allows you to restrict the dimensions of the resulting QR code overlay to a certain size. Set this option to 0 to disable size restriction. The QR code then grows as large as required to fit in the text at the given block size.
If you set a Maximum Size and the text at the chosen block size would produce a too large QR code overlay, this option kicks in and limits the resulting overlay size. This prevents the QR code from ruining the Batch Processor output layout by becoming too large. This option may be useful if you work with varying text lengths, e.g. when you include variables in your QR code.
If you reduce the resulting QR code size too much by applying a too small Maximum Size you may end up with unreadable QR codes.
For short texts like a website address, a QR Code size of 60 to 100 pixels is usually OK for screen usage. For print, don't go much smaller than 1 cm or maybe 0.75 inches. If you work with longer texts of 200 characters or more, a pixel size of 250 - 300 pixels ensures readability across a wide range of smartphones and scanner devices.
Use your smartphone to test the output and make sure that the chosen QR code size produces readable codes.
This option group gives you some useful image effects to work with. While these effects are no replacement for a capable image editing application or RAW processor, they can be very handy when you export large batches of files for web presentation, sharing or email.
Each effect is presented as a separate group. To enable an effect, click on the check box in the group header:
At the top you see a small rendition of the image with all enabled effects applied. This small preview gives you nearly instant feedback when you change effect settings. To display the final result with all other Batch Processor settings applied, use the Preview Panel.
All effects are applied to the original image, after resizing, but before adding text or image overlays, borders and such.
Click on the Original image check box to see the unmodified image in the small preview for before/after checks. The Reset button resets all effects to default values and disables them.
When you enable an effect, it expands and displays all available options and controls. In this case we enabled the lOMO effect to give the image a aged Lomo camera effect.

Double-clicking a slider resets it back to its default value.
You can enable any number of effects at a time. IMatch combines the results of each effect into the output image automatically.
Once you have created the final effect settings, IMatch applies them to each file you batch process using this preset. This allows you to apply effects to a large number of files, which makes this feature ideal if you upload or share your images.
While working with effects you should use the Preview Panel to check the effect output at 100% magnification.
The following table describes each effect briefly. You are encouraged to play with the available effects to find out how the different settings impact the output, and how you can achieve the results you want.
Channel Mixer | This effect allows you to adjust the color balance in the output image by individually increasing/decreasing the red, green and blue components. You can also create a monochrome output image by setting the corresponding option. In this case the red, green and blue sliders control the amount in which each of the channels participates in the output. The Tint option allows you to tint the image with a selected color. This implies a monochrome output image. |
Vignetter | This effect group enables you to add a customizable vignette to your image. You can produce both dark and light vignettes, control the size, blur and roundness of the vignette and even how it is blended with the image. |
Blur | This effect works similar to the Vignetter, but allows you to blur (or un-sharpen) the edges of the image, similar to a lens blur. This effect is often combined with the Vignetter effect. |
Levels | With this effect you can control the contrast of the output image by individually changing the shadows, highlights and midtones. Increate the shadows and decrease the highlights sliders to improve overall contrast, then use the midtone slider to affect overall brightness. |
Hue, Saturation and Value | This effect group allows you to change the hue, saturation and value (brightness) of the image. Use it to make the image 'pop' or to de-saturate the result for a more sophisticated look. |
Show Biz | This filter can be used to improve skin tones in an image, or to produce an overall glamour effect. |
Special Effects | A small collections or pre-built effects to choose from. |
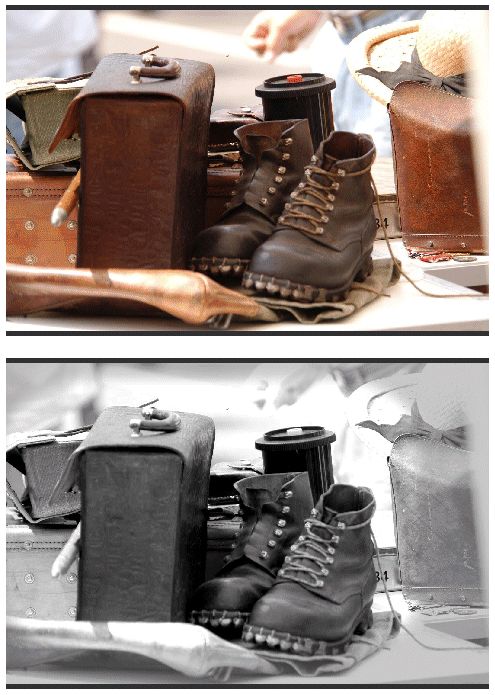
Used the Hue, Saturation and Value effect to de-saturate the image.
Added a bit more contrast via Levels and finally a light vignette, slightly off-center horizontally.
It's fun to play with the effects and to try out how the settings affect the result. The output of each filter mostly depends on the input image so prepare for a bit trial and error to find optimal effect settings for your shooting style and the 'look' you want to achieve. If you have found a good combination of effects, save them as a preset for later reuse.
Independent from the global Batch Processor presets you can maintain separate effect presets. This allows you to reuse effects for different Batch Processor presets or to share your effect presets with other IMatch users.
Click on the Presets... button to open the Presets dialog box:

Working with Effect Presets
Click on Load to load the selected preset and to close the dialog box. Alternatively you can double-click the desired preset.
To save the current effect settings, click on the Save button. Enter a new name to create a new preset, or enter the name of an existing preset to replace it.
The Save dialog box always uses the name of the currently selected preset as the default.
Via the Export and Import buttons you can save and load presets to and from disk files. This allows you to import effect presets and to share your presets with other IMatch users.
To duplicate a preset, first load it into the Batch Processor. Then open the Presets dialog box again and save it under a new name.
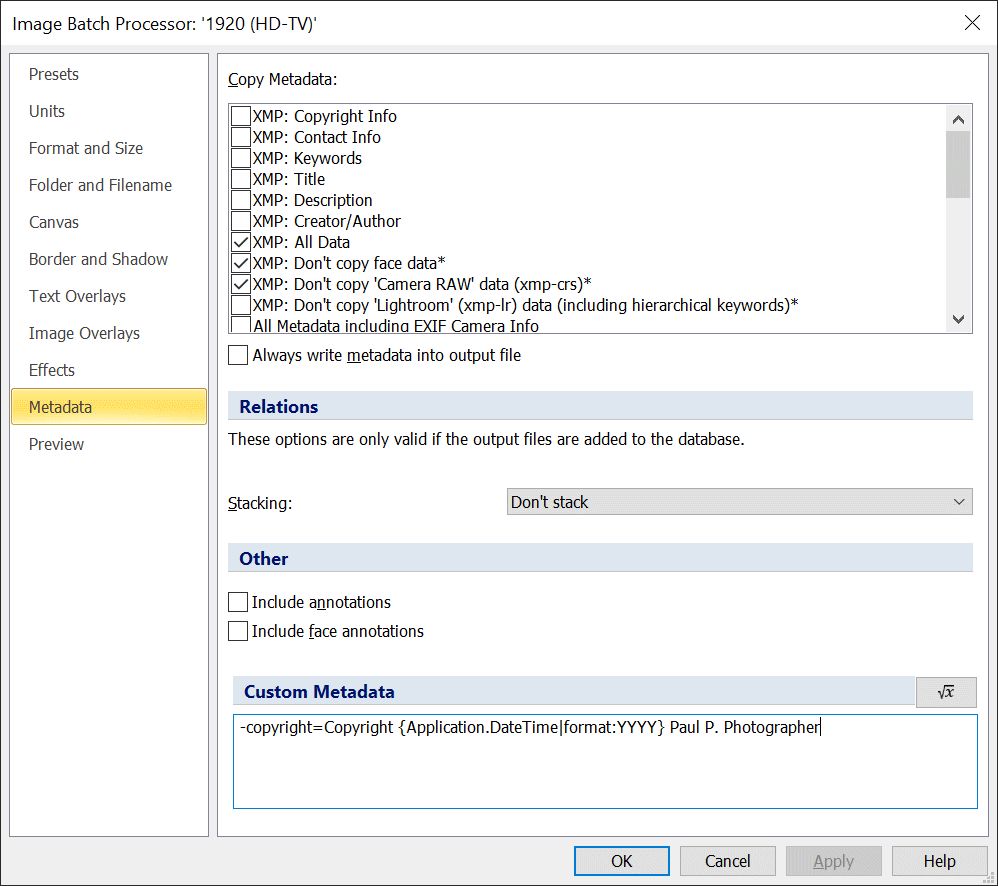
This option group controls how IMatch processes and copies metadata from the input image to the output image. Via the settings in this group you have full control over the amount and type of metadata to copy.
If and which metadata you copy depends on your requirements and the receiver of the output files. If you plan to upload the files to a website, you may prefer not to copy personal data, XMP face data or other private data. The IMatch Batch Processor offers very fine control over which metadata you transfer to the output file.
Depending on the input and output format, some metadata fields may not be safe to copy. ExifTool will skip these fields automatically to ensure a valid metadata record in the output file.
If you prepare images for websites you may want to minimize the amount of metadata in the output image, for privacy reasons. Maybe only only copyright-related data but not the EXIF or GPS info with all the details about how and where the image was taken.
Just check the metadata you want to copy to the output file in the list at the top. The Batch Processor analyzes your selection and copies the combined set of metadata fields into the output file.
EXIF data stores technical data and is closely linked to the original image. Copying EXIF data en-bloc is usually not advisable.
The Batch Processor allows you to copy some useful sub-groups. And the Don't copy maker notes should usually be checked to prevent copying maker notes (which often become invalid when copied to another file).
If you want to include at least the output resolution, resolution unit, orientation and modify date in the resulting image file, enable the EXIF: Minimal Data option. The output resolution (e.g. 240 DPI) can be used by the applications or services processing the files you create with the Batch Processor.
The metadata groups/elements starting with IPTC: refer to legacy IPTC Data (IIM). Not to be confused with the IPTC data which is part of XMP.
In most cases you don't want to copy this legacy format into output files (assuming the source image has legacy IPTC data). An exception would be when your client / agency / website requires legacy IPTC metadata.
When you copy at all or some XMP metadata, you can use one of the XMP: Don't copy attributes to explicitly suppress copying parts of XMP which may cause privacy issues (face data) or which would add a lot of extra bulk to the output file (Adobe Camera RAW data, which includes Lightroom settings).
The Don't copy for Lightroom metadata is useful only for some very specific situations.
If you copy XMP to the output file but you don't want the output file to contain XMP derived from metadata pointing at the source file, enable this option.
The XMP: Keywords (flat and hierarchical) tag set writes the hierarchical keywords and flattened keywords into the XMP record. The IPTC: Keywords writes the flattened keywords into the legacy IPTC metadata record. How the keywords are flattened is controlled via Edit menu > Preferences > Metadata.
If you have to follow specific rules (e.g. stock photo agency guidelines) for flattening keywords, you have four additional tag sets to choose from:
For a file with the keywords Location|Beaches|Daytona and Motive|Portrait:
1. and 3. write Daytona and Portrait
2. and 4. write Location, Beaches, Daytona, Motive and Portrait
This offers a lot of flexibility for flattening hierarchical keywords into the metadata written by the Batch Processor.
This option (off by default) allows you to override the options for the output format you have configured in Metadata 2. If it is enabled, IMatch embeds XMP metadata and other data directly into the output file, if the format supports embedded XMP.
If the output images are added to the database and you use file relation rules to propagate metadata, these rules may be applied to the output images. This can impact the metadata stored in the output file and take precedence over the settings you make here.
If you want to automatically stack the output image with the original image, choose one of the options available in the Stacking drop-down list.
Stacking is only possible if the output image is added to the database. Either the output folder must be already indexed by the database or you need to enable one of the options to include the output folder in the database. See here for details.
Enable this option if you work with Annotations and you want to show the annotations of the input image on the output image. This includes all annotation types, except face annotations.
Enable this option if you want to render face annotations to the output image.
The reason for separating the annotation types is privacy. While it is usually no problem to render text or vector annotations, rendering face labels may cause privacy issues. So it is optional.
Annotations will only be placed correctly if the aspect ratio of the output file is the same as for the original file. When you use one of the fill resize modes, this may not be the case.
This is an advanced feature. It allows you to run a limited set of ExifTool commands right on the output file.
For more information about ExifTool and detailed usage instructions, please visit the official ExifTool web site.
Even if you don't copy any of the metadata from the original file (e.g. when you produce output for websites or stock photo agencies) you may want to include copyright info, a link to your website and a few other fields in the output files. This data must not be necessarily in the original file, sometimes it makes sense to use completely different data for the output files.
The custom metadata edit field accepts ExifTool commands which add, set or remove data in the standard ExifTool syntax. For example:
-copyright=My copyright statementThis statement sets the copyright tag (ExifTool lingo for EXIF:copyright) in the output file to the text 'My copyright statement'. Even if you don't copy any other metadata at all, the output file will then contain a minimum EXIF record with your copyright statement.
Each statement must be on a separate line (press Return in the edit field to start a new line):
-copyright=My copyright statement
-label=Web
This custom statement adds a copyright field to the output file and sets the label of the output file to 'Web'. ExifTool will take care that corresponding basic EXIF and XMP records are added to the output file.
If you don't want EXIF records in your output files but XMP is OK, you can use
-xmp:rights=My copyright statementas an alternative.
You can delete/remove metadata also, using the standard ExifTool syntax. For example, to remove the rating from the output file, you would use:
-rating=Or, maybe, you want to copy all XMP metadata except flat and hierarchical keywords? In that case, enable the XMP: All Data option (maybe exclude faces or crs) and then use these custom tags to delete keywords in the output file:
-subject=
-hierarchicalsubject=You can mix IMatch variables with literal text in this field. For example:
-copyright=Copyright {Application.DateTime|format:YYYY} Paul P. Photographer
results in metadata like 'Copyright 2013 Paul P. Photographer'. IMatch will automatically fill in the current date and time for you. The format:YYYY takes care that only the year part is used.
The ability to use variables allows you to fill metadata tags from other metadata:
-keywords+={File.MD.Exif::Main\272\Model\0}adds the name of the camera model to the keywords in the output file.
Windows displays a proprietary tag named XP Subject in Windows Explorer. If you want to fill that tag from the XMP headline, add this:
-xpsubject={File.MD.XMP::photoshop\Headline\Headline\0}You can then see the XMP headline also in Windows Explorer.
If you use Attributes for submission tracking or similar purposes, or you keep notes in an Attribute Set, you can access the Attributes here and include them in the output file.
-description={File.AT.Submission.ClientName}/{File.AT.Submission.TrackingNo}This custom statement assumes that you have an Attribute Set named Submission. It combines the name of the client with the tracking number you manage in your attributes and writes this info into the description of the output file. This makes it easy for your clients to link the image to a specific order or submission.
If you don't want to copy EXIF or XMP metadata, but you want to set EXIF date and time in the output file manually, this can also be achieved with variables.
The following custom metadata configuration sets the date and time original (Date Subject Created) and datecreated (Date Created) from the corresponding variables of the input file. This way you copy over both EXIF dates from the source image into the output image:
-exif:createdate={File.MD.createdate|format:YYYY:MM:DD hh:mm:ss}
-exif:datetimeoriginal={File.MD.originaldate|format:YYYY:MM:DD hh:mm:ss}
This example uses shortcodes to access the frequently used date and time metadata values with variables.
Note how the date and time format expected by ExifTool (YYYY:MM:DD HH:MM:SS) is created from the variables by using the format function. This is important, because date and time variables by default use the local date formatting (as configured for your Windows user account) and ExifTool does not accept such localized formats.
When creating a file, the Batch Processor sets certain timestamps using an override:
-XMP-xmp:ModifyDate<Now
-XMP-xmp:CreateDate<Now
-XMP-xmp:CreateDate<xmp:CreateDate
-xmp-photoshop:DateCreated<Now
-xmp-photoshop:DateCreated<xmp-photoshop:DateCreated
You can "undo" these default timestamps by manually copying the timestamps (all or some) from the source file. For example:
-XMP-xmp:ModifyDate={File.MD.XMP::xmp\ModifyDate\ModifyDate|format:YYYY:MM:DD hh:mm:ss}
-XMP-xmp:CreateDate={File.MD.XMP::xmp\CreateDate\CreateDate|format:YYYY:MM:DD hh:mm:ss}
-XMP-xmp:CreateDate<xmp:CreateDate
-xmp-photoshop:DateCreated={File.MD.XMP::photoshop\DateCreated\DateCreated|format:YYYY:MM:DD hh:mm:ss}
-xmp-photoshop:DateCreated<xmp-photoshop:DateCreated
If you want to copy data between tags, e.g. to create a title on the fly from other data or if you want to set certain tags from image data like width or height, you can use some special ExifTool commands for this.
-"title < $filename"copies the file name into the XMP title.
-"CroppedAreaImageWidthPixels < $ImageWidth"
-"CroppedAreaImageHeightPixels < $ImageHeight"copies the width / height of the output file into the CroppedArea* metadata tags.
Make sure you enclose the special tags in " and ". See the ExifTool Documentation for more information.
Batch Processor Actions are a very versatile automation feature. They enable you to run a command or a Favorite before files are processed or after.
A typical use-case for running an external command is for instance uploading files created by the Batch Processor to your website.
A common use case for running a Favorite is to run a Metadata Template that changes some data in the original file. For example, setting an Exported label so you can easily tell which files were already exported. Or maybe record the date and time in a XMP timestamp tag or the description of the file.
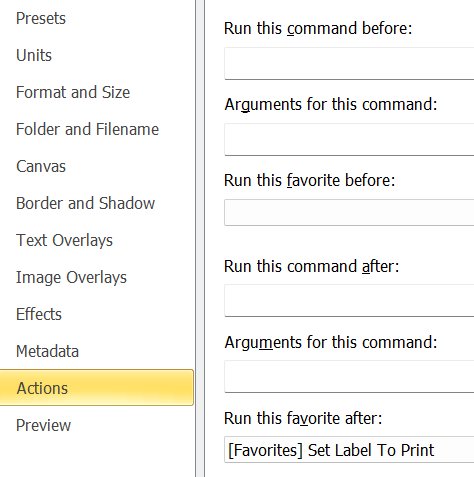
Batch Processor in this sample preset runs a Favorite after all files have been processed. The Favorite in turn runs a Metadata Template that sets the XMP label of all processed files to the 'To Print' label. An easy way to mark files as exported. You can of course use any label you like or run any Metadata Template you like.
Since Favorites are very powerful, you can achieve a lot with Batch Processor Actions. From running Metadata Templates or AutoFill Templates to assigning files to collections or categories.
The pre command and favorite runs before the Batch Processor starts processing files. The post command and favorite run once the Batch Processor has finished processing normally.
When you run a Favorite pre- or post, the Favorite receives all source files processed by the Batch Processor. The effect is the same as if you would select the files in a File Window and then execute the Favorite.
Commands support Variables in both the command and the arguments. IMatch uses the first source file as context for the variable.
The pre- and post command run once, not for each processed file.
You can for instance run a PowerShell command or a Python script before or after the Batch Processor runs.
The Batch Processor supports a number of special tokens (not Variables!) for the pre and post command.
| Token | Description |
|---|---|
{o} | Fully-qualified name of the output folder enclosed in ", produced from the first processed file. Only filled for the post command. This might be useful to forward the output folder name to a script or application. Example: "c:\temp". |
{sf} | A semicolon-separated list with the file names of all source files, each file name enclosed in ". This might be useful to forward the list of source files to an external script. Example: "c:\data\images\202604\DSC12345.RAW";"c:\data\images\202604\DSC12346.RAW". |
{of} | A semicolon-separated list with the file names of all successfully processed output files, each file name enclosed in ". This might be useful to forward the list of created files to an external script. Example: "c:\temp\202604\DSC12345.JPF";"c:\temp\202604\DSC12346.JPF". |
These tokens are processed before other variables in the command or arguments are parsed.
After the processing has completed, the Batch Processor displays a dialog box with the processing results:
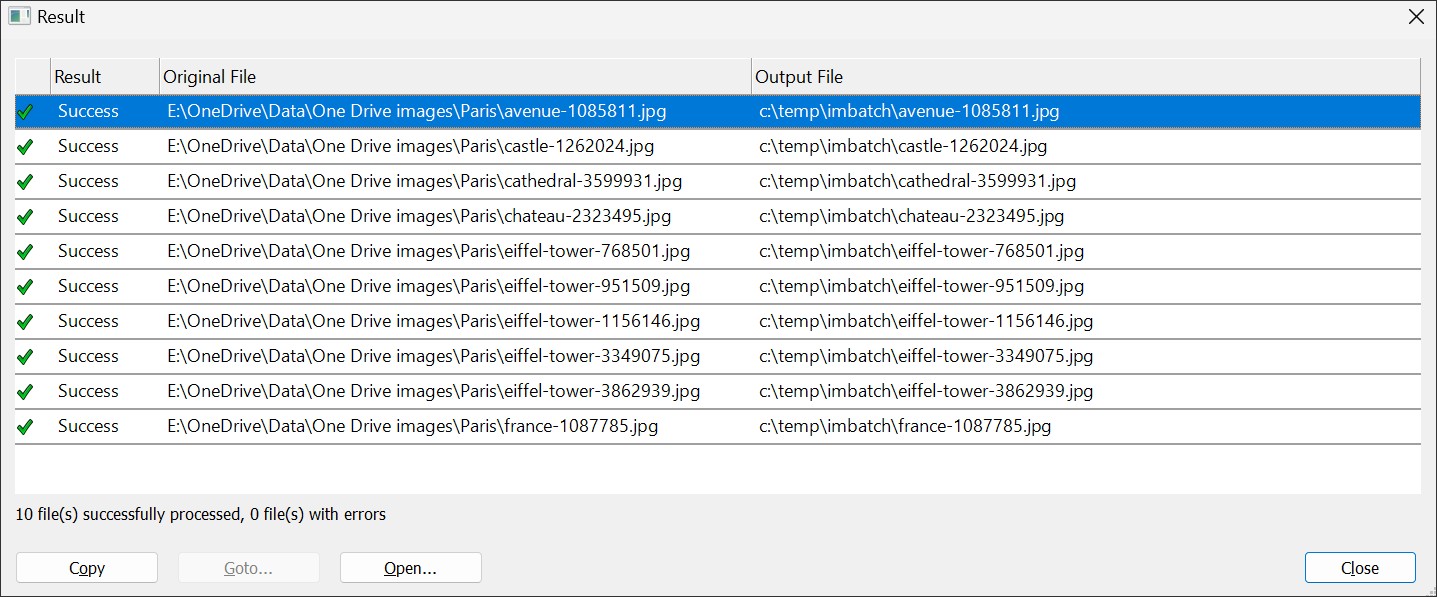
This dialog box lists the original file name, the output file name and the processing result for each converted file.
The Copy button allows you to copy the selected rows into the Windows clipboard, e.g. for documentation purposes.
The Goto... button is enabled when the output file has been added to the database. Use this button to close the result dialog box and select the file in the Database View.
The Open... button opens the selected file in Windows Explorer.
You can add Batch Processor Presets to the Favorites Panel.
This way you have your most often used Batch Processor Presets accessible via a single mouse click.