Edit Menu > Preferences > Database
These options allow you to control settings for your database.
The unique id stored in each database associates the database with resources like the file cache and other permanent and temporary resources. These resources are not designed to be shared and problems will occur if you don't unlink (separate) both databases.
If you duplicate a database by copying the database file on disk, you must change the unique id of the new database afterwards.
You can do this under Edit > Preferences > Database.
When you copy a database, always copy the entire folder, including all temporary files and all files with the same name as your database file (independent from the file extension).
The settings database also uses the unique database id to store database-specific settings. You must change the id of the new database in order to separate the settings of these two databases. Changing the id of the second database will do exactly that. The new database will use its own resources and its own folder in the cache folder root directory.
Always store your IMatch database on your fastest disk. Put it on your SSD, if your computer is equipped with one. This results in a much better performance than using a regular spinning disk.
IMatch by default stores databases in the official folder designated by Windows for this type of data, usually "My Documents" or similar, depending on the Windows version used and the language settings.
We recommend to create a dedicated sub-folder for your databases, e.g. IMatch Database or similar. This makes it easier to backup your database(s), to transfer them to other computers and to configure your virus checker if it causes issues (see below).

We don't recommend storing IMatch databases on folders managed by services like DropBox, OneDrive or GoogleDrive.
These services monitor their folders and may cause problems by locking a database file in the wrong moment - because they want to upload the database file.
The IMatch database system creates short-lived temporary files during specific database operations, often in quick succession. This can cause additional sync issues and potential problems due to OneDrive or DropBox locking these files, preventing IMatch from accessing them.
You can manage images stored in these folders in your IMatch database without problems, though.
IMatch stores a thumbnail for each file inside the database. These thumbnails are used for the file window and other purposes. The default thumbnail size is 300 pixels, which is quite sufficient for all but the biggest screens. You can change the thumbnail size on this dialog. If you work without caching previews but you want to be able to see larger previews for your files you can increase the thumbnail size. If you plan to add hundreds of thousands of images to your database or you work on devices with small hard disks, you can use a smaller thumbnail size.
Click on the Preview button next to the thumbnail size to get an impression of how large the thumbnails are and how much disk space (approx.) is needed to store 1000 thumbnails.
IMatch will use the new size on all thumbnails created in the future. The size of existing thumbnails in the database will not change when you change this setting. To re-create thumbnails with the new size you can rescan one or more folders or even drives with the Force Update option enabled in the rescan dialog (hold down the Ctrl key when you choose the Rescan command to get additional options).
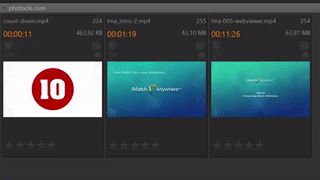
For video files, IMatch produces multiple thumbnails and stores them in the database. This allows IMatch to present you with a time-lapsed preview of the video when you hover the mouse cursor over the thumbnail panel:

By default, IMatch creates 5 frames (thumbnails) for each video file. It extracts one frame every 5 seconds, and skips the first 2 seconds of the video because these usually don't contain anything useful.
Depending on the kind and length of videos you manage in IMatch, you may want to change these defaults. The video thumbnails are produced in the same size as the normal thumbnails. This allows you to guess at how much disk space is needed when you use 5 or 10 frames per video file.
If you want to use different settings for different videos, you can change the video thumbnail settings and then do a forced refresh of the video to drop and re-create the thumbnails. To force a refresh, select the videos in a file window and then press Shift+Ctrl+F5.By default, IMatch picks the first video thumbnail to present the file in the File Window, the Quick View Panel, the Viewer and the Slide Show. You can change the default thumbnail by selecting one or more files in a File Window and then pressing Shift+Ctrl+Page Up or Page Down
When you add bookmarks to video files in the IMatch Media Player, IMatch prefers them over the automatic generated bookmarks. This gives you detailed control over which video frames you want to preview.
You can protect your database with a password. Only users who know this password can open the database. On this dialog you can change and remove the database password.
Do not lose your password!
Your database will become inaccessible if you don't remember your password.
The usual password rules apply. Check the Internet for information about how to choose a safe password.
The password protects only the database.
Your image files and other files will still be accessible for everybody with access to your PC, unless you keep your files in folders with file system permissions restricting access to you only. See the Windows help for information on Windows file system security.
When you use your database on more than one computer you may find that you need to relocate folders or disks every time you deploy a new copy of your database.
Using the Portability Options in the Database Configuration dialog enables you to activate per-computer auto-relocation. If your images are located in c:\images on computer A, but on d:\data\images on computer B, you can tell IMatch to automatically relocate these folders when the database is opened on either computer.
Even if the files are in the same folder and on the same disk on both computers, you still need to relocate because IMatch recognizes disks by their unique serial number. This is required in order to handle drives with removable media, like DVD or BR-D drives.
In this case you set IMatch to auto-relocate the entire drive to itself (e.g., relocate C: to C:). This updates the database with the serial number of the current disk and all folders will be brought back online.
Click on the Portability Options button in the Database Configuration dialog box. This opens the Portability Options dialog:

In this dialog first choose the name of the computer for which you want to edit portability options. If the name of the computer is not in the list, type it and press Add to the list.
In the relocation rule list you see all rules available for the selected computer. There are two types: Folder and Disk. Disk relocates all top-level folders on the given disk (and all sub-folders, recursively) and Folder is used to relocate individual folders.
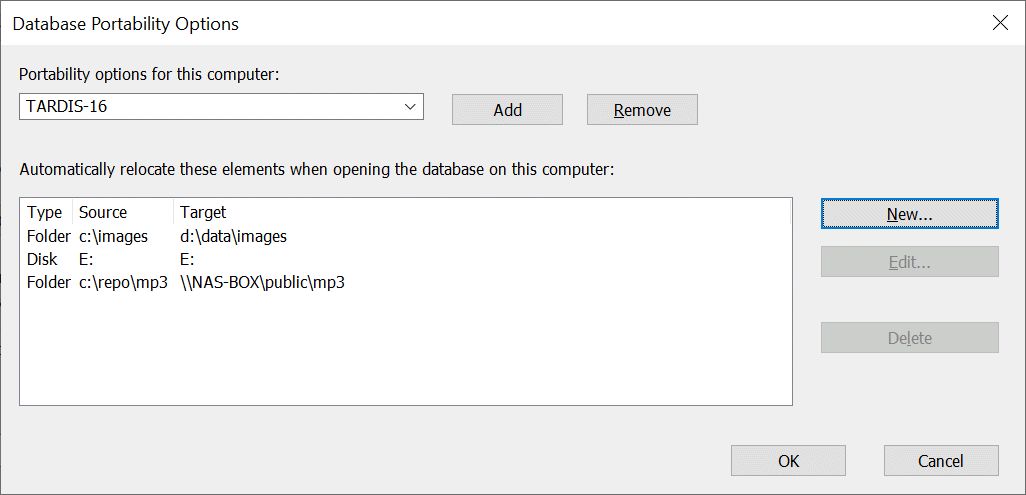
In the screen shot above you see the relocation rules defined for the computer with the name TARDIS-16:
c:\images to d:\data\imagesE: to E:. This kind of rule is used when the drive letter is the same on both computers. IMatch will just update the database to use the disk serial number of the E: drive on TARDIS-16.c:\repo\mp3 to an UNC share pointing at a NAS system named NAS-BOX.To add a new rule, click on the New button. Select the type (Folder or Disk) and enter the source and target for the relocation.
The folder selector dialog you can open via the ... button does not allow you to select folders which don't exist on the current computer. To set the relocation target, just type in the folder name by hand.
To edit an existing rule, double-click on the first column or click on Edit
To delete a rule, select it in the list and then click on the Delete button.
All changes are saved when you close this dialog with OK. To undo changes, close the dialog with Cancel.
IMatch has only limited ways to check the validity of your rules as long as they are not executed on the target computer. If IMatch cannot find the source of a relocation (e.g., a c:\imagez folder (typo)) it will silently ignore the rule when executing it on the target computer. A warning will be logged to the log file.
If the target of a relocation rule cannot be found (wrong name, inaccessible) IMatch will stop processing of relocation rules and display an error message.
It is highly recommended that you test your relocation rules and only with a copy of your database. If you make a mistake and relocations go wrong, you can safely revert back to your database backup and start over.