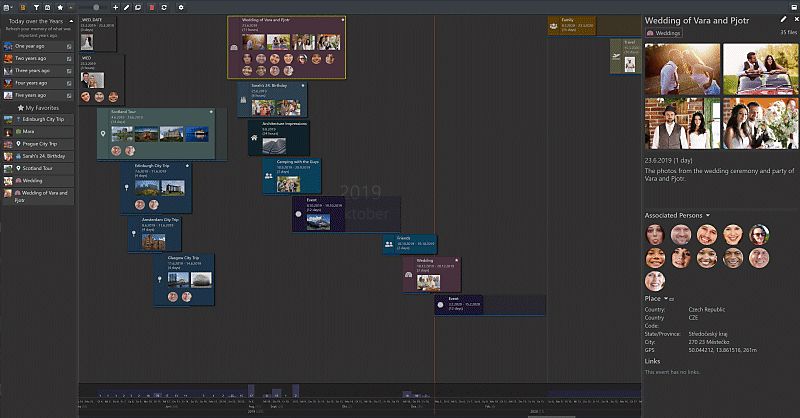
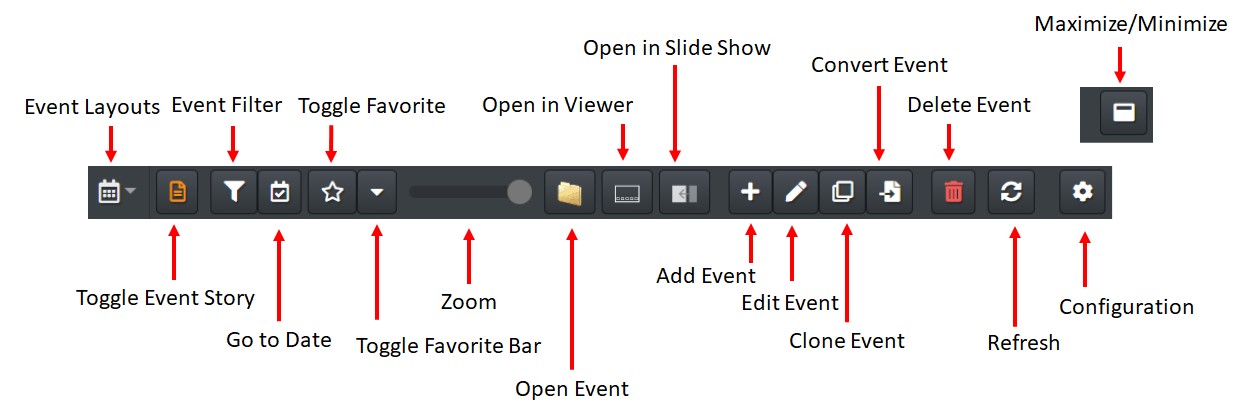
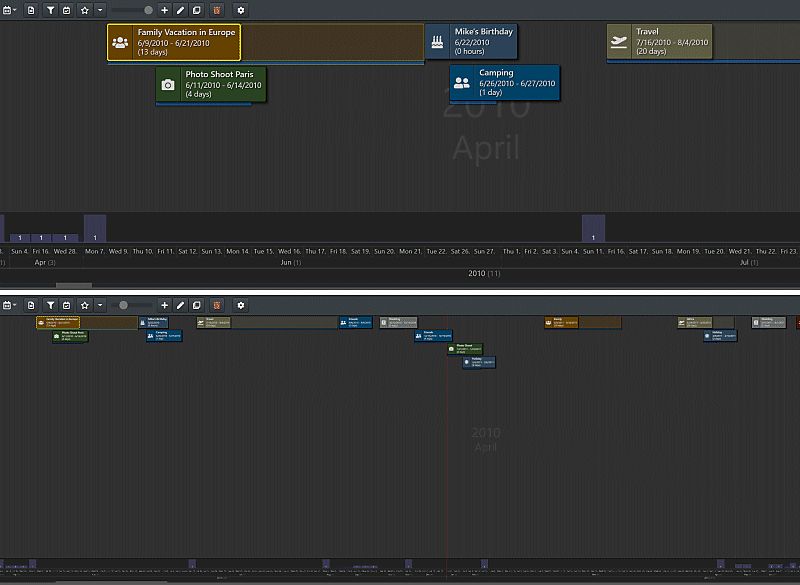
The Event View, with the Favorite Bar and Event Story visible.
For many people, thinking in events like "Trip to London 2018" or "Joe's 40th Birthday" feels very natural.
For many people, thinking in events like "Trip to London 2018" or "Joe's 40th Birthday" feels very natural. This topic explains how IMatch enables you to use time and events to organize your files.
Quick link: Keyboard Shortcuts.
With events, you can organize files based on time and topics like:
Events are a unique, powerful concept for organizing files in a very visual and intuitive way, by combining related files into event containers.
Events have a start date and a duration, based on the files they contain. IMatch arranges events along a dynamic timeline. By scrolling this timeline, you can easily revisit events you have created over the past 5, 10 or 50 years.
The Event View, with the Favorite Bar and Event Story visible.
Events differ based on how they are created. Events can be based on folders, categories, date ranges and files. This gives you a variety of options to pick the files you associate with an event.
You can reuse your existing file organization, e.g., by creating events from categories or folders.
You can create events in the Media & Folders View (folder-based events), the Category View (category-based events), any File Window (events based on a selection of files) and in the Timeline View (date-based events). See below for details.
If you create events from folders, categories and date ranges, the events dynamically adapt when the underlying object/data changes. When you add files to a folder or category linked to an event, the event automatically reflects these changes. Date-based events update when files are added or removed to/from the date range covered by the event.
A special case are events created from a fixed set of files. The contents of these events never changes, unless you add or remove files yourself. This event type offers a lot of flexibility, because you can combine files from anywhere in your database into this kind of event.
To open this View, click on the Events tab at the top of the IMatch window or use View menu > Views > Events. The Keyboard shortcut is Ctrl+W, 5.
The Event View combines the event timeline with a File Window. The timeline shows all events you have created, and the File Window shows the files contained in the currently focused event (yellow border).
See the Event Timeline below for more detailed information. We'll first look at creating events.
You can refresh the Event Timeline by pressing F5 at any time.
The main ingredients for an event are the title and one or more cover images for representing the event in the event timeline.

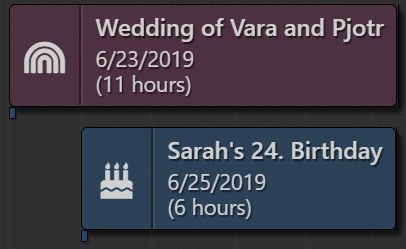
Events showing title, time span, cover images, icon and category colors.
Events have an optional description and other properties, like the event place, associated persons and links. You can organize events further using event categories, for easy filtering and visual identification by color and category icon in the timeline.
There are several ways to create an event.
Select one or more files in a File Window, and then use the Events > Create event from selection... command from the context menu. The keyboard shortcut is Ctrl+Alt+E.
This produces an event with a fixed set of files. The contents in the event change only when you add or remove files manually.
To add files to the event later, use copy & paste (similar to adding files to a category or folder). Select the files you want to add to the event in a File Window and add them to the Windows clipboard with Ctrl+C. Switch to the Event View and select the event you want to add the files to. Press Ctrl+V.
Alternatively, you can use drag & drop to drag files from another File Window into the File Window of a file-based event.
To remove files from a File Event, select the files in the Event View and press U.
Select one or more folders in the Media & Folders View and use the Events > Create events for all selected folders... command from the context menu. The keyboard shortcut is Ctrl+Alt+E.
If you select one folder, IMatch opens the Event Editor and allows you to input additional information and options immediately.
If you select multiple folders, IMatch creates one event for each folder with default settings. Switch to the Event View to review and configure the events.
IMatch uses the folder name and description, if available, to fill the properties of the new events. The folder thumbnail is used as the default cover file.
Folder Events are dynamic. When the files in the folder change, the files in the event change too.
Select one or more categories in the Category View and use the Events > Create events for all selected categories... command from the context menu. The keyboard shortcut is Ctrl+Alt+E.
If you select one category, IMatch opens the Event Editor and allows you to input additional information and options immediately.
If you select multiple categories, IMatch creates one event for each category with default settings. Switch to the Event View to review and configure the events.
IMatch uses the category name and description, if available, to pre-fill the event properties. If the category has no thumbnail image, the earliest file with the highest rating is used as the default cover file.
Category Events are dynamic. If the files in the category change, the files in the event change too.
You cannot create events based on multiple categories. If you need this, first create a category which combines the other categories using a formula, then create an event from that formula category.
This also makes it possible to create events based on Collections and other objects accessible via category formulas.
To create a date-based event, switch to the Event View and click on the button in the toolbar. If an event is currently focused, the new event gets the same start date as this event. This allows you to easily create a new event based on the same date range as another event. As a starting point or for a different set of files using a filter.
If no event is selected, the current position of the timeline (the day visible on the left) is used as the initial start date for the new event.
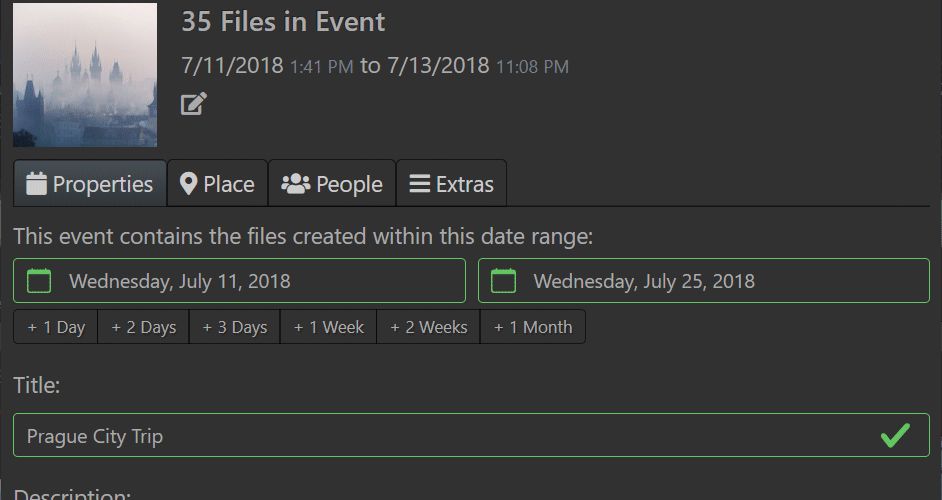
The Event Editor opens and you can adjust the start and end date as needed. The small + n buttons below the start date input field allow you to quickly add common durations to the start date.
While you change the date range, the editor calculates the number of files contained in the date range and updates the display at the top.
This is the most flexible event type. You just select a date range (e.g., the start and end date of a vacation) and IMatch combines all files created during that period into the event.
Selecting the time range or duration of an event.
You must enter a valid date range and title before you can close the editor with OK to save it.
This event type requires more CPU and database resources to calculate than the other event types.
Every time events of this type are loaded or modified, IMatch must search all files in the database to find the files matching the event. If your database is huge or the date range large, IMatch will take some time to figure this out.
You can convert events based on folders, categories and date ranges to file-based events by clicking the Convert button in the Event View toolbar. Converting an event to a file-based event might come in handy when you have, e.g., a date-based event that contains files that do not really belong to that event.
In this case, you can easily convert the event to a file-based event and then remove the files you don't want to include anymore via the U key in the File Window.
See Modifying Events for more info.
If you want to further restrict the files included for an event, you can use the Filter by file name option in combination with a standard IMatch regular expression. This can be very useful for a variety of use-cases.
The date range configured for an event contains the original files (RAW), final images in JPG format and some auxiliary files. You only want to include the JPG files in the event. Using a file name filter with the pattern \.jpg ensures that only the JPG files show in the event.
File-based events don't support filename-based filtering. Since you select the files for the event manually, you have full control anyway.
The Event Editor is used to create, view and modify events.
To create a new event from a date range and to open the Event Editor, click the button in the Event View toolbar.
To edit an existing event, double-click the event tile in the timeline, or click on in the toolbar to edit the focused event.
An event can have up to four cover images. These images are used to represent the event in the timeline and for the Event Story.
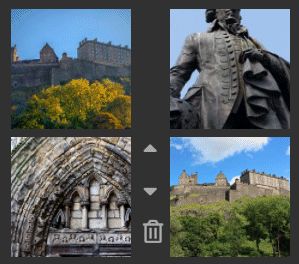
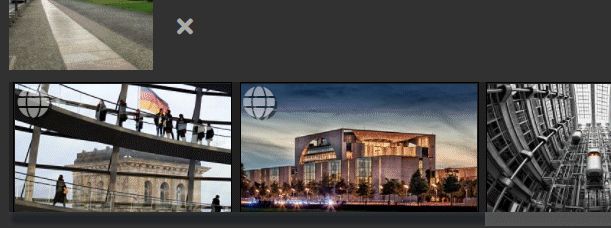
IMatch picks a default cover image for new events automatically. To change this or to add additional images, click on the icon next to the cover image. This opens a film strip which displays all files contained in the event. Click on the image in the film strip you want to add as a cover image. If there are already four cover images, the last cover image is replaced by the new image.

To reorder or remove a cover image, left-click it. This displays additional controls for moving cover images up and down and for deleting them:
Each event must have a non-empty title. The optional description is displayed in the Event Story and allows you to explain what the event is all about. There are no length limits for these properties. Keeping the title short and descriptive works and looks best in the timeline.
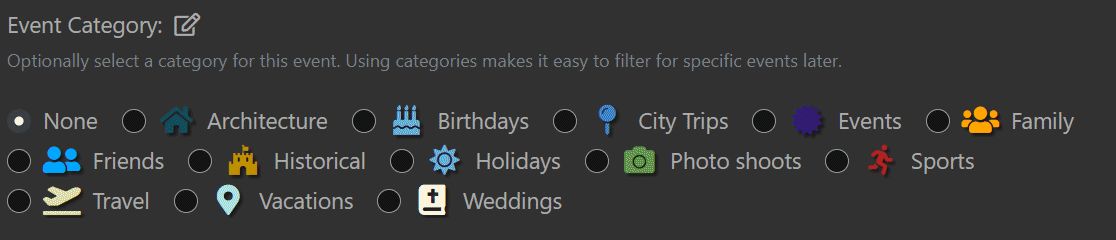
Events can be assigned to an event category, like Family, Friends, Weddings, Travel, etc. IMatch includes a set of default categories you can use for a start.
A category has a name and an optional icon and color. The icon is displayed in the event tile in the timeline and the category color is used to tint the event tile.
Using event categories makes it easy to differentiate between different types of events in the event timeline by color. You can filter events quickly by their category, e.g., to show only Vacation events.
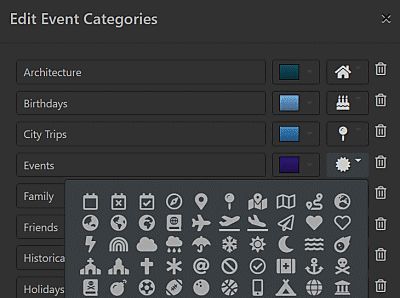
To assign, add, edit and rename event categories, open the Event Editor for one of your events.
Click the button to edit event categories. Use a name of your liking and optionally select a color and icon for your categories:
Event categories are unrelated to IMatch categories. They are just an easy way to visually organize different types of events.
You can optionally associate events with a place, with GPS coordinates and address data like country and city.
The Event Story displays the location information and optionally a map, centered on the event place and showing all files in the event with GPS coordinates.
Depending on which map provider you use, displaying the map will count against your quota and additional cost may occur if you exceed your monthly free quota.
To set or edit the Event Place, switch to the Place tab in the Event Editor. You can either fill in the information manually, apply an IMatch Location or use the configured search engine to find a place (mind the potential fees).
The most comfortable way to set a place is to use existing GPS and address data from one of the cover files for the event.
When you select cover files, the film strip indicates files with usable location and address data (latitude, longitude, country, country code and city) with a globe icon:
If you plan to set a place, make sure to use one of these files as a cover file. Then you can set the place with a single click of the Auto-fill from Cover Files... button. This button is only enabled when there is at least one cover file with usable address data.
IMatch uses the first usable cover file when setting the place. If you want to use a specific cover file, make it the first.
To fill the ZIP field, IMatch uses the ZIP in the XMP::iptcCore\CreatorContactInfoCiAdrPcode\CreatorPostalCode metadata tag, since none of the IPTC location takes contains a ZIP element. If you use an IMatch Location, the ZIP element from the location is used. If you use the search function and the geocoding service returns a ZIP element, it is used to fill the ZIP of the Event Place.
You can optionally associate one or more persons with an event. Photos for events like weddings, family festivities, vacations, parties etc. usually involve one or more persons you know. If you use IMatch's powerful face recognition and People features, you can associate these persons with the event to make it more complete.
The easiest way to associate persons with an event is via the People in Event... button. The Event Editor then lists all persons assigned to at least one of the files included in the event:
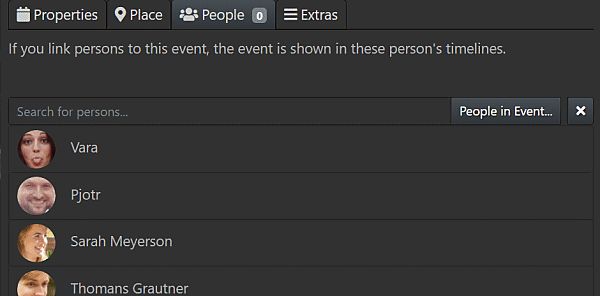
Simply click on the persons you want to associate with the event. If you have not assigned persons to the images in the event, you can search for persons by name or tag and link them to the event.
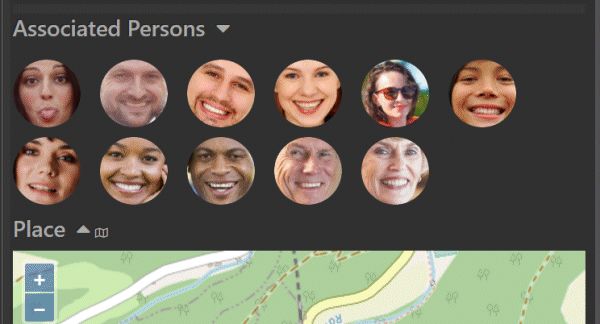
The Event Story shows the persons associated with an event:
If you want to add one or more website links to an event, enter them here. Some things you may want to link to:
You add links as plain text into the input field, one link per row. If you want to provide a title for a link, add it in front of the URL and enclose it in square brackets:
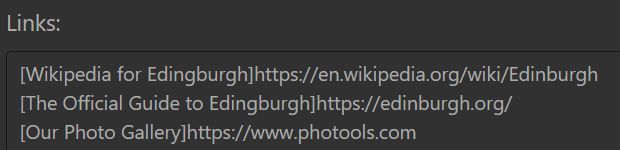
The Event Story lists links for events at the bottom:

Sometimes, when you create events from folders or categories, the resulting event contains outlier files with a vastly different date and time, spoiling the display of the event on the event timeline.
For example, you produce additional documentation and media for a folder-based event and put these files into the event folder. The new files automatically become part of the event. But now the event actually running from June 1. to June 14. contains additional files created in August or September. Since the event duration is calculated from the earliest and latest file in the event (except for date-based events), this messes with the event duration. The event duration is no longer 14 days, but several months! And this results in a very long (and misleading) duration bar on the timeline.
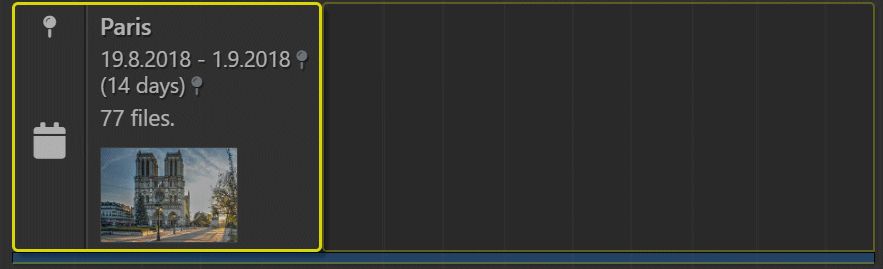
To deal with such situations, you can pin events to a specific start date and duration via the corresponding controls in the Event Editor. For the current example, you would pin the event to its actual start date on June 1. and pin the end date to June 14. Now the event appears with a 14-day duration on the timeline.

When you enable the pinning option in the Event Editor, the pinning start and end date are initially set from the start and end date of the event.
In most cases, you just modify the pinned start date, and then use the +1 day...+1 week... buttons to set the pinned end date relative to the pinned start date.
Event tiles for pinned events show a pin icon in the left upper corner and they are positioned at the pinned start date on the time axis. The duration bar reflects the pinned start date and the event duration calculated from the pinned end date, or, when there is no pinned end date, the actual end end date calculated from the files in the event.
If the event has only a pinned end date, the event tile is positioned at the start date calculated from the files in the event and the pinned end date controls the length of the duration bar.
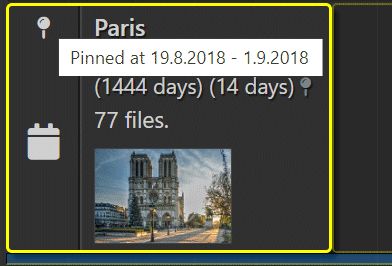
The following image shows an event created from a set of files that span 1,444 days. Maybe some documentation was added years later or some files in the event have a wrong timestamp.
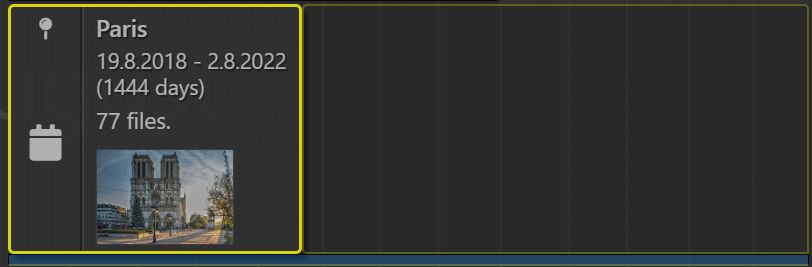
By pinning the event, we can specify a start and/or end date for the event to correct this problem:

The Event View offers three display types for event date and event duration:
Auto Date | This is the default. This type uses the pinned start/end date for pinned events, else the regular event start/end date calculated from the files in the event. If the event has only a pinned start date or a pinned end date, the missing date is calculated from the files in the event. If the auto date is used and the event is pinned, the date shows a small icon at the end. See screenshot above. |
Date | Displays the start and end date calculated from the files in the event. |
Pinned Date | Displays the pinned start and pinned end date. If the event is not pinned, no date is displayed. |
Auto Duration | Displays the duration of the event calculated from the pinned start/end date or the actual start/end date based on the files in the event. If the auto duration is used and the event is pinned, the duration shows a small icon at the end. |
Duration | Displays duration calculated from the files in the event. |
Pinned Duration | Displays duration calculated from the pinned start/end date. If the event is not pinned, nothing is displayed. |
If you configure custom layouts, we recommend to use the Auto variants for date and duration. This way you see date and duration matching the event tile and duration bar. The specific date and duration are useful if you need to see the actual and the pinned date range and duration.
When you hover the mouse cursor above the icon, a tooltip shows the pinned start and end date:
Besides placing an event at a specific day and duration, pinned events can be used for other purposes as well.
Pinning makes events independent from the dates and times of the files they contain. You can use pinned events to group any type and number of files, and place the resulting event at a specific day and with a specific duration on the timeline. This opens up new possibilities for visually arranging files along the timeline.
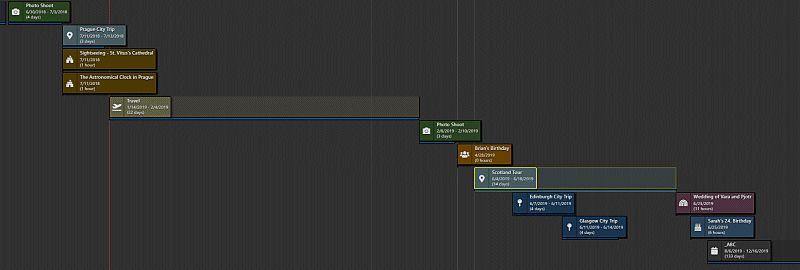
All events you create show up in the event timeline. The timeline arranges events horizontally and covers the timespan from the earliest to the latest event.
Each event has a start date and a duration.
The start date is set by you for date-based events and calculated automatically from the oldest file in the event for all other event types. The duration (time-span) is set by you for date-based events via the end date and automatically calculated for all other event types.
The timeline orders events based on their start date from left to right. The earliest event is displayed first.
Events use the standard File.DateTime IMatch maintains for each file. This is the same date you see in File Windows and that is used for the timeline, variables etc. See How IMatch uses Date and Time Information for more information.
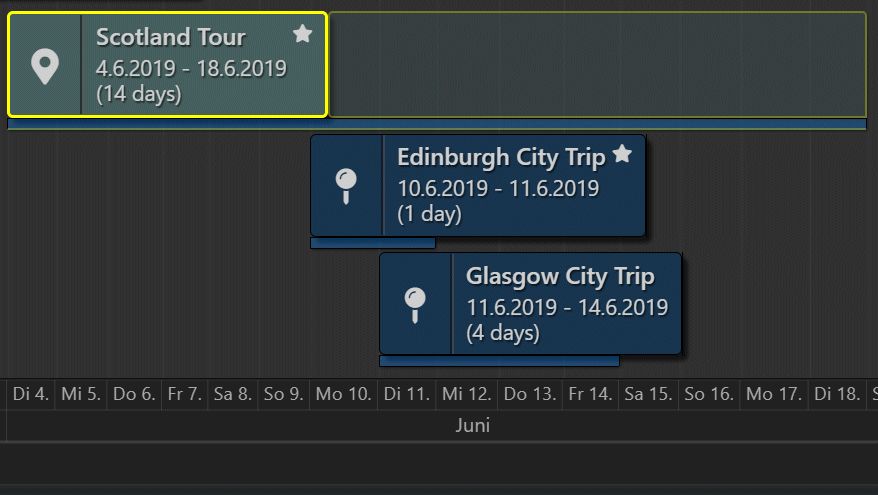
When events overlap, they are stacked. The earlier event is on the top, and below it the timeline places events with start dates in the time span of the other event.
Consider a two week vacation, with several day trips. If you create an event for the entire vacation and events for the day trips, the day trip events overlap with the two week main event and are stacked. This produces a neat 'temporal' arrangement of associated events.
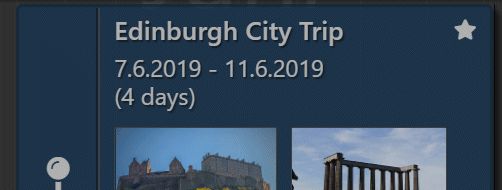
Each event is represented by the event tile and the optional duration bar:
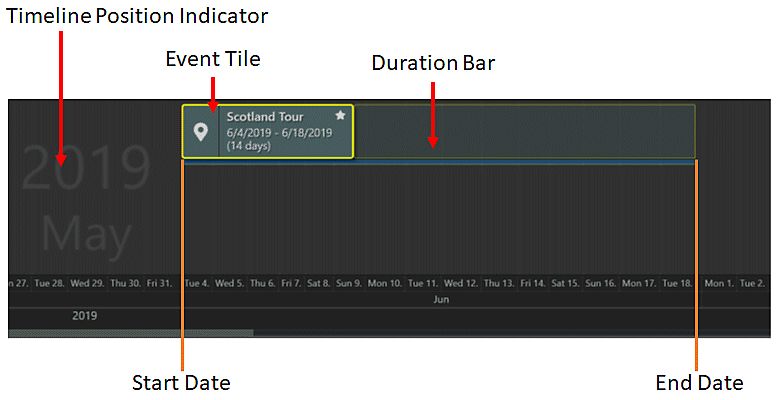
The event tile displays information like title, category icon, category color, start and end date, duration etc. You can configure the information to show via the layout settings.
The duration bar indicates the duration of the event, in days or hours (if the event has a duration of less than one day). The event in the image above has a duration of 14 days. The duration bar is wider than the event tile, creating a tail.
For events with a short duration, the event tile may be wider than the actual event duration:
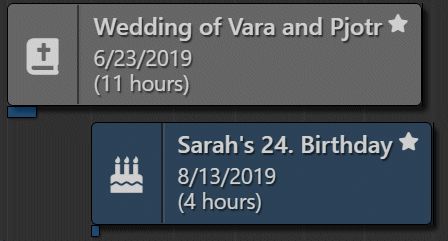
These events have a duration of a few hours each, but the event tile needs more space to display the information. The duration bar visible under the event tile indicates the actual event duration.
Events can have any duration, from a few hours to weeks or months. Usually it is best to limit events to a few weeks maximum, for a more pleasing and manageable timeline.
Events which receive their position on the timeline based on the files they contain, can become invalid.
Consider a folder-based event. If you delete the folder, the event will have nothing to calculate its position on the timeline or duration anymore. The same is true for category based-events ‐ when the category is removed, the event becomes invalid.
If an event does not 'contain' at least one file is also invalid, since there is no way to calculate its position on the timeline or duration.
Date-based events are an exception, because they always have a valid position and duration.
The timeline positions invalid events flush left at the start and marks them with a red flag on the right side of the event tile:

If you don't need the invalid event anymore, delete it. Else assign a different folder or category or, for file-based events, assign at least one file to the event.
The Open Event button appears when an event based on a folder or category is focused. Clicking this button switches to the Folder / Category View and opens the folder / category the event is based on.
This button opens the files of the focused event in the IMatch Viewer.
This button starts a slide show for the files of the focused event.
The timeline allows you to select one of 5 layouts. The layout controls the amount of information displayed for events.
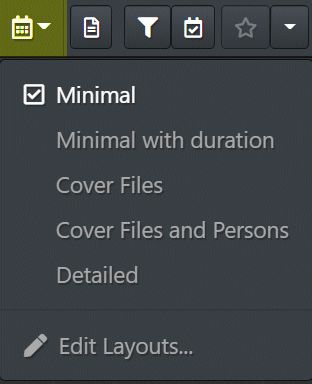
Selecting the layout to use for displaying events.
Via the Edit Layouts... command in the layout menu you can open the layout configuration dialog box which allows you to customize any of the 5 layouts:
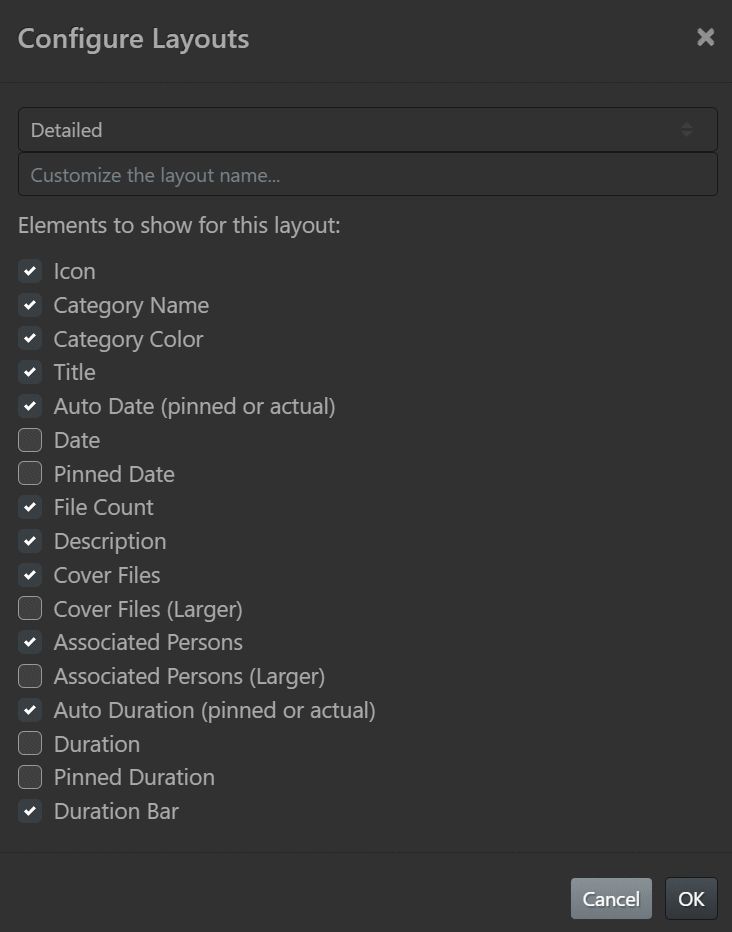
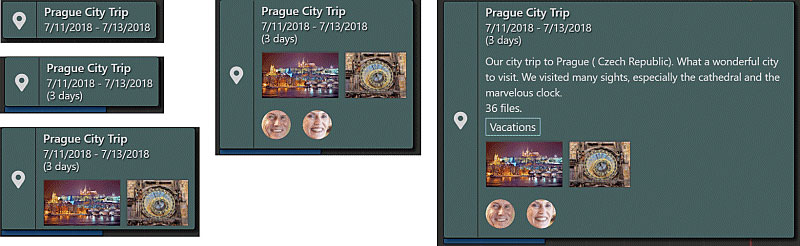
The default layouts produce a variety ranging from a very minimalistic layout (for small screens) to a very detailed layout with very large tiles:
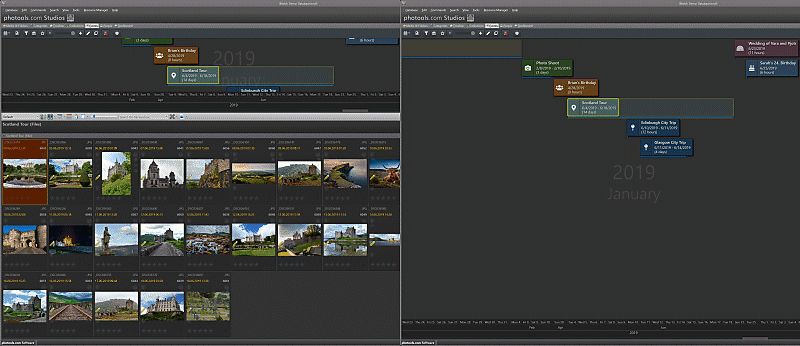
IMatch automatically creates the Event Story from the information you enter for an event. The more information you provide, the richer the Event Story will be. To open the Event Story, press S or click the corresponding toolbar button.

The Event Story for the focused event.
The Event Story shows the cover files you have selected for the event, the category and file count, date and duration, the description, associated persons and the place and address data for the event. If you add links for the event, you can open them in your web browser by clicking on them in the Event Story.
From the small toolbar at the top of the Event Story you can open the Event Editor and switch to the folder or category for folder-based and category-based events. The closes the event story, same as pressing S on your keyboard.
You can change the height of the cover file, description and map sections to adjust them to your screen size and personal preferences. Left-click and drag the track bars under these sections to change the height comfortably.
If you have added a place to your event, this section shows a map with the area surrounding the place and the address data below it. The location of all files in the event is indicated by blue circles:

You can zoom in and out using the mouse wheel. The Event Story panel remembers the zoom level automatically. When you switch to another event, the map is centered on the event place of that event. To work with GPS coordinates and location date, use the Map Panel.
You can hide the map collapsed with the small arrow icon next to the headline. If you use a fee-based mapping service like Google, Bing or HERE, showing the map will count against your (free) quota so may want to show the map only when needed.
You can select any of the map providers configured in IMatch under Edit > Preferences; > Geo & Maps in the Event View configuration dialog box. Click the in the Timeline Toolbar.
If you add links to your event, the Event Story lists them at the bottom. You can open the links in the default web browser with a simple click.
Links are a great way to connect an event with external information, websites, social networks, your online photo gallery, and more.
Use the scroll-wheel to scroll the timeline. If you scroll faster, the timeline moves a larger distance. You can also use the scroll bar at the bottom of the timeline to scroll with fine precision.
If the timeline shows deeply stacked events, it may be required to scroll vertically. In that case, either use Shift + scroll-wheel or the scroll bar at the right of the timeline.
A timeline with many stacked events.
The same will be needed when you show the Event Story and it exceeds the available vertical screen height.
You can maximize the timeline to enhance the vertical screen real estate.
Click into the timeline to focus it before using these keyboard shortcuts.
Cursor left | Navigate to the previous event. |
Cursor right | Navigate to the next event. |
Home | Go to the first event. |
End | Go to the last event. |
Ctrl + Home | Go to the beginning of the timeline. |
Ctrl + End | Go to the end of the timeline. |
Page Up | Scroll the timeline one page to the left. |
Page Down | Scroll the timeline one page to the right. |
C | Scroll to the focused event. |
F11 | Maximize or restore the timeline. |
| Favorites | |
|---|---|
V | Set or clear the Favorite status for the focused event. |
B | Show or hide the Favorite Bar. |
To select an event, left-click the event tile or duration bar. This selects and focuses the event. The Event Story shows the data for the focused event. To select multiple events, use Ctrl + left-click. The focused event shows with a yellow border, other selected events show with a red border.
If you navigate the timeline with the cursor keys (see below), you automatically set the focus and selection.
By clicking on a year, month or day in the time axis at the bottom of the timeline you load all the files created during that time span into the File Window.

Viewing the files created in February 2020.
Note that different from the Timeline View, the time axis may include days (sometimes even months) without files. This happens when you use date-based events which include days where no files have been created. If you click such a day, IMatch displays a notice and the File Window is emptied.
When you enable the Files Calendar, you can see if and how many files were created on each day.
You can add events to the Favorites by selecting the event and then clicking on the button in the toolbar, by dragging the event into the Favorite Bar or by pressing V to toggle the Favorite status of the focused event.
Favorite event show a little icon in the upper right corner of the event tile:
To remove a favorite, focus the event (click it) and press V or click on the button in the toolbar.
All Favorites you have created are shown in the Favorite Bar.
Press B on the keyboard or click the arrow button next to the Favorite button in the toolbar to show and hide the Favorite Bar.
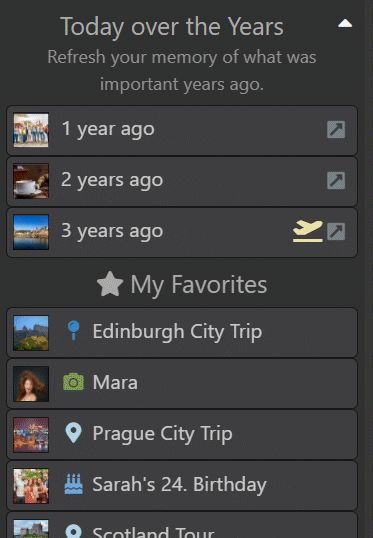
The Favorite Bar with Today over the Years and My Favorites.
This section lists all your Favorites in alphabetical order. Click on a Favorite to navigate to the corresponding event.
Drag events into the Favorite Bar to make them Favorites.
This section allows you to revisit images created on today's date, but one or more years ago. Looking a few years back can refresh your memories and often reveals interesting or awesome images you have long forgotten about.
You can configure the number of years to show here in the timeline configuration. Only years with at least one file on today's date are listed.
With the little caret icon next to the title at the top you can collapse this section to make more room for Favorites.
You can zoom the timeline between 10% and 100% either with the zoom slider in toolbar or with Ctrl + scroll-wheel. This can be very useful if you have many events or you want to look at a larger timespan.
The keyboard shortcut Ctrl + 0 resets the timeline zoom to 100%.
The timeline at different zoom levels
In order to see deeply stacked events or to see more of the event story, you can maximize the timeline to occupy the entire height of the Event View. If you maximize the timeline, the File Window is hidden. Use the maximize/minimize button in the toolbar to toggle the maximized mode or press F11.
Normal and maximized timeline.
Maximizing the timeline will allow you to see dialog boxes and the event filter better, especially when you work on a small screen. You can also use the scroll wheel to scroll vertically to see the entire dialog box, if needed.
Click on the button in the toolbar to open the Go to Date dialog box. Select a year and month to scroll the timeline to the selected date. The keyboard shortcut is Ctrl + G.
The dialog box shows only the months with data (events, files) for the selected year.
Click on the button in the toolbar to open the Event List. This list shows all your events in a very compact format. It allows you quickly find events by searching for text in event properties like title or description, and to filter by event categories and associated persons.
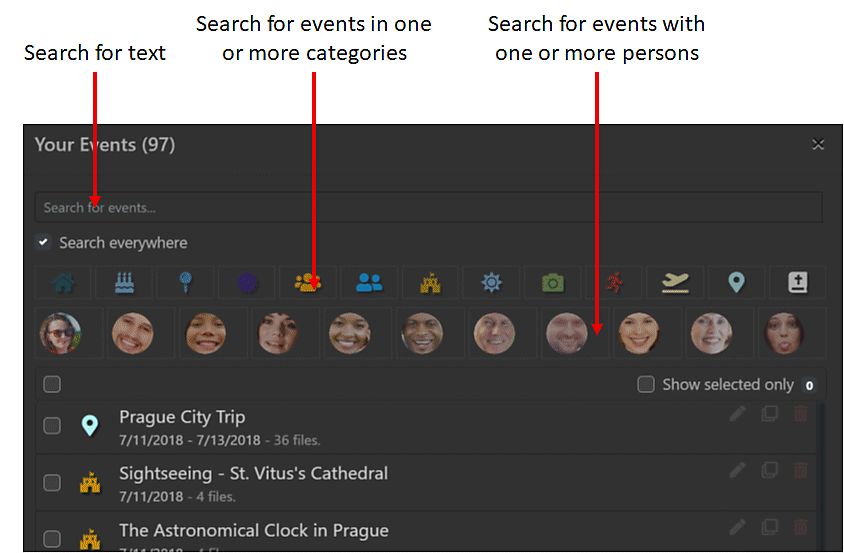
To find events by title, description, location, year etc. just type in some text at the top. The event list updates immediately to show all events matching your search term. Uncheck the search everywhere check box to control which event properties you want to include in your search.
The category list and person lists show categories and persons associated with at least one event in the current search result (or all events, if no search is active). Click on one or more categories or persons to see only events in the selected categories or associated with the selected persons.
To see all events in one or more categories, click on the category icons and leave the search field empty. In the same way you can quickly filter for events associated with one or more persons.
When you click on an event in the list, the timeline scrolls to that event and focuses it. If you have the Event Story open, you see all relevant event information for the clicked event.
Close the Event list when no longer needed. It automatically remembers the current search settings.
Use the Reset Filter button to clear all filters.
If you search or filter in this dialog box, you control which events are shown in the event list. But this does not affect the timeline itself. When you close the event list, it remembers the filter, but you will still see all events in the timeline.
To apply the filter to the timeline itself, click on the Apply Filter button. This closes the event list and filters the timeline to show only events matching the filter. A quick way to reduce the number of events to handle in the timeline.
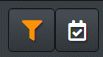
When a filter is active, the event list toolbar button changes its color to indicate that:
To remove the filter, open the event list again and click on the Reset Filter button and then close the event list. The timeline reloads and the event list button changes back to its default color.
Using the check boxes in front of the events in the list, you can quickly select some or all events in the result (this also selects the events in the timeline). When at least one event is selected, the duplicate and delete buttons in the toolbar above the list become available:

The same commands are also available in the timeline toolbar, but sometimes it's more convenient to use them together with a filter.
In addition to the events, you can configure the timeline to display an additional files calendar at the bottom. This calendar displays the number of files created per day, month and year, similar to the Timeline View:
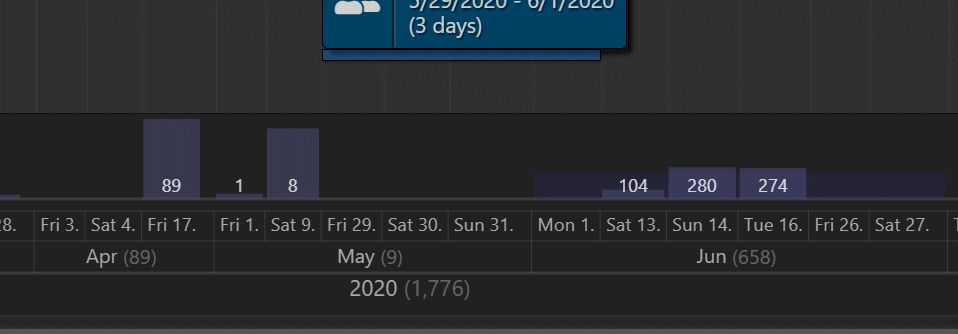
In the screenshot, you see the year 2020 at the bottom, above it the months April, May and June and above that the days of each month. Each segment lists the number of files created in its period. For example, 280 files were created on June 14. and 658 files in June 2020.
If years, month or days without files created are included depends on the axis folding mode.
The height of the day bar is an indicator of the percentage of the images taken that day, relative to the total number of files taken in that month. The higher the bar, the busier the day in that month.
Behind the day bars, the month bar indicates the percentage of files taken in that month, relative to the year. This tells you which months were the most busy.
The timeline by default only displays days included in (overlapped by) one or more events. And, if you use the files calendar, days where at least one file was created. This creates a very compact and efficient timeline.
If you create an event in January and the next in April, the timeline skips February and March, where nothing happened. If there are no events in June, but you've created files on the 3. and 19., the timeline shows these two days only.
Smart folding creates compact and efficient timelines. If you don't want this, you can change this in the timeline configuration.
To open the timeline configuration, click on the button in the toolbar.
| Setting | Description |
|---|---|
Files Calendar | Enable the Files Calendar to see when files were created. |
Timeline Position | This setting controls where in the Event View the timeline is docked. If you work on a small screen or a notebook, you may prefer to dock the timeline on the left or right of the Event View to better utilize screen real estate. |
Story Pane Position | This setting allows you to control where the Event Story pane is docked. If you dock the timeline horizontally, the Story pane may work better for you if you dock it on the top or bottom. |
Day Format | Controls the format to use for days in the timeline |
Month Format | Controls the format to use for months in the timeline |
Use smart axis folding | Enables the axis folding (on by default). |
Limit Files Calendar to event date range | This is another optimization, especially in combination with axis folding. If this is enabled (default) the Files Calendar only shows days which are also included in one or more events. If this setting is off, the Files Calendar considers all files in the database. |
Map Provider | This setting controls which map provider to use for the Event Story map section. All map providers with configured credentials are shown in this list. |
'Today over the Years' shows' | This setting controls how far bar back in time the Favorite Bar looks. |
Events can be exported into a text file in JSON format. This makes it possible to import them into another database, if required.
For events linked to database objects (file-based events, folder-based events, category-based events), the export file contains the fully-qualified paths of these objects. This allows IMatch to re-create the events during import, provided that the target database contains the same files, folders and categories.
IMatch Sort Profiles support several event-related attributes. This allows you to sort files in the File Window and elsewhere by attributes like event date, title or category.
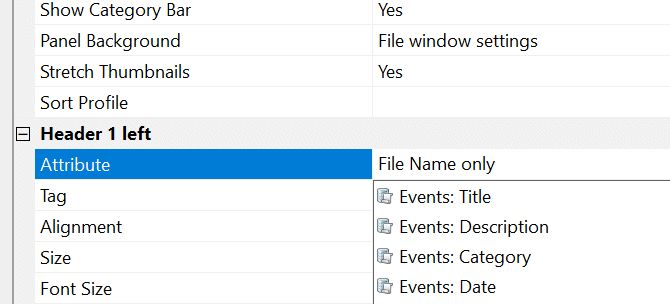
File windows support multiple event-based layout attributes you can use to display event information in the thumbnail panels.
IMatch supports a number of variables you can use to access event data. These can be used to display the event a file belongs to in a File Window layout or in Design & Print, for example. See Event Variables for more info.