IMatch contains built-in powerful artificial intelligence (AI) face recognition technology and features to organize your files automatically based on the...
IMatch contains built-in powerful artificial intelligence (AI) face recognition technology and features to organize your files automatically based on the persons shown. This help topic explains everything you need to know.
The IMatch AI runs on your computer, not in a 'cloud' or on an external server.
No image or face data is transmitted to 3rd parties.
If you start with an existing database and you just have upgraded to the latest IMatch version and are working with face recognition for the first time, make sure you read the section Starting with an existing database below.
IMatch does a lot more with faces and persons than other software you might have used before.
We recommend reading this topic top-to-bottom at least once. Later you can use these quick links to jump to specific areas.
Expand the Table of Contents at the top of this page for a complete overview of all topics covered here.
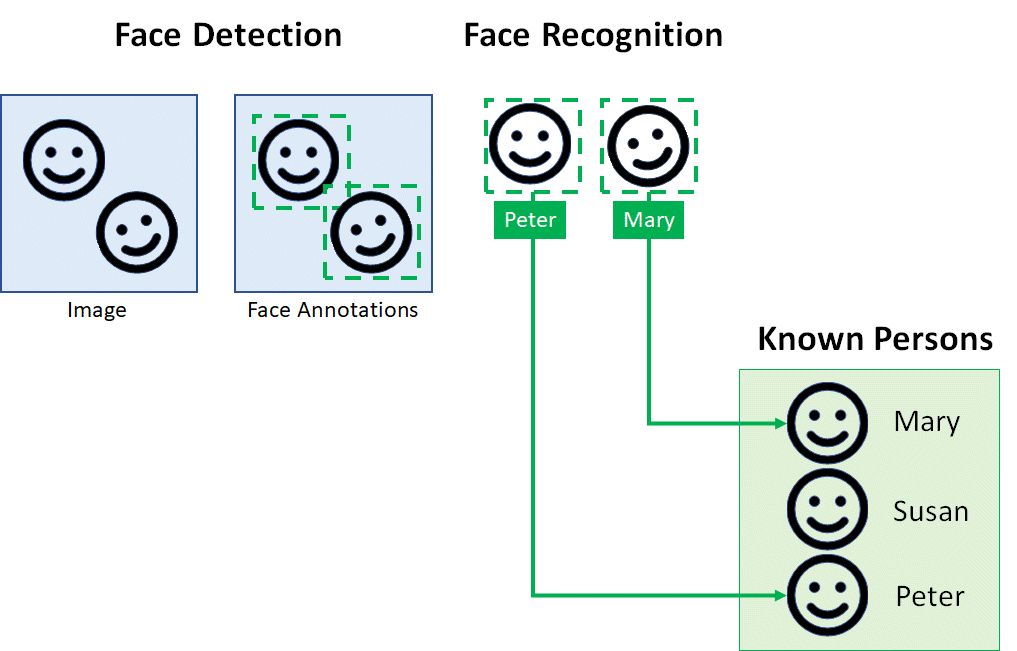
The IMatch AI analyzes your images to find faces and then links these faces to known persons you have created in the People View.
You can configure IMatch to automatically run face recognition for new and updated images (Edit > Preferences > Application: Face Recognition or you can run face recognition on-demand in File Windows and the Viewer.
When new faces are detected, IMatch automatically assigns the best matching person. You can confirm the assigned person or assign the correct person when IMatch was wrong.
Once you have face annotations created and persons assigned, you can use all the features IMatch offers for working with persons and faces.
Several features in IMatch use face and person data to organize your files.
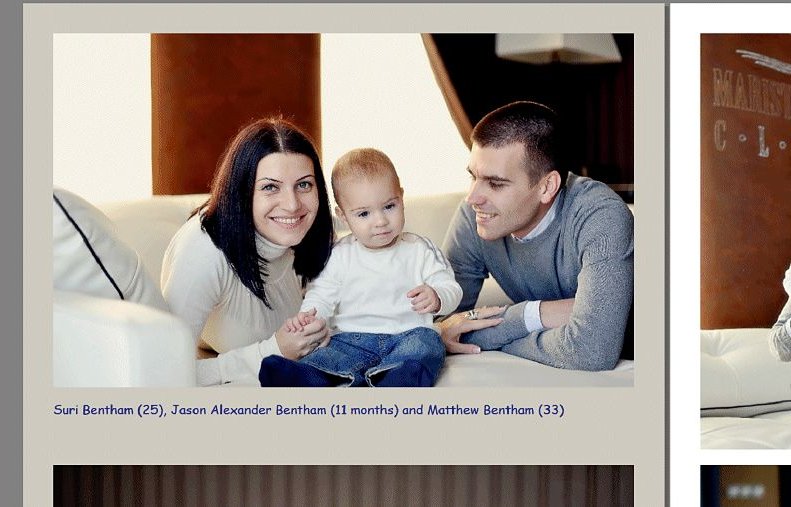
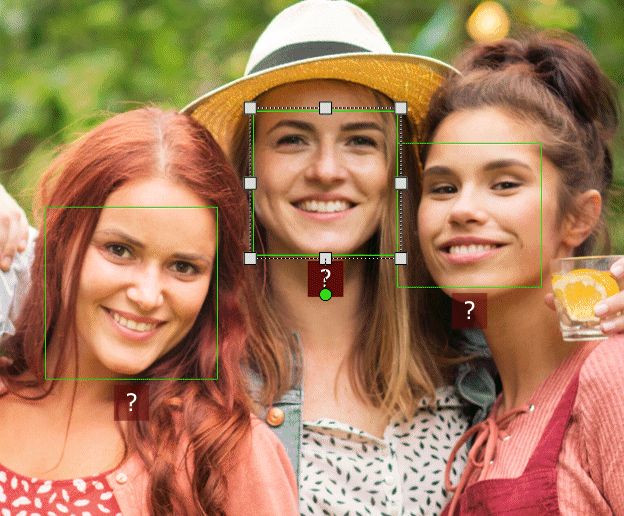
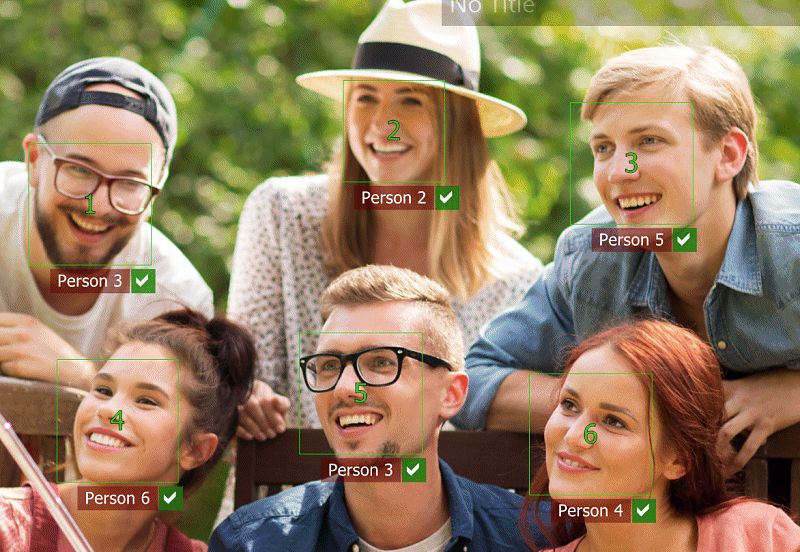
File Windows can display tags, names, ages etc., of the persons recognized in the image:
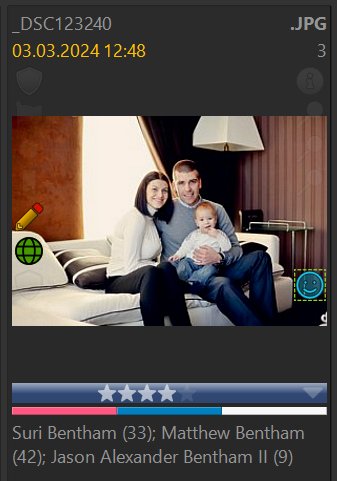
An image with three recognized faces in a File Window. The thumbnail panel displays the name and age of each person. The displayed age is calculated dynamically, relative to the date the photo was taken from the day of birth for each person!
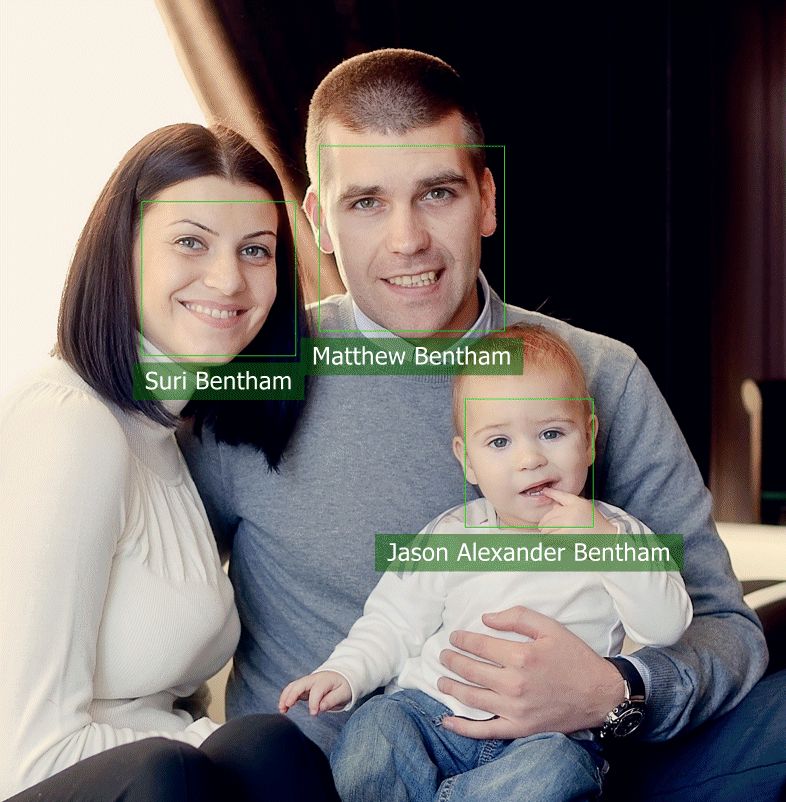
The Viewer optionally displays face annotations and known persons.
It is also one of the main tools for working with persons and face annotations. Here you assign persons to faces, review assignments done by the IMatch AI and run manual face detection if required.
Face Annotations in the Viewer
To hide face annotations in the Viewer via the Pause button in the Annotation Panel or via the keyboard shortcut A, E.
It can sometimes be useful to hide face annotations, i.e., when your image shows many persons close-by and the annotations and labels overlap the faces you actually want to see. Even if face annotations are hidden, the tooltips work normally. By hovering the mouse cursor over a face, you can see the person label for the person:
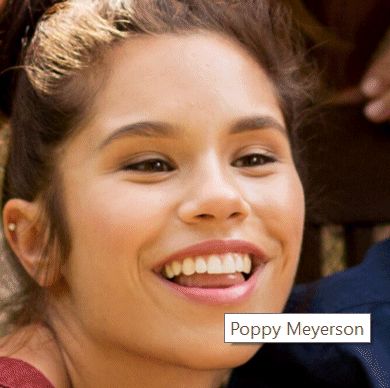
A tooltip showing the person label, even when annotations are temporarily hidden.
Face annotations are displayed in the Quick View Panel. You cannot edit or confirm faces in the Quick View panel, however.
See Annotations for general info about the different vector annotation types supported by IMatch.
The People View is the primary feature for working with persons, families and persons. Here you can view the files linked to persons, add and edit persons, families and groups.
IMatch organizes your files by known persons in the People View.
With the People Filter, you can filter the current scope in the File Window for images containing one or more persons or a combination of persons. The filter offers options to quickly find images without faces, unconfirmed faces or with missing person assignments.
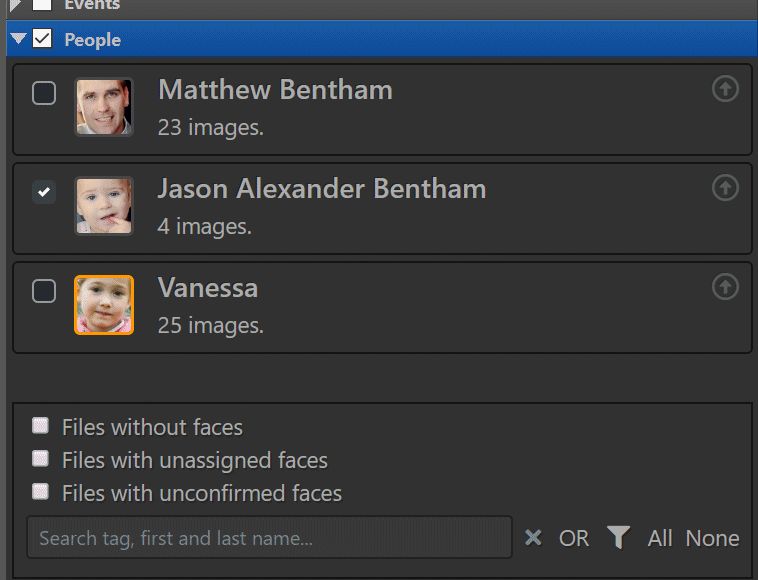
See People Filter for more information.
The Face Manager allows you to quickly review, confirm, train and change persons IMatch has assigned to faces. You use it to quickly work through all faces assigned to persons, which is especially useful when you begin with face recognition and have thousands or even tens of thousands of faces to process.
IMatch automatically organizes images based on how the persons in the image are arranged in form of a category hierarchy:
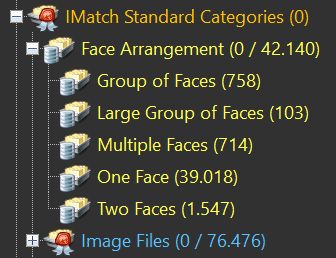
Images organized by face arrangement in the Category View.
You can use these categories e.g. to find images with groups or persons or images with "Paul" and one or more other persons.
See Face Arrangement for more information.
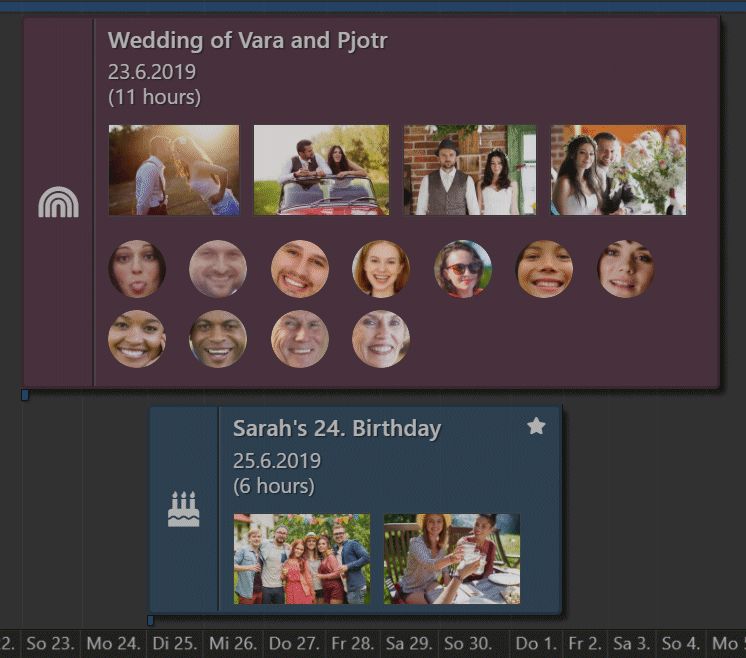
Persons can be associated with Events. The Event View shows persons linked to an event together with other information in the detailed view:
People data is accessible via variables, and this makes it easy to use them in features like the Batch Processor, Text Export or in the Design & Print feature:
Creating smart captions based on person variables to automatically annotate images in your print documents.
There are two steps to perform in order to work with persons in IMatch:
Face detection is the first step. During face detection, IMatch loads images and analyzes them to find faces. Information about the faces found is stored in the database. Each new face is compared with faces of known persons, to connect the face to a person. If no matching person is found, the face remains unassigned.
Creating persons and linking them to persons is the second step. We'll cover this later in this help topic.
IMatch can only run face detection on images which are online or for which cache images have been created previously. Face detection always uses the original image, not the visual proxy if one is configured.
There are two ways to perform face detection. You can run it manually, on-demand. And you can configure IMatch to automatically run face detection when adding new or updating existing images.
Manual face detection gives you precise control over which files are processed and the options used. This mode is recommended if you start with an existing database (see also the notes below) or when you have many files which don't contain faces and you want to save time by not processing them.
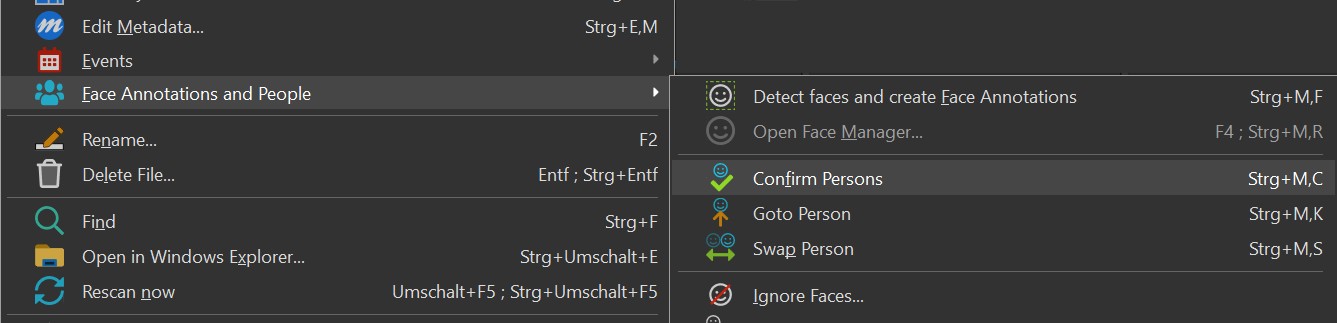
To run the manual face detection, select the files you want to process in a File Window, and then use Face Annotations and People > Detect... from the right-click context menu. The keyboard shortcut is Ctrl+M , F.
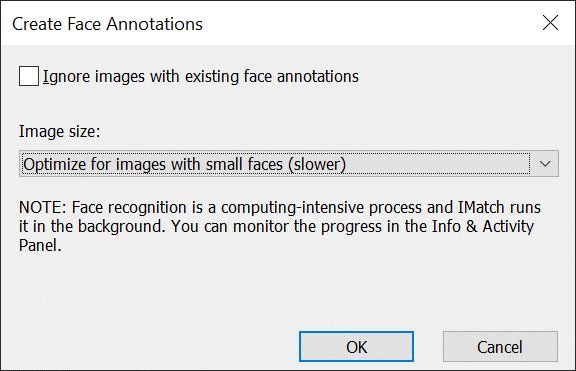
IMatch checks all selected files to see if they are online or have a cache image. Then it displays a dialog box where you can configure some options for the recognition process. You can optionally exclude files with existing face annotations (recommended in most cases) and you can override the image size IMatch uses for detection. See face recognition options below for more info.
Click on OK to add the selected files into the background processing queue. IMatch processes the files in the background as soon as possible. A message informs you about the number of files added to the queue:
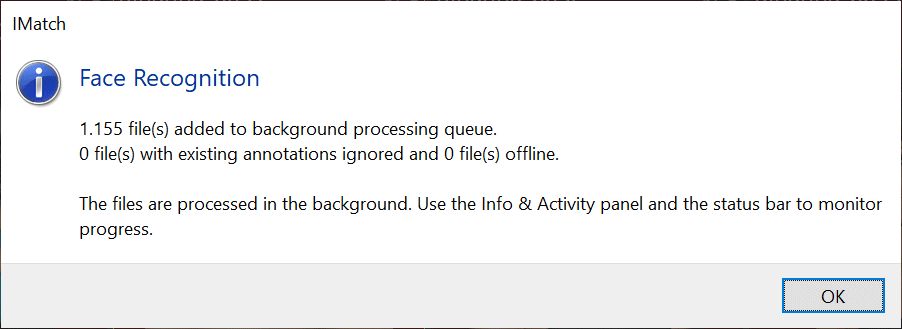
While IMatch runs face recognition, the Info & Activity Panel displays the progress and an estimate for the remaining processing time. The same information is also available in the Dashboard.
The status bar at the bottom of the IMatch window also displays a progress indicator.
If you accidentally start face recognition, you can cancel it by clearing the processing queue. Click on the banner at the top of the Info & Activity Panel, the progress indicator in the status bar or go to Database > Database Tools > Clear Processing Queues...
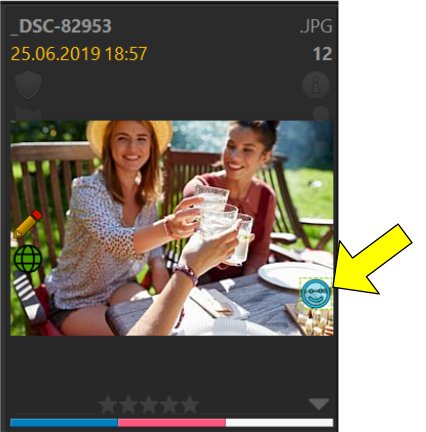
Images with (face) annotations show a blue face icon in the File Window:
The Viewer and the Quick View Panel indicate detected faces with a face annotation rectangle:
Face annotations in the Viewer. No persons have yet been assigned to these faces.
If the Quick View Panel does not show annotations, you need to enable this feature via the context menu in that panel.
If no faces are found for some of the images, repeat the manual face detection process for these files. This time choose the Optimized for images with small faces option in the face detection options dialog box.
If the faces in the image are very small, IMatch may be unable to detect them, when the normal detection mode is used. The normal mode uses a source image with approximately 1000 pixels for detection. This is a good size for typical portrait or people/family photos and results in a good performance and detection rate.
If the faces in the source are smaller than 80-100 pixels, they may be missed. The Optimized... mode uses source images with four times as many pixels and can detect much smaller faces. But it is also slower. Not a big deal when you process only a few hundred files, but it sums up when you process tens of thousands of images.
There are modes for using the original image at 100% size and even for up-sampling small images. These modes help with special cases like very small images, or images with many small faces (large groups of people or choirs).
Note that face detection is much slower when you use one of the advanced modes. It is usually best to first run face detection in the normal mode. Then re-run it in one of the advanced mode for images where faces were missed in the first run.
You can also run face detection while in the Viewer. This always uses the 'Optimize for small faces' mode.
If you work with very small images, try zooming in in the Viewer and then running the face detection again. This trick often allows the IMatch AI to pick up even very small faces.
When you view images in the Viewer, you can start face detection by pressing F6 or by using the corresponding command from the context menu.
The Viewer offers additional commands for working with face annotations. These are described below.
When you enable this under Edit > Preferences > Application: Automatic Face Recognition, IMatch automatically performs face detection when it indexes new files. It also searches for persons matching the newly detected faces and assigns them.
File with existing faces are not processed again.
If you want to re-process files for some reason, run a manual face recognition as described above.
Running face detection during indexing will slow down IMatch. About 0.25s to 2s is required for face detection per image, depending on the image size and format and the speed of your computer. RAW files take longer than JPEG files if IMatch first has to create a temporary cache image before it can run face detection.
During face detection, IMatch identifies faces in your files. The AI creates a digital fingerprint and a face annotation for each face found. When you look at one of the processed files in the Viewer, it will look similar to this:
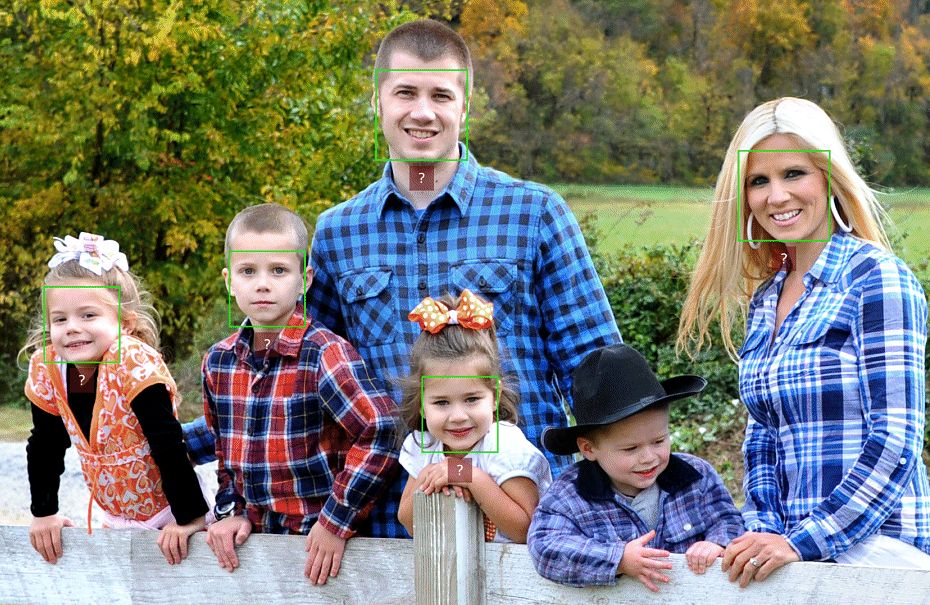
Several faces have been detected in this image, but IMatch could not identify any person yet.
Note that no face was detected for the small boy on the right. The angle of the face or the hat prevented IMatch from detecting the face. We'll fix this in a moment.
IMatch allows you to create any number of persons. Persons are managed in the People View. A person is initially just a data record, with properties like a unique tag, a name, date of birth and other information. Everything except the tag is optional. How much information you add for each person is up to you.
Unique Tag: While several persons in your database can have the name 'Mike Smith', they must have different tags to allow identification. IMatch ensures that all persons have a unique tag.
The following characters are not allowed in person tags: @:<>&{}[]^\\/?*%~,;.
You can create persons in the People View or directly from a face annotation. For this example, we'll use the second option.
To assign a person to face, double-click the face annotation or click on the face and press F2. This opens the Person Selector. Alternatively, click on the ? label below the face annotation rectangle. The Person Selector dialog box allows you to see suggestions made by IMatch, select from a list of existing persons and the list of recently used persons. You can create a new Person directly from this dialog box when needed.
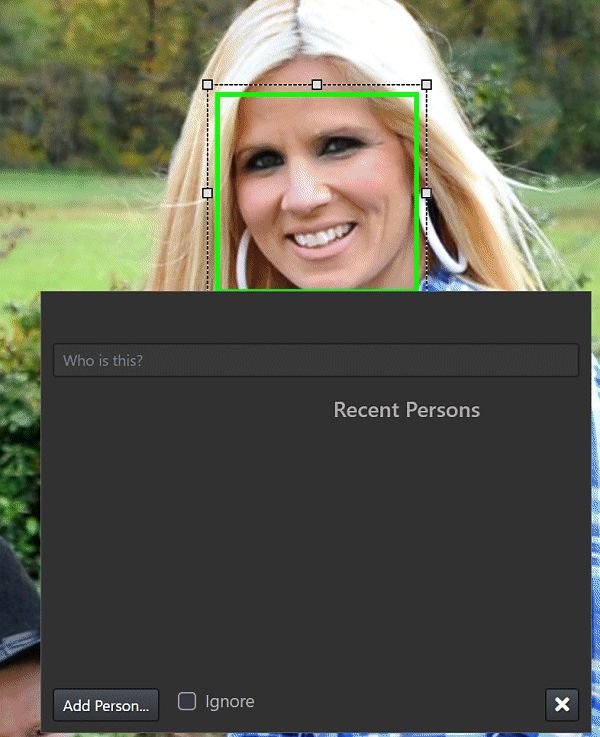
The Person Selector dialog box. No persons exist yet in this database, so there are no suggestions or recently assigned persons.
The Person Selector displays the label of persons (not necessarily the tag). See Person Label for more info.
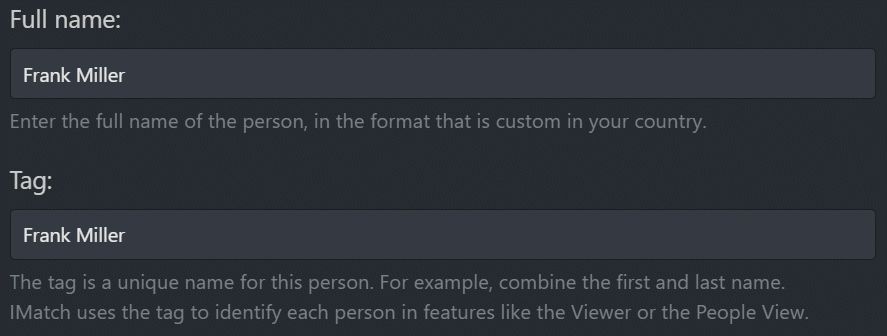
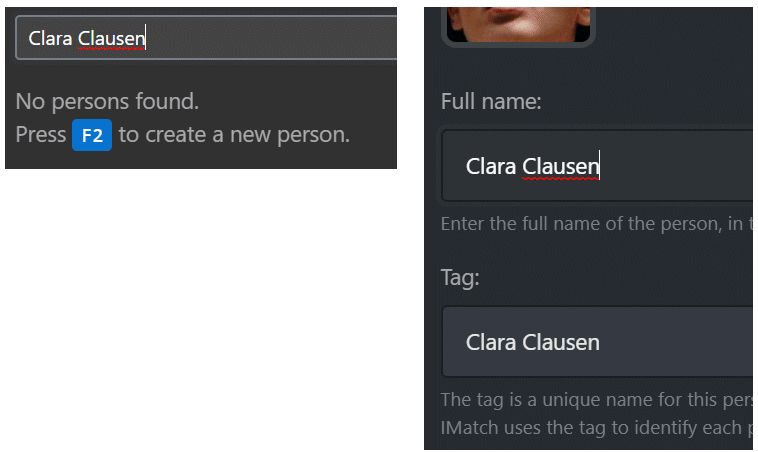
Clicking on Add Person switches to the Person Editor dialog box. Here you enter the name of the person - using your preferred naming convention. How names are written often depends on the country you're in and IMatch makes no assumptions about how the full name is formatted.
IMatch automatically creates a unique tag from the name while you type (unless there is already a tag). You can change the tag to your liking. In this example, we removed the middle name from the tag to make it shorter. Short tags are generally preferable.
IMatch checks the tag for uniqueness when you save the person data. If there is already a person with that tag in the database, IMatch displays a message. Make the tag unique by adding more text or appending a number.
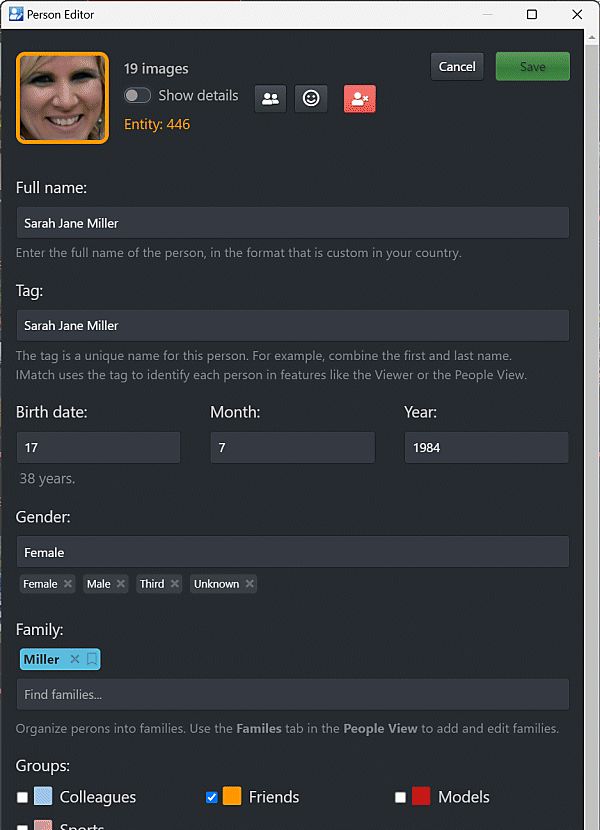
The Person Editor
We've also entered Sarah's date of birth and assigned here to the group 'Friends'.
By default the editor only shows frequently used properties. Enable the Show Details switch (at the top, next to the person's image) to see all available properties.
Entering the birth (DOB) or death (DOD) date is optional, but you should add it when known. IMatch uses the date of birth to aid the AI and for example in the File Window to display the age of a person relative to the date the image was taken. The relative and absolute age are available via person variables for other IMatch features.
The age of a person (calculated from the day of birth entered) is taken into account when IMatch performs face recognition. It helps the AI to decide whether or not a person is a possible match for a face in an image.
Faces change over time. They change more when a person is very young and less for mature persons. The IMatch AI considers this when matching faces.
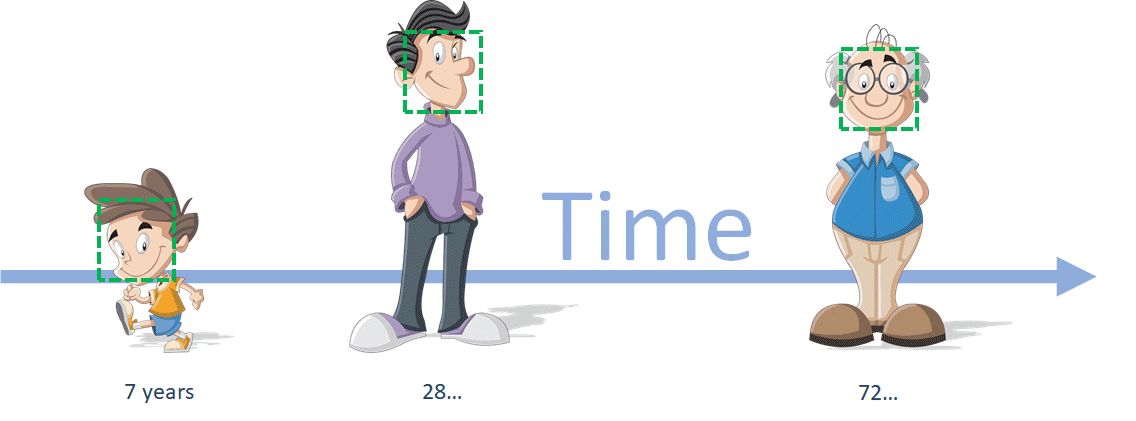
The lifetime of a person
When IMatch analyzes faces in an image to find matching persons, it considers the age of the person relative to the date the image was taken.
For example: IMatch performs face recognition for an image with a date from May 1980. When it checks if 'Paul' is a match, it considers that Paul was born in 1960. Trained faces from Paul at the age between 20 and 30 are considered as more relevant than faces of Paul at the age of 60.
IMatch optionally considers the lifetime of a person. Person not born or already deceased in 2010 are not considered for images taken in 2010. For this feature to work correctly, the following conditions must be met:
This feature is optional because it could cause face recognition to perform badly when the date and time in your images is not correct. If the image dates are wrong, persons actually in the image cannot be matched if the person lifetime does not match the (wrong) date and time of the image.
For example, consider a person deceased in 2010. You have an image taken in 1990, but the date and time of the digital image is accidentally set to 2020. The person will not be considered for face matches because of the mismatch between the person's lifetime and the image date.
Different countries use different ways to sort people. Or arrange family name and individual names in different sequences. To handle all that, IMatch uses a default sort order for people but allows you to override this sort order for each person.
By default, IMatch sorts persons in the People View and elsewhere by their unique tag, unless the sort by property has been set. Using this property allows you to control precisely how persons are sorted.
Consider a database with persons tagged as: 'Susan Miller', 'Anna Miller' and 'Barbara Paulson'. When IMatch sorts these persons by their tag, they will be listed in this order:Anna Miller
Barbara Paulson
Susan Miller
This may, or may not, be the order in which you want these persons to appear. If you prefer to order them by their last name (family name), you can achieve that by filling the Sort by property.
| Tag/Name | Sort by property set to |
|---|---|
| Anna Miller | Miller,Anna |
| Susan Miller | Miller,Susan |
| Barbara Paulson | Paulson,Barbara |
If the Sort by property of a person is filled, IMatch uses it for sorting instead of the tag. In this example, the above setup changes the order to:Anna Miller
Susan Miller
Barbara Paulson
If you want to create a specific sort order within persons with the same last name, you can use something like:
Miller,02,Carl
Miller,01,Susan
Miller,03,Anna
To order these persons as:
Susan Miller
Carl Miller
Anna Miller
The numbers enforce the specific sort order in this case, not the first name.
The Sort by property gives you complete control over how a person is sorted. You can use parts of the person's name or any combination of text and numbers to create the sort order you want or that is custom in your country.
You can sort files in File Windows by the persons that have been assigned to them.
Sort Profiles support a variety of person properties for sorting.
By default the Person Editor only shows frequently used properties. Enable the Show Details switch (at the top, next to the person's image) to see all available properties.
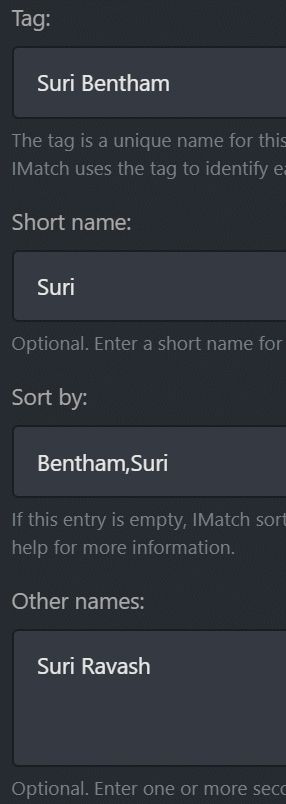
There are many other properties you can enter for a person. Short name, secondary names (i.e., birth name, maiden name, previous names), title, email, address data, a description and more. If and which of these properties you use is totally up to you. You can access all person properties via person variables, which allows you to use this data with many IMatch features.
We recommend to fill in the person's full name, tag and day of birth as a minimum.
Different countries have different rules or customs for how names are changed after marriage or divorce. Sometimes a person's name is different in different languages or idioms. And sometimes people change their name for other reasons.
To handle all these cases, IMatch offers the Birth Name and a generic Other Names properties, which allow you to record any number of additional names for a person.
Using the clone button () in the Person Editor you can clone the current person. IMatch creates a new person and copies over all properties from the current person. It also generates a unique tag automatically. Note that cloning a person in IMatch is fully legal
Click on the delete button () to delete the current person.
Deleting a person cannot be undone.
All keywords and categories associated with the person are removed from the files with faces assigned to that person. Depending on how many files are linked with that person, this can take some time.
By default, IMatch assigns the 'best' matching person to faces when it performs face recognition or updates person assignments in the background. If you want to prevent a person from being considered for automatic assignment, enable this option in the Person Editor.
Persons with the Don't automatically assign option enabled, show a corresponding icon in the People View:

Amanda has the Don't automatically assign option enabled and is not considered by IMatch when assigning persons to faces.
Click the icon to toggle the state of the Don't automatically assign option.
If multiple people are selected, including the person you click the icon for, the state of all selected persons will be toggled.
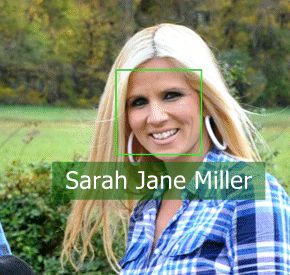
After closing the editor with Save, the newly created person 'Sarah Jane Miller' has been linked to the face. The Viewer shows the name in the person label box below the face annotation:
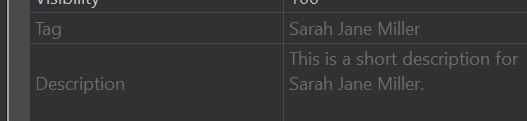
A person must have a tag and can optionally have a full name, short name and secondary names (like the birth name).
For example, a person with the full name 'Sarah Jane Miller' may have 'Sarah M' as the short name, and 'Sarah Jane Smith' as a secondary (birth) name.
By default, the label shown in the People View, Viewer, Quick View Panel, Person Selector etc., is the person's unique tag. You can change this to other person properties like the full name (as we did for this example) under Edit > Preferences > Application: Property to use as label. Just search for label in the Application settings to find the options.
The Viewer shows the label under each face annotation. The property panel shows the labels of all known people in the current image:
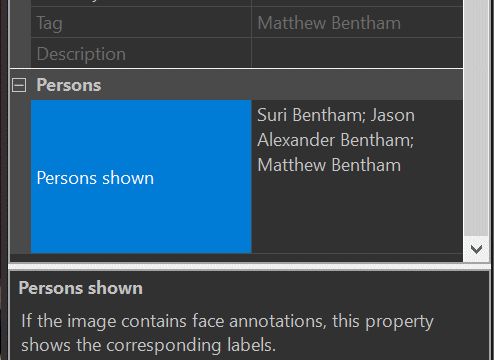
You can hide face annotations in the Viewer via the Pause button in the Annotation Panel or via the keyboard shortcut A, E. Alternatively use the Display Options > Show Annotations command from the right-click context menu in the Viewer.
You can use the property panel in the Viewer to set tags and description for annotation objects. For face annotations, these properties are read-only and automatically filled from the properties of the person assigned to the face.
In the section above we have created a new person and assigned 'Sarah Jane Miller' to a face.
When you assign a person to a face (new person or existing person), the IMatch AI learns that this face belongs to this person. It uses the face fingerprint of the face created during face detection and updates the internal model it maintains for the person. This enables it to recognize the person when it encounters similar faces.
When you assign a person to a face, IMatch searches all unassigned faces in the database to check for faces belonging to the person. After you have assigned a person to a couple of faces, IMatch is usually able to find matching faces automatically.
In this example, several matching faces were found. IMatch automatically assigned the person 'Sarah Jane Miller' to these faces in our test database:
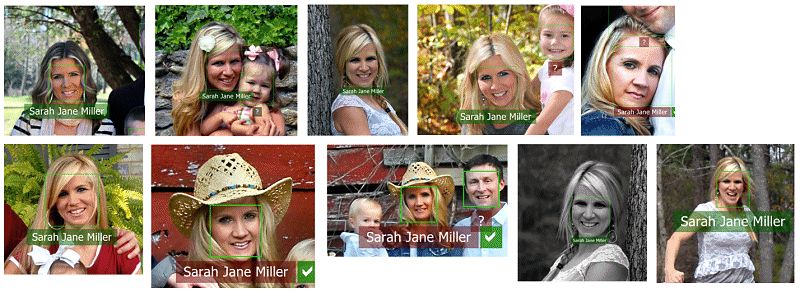
The photos vary in lighting, size and layout. And they have been created over a period of several years. The IMatch AI face recognition technology is very tolerant for differences in age, lighting, hair style, facial expressions etc.
When IMatch automatically assigns persons to faces, it does this by default as an unconfirmed assignment. This means that the assignment is considered as a suggestion, with more or less confidence.
Unconfirmed persons are subject to re-assignment when IMatch reprocesses faces when you assign persons to faces in the Viewer or when you confirm person assignments. The IMatch AI learns from your actions and may be able to do better assignments afterwards.
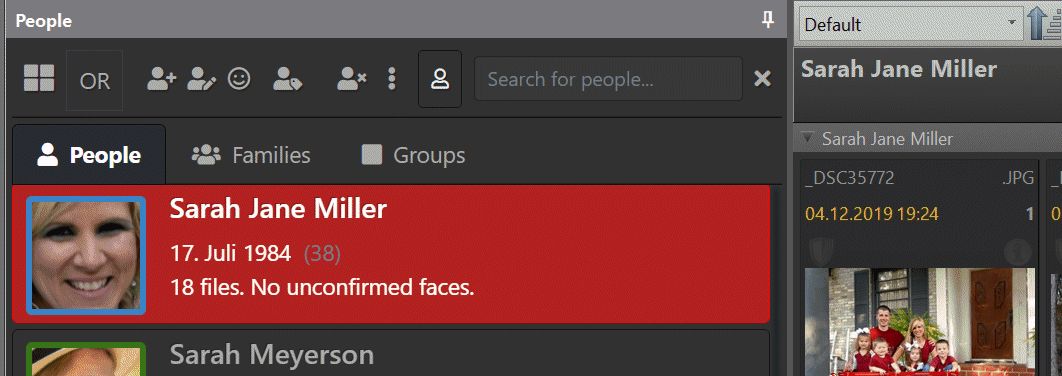
When we switch to the People View and click on the Person 'Sarah Jane Miller', IMatch displays all images containing faces linked to this person:
In the workflow described above we're created a new person named Sarah Miller and assigned her to some faces. We've also covered how tags and labels work, how to clone and delete persons via the Person Editor.
Creating persons on-the-fly when unknown faces show up is one way to work with persons and faces. Another way is to create persons first in the People View. This way you can directly select them when assigning people to faces.
This workflow is especially helpful when you only have to deal with a fixed set of persons, like family and friends.
Click on the New Person button in the ribbon.

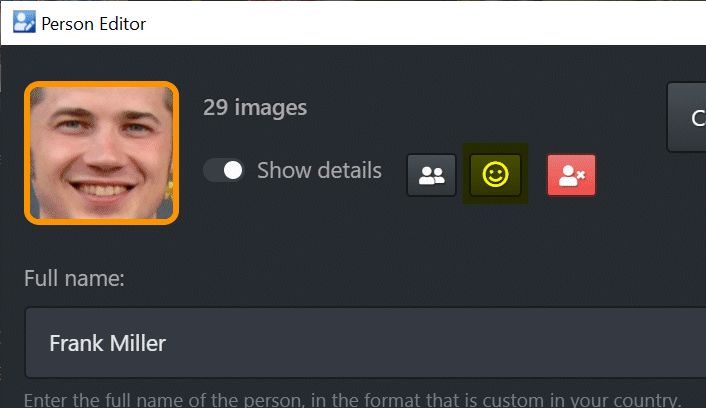
The Person Editor opens and we enter information about Frank Miller as follows:
After closing the Person Editor with Save, the entry for Frank shows up in the People View. Since we have not yet assigned the Frank person to any face, no cover image is available and IMatch displays a generic 'Unknown' icon.
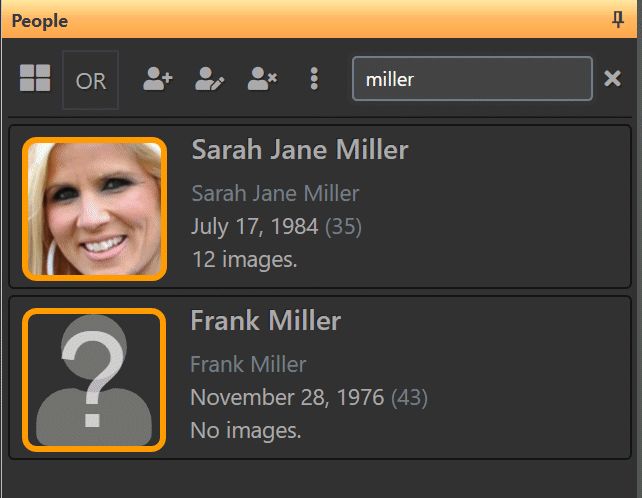
IMatch sets the cover image automatically when we assign this person to the first face. You can change the cover image at any time. See Changing the Cover Image below for more information.
After switching back to the Viewer, we assign the new person 'Frank Miller' to a couple of faces. We open the Person Selector by clicking on the red ? label below the face rectangle.
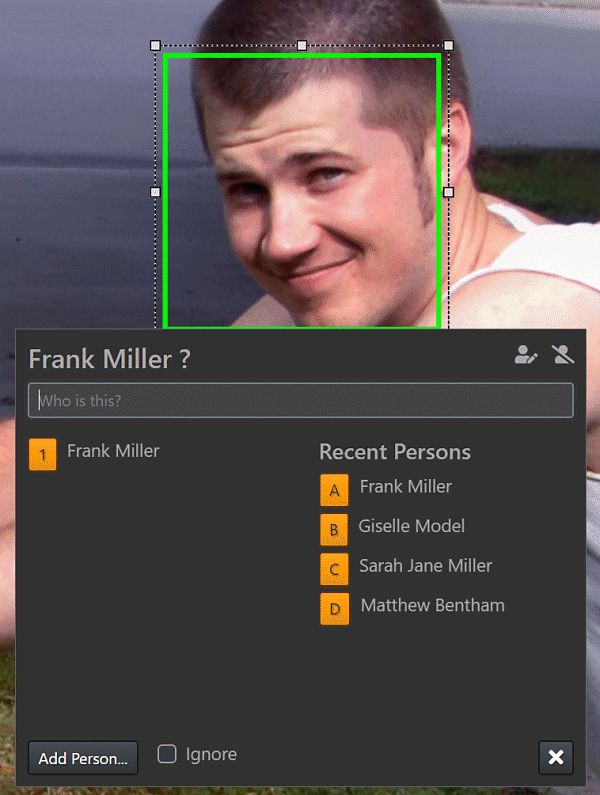
If the correct person is not listed, type a part of the person's name into the input field at the top. IMatch searches all persons and presents the results as a list of person labels:
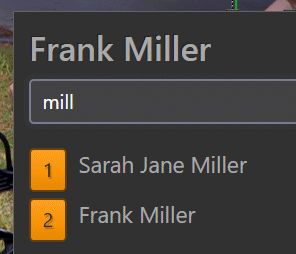
The first 5 listed persons support short codes: Use Ctrl and the number/letter to assign the corresponding person. If more than five persons are listed, assign by clicking the person's name.
You can resize the person selector dialog box by grabbing the right and bottom border. Resize it to match your screen resolution.
To find an existing person by name or tag, enter some text into the search bar in the Person Selector.
Matching persons are listed below the input field. Click on a person in the result list or use the numerical short codes to assign the person to the face.
If you press F2 after entering a search text, you can create a person with a tag and full name created from that search text:
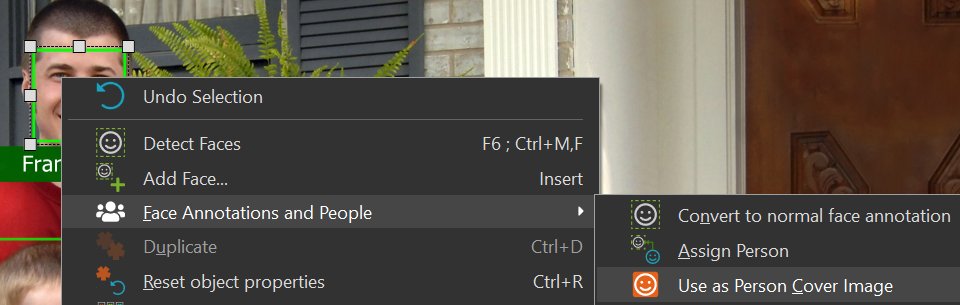
You can change the person cover image in the Viewer. Browse images until you find an image of the person you like. Right-click the face annotation and select Use as Person Cover Image:
IMatch changes the person cover image to the new image and updates the People View:

While the person selector is open, you can navigate between the faces in the current image using Ctrl+Cursor Right and Ctrl+Cursor Left. Together with F2 and the shortcuts in the Person Selector, this allows for a very fast and efficient workflow.
When the Person Selector is not open, you can navigate between annotations (all types, not only faces) using Tab and Shift+Tab keyboard commands.
Press Tab after loading a file in the Viewer to select the first annotation. If this is a face annotation, you can use the keyboard shortcuts C to confirm, I to ignore or F2 to open the Person Selector. You can also open the Person Selector by double-clicking a face annotation.
See IMatch Annotations for more information about vector annotations in IMatch.
The Viewer offers a range of helpful face annotation commands on the context menu of face annotations. Right-click a face annotation to see the context menu.
| Edit Person | Edit the person for the face annotation. Use F2 for the same purpose. |
| Use as Cover Image | Set the face as the cover image for the person. |
| Confirm Person | Confirm the person for all selected face annotations. |
| Assign other Person | Replaces the assigned person with another person, if a 'better' match can be identified. This command is useful when IMatch has assigned and confirmed the wrong person. Use this command as a more convenient try to find a better match replacement for using the Person Editor to correct wrongly confirmed assignments. This command identifies the 'next best' matching person and assigns it. |
| Ignore Face | Ignore all selected faces. |
| Goto Person | Switch to the People View and select the person associated with the focused face annotation. |
| Swap Person | This command allows you to swap the person assigned with another person for faces in all selected files. This command can be very handy when IMatch mistakes one person for another, e.g. siblings or twins. Just select the files with the wrong person assignments and use this command to swap them to the correct person. |
| Open Face Manager | Opens the Face Manager for the selected person. |
| Edit Person | If a face annotation with an associated person is selected, this command opens the Person Editor. |
When you assign a person to faces and the IMatch AI does not know this person yet, it learns from you.
Try to assign representative faces of the person initially. Different facial expressions, faces taken at different ages.
IMatch automatically learns from the first about 10 assigned faces. You can review and modify trained faces anytime in the Face Manager.
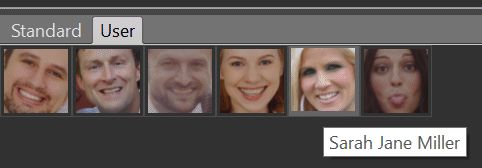
While we assign a couple of faces to 'Frank Miller', IMatch automatically scans all other unconfirmed faces in the database for similar faces. A quick look at the People View for Frank shows the results:
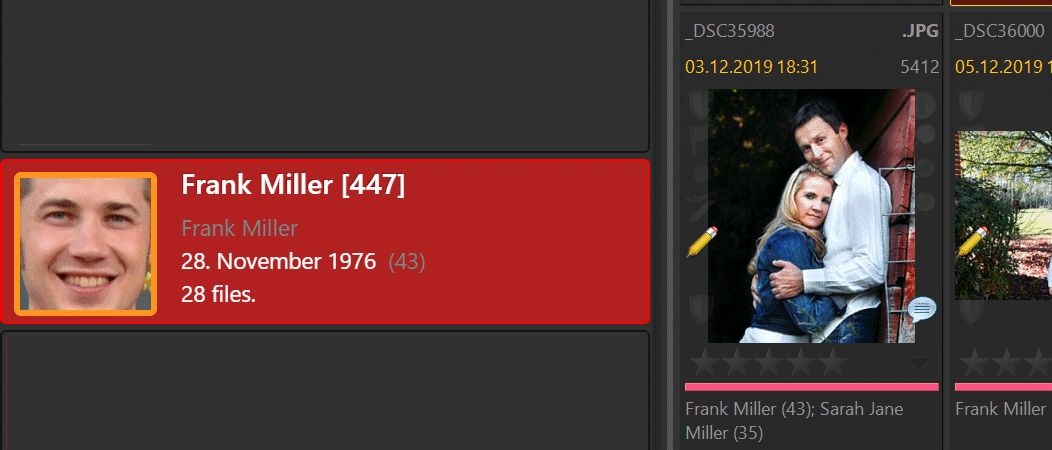
Note that the File Window now lists two persons (Sarah and Frank) below the thumbnail. IMatch has also picked a cover image for Frank.
The more unconfirmed faces are in the database, the longer IMatch needs to process them to identify matches. For performance reasons, you should always confirm correct person assignments.
You can open the Person Editor directly from the Person Selector with the edit icon at the top or F2. See the screenshot above. This icon is only visible when a person is assigned to the current face.
A face annotation can be in one of the following states:
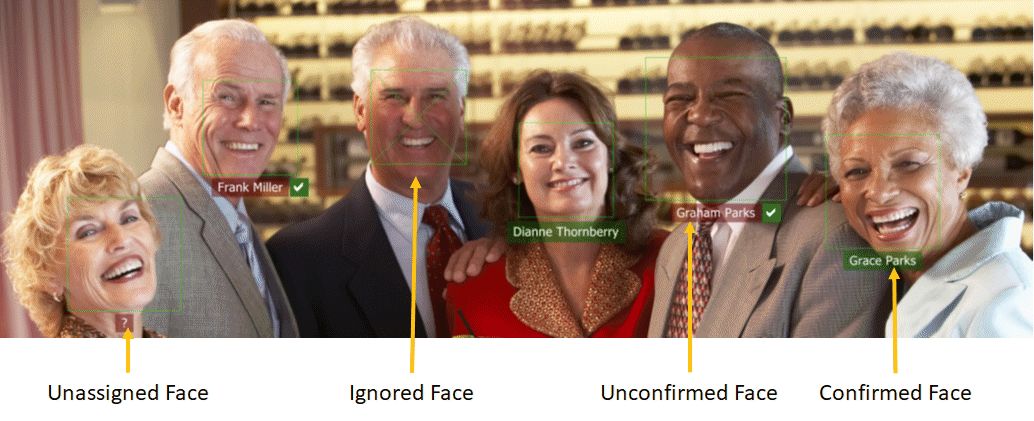
No person has been linked to the face yet. This is the default state after performing face detection when IMatch could not find a matching person for a face. The person of that face is unknown and IMatch shows a ? on a red background as the face label.
To assign a person, click on the ? or select the face annotation and press F2 to open the Person Selector.
A person has been assigned to the face by the IMatch AI. But the AI is not sure if the person is correct and considers the assignment as a suggestion. The face label uses a red color to indicate this state.
When you start with face recognition and there are not many persons and confirmed faces, it is normal that the AI assigns the wrong persons to faces. When you add more persons and assign persons to faces, the AI learns and improves. Every time you assign a person to a face, all other unconfirmed / unassigned faces are re-evaluated and persons are re-assigned if a better match is found.
When you assign a person via the Person Selector, it is confirmed automatically. For face assignments done by IMatch (suggested assignments), there are several ways to confirm them.
To confirm a person assignment in the Viewer, click on the green check button next to the label to confirm the person. Or select the face annotation and press C. Or right-click the face annotation and use the Confirm command from the context menu.
To confirm multiple faces, select them with Shift-click and then press C. Or, press Ctrl+A to select all annotations on the current layer and then press C to confirm. See the Annotations help topic for more information.
To change the suggested person, click the face annotation and press F2 or left-click the red-colored suggestion rectangle. Both operations open the Person Selectordialog box.
You can also confirm assignments in the File Window. This is especially useful to confirm many assignments at once.
Select the files for which you want to confirm faces and then right-click to open the context menu. All face- and person-related commands are available there.
This command confirms all assignments for all faces in the selected files.
If you need to be more selective, you can use the File Window in the People View. Select the person for which you want to confirm assignments, then select the files to confirm. This way you confirm only assignments for the selected person.
You can see face annotations in the Quick View panel, but you cannot edit annotations or confirm faces.
To change the person, click on the or select the annotation and press F2.
A person has been assigned / confirmed by the user and is considered '100% correct' by the IMatch AI. This state is also used when the AI assigns a person to a face and is sure that the match is correct. How sure the AI has to be before it confirms a face be can be configured.
Confirmed faces show a green label and are no longer considered for re-assignment when the AI is updating the database after a person is assigned to a face. You can change the person in the Person Selector, of course.
Try to confirm as many faces as possible. This greatly improves the performance when IMatch searches the database for unassigned/unconfirmed faces.
The face annotation has been set to ignore in the Person Selector. The face annotation displays two crossed lines and no label. IMatch does not try to find a matching person for ignored faces.
Use this option if you want to keep the face annotation, but don't want the AI to consider the face when matching faces to persons. A typical example for faces to ignore are bystanders or persons in the background.

To ignore a face, select the face annotation and press I to ignore it. Press I again, to un-ignore the face. You can also ignore faces via the context menu of face annotations and in the Person Selector dialog box.
If you ignore faces instead of deleting them, IMatch still knows that the file contains faces.
Assigning and confirming faces via the corresponding commands in the Viewer or File Window is intuitive but can become a bit of a drag when you have to deal with hundreds of thousands of faces.
Here is where the Face Manager comes into play. It allows you to see all faces assigned to a person (confirmed, unconfirmed, trained, ...) and to do bulk editing - like confirming hundreds of faces with a few mouse clicks or keyboard shortcuts.
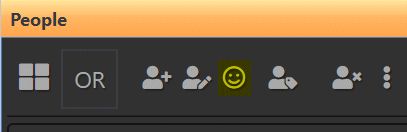
You can open the Face Manager in several ways. Via the buttons in the People View and Person editor:
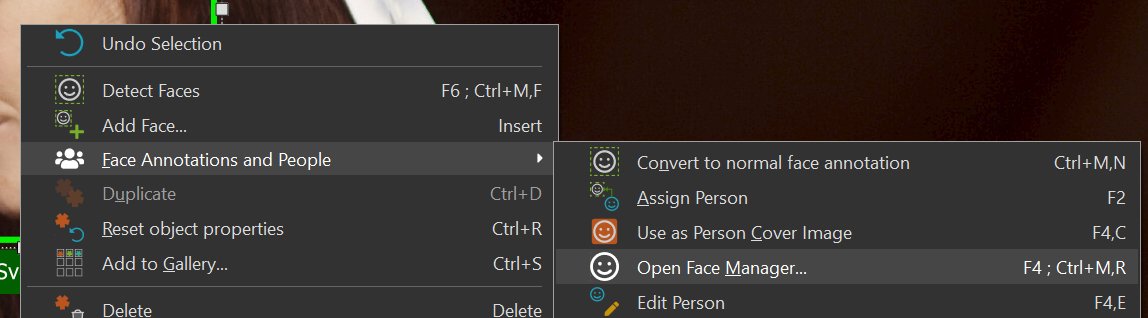
You can also select a face annotation in the Viewer and then press F4 or select the Face Manager command from the context menu:
These commands are also available in the File Window context menu for all files with faces.
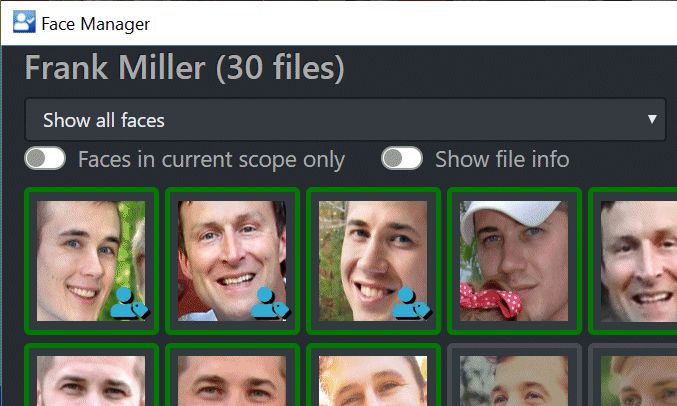
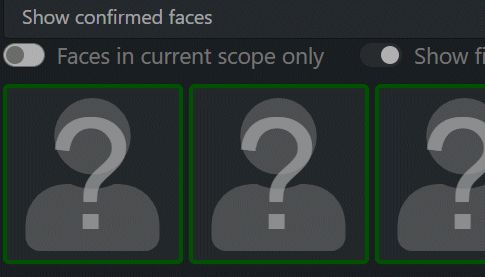
All commands open the Face Manager in a separate window. You can now see all faces assigned to the person.
The faces for Frank in the Face Manager.
For more information about the Face Manager, please see the separate Face Manager help topic.
Sometimes IMatch may be unable to detect a face. Maybe the face is averted from the camera, partially covered by hair or a hand. Angled faces, people wearing hats or large sunglasses may also prevent IMatch from detecting their faces.
Another common reason is faces which are too small to be detected. If you use the default face recognition options, IMatch uses an image size of about 1,000 pixel when detecting faces. This works very well for typical family photos or portraits. It may fail if the persons in the image are at a larger distance from the camera, or the faces are very small compared to the image size (choirs, groups of many people). The face must have a size of approximately 60 - 100 pixel (respective to the 1,000 pixel of the default source file) in order to be detected.
If the faces in the image are quite small, running a manual face detection with an larger image size usually allows IMatch to detect the faces.
When you run a face detection in the Viewer, it always uses an image size optimized for detecting small faces.
If IMatch fails to detect a face, you can create a face annotation yourself in the Viewer: click the face icon in the Annotation panel or press Ins.
Now left-click near the upper left corner of the face to place the face annotation. Hold the mouse button down and move the mouse to resize the annotation as needed. Release the mouse button to finalize the new annotation. You can now move and resize it as needed.
Hold down Shift while dragging to create a quadratic shape.
Click the video for a quick demonstration.
If you want IMatch to be able to detect the face, include the entire face from eyebrows to chin. Keep the annotation pretty close to the face size, do not include too much of the surrounding area. This makes it easier for the IMatch AI to perform face detection.
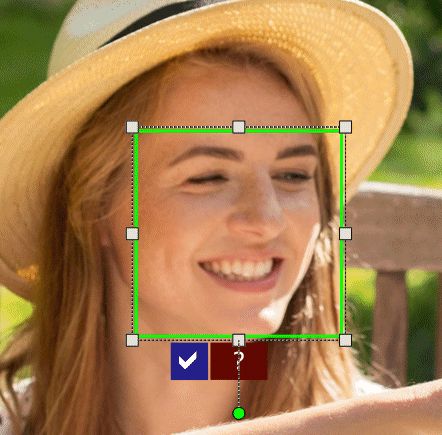
In this photo, the face of little Brian is averted from the camera, at an angle and he's also wearing a hat. IMatch fails to detect the face. We create a manual face annotation by pressing Ins and then left-clicking in the upper left corner of the face to start. We size the new annotation to contain the face and left-click again to finish the task:
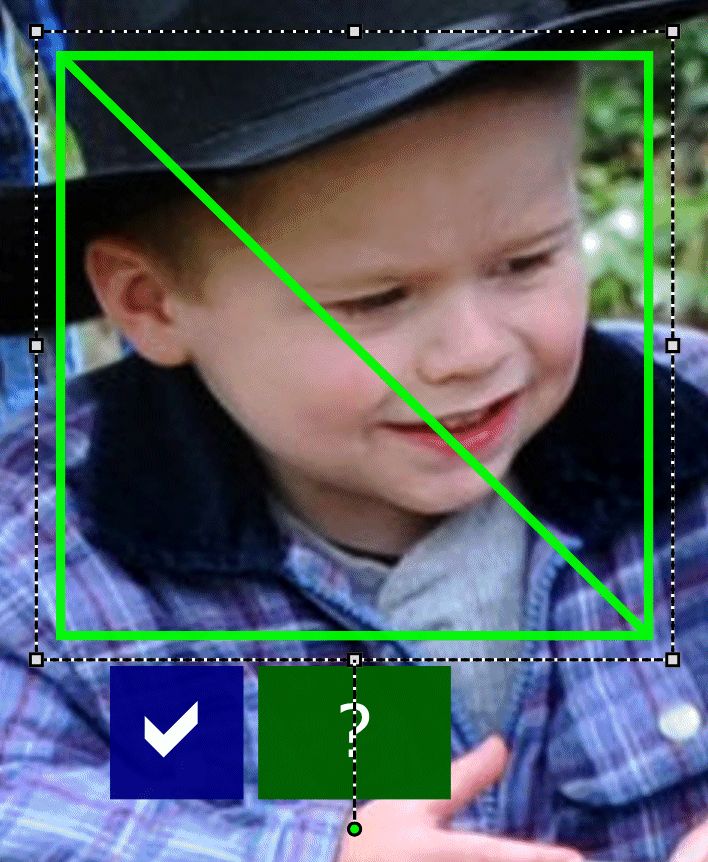
When we click the blue check button, IMatch tries to find a face region in the new annotation, and if one is found, to find a matching person.
Creating a manual face annotation and positioning it properly often allows IMatch to extract the face features and to create a face fingerprint. IMatch then automatically tries to find a matching person.
If IMatch does not find a face in the annotation, but the face is clearly visible, try to shift or resize the face annotation a bit and then click the blue check button again. This often helps IMatch to find a face within the annotation.
When you press F6 in the Viewer or use the Detect faces command in the context menu and there are already face annotations, IMatch offers to create a new face annotation you can place yourself (like you would do by pressing Ins) or to remove and replace existing face annotations by running the face detection again.
A true manual face annotation, for which IMatch cannot extract a face fingerprint, is indicated by a small circle at the top of the face annotation. This does no harm, you can still assign a person to the face and all person-related features work normally.
To speed up adding manual faces, you can copy an existing face annotation of the person into the clipboard and then paste it into other image. Resize and move the face annotation as needed to cover the face of the person.
If IMatch can detect a face inside the face annotation, it creates a face annotation with associated face fingerprint. Else it creates a true manual face annotation (indicated by the circle symbol at the top of the annotation.
Either way, keywords and categories associated with the person will be assigned to the file.
You can add frequently used face annotations to the User Gallery in the Annotation panel.

To insert a face annotation for one of these persons, just click on the thumbnail. Position and resize the face annotation as needed. This can save a lot of time if you often deal with faces which are unrecognizable for the IMatch AI and hence require manual face annotations.
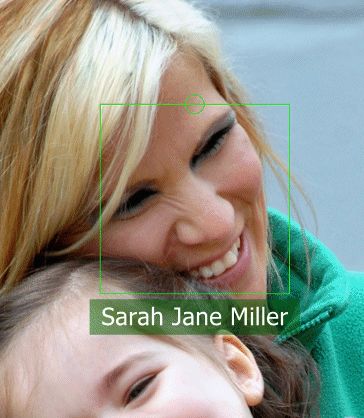
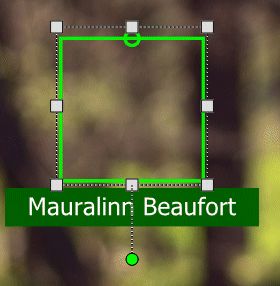
If a face is angled, it often helps to rotate the face annotation (with the little circle grabber at the bottom) to match the angle of the face. This allows IMatch to internally straightens the face before attempting face detection. See the following image as an example:

The annotation for the face of the mother was rotated right to accommodate for the face angle. This allowed IMatch to detect and recognize the face.
When you add/position face annotations manually, IMatch automatically tries to detect a face inside the annotation boundaries. If a face is found and a fingerprint can be extracted, the annotation becomes a regular face annotation. Else it becomes a true manual face annotation (see above).
When you move, resize or rotate an existing face annotation, IMatch marks the annotation with a special blue check mark button:
Click this button when you have finished modifying the face annotation. IMatch then analyzes the contents of the annotation rectangle to find a face.
Since face detection can take a second or two, depending on the speed of your computer, IMatch does not run it automatically after every change you make to annotations. This would be annoying and get in the way. Just click the blue check mark button when you're done changing the annotation and IMatch scans the annotation rectangle to see if it can find a face.
When you close the Viewer or navigate to another image, IMatch automatically processes all pending modified face annotations to detect faces.
You can link persons to files. This method does not require face recognition or manually added face annotations. Instead, IMatch places a special link annotation on the file for each person you link to it. You can link any number of persons to any number of files with a menu command or keyboard shortcut.
This feature can be used to quickly deal with large batches of images containing unrecognizable faces (but where you know the persons contained in the image). Or, if you so far organized people using IMatch categories or keywords, you can benefit from all People-related features (People View, People Filter, Variables and more) by linking persons directly to files. Since you have already organized your files by persons, this is quick and easy - because you can select all files for a person and link a person to them.
Use a Link when a person is not visible in an image but, you know he/she was there.
Using a Link is a convenient shortcut. In the long run, using real face annotations to indicate the position and size of persons faces is preferable, however. Links have no position or size, which means that IMatch cannot use them for features like Face Arrangement.
You can use Person Favorites to quickly link/unlink persons.
Select the file to which you want to add one or more persons. Open the context menu and then select Face Annotations and People > Link persons to files... or use the keyboard shortcut Ctrl+M, L.
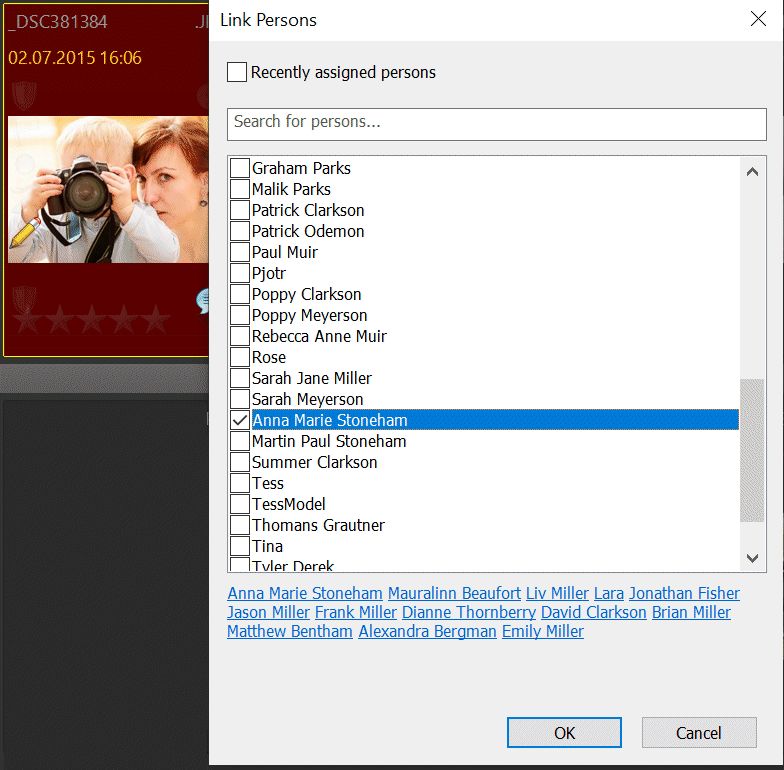
This opens a dialog box which allows you to select one or more persons to link to the selected files. It lists all persons in your database and provides a search box to quickly find persons by tag, name or group.
If you now look at this file in the Viewer (or the Quick View Panel), you'll notice that IMatch has placed a special kind of face annotation on the file:

These special link face annotations use a different color than regular face annotations. You can move them, but not resize or rotate them. They are just an indicator that you have linked a person to the file.
You can use Ctrl+M, L keyboard shortcut (or the corresponding menu command) in the Viewer.
If you link more than one person to a file that way, IMatch arranges the link annotations vertically:
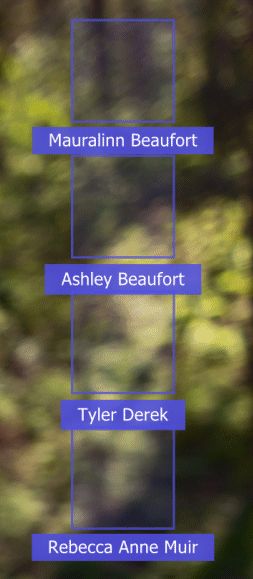
The order in which you assign the persons defines the person order, which in turn controls the sequence in which the persons are listed e.g. in variables or File Windows. See Ordering Persons in Images for related information.
The dialog box remembers the 50 recently assigned persons automatically. If you tick the check box, the person list shows only persons recently assigned, with the most-recently assigned person on top.
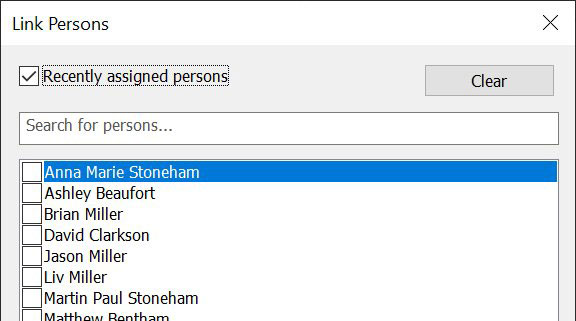
This makes it much quicker to assign persons from a current set of persons. And if you use the search box, only the recently assigned persons are searched.
Use the Clear button to clear the list of recently assigned persons.
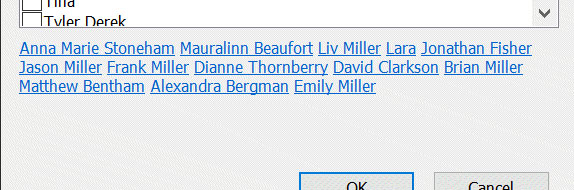
At the bottom of the dialog box IMatch lists the most recently used persons. You can assign or unlink persons with a single click using this list:
By default, clicking a person name in this list applies the change and closes the dialog box.
Hold down Ctrl while clicking to link/unlink multiple persons.
Use Ctrl + 1 to Ctrl + 9 to directly link/unlink the first to ninth person from this list. This also closes the dialog box automatically.
To unlink a person from an individual file, just delete the special link face annotation(s) in the Viewer like any other face annotation. To delete one ore more person links from multiple files, select these files in a File Window and then open the context menu and select Face Annotations and People > Unlink from persons... or use the keyboard shortcut Ctrl+M, U.
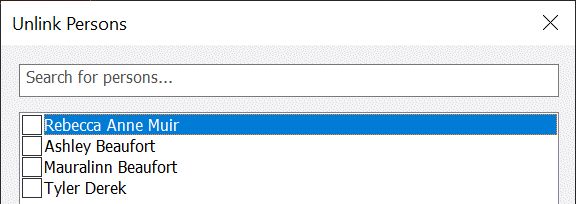
This opens a dialog box which lists all persons linked to the file. Check the persons you want to remove in the list and close the dialog box with OK.
Unlinking only affects persons linked to the files. If the files also contain real face annotations, these remain unchanged.
If you want to convert a link annotation to a real face annotation, right-click the annotation and use the corresponding command from the context menu:

The link annotation is converted into a normal manual face annotation, with the person still assigned.
You can now move and resize the annotation and place it on the face of the corresponding person in the image.
If you assign persons to files, IMatch cannot create a face image as it would do for normal face annotations - because there is no face to work with.
When you work with these faces e.g., in the the Face Manager, IMatch can only display a placeholder image:
When you add real face annotations for the person later, this issue resolves itself.
Link annotations have not size or position. IMatch thus cannot consider them for all Face Arrangement-related features.
While linking persons to files is quick and easy, it has some drawbacks compared to placing real face annotations on faces.
If a person's face is obscured or the person is looking away from the camera, automatic face recognition will fail. Placing a link for the person is one way to deal with that. Placing a real face annotation on the persons face / head is another.
Using a real face annotation is preferred, because it also has a position and size. Which is used for features like face arrangement, determining the point of interest in a photo for positioning or cropping etc.
You can optionally specify one or more keywords and/or categories for a person. IMatch refers to these as person keywords and person categories, respectively. IMatch automatically adds these keywords/categories to files when a person is assigned/confirmed.
Time-saver!
At the same time you confirm a person, the matching keywords and categories are applied to the file.
This is how it works:
This means that if you add the following keywords to the person 'Sarah Jane Miller':
hair color|blonde, eye color|blue, Gender|female, WHO|Sarah Jane Miller, WHO|Families|Millers, friendsIMatch adds these keywords to each image with Sarah. Automatically, as soon as you or IMatch confirm the face.
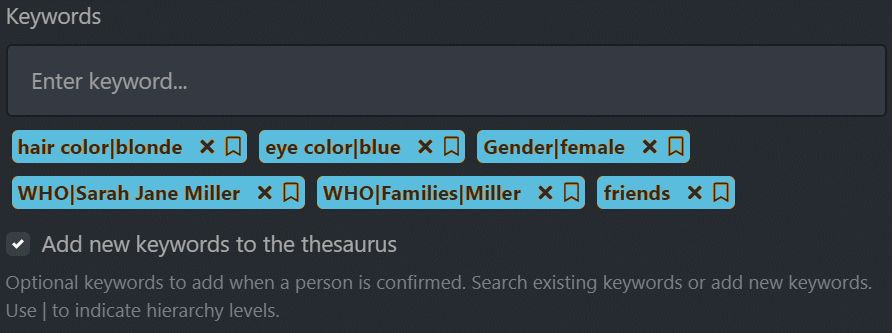
The keywords you have assigned to a person are listed in the Person Editor.
To add keywords to a person, enter them in the Person Editor. When you type a word (optionally including the hierarchy with |) the dialog box looks up matching keywords in the IMatch universal thesaurus.

To add keywords, just click on them in the result list.
To add a keyword not in the thesaurus, enter it into the search box and press Enter. To add hierarchical keywords, use | as the level separator as usual.
Optionally enable the option to automatically add new keywords to your thesaurus.
If you prefer to use categories, you can make IMatch automatically assign files to categories, based on the persons they contain. You can mix person keywords and person categories freely.
Categories are added in the same way as keywords. When you type in a word, IMatch presets categories containing that word. Click on the category name in the result list to add it to the current person. You cannot create new categories in this dialog box, only select from existing categories.
Keywords and Categories are applied when a face is confirmed or when you assign a person to a face manually . This avoids unnecessary keyword/category updates when IMatch re-assigns unconfirmed faces after a person is assigned to a face.
If you prefer to work with categories or you don't want to add person keywords to files for privacy reasons, you might use a small trick that utilizes IMatch's unique data-driven categories to automatically organize persons into categories.
Create a data-driven category based on one of the person variables, like {File.Persons.Tag} or {File.Persons.Label}. If you want to include only confirmed persons, use {File.Persons.Label.Confirmed}. IMatch then creates one child category for each unique tag/label and assigns all files with that person to this category. A quick and easy way to dynamically manage persons in categories.
The important settings for the data-driven category are:
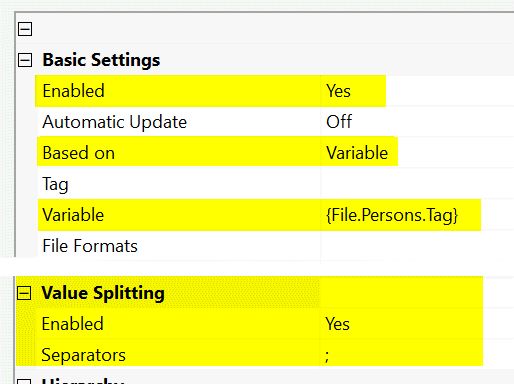
Which Person variable you use depends on your preferences and you may want to configure the category to update automatically if this does not cause performance issues for your system.
The important setting is the automatic splitting of variable data when a semicolon is found. If there is more than one person in an image, the variable returns a list of the person tags (or labels, names, ...), separated by ; =< "John;Paul;Ringo;George".
By splitting this list into individual elements, you get one child category for each unique name and the file is assigned to the matching categories for each of the persons in the image.
This is the main feature for working with people. Here you view create, edit and delete persons, groups and families. You can search for persons (see also: People Filter) and assign persons to groups and families.
At the top of the view is a toolbar and 3 tabs which allows you to switch between People, Families and Groups.
People | In this View you see all the persons you have created in your database. You add, edit and delete persons in this View. |
Families | This View shows all the families you have created. You add, remove and delete families and assign persons to one or more families in this View. |
Group | This View shows all the groups you have created. You add, remove and delete groups and assign persons to one or more groups in this View. |
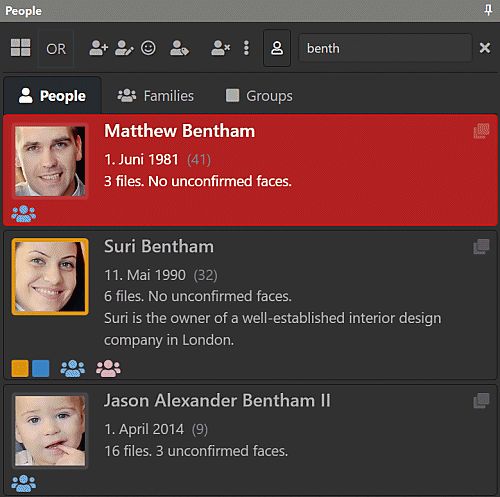
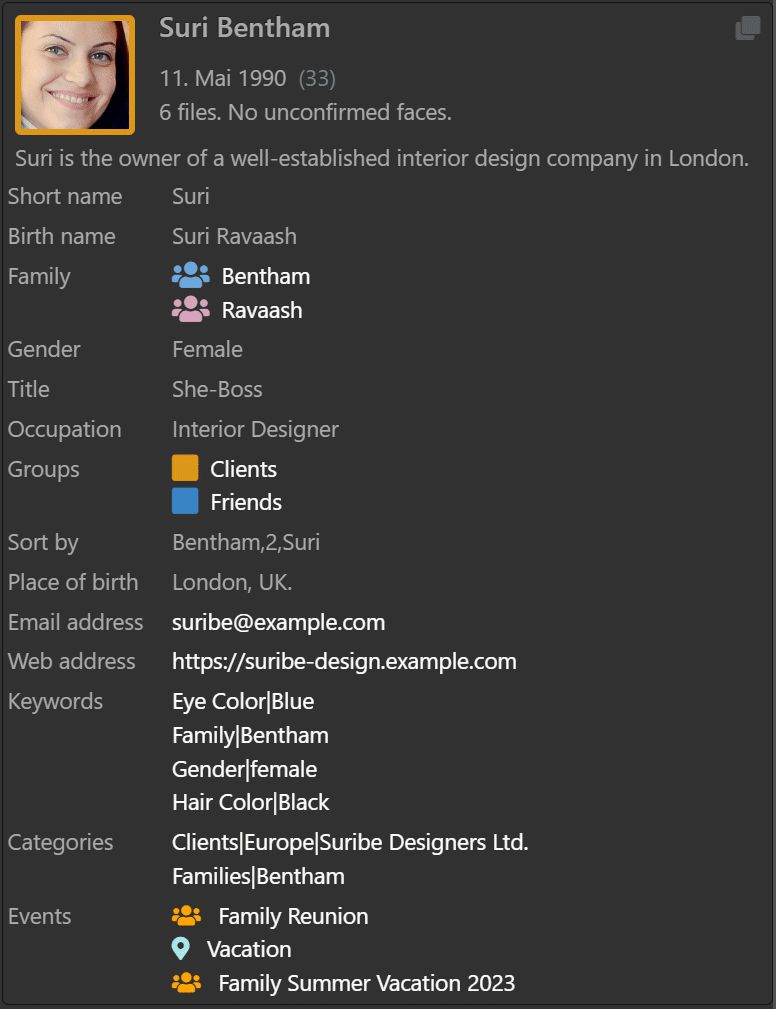
Viewing people in the People View.
We searched for the word benth to see only persons matching that name.
At the top is a toolbar which gives you direct access to all commands and features.
The People View supports multiple layouts (arrangements) for the persons in your database. Use the toolbar button or Ctrl + L to switch between the available layouts.
The first three layouts show more or less details about the person. The other layouts display face cover images only, in various grid arrangements:
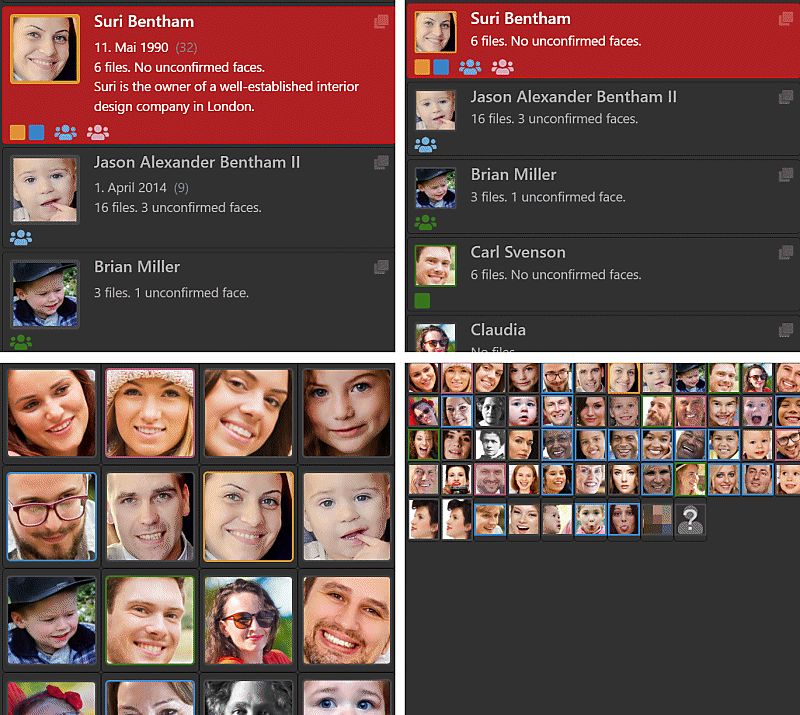
Some of the layouts available in the People View
The grids adapt to the width of the People View, changing the size of the thumbnails automatically.
Depending on the layout you select, different types of information are displayed per person. Thumbnail-only layouts show many persons in a small area. List-based layouts show information like names, the number of files of a person etc.
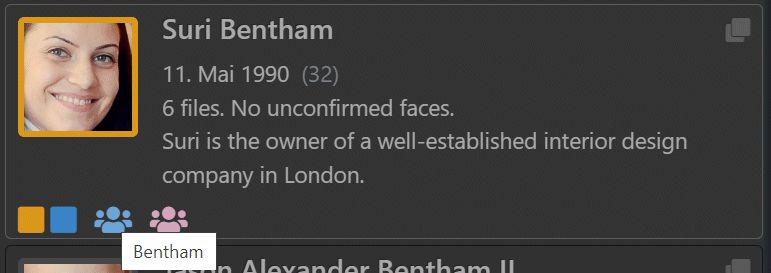
The list-style layout above shows a portrait, the persons name, birth date, age, number of files and unconfirmed faces and the person's description. Below the thumbnail are icons for the groups and families the person belongs to.
Click on a group or family icon to switch to that group or family.
When you switch to the detailed layout, you see all the information available for each person.
Empty properties are hidden to create a more compact layout.
The Detailed Layouts
When you click on a person, the images showing this person are loaded into the File Window in the People View. If you select multiple persons, the second button in the toolbar controls how the images of these persons are combined.
To select multiple persons, hold down the Shift key while you click on a person. This selects all persons between the last clicked person (anchor) and this person. Hold down Ctrl to select multiple persons directly.
Click on the OR/AND/EXCL button in the toolbar to switch between the available modes.
| Mode | Description |
|---|---|
| OR | If multiple persons are selected, the People View shows all files containing at least one of the selected persons. This mode shows images with Paul or Mary or both. |
| AND | If multiple persons are selected, the People View shows only files containing all selected persons. This mode shows only images with Paul and Mary in the same image. |
| EXCL | The People View shows only files containing the focused person exclusively. This mode allows you to see only files with Mary alone. |
The search box in the People View toolbar allows you to filter the persons you see in the View. The filter is not case-sensitive and hides all persons not matching the search term.

Empty the search box or click on the button to see all persons again.
By default the filter text is applied to person properties like name, tag, full name, description, gender, group and family names.
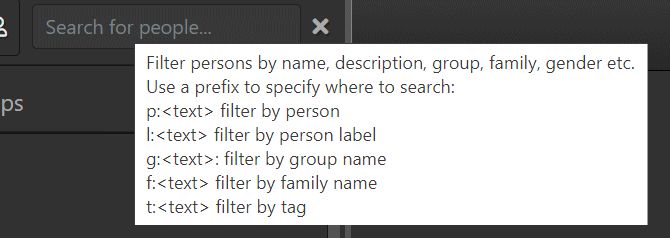
To search only in specific areas, you can use a prefix:
| Search only in person properties. | ||||||||||
| Search only in person labels. This can be helpful if you mention persons e.g. in the descriptions of other persons, but you only want to find persons where the person's name matches the search term. | ||||||||||
| Search only in person tags. | ||||||||||
| Search only in group names. | ||||||||||
| Search only in family names. | ||||||||||
| Search (partial) day of birth. This is a very flexible search option:
| ||||||||||
| Search (partial) day of death. This search attribute works exactly like dob, but searches the day of death. |
g:friends finds all group names matching the word friends and f:smith filters for persons assigned to families with names containing smith.
Hover the mouse over the search box to see a helpful tooltip that lists all options.
When processing the Gender person property, the filter works slightly different. It checks if the property starts with the filter text, not if it contains the filter text.
This allows you to search for male to find male persons. Else female persons would be found too. Just remember to use a filter term that matches the beginning of the gender name you're looking for, like male or fem.
The button toggles the option to show only persons with unconfirmed faces. If enabled, only persons with at least one unconfirmed face are shown. You can combine this filter option with the text filter.
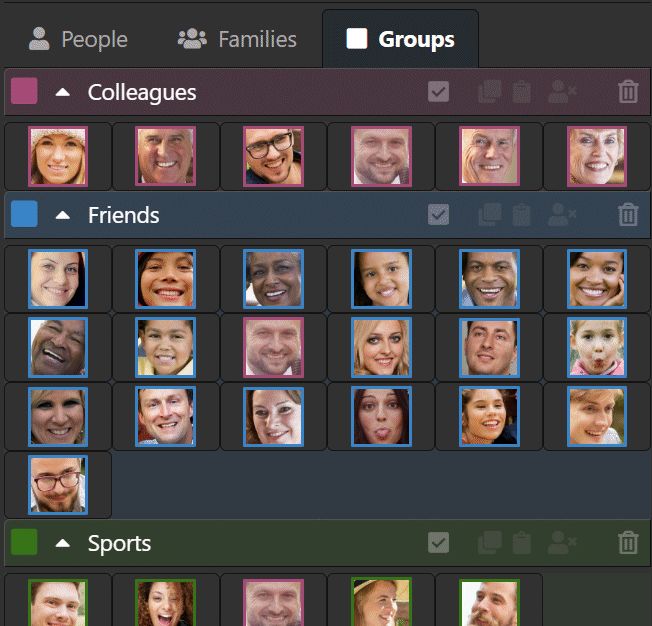
You can create groups to organize persons. Assigning persons to color-coded groups like Friends or Team makes working with large sets of persons easier.
The People View displays groups in the Groups Tab uses the color of the first group (in alphabetical order) to frame the person's cover image. You can use groups as a filter in the People View and People Filter.
You can add persons to groups directly in the Person Editor or you drag one or more persons in the Group Tab onto the header of a group. Persons can be in any number of groups.
By default, dragging a person moves the person from it's current group to the target group.
Hold down Ctrl while dragging to add the person to the target group.

Dragging a person element to a group header to add the person to the group.
To create a new group or to edit existing groups, click on the icon in the toolbar at the top.
If you have hundreds of persons in your database, use the Filter Bar to search for the persons you want to add to a group. Then drag them onto the header of a group to add the person to that group. This avoids a lot of scrolling and is quick.
Alternatively, copy the persons you want to add to a group into the clipboard with the icon or Ctrl + C and then paste them into a group.

Use the other buttons in the group header to remove persons from groups or to delete the entire group.
Hover the mouse cursor over the buttons to learn about their function.
The groups a person belongs to can be listed in File Windows using the corresponding attributes and also accessed via Variables to use them with other features.
Similar to groups, you can create families and add persons to them. A person can be in one or multiple families.
The People View shows families and the persons associated with them in the Family Tab. To create a new family, click on the button in the toolbar at the top.
You can create any number of families. There can be multiple families with the same name, but all families need a unique tag.
If there are multiple families with the same name, IMatch sorts them by their tag and also shows the tag in the family panel:

The tag allows you to differentiate between families sharing the same name.
You can use different colors to differentiate different types of families.
The Persons without Family group at the bottom of the Family Tab allows you to create a family from one or more selected persons.

Just select the persons you want to add to the new family and click the button in the group header. Depending on your preferences, this might be quicker than first creating a new family and then dragging persons into it.
The rest of the Family Tab works like the Group Tab. You can add persons to families by dragging them into the header of the family panel. You can also add or remove persons to and from families directly in the Person Editor.
By default, dragging a person moves the person from it's current family to the target family.
Hold down Ctrl while dragging to add the person to the target family.
Alternatively, copy the persons you want to add to a family into the clipboard with the icon or Ctrl + C and then paste them into a family.
Adding persons to families and groups gives you additional tools to organize your images and other files.
IMatch offers a wide range of People Variables to access person properties and information about a persons family and groups in all features which support variables, from File Windows to Design & Print.
Click on the button to add a new person and to open the Person Editor.
You can also add persons while assigning person to faces in the Viewer.
Double-click the person in the list or click on the button in the toolbar to open the Person Editor.
When you change the keywords and/or categories associated with a person, IMatch updates the database automatically when you close the Person Editor with OK. Depending on how many files are linked with that person, this can take some time.
Click on the to delete all selected persons. IMatch displays a confirmation dialog box.
Deleting a person cannot be undone.
All keywords and categories associated with the person are removed from the files with that person. Depending on how many files are linked with that person, this can take some time.
If you have disabled the automatic face search, IMatch does not automatically searches for similar faces for persons you assign.
Using the button, you can trigger the search for faces manually, for all persons selected in the People View. IMatch adds your request to the background processing queue and runs the scan at the earliest opportunity.
After the scan has completed (watch the status bar and the Info & Activity Panel), review the results in the People View.
The menu contains some additional commands.
This command starts the People Organizer App which can automatically group images with similar faces together.
This command allows you to merge the faces linked to two or more persons. Typical use cases are:
To merge people, select them in the People View. The last selected person becomes the focused person (red background) and this is the target person into which the other selected persons (source persons) will be merged. After the merge has been completed, the source persons are no longer linked to any faces.
Now select the Merge People command from the additional functions menu. IMatch displays a dialog box with some options to control how merge is performed.
| Option | Description | ||||||
|---|---|---|---|---|---|---|---|
| Confirm faces | This option controls if and how the merged faces are confirmed.
| ||||||
| Delete merged persons | Set this option to automatically delete the empty source persons after the merge is complete. |
Make sure the target person for the merge operation has some trained faces (assign the person to a number of files in the Viewer). This improves the confirmation of faces in auto mode.
This command creates a text file in JSON format from all persons in your database. You can use this file with the import function to transfer the persons to another database.
This command imports a JSON file produced with the export function. Only persons not already in the database are imported.
This command is only meant to be used with new, empty databases. It will not trigger face matching or assign keywords/categories to existing files.
If you have a database with persons somewhere, you can transfer these into IMatch by creating a JSON file programmatically in the syntax IMatch expects for import. The JSON syntax is easy and can be derived from looking at a export file created by IMatch.
This App can be used to do an initial grouping of faces in your database.
In addition to the semi-automatic way to create persons and let the AI find matching faces, IMatch can automatically group similar faces together and assign them to a newly created person.
This intelligent auto-clustering is performed by a dedicated app named People Organizer. You can run this app directly from the menu in the People View.
Run Face Detection on your files before running this app.
The app is technically sophisticated but very simple to use. You can choose if you only want to auto-cluster ignored faces, unassigned faces or also faces with a yet unconfirmed person.
An option allows you to restrict the process to the currently selected files. This can be handy if you want to automatically organize only selected files. Or if you want to work in smaller batches due to time constraints.
This option controls how many similar faces must be in a group before IMatch creates a new person for them. The standard value usually works well.
The People Organizer always creates new persons with standard names like 'Person 1', 'Person 2' and assigns all similar faces to these persons.
After the app has finished, you can switch to the People View and rename the persons as needed, adding more data to each person, keywords, categories etc.
The People Organizer is not perfect. It will sometimes group the wrong persons together. This is inevitable. No AI is currently as good as a human person (aka 'us') when it comes to handle all variants of face recognition. Humans have perfected this over tens of thousands of years.
You can easily correct wrong assignments in the Viewer using the normal workflow described in this help topic. Despite this manual step, using the People Organizer can create some initial organization when you have just finished face detection.
Running the People Organizer on a large database with tens or even hundreds of thousands of faces can take a long time, maxing out all processor cores and the database. If you plan to run the organizer, do it when you don't need IMatch for a while.
IMatch manages all annotations in dedicated collections under the Annotations root collection. Each person with at least one assigned face creates a sub-collection under Annotations|Region|People.
This allows you to find people via their collection and to use the collection in features like category formulas.
This collection contains all files with unconfirmed faces. You can use it for a quick overview or to work with the Face Manager on these faces.
Use the Similar Faces sort profile to quickly group files with similar faces together for quicker processing.
IMatch makes all person data available via dedicated variables. This enables you to use person data in all IMatch features which support variables, from various export modules to data-driven categories to Design & Print:
Using person variables to automatically caption images in IMatch's Design & Print module.
File Window layouts support a number of person-related Attributes. You can use these in the header and footer sections to display the labels
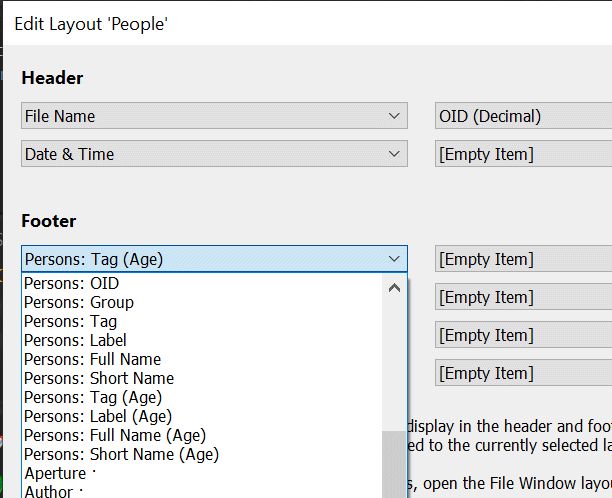
The simple File Window layout editor with the available person attributes.
The attributes with (Age) display the tag/name and the age of the person relative to the date the image was created. You need to fill in the date of birth property for each person to make this work.
If you use a fresh IMatch installation, you can select the pre-configured People File Window layout from the layout drop down in the File Window. If you don't see this layout, you can import it from the people.imfwl included in IMatch. Or quickly create your own Person layout.
For custom formatting or access to all available properties for persons, use the person-related variables in combination with a custom template in your layout.
If your photos show more than one person, you often need to control the order in which persons are listed. In File Window layouts or person variables.
IMatch uses a smart algorithm to order face annotations automatically. It tries to arrange faces from top to bottom and left to right. If you want a different order or the automatic fails, you can easily change the face order following these instructions.
IMatch allows you to reorder face annotations in the Viewer. First, press O (Oh) to toggle the display for the face annotation order. You can also use the corresponding command in the face annotation context menus or the Smart Menu.
The Viewer displays the annotation order as numbers inside the face annotations:
Showing the face annotation order. Note the green numbers inside the face rectangles.
You can now use the standard top/bottom forward/backward commands and hot keys to change the annotation order. The names of the persons are later listed in the same sequence in which you arrange the annotations, starting with person 1.
Start at the last (bottom/right) face and press T to bring it to the top. Repeat until you reach the first (top/left) face. This way you automatically arrange the faces from top/left to bottom right. See the image above.

A more complex example, with custom face order.
Under Commands > Image > Face Annotations and People you'll find additional commands for working with faces and people.
Some of these commands are mirrored in the File Window context menu, like the commands for running face detection or confirming people.
In the case you need to remove face annotations, you can do this in the Viewer by selecting all face annotations and then pressing Del. To remove face annotations from larger sets of files, use the Delete Faces... command in this menu. Select the files in a File Window and then run this command to delete all or specific face annotations in one go. The same menu is also available in the File Window context menu.
The reason for deleting face annotations (which also removes the associated XMP region metadata data) could be privacy reasons. Or you want to run face detection again.
Use the Command Palette and search for face to find the command quickly.
In the same menu, you can ignore faces in all selected files and add and remove links.
This command deletes all existing face annotations and then creates them anew, from the XMP face regions contained in the image.
This command may be useful if you have created face annotations in an external software, and you want to replace the face annotations IMatch maintains for these files with the externally created face data.
Running face detection and recognition is quite easy. Depending on how many persons you have in your files (20, 50 or 500...), you may need to put some effort in creating the persons. But that needs to be done only once (and for each new person).
A proven workflow is:
If you use manual face detection on a folder, use the standard settings, unless your files contain many small faces. In that case, use the setting optimized for small faces.
When the process has completed, you can easily identify files for which no faces were detected via the People Filter in the Filter Panel. Filter out all files with faces and then process the remaining files using the 'optimize for images with small faces' setting. Manually create face annotations in the Viewer faces are not detected automatically.
Use the People File Window layout. This allows you not only to see which files have face annotations, but also if and how many persons have been identified. If you notice missing or wrong persons, correct the assignments in the Viewer.
This way you can process even large file volumes efficiently and in batches, as time permits.
The 'People' layout is created for new IMatch installations automatically. If you have upgraded from an older version, you can create your own 'People' layout quickly following these steps:
Persons: Label (Age) attribute. Or any other Person attribute you likeThat's all there is to it. Here is what we use for the default 'Person' layout:
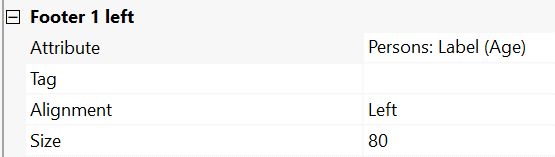
Displaying the names (labels) and age for each person in a File Window layout.
The Label attribute shows either the tag, full name or short name of a person. You can configure the label as explained here.
To correct incorrectly assigned persons, keep an eye on the People View. Select a person and then check the images for that person in the File Window in combination with the Quick View Panel for a larger view. Or load all files into the Viewer and step through. Assign persons to unassigned faces, correct false assignments and confirm correctly assigned faces to reduce the number of faces IMatch has to process whenever you assign a person to a face.
The XMP metadata standard allows applications to store face regions inside the XMP record of images. These face regions are basically just a combination of a rectangle and a text tag. The rectangle describes the location and size of the face, and the tag associates a name with it. Pretty simple.
You can control XMP face region import options under Edit > Preferences > Metadata 2.
When IMatch imports an image and the image has no face annotations yet, it by default checks for XMP face regions. This is useful when you used face recognition in another application and this application has stored the face regions in XMP.
This feature allows you to reuse face data produced by applications like Adobe Lightroom® or Google Picasa™. Or to import face region and tags produced by your smart phone or camera.
If XMP face regions are detected, IMatch performs the following tasks:
These steps allow you to import face data and persons created in other applications into IMatch. With very little effort.
It may be useful to first create persons in IMatch, before importing the files with XMP face regions. This way keywords and categories you want to apply are defined before IMatch imports the faces from XMP.
Sometimes other applications use very 'tight' face regions, not covering the whole face. If IMatch fails to detect the face, it creates a manual face annotation and assigns the person. You can later resize/move the fade annotation afterwards if you like, to allow IMatch to create a face fingerprint and to convert the annotation from manual to regular.
If the quality of the XMP face regions in your files is bad, or the annotations generally have no usable tag/label, it may be better to disable XMP face region import and to let the IMatch AI do the face detection and recognition from scratch. This usually produces superior results.
PersonInImage TagWhen at least one face region is found and imported, IMatch updates the IPTC PersonInImage tag with the sanitized tags of the detected person(s). If no faces are found, the contents of this tag are not modified.
During write-back, IMatch by default creates XMP face regions from faces stored in the database.
If a face is linked to a person and confirmed, the tag of the person is stored in the XMP region as the region name and the description of the person stored as the XMP face region description.
You can control XMP face region export options under Edit > Preferences > Metadata 2.
This ensures that the face data created by IMatch is available for other applications which can read face regions from XMP.
The following characters are not allowed in person tags in IMatch: @:<>&{}[]^\\/?*%~,;.
If any of these characters is used in a XMP face region tag, it is stripped during import, when IMatch creates a person from the face annotation. The original XMP face region tag can be retained in the full name person property, depending on your settings. The the sanitized XMP face region tag (without the unsupported characters) is used as the person tag.
PersonInImage TagThis tag is part of a structured tag that records the names and additional data or persons shown in an image.
When you perform face recognition and assign persons to faces or you create manual links between persons and files, IMatch adds the person tag of all persons associated with the file to the XMP::iptcExt\PersonInImage\PersonInImage tag. This data can then be read and processed by other applications, even if they don't support XMP face regions.
When IMatch imports a file and the file has no face annotations (and no XMP face regions), IMatch looks at the PersonInImage tag to see if it contains one or more person names. If this is the case, IMatch creates a person with a matching tag (unless the person already exists) for each person entry found in this tag and also adds a manual link for that person to the file.
This is a convenient and automatic way to import persons recorded in the IPTC data into the normal IMatch person feature set.
This image has two entries in the PersonInImage tag (from the Metadata Panel):

Since the file has no XMP face regions or IMatch face annotations, IMatch uses the values in this tag to create matching persons and to add manual links to the persons:

All this is fully automatic and enables you to reuse data you have added to this tag in other applications, even if the files have no face regions and you don't want to use IMatch's awesome face recognition features.
You can enable/disable and configure this feature under Edit > Preferences > Metadata 2.
As a specialty, IMatch checks if the person name found in PersonInImage contains a | (pipe) symbol, like Miller|John. If a pipe is found and the corresponding option is enabled under Edit > Preferences > Metadata 2, IMatch splits the person name and uses the part left of the | as the family name.
In case of the entry Miller|John, a person with the tag Miller|John would be created (if it not already exists) and the person is assigned to family Miller. If no family with this name exists, it is also created.
When PersonInImage contains the value Susan, the resulting person tag and full name are both Susan. When the tag value is Miller|Susan, the person tag is set to Miller|Susan. How the full name turns out depends on the setting you have chosen in Edit > Preferences > Metadata 2.
By default, IMatch produces the full name using [Person Name] [Family Name]. Which in case of Miller|Susan would be Susan Miller.
If the naming conventions in your country differ, you can e.g. produce [Family Name] [PersonName] or [Family Name], [PersonName].
Both applications can store XMP face regions (including an identifying tag) in the XMP metadata of images.
If you configure these applications to do this and you enable the XMP face region import in IMatch (see above), IMatch automatically creates face annotations, face fingerprints etc. This allows you to reuse the basic data produced by these applications together with the advanced people features in IMatch.
If you create or modify XMP face regions in external applications for images already in your IMatch database, IMatch automatically protects the face annotations. IMatch will not delete and replace existing face annotations when metadata is imported because a file is modified by an external application.
If you really need to replace face annotations maintained by IMatch with faces stored in XMP by other software, you have to first delete all face annotations for the file in IMatch and then force a re-import of the metadata of the image.
This topic is for users who upgraded to IMatch from an earlier version and with one or more already filled databases.
If you start with an existing database, the initial process of processing all files to detect faces can be somewhat time-consuming - especially if you manage hundreds of thousands of images. Depending on your settings, image sizes and the performance of your PC, IMatch performs face detection for 50,000 files in 1 to 2 hours. 3 or more if temporary cache images have to be generated first (for RAW files) or the images are on a slow storage medium like a remote NAS.
Using face detection and People-related features is of course totally optional in IMatch. If you don't need this and you see no benefit, don't use it.
There are some proven tricks and workflow ideas which help to manage this with a minimum of work on your part.
These steps break up the large task of doing face detection/recognition for 100,000s of files into manageable steps. By assigning faces to persons and confirming face assignments you train the AI and reduce the number of free faces to process after each person assignment. Which is very good for performance.
Face recognition has to be done only once for your existing files. This gives you all the benefits and automatic organization provided by face- and people-related features in IMatch.
When you later add new files to your database, IMatch can do face detection and recognition automatically in the background. You can enable this in the application options. Or you run face detection manually as needed.
A special Face Similarity sort attribute is available for Sort Profiles. It allows you to sort the files in the File Window based on how similar the faces are.
Face detection/recognition has been designed to work automatically. You train the IMatch AI by assigning persons to faces and IMatch does the rest. This usually just works out-of-the-box, with the default settings.
However, there are many IMatch users and many different workflows. Databases with 50,000 or one million managed files. Databases with 20,000 faces or 500,000 faces. Users work with IMatch on high-end workstation computers and on slower notebooks.
Under Edit > Preferences > Application: Face Recognition you can configure several options (search for face rec on that page). These settings control how IMatch performs face detection and recognition and how the AI processes persons.
| Option | Description |
|---|---|
Automatic Face Recognition | If this option is enabled (default: off), IMatch automatically performs face detection and recognition on new images (or images being updated and which have no faces yet). This slows down the background ingest speed by about 0.25 to 2s per image (depending on other options, image size, format, computer speed). Unless you process large amounts of images frequently or you are concerned about performance, enabling this is usually a good idea. You may want to keep this off if you process many images or if many of the images you process don't contain faces and you prefer to do manual face detection. |
Face Recognition | This setting controls the size of the image IMatch uses for face detection. The smaller the image size, the faster the process works. But if your images contain 'small' faces (relative to the image size), IMatch may miss some of these faces. The default image size IMatch uses is about 1000 pixel (it resizes the cache image down in-memory before processing). This works very well for typical portraits, family photos etc. If your images usually contain small faces, using the Optimize for small faces option may improve results, but this mode is about four times slower than the normal mode. Use the default setting and do a manual face detection with the larger sizes for images where IMatch fails to detect faces. Expert SettingsThe two other modes have been added to handle very specific situations. Using the original image size or upscaling image smaller than 2000 pixel can help to solve tricky situations, like shots of a choir or larger groups of people, where every face is relatively small. These two modes are very slow and should only be used selectively and only in combination with manual face detection. |
Face Recognition Mode | This setting controls how thorough IMatch looks for faces in your images. By default, it searches for normally positioned and slightly tiled faces, as you find them in normal photos taken with cameras and smart phones. In the Advanced modes, IMatch also searches for faces rotated to the left or right at various angles, which are more common e.g. in sports or dance photography. Consider an image like this: 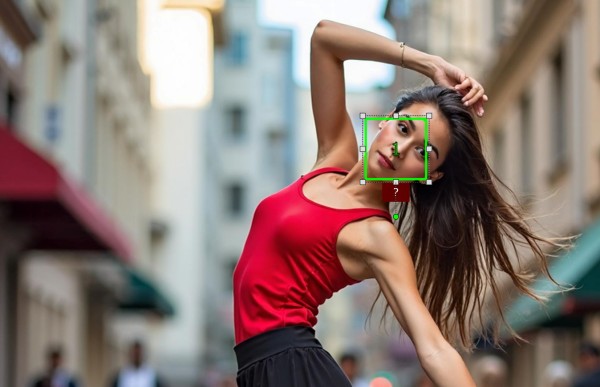 The face in this image would not be detected by the default recognition mode. The face's angle is too large. It is detected in the advanced modes, though. The first advanced mode searches for faces in all orientations and stops with the first found face(s). When you process images with only one face or all faces are roughly in the same orientation, this can save a bit of time. The second advanced searches for faces in all orientations. It is the slowest mode, but will find faces not found by the other two modes. |
Face Recognition Quality | This option controls how much pre-processing IMatch performs on the extracted faces before storing them in the database. The higher the quality setting, the better the recognition rate is for partially obscured, blurred, rotated etc., faces. But higher quality also requires a lot more processing power and causes the recognition process to become 5, 10 or 100 times slower. For typical photography, the fast default setting works very well. Expert SettingsIf you deal with historic photographs with lots of blur or scratches, widely varying facial poses and expressions, frequently partially obscured faces etc., using a higher quality setting may improve overall recognition rate. If you change this setting, you will have to re-create the face fingerprints via a manual face recognition of all affected files. You may also need to retrain the persons to improve match quality. If you deal with challenging photos, it's a good idea to create a small test database, add a few thousand representative images to it and perform face detection / recognition using various options. This should allow you to figure out the best compromise between performance and recognition rate. |
Automatically assign | This option is enabled by default. When you assign a person to a face or you confirm a face, IMatch performs a search for similar faces in the background. It looks at all unconfirmed faces and faces without an assigned person. If it finds faces matching the person you've just assigned/confirmed, it assigns these faces to the same person. This way IMatch automatically organizes your files by the persons shown. And re-organizes them while you assign persons and the AI learns from your work. When to disable this featureIf you work with very large databases and with tens of thousands of unassigned faces, you might want to temporarily disable this automatic search process because it can slow down IMatch considerably. You can tell IMatch search for matching faces for one or more persons using the corresponding command in the People View at any time. Create persons, assign them to some representative faces for each person, then let IMatch rescan the database to find matching faces for each person. Once you have organized your files, you can re-enable the background search. IMatch then automatically searches for matching faces again. |
Automatically | This option is set to Never by default. When IMatch performs automatic background searches for matching faces (see above) it assigns persons but does not confirm them. This has two reasons:
When to enable this featureIf you have organized many of the images in your database by persons already and you think that the IMatch AI is doing a good job when automatically assigning persons to faces, enabling this option can save you time. If you enable this, IMatch will confirm faces when it finds a sure or very sure match. This will also apply keywords and assign categories and organize your database automatically. The 'confident' setting usually works well. If you see too many false confirmations in this mode, switch to the very confident setting. |
Thumbnail Padding | To create a thumbnails from the face region the IMatch AI has detected, IMatch copies the rectangle surrounding the face region from the source image or cache image and standardizes the resulting thumbnail to 300 pixels. You can control how much of the area surrounding the face is included with the setting Edit > Preferences > Application: Face Recognition > Thumbnail Padding. By default, 20% of the face size on each side are added. This includes more of the hair of the person and produces suitable thumbnail representations of the face.  Left: original face area. |
When new faces are detected or you assign a person to a face, change an assignment, confirm a face, ignore or delete a face, IMatch automatically searches for faces similar to this face and assigns the same person. This process is automatic and performed in the background.
Depending on how many unconfirmed faces there are to check, it may take a few milliseconds to a few seconds. Although this runs in the background, it keeps the database busy so IMatch may be slower to respond when IMatch matches faces in the background.
If you allow IMatch to automatically confirm likely face matches, many files may get keywords added or categories assigned during this phase. Which triggers additional operations, like updates for data-driven categories, collections, panels.
The best way to speed this up is to minimize the number of unconfirmed faces. Confirm assignments done by the IMatch AI frequently. Confirmed faces are no longer processed during background scans and this improves performance.
Face detection is a very complicated and computing-intensive process. IMatch uses all available processors in your computer to achieve the best possible performance for this task. Running face recognition on thousands or tens of thousands of files will keep all processors in your system near 100% utilization for prolonged periods of time. Which is good, because it means that IMatch is performing well and getting the job done as quickly as possible.
If you run IMatch on a battery-powered notebook or similar, you should plug it in before running face detection for large sets of files. Otherwise the process may drain your batteries and/or your notebook will reduce CPU speed to conserve battery power ‐ which makes things slower.
See Performance Profile for more information about how to control the computing resources IMatch uses.