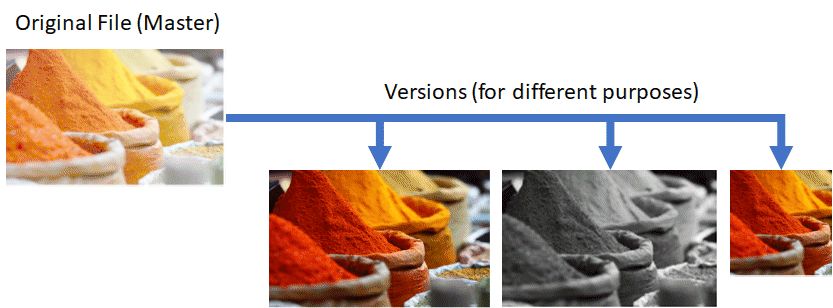
Most likely you work with versions already, e.g., by converting your RAW files to the DNG format or by producing multiple revisions and outputs from your files. The versioning concept in IMatch is designed to help you to manage all the versions you create from your files.
For IMatch, a version is some sort of derivative file that you create from another file.

For example, if you process a RAW file (Master) and create a DNG, JPG or TIFF file from it, this new file becomes a version of the RAW file. These files belong together. If you create multiple variations of the original file for different purposes, these files are also related to each other and to the original file.
Versioning in IMatch makes it easier to keep track of all these versions and to perform certain operations like automatically propagating (copying) metadata from the master to its versions.
Versions are an advanced concept.
If you are new to IMatch, we recommend to work with IMatch for a couple of days before you consider using versions. It helps when you understand how IMatch works with metadata.
IMatch manages versions automatically if you set up one or more File Relations. File Relations tell IMatch which files are master files (e.g. your RAW images) and how to find versions for these master files.
See File Relations for details about how to set up file relations for versioning.
The other method to define masters and versions is to do it manually.
Sometimes you may want to include a file in a version which cannot be identified by automatic means. To manually make a file a version of another file, start by selecting two or more files. The focused file will become the version master, unless one of the selected files is already a version master.
From the file menu content menu choose Versions > Create manual version link. IMatch will prompt you to select a relation definition to use as the basis of the manual link you are creating. Choose one and click OK to create the version link. Although the link between the two files has been created by you, the propagation rules and other options defined in the relation definition will be applied.
If you create a manual version link for a relation definition which is currently disabled, some features (e.g. the version panel) will not work correctly. You first have to enable the relation definition under Edit > Preferences > File Relations to enable all relation features.
To break a manual version link, select the files you want to unlink and then choose Versions > Remove manual version link from the file window context menu.
If the files are not in the same scope (e.g. the spread over different folders) you can remove the manual versions in the Versions panel.
The Renamer has an option to copy/distribute files. This feature can also create manual versions to automatically link the copies with their originals.
In the file window, versions look similar to stacks. The master file uses an Orange indicator icon, versions use a turquoise indicator icon. You can click on the icon to open a context menu with frequently used version commands. Version commands are also available in the standard file window context menu.
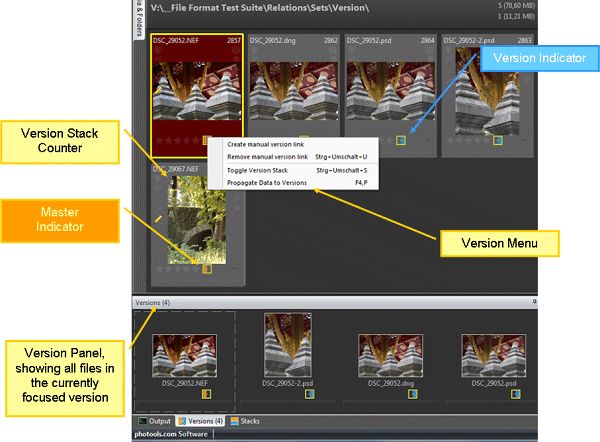
Version icons in a File Window.
You can access version-related commands in the file window via the context menu or the associated keyboard shortcuts. You can also reach version-related commands by clicking the version icon or the version stack icon in a file window panel.
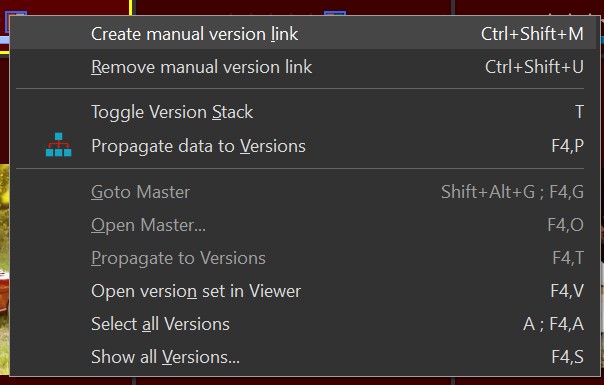
Version context menu
Toggle Version Stack | Expands or collapses the version stack. |
Propagate data to Versions | This command can be used to propagate data from the master to all versions immediately. This command is only enabled when a master file is selected. This command is only used under special circumstances. See Propagation below for more info. |
Propagate to Versions | This command is only enabled when at least one version is selected. It determines the master(s) of all selected versions and triggers propagation. This command is only used under special circumstances. See Propagation below for more info. |
Goto Master | Locates the master for the currently selected version. If the master is in the same scope (file window), it is selected and brought into view. If the master is not in the current file window, this command switches to the Media & Folders View and locates the master there. |
Open Master... | Opens the master of the currently selected version with the associated application. This allows you to quickly open the master of a version even if the master is currently in a different scope or hidden. |
Show all Versions | This command locates all master files and all versions for the current selection and opens them in a separate result window. See below for details. |
Select all Versions | This command selects all versions in the current scope. If the version stack is collapsed, you need to expand it first. |
Open version set in Viewer | Loads the selected master and all it's versions into the Viewer. This command is only available when a master is selected and focused. Use the Goto Master command before if needed. |
Create manual version link | This command allows you to create a manual link between the currently selected master and other selected files. It can be useful if you cannot link two files via a normal relation definition or you just want to include an otherwise unrelated file in a version set. |
Remove manual version link | Removes manual links between the selected master and other selected files. |
A version automatically forms a stack from the master and all versions.
You can hide all versions via the Toggle Version Stack command available in the context menu of version icons. If you collapse the stack, only the master file is displayed, versions are hidden. A stacked master displays a version stack indicator to show the number of files in the version set (even if there is only the master). The thumbnail panel also takes on a 'stacked' appearance to indicate the stacked state.
All version files within the same scope as the master will be hidden if the master is collapsed. Consider the following folder hierarchy:
|- Root
   |- Child
The Root folder contains some master files, and some versions. The Child folder contains only versions. All masters are collapsed.
The same principle also applies to categories and collections. Whenever master files and versions are displayed in the same scope (file window) the versions will be hidden. If you look at a category which contains both master and versions, the versions will be hidden if the master is collapsed. If you look at a category which contains only the versions, they will be visible.
Filters ignore stacks. If files are hidden in a file window, the filter panel still works on the entire scope. This allows you to reveal files from a stack when the corresponding stack top or master is filtered out.
When you collapse a version stack, the master is shown as the stack top. Which image is displayed, depends on several conditions:
This allows you to display a specific version (e.g. the 'final' version) when you collapse a version stack. When the stack is open, you see all files in the stack.
Consider the following example:
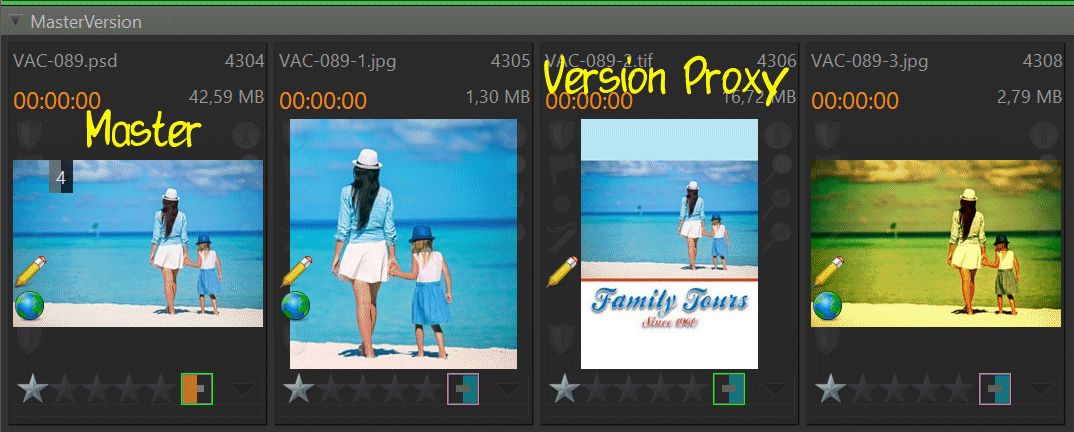
These four files form a version stack. The master is the leftmost file. For the PSD->TIF file relation we have enabled the Version Stack Visual option in the File Relations configuration dialog. When we now collapse the stack, it shows as:
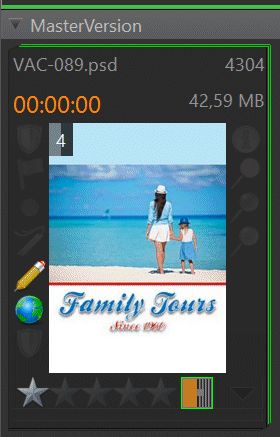
All files in the stack are hidden and the version designated as the version stack visual is shown instead of the master image. This way you can easily tuck away any number of versions under a 'best' or 'final'' image.
Like the Stack Panel, the version panel displays thumbnails of all files in a version set. The master is on the left, the versions are displayed on the right. Right-click on any of the thumbs to open a context menu. The version panel uses the same sort order as the file window.
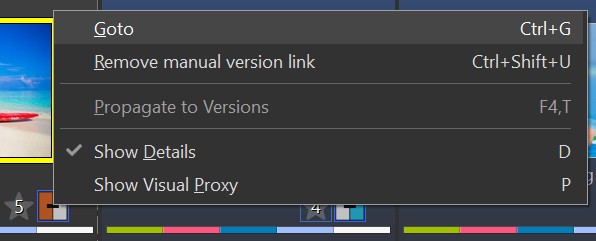
Version panel context menu
The version panel by default does not use visual proxies. This allows you to see the master file in its original appearance. You can enable visual proxies via the context menu in the version panel.
If you keep versions in different folders and/or categories it may be sometimes difficult to perform certain actions. For example, if versions are in different sub-folders and you want to select them to perform a command, you have to bring them into the same scope (aka file window) first.
This can be achieved by including sub-folders or child categories in the file window via the hierarchical display mode. Or by keeping master and versions in the same category or collection. Or by keeping them in the same folder of course.
See The Result Window for more information about result windows.
An easy and independent way to get one or more masters and all their versions into the same scope is the Show all Versions command accessible via the file window context menu and the associated shortcut.
This command determines the masters for all currently selected files and opens a result file window with these files. You can select a free mix of versions and masters, the command determines automatically which masters are needed. The following result window shows two masters with two versions each:
The result window uses a hierarchical display. Masters are represented as group captions, and each group contains the versions of that master. Basically IMatch treats the masters as originals in this result window. For each original (Master) you get one result with all versions of that master.
See also Searching for more information about searching in IMatch.

You can apply a sort profile of your liking to sort masters and versions by any criteria. If you include the Version sort attribute in your profile, the masters are sorted before their corresponding versions. The image above shows the result of a sort profile which sorts by version.
The Result window is a normal file window and all panels and command are available. You can filter your versions, edit metadata and keywords, open the files etc.
The master/version icons and the Versions panel make it easy to tell which files are versions and where to find them, even if you distribute versions over multiple disks.
In addition, IMatch can perform additional tasks for versions. These tasks can be controlled and configured via the relation definitions you use for your automatic or manual versions.
Propagation means automatically copying metadata from the master to its versions.
For example, if you assign a rating to the master file you may want this rating to be applied to all versions too. Or if you set the copyright info on the master, you may want all versions to get the same copyright info stored in their metadata.
IMatch data like collections, categories, Attributes etc. is safe to copy.
Before you start copying metadata like IPTC, EXIF or XMP between files, make sure you understand the metadata format you work with and the consequences of copying metadata between files.
Relation Definitions offer a lot of control about what is propagated from the master to versions. For example, you may propagate rating but not labels or propagate only XMP data but not other metadata.
IMatch provides convenient tag groups (or sets) for propagation, e.g. All XMP Metadata or XMP Title. You just enable the group(s) you want to copy in the File Relation configuration dialog:
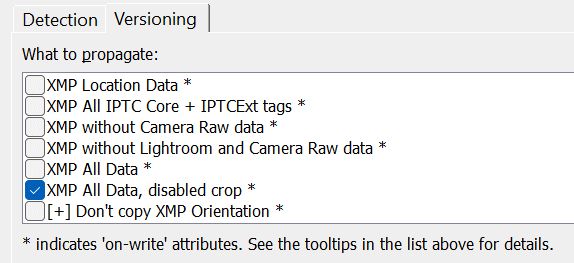
Entries marked with [+] are meant to be used with one of the other XMP tag groups. For example, if you enable the XMP All Data or XMP All Data, disabled crop you can add operations like Don't copy XMP Orientation or Don't copy XMP keywords to exclude potentially problematic or unwanted tags or tag groups from being copied.
The Merge XMP Keywords allows you to keep keywords in versions and only add keywords found in the master but not in the version.
When you use one of the keyword add-ons, IMatch will not longer remove keywords you remove from the master from versions. You have to remove the keywords manually.
This all depends on your personal workflow and tool chain.
Copying the orientation tag from master to versions, for example, will cause problems if you have rotated the version differently. Copying XMP regions (face annotations) will cause problems when you have resized or copped the version. The regions will be show at a different location in the version in this case.
This is why IMatch gives you many and detailed options for controlling which metadata is propagated. Propagating only safe tags like title, description, keywords etc. is usually the best optioin.
If you plan to copy IPTC, XMP and especially EXIF metadata between files, it is important that you understand the potential risks. Usually you copy metadata from a master file to one or more versions. If you only copy safe metadata like XMP, this usually works really well. IMatch and ExifTool take care that things work.
For XMP metadata, there may be some potential pitfalls when you work with RAW processors which keep settings or development instructions inside the XMP record.
If you copy the XMP record between files, and you later open the copy in the RAW processor, it may try to apply the settings contained in the XMP file (which belong to another image) and thus produce a wrong result. An example for this is Adobe with their Lightroom and CS products. This software stores a lot of proprietary data inside the XMP record, and copying this data between files is not recommended.
IMatch has a special propagation attribute which copies all XMP data, except the proprietary LR/CRS data.
EXIF metadata contains information about the image file itself (dimensions, orientation, color data etc.) and the camera and lens used. It was never intended to be copied between files. If you, for example, make IMatch copy EXIF data from a RAW file to a JPEG version you have created, the EXIF record will not match the JPEG file. It may contain maker notes and other data which is valid for the RAW, but wrong for the JPEG file. Although ExifTool does a great job when copying EXIF data between files, it is only recommended for very specific situations and when you know what you are doing.
To copy only rating and label between master and versions, use the corresponding attributes. If you want to transfer the mass of metadata, e.g. headlines, descriptions from the master to versions, propagate XMP and maybe classic IPTC data too. Since XMP also contains shooting data like lens, ISO, camera model etc. you get all the info you need in the version that way.
If you copy EXIF data between files, the version may end up with the wrong orientation when you copy EXIF data. This is because often the version file has already been normalized (no rotation) when you exported it in your imaging application. When you now copy a non-neutral orientation from the master file via the EXIF data, the version is rotated like the master, but that can be wrong.
In this case, use the without orientation propagation rule set.
If you also copy XMP data, make sure you enable the Don't copy XMP Orientation rule set in addition to other XMP rule sets you use. Otherwise the XMP data copied from the master will restore the EXIF orientation when IMatch maps XMP to EXIF.
When you propagate the XMP All Data or related groups, this includes both flat (xmp-dc:Subject) and hierarchical keywords (XMP-lr:hierarchicalSubject). Which means that the master and its versions always share the same set of keywords.
If you want to maintain separate sets of keywords for master and versions, enable the Don't copy XMP keywords attribute in addition to attributes like XMP All Data or similar. If this is enabled, no keywords are propagated from the master to versions.
If you want to be able to add additional keywords to versions, enable the Merge XMP keywords option. IMatch then copies keywords from the master to versions, but keeps existing keywords in the version. If the master and a version share the same keywords, they are not duplicated.
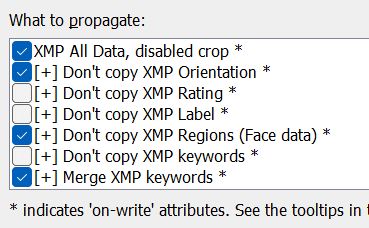
This screen shot shows a typical combination that works well for many users. All XMP data is copied, but not the crop information, orientation and regions. Copying this data may cause unexpected results when the version has been resized or rotated. This of course depends on your workflow.
The Merge XMP Keywords option ensures that keywords are propagated from the master to versions, but versions can have additional keywords.
When you remove keywords from the master and propagate again, IMatch will not remove the keywords removed from the master from the versions.
There are additional options to copy XMP data but leave out the proprietary data in the Adobe camera name space. This data is specific to one image and should usually not be copied to other files.
You can also copy XMP metadata but leave out all proprietary Adobe Lightroom metadata. This may be useful for some specific situations, but also strips all hierarchical keywords from your files.
This option allows you to propagate XMP data. If the XMP data contains a 'crop' record, it will be disabled. This prevents the version from using a wrong crop when displayed in applications like IMatch which support virtual crops.
If you don't want to copy Face data from the master to the versions, make sure you set the Don't copy XMP regions option. This should also be the case when the version is been rotated or cropped differently than the master. IMatch cannot adjust face regions to cropped or rotated versions.
Propagating metadata using the convenient tag groups or individual tags is the safest way to propagate metadata.
If you have specific requirements or you want to copy only specific tags, you can do so via the advanced options.
First enable the collections and/or tag groups you want to propagate. Then click on the Advanced... button in the File Relations configuration dialog:

This dialog allows you to specify individual tags you want to propagate, exclude from propagation or assign a specific value to during propagation.
Tags must be specified in standard ExifTool syntax and one tag per row.
Use the Tag selector button available in the advanced options dialog to insert tags in the correct syntax.
| Specify the tag with two leading minus signs to exclude it from propagation. |
| Specify the tag with one leading minus sign to propagate it. |
| Use a leading minus sign, the tag name, a = and a value to set the tag to that value during propagation.You can use variables to set the value, which opens up a lot of possibilities. File.* variables reference the current master file. |
--XMP-dc:Title
Do not propagate the XMP title. You combine expressions like this with an enabled tag group like XMP All Data. IMatch in this case propagates all XMP data, except the XMP Title.
--XMP-dc:Title
--XMP-photoshop:Headline
-XMP-photoshop:Credit=Paul P. Photographer
Do not propagate the XMP title and headline. Set the credit tag in the version to Paul P. Photographer.
If you don't enable any of the propagation tag groups, you can propagate individual tags as needed. This gives you ultimate control over which tags to propagate, but may also result e.g. in non-compliant XMP records if you don't propagate all required tags. This is an advanced feature and should only be used when you have detailed metadata know-how.
-XMP-dc:Title
-XMP-photoshop:Headline
-XMP-photoshop:Credit
-XMP-xmp:Rating
-XMP-xmp:Label
Propagate only title, headline, credit, rating and label.
You can combine this with propagating entire tag groups, e.g. when you want to propagate some extra tags not in the propagation group.
-XMP-photoshop:Credit=Copyright {File.DateTime|format:YYYY} Paul P. PhotographerSet the value of the credit tag for the version during propagation based on a variable. The year is based on the File.DateTime of the master file.
If you propagate categories, you can choose which categories (with or without child categories) you want to propagate in the Categories tree. If you want to propagate all categories, just check the @All node in the tree. Otherwise, check specific categories.
Via the check boxes you can include and exclude individual categories, and also decide whether or not you want to include child categories. The following check states (in additional to unchecked) are available:
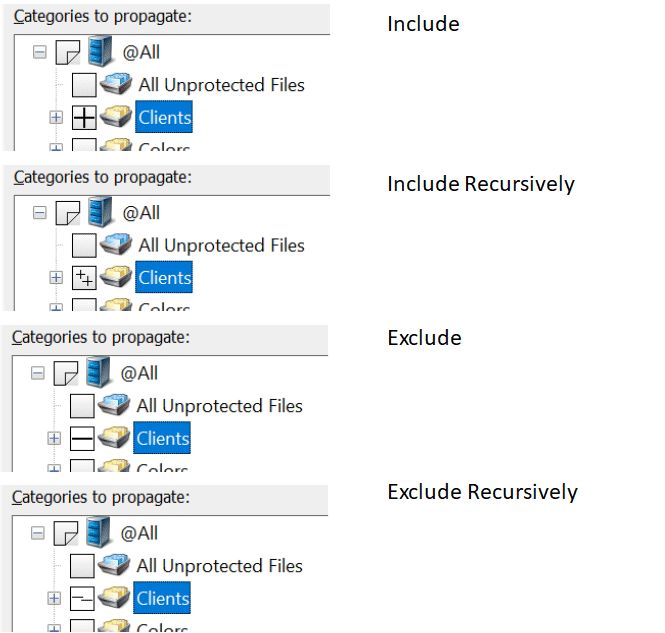
Recursively here means that all child categories of the checked categories are excluded / included, recursively down to the bottom level.
Propagation of IMatch-internal attributes (pins, dots, flags) is immediately carried out when propagation is enabled. Propagation of metadata like IPTC or XMP is performed when IMatch writes the metadata of the master file. If you enable automatic write-back, this is done automatically. Otherwise IMatch propagates values from the master to its versions when you write-back the master file.
Propagation of Attributes is performed when you change the Attributes of the master in the Attribute Panel.
Rating and Label are an exception. Although these are actually XMP metadata fields, IMatch automatically propagates these frequently used attributes whenever you change them, not only when the data is written to the file.
If you don't check the options to propagate rating and label, IMatch also skips rating and/or label when you propagate XMP data at write-back. This means that IMatch copies the XMP data from the master to the versions, but excludes the rating and label - allowing the versions to retain their own rating/label.
If you protect/un-protect the master, this option, when enabled, will propagate the protection status of the master to it's versions. See Protected Files for more info about file protection.
Annotations are copied from the master to its versions when you change the Annotations of the master.
Be careful when you combine propagating annotations with face recognition. Copying face annotations between images may not work correctly, especially if the version has been cropped or rotated.
Pay close attention to how keywords are propagated when you propagate face annotations which are linked to persons and these persons have keywords assigned.
The general recommendation is not to propagate annotations when working with face recognition.
You control which data is propagated (copied) between master and versions with the What to propagate settings in the relation rule.
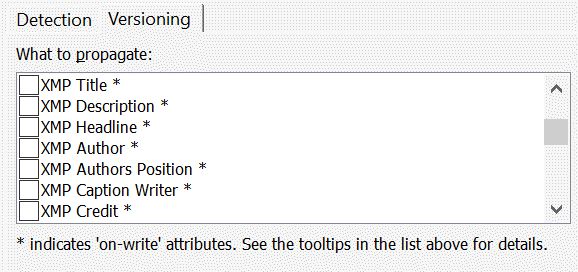
Controlling which metadata to propagate (copy).
Metadata propagated at write-back time is indicated by a * in this list. All elements marked with a * are copied from the master to the version when IMatch writes back data to the master file.
There are no common rules for what metadata to propagate. It all depends on the format of files you use, the metadata contained in these files, how the versions are produced (which software you use to produce them from the master) and so on.
Be careful when you make IMatch propagate metadata from the master file to versions.
Copying too much or the wrong data may cause problems when displaying or processing the versions later. If you have no firm grasp yet of all the different metadata available for copying, follow the guidelines below.
IMatch-internal data like categories, annotations, attributes and collections is safe to propagate. This data is not stored inside your files but in the IMatch database.
We recommend to propagate XMP metadata only, because it is universal and supported by all file formats.
IMatch enables you to copy selected XMP tags only, like the headline or keywords. You can also copy the entire XMP record, if you want. Keep in mind that an XMP record contains copies of EXIF metadata fields, and copying it in it's entirety may cause some of the EXIF tags in XMP to become invalid.
When you propagate the entire XMP record, you may want to trim the proprietary camera raw data (added e.g., by Adobe's Raw Converter or Lightroom) and also the Lightroom settings embedded in the XMP. Both sets of information belong to a specific image, and copying them to another file will invalidate them.
You can explicitly exclude some XMP tags from being copied. This includes tags like orientation or the crop record, which often cause problems when copied to another file. Not propagating XMP regions (face data and face tags) for privacy reasons is another option.
You can control whether IMatch uses the crop record at all, or for which formats, under Edit > Preferences > Metadata 2.
EXIF metadata was never designed to be copied between image files, or even between image files in different formats. EXIF contains data about physical properties of the image, like dimensions, orientation, byte format, color profile etc. Copying this information into a another file will invalidate at least parts of the data. If you absolutely must propagate EXIF data, use EXIF (Safe tags only). ExifTool then copies only tags known to be safe.
A file can contain two sets of GPS data - the native GPS record and a copy of it in XMP. When you copy XMP data record, XMP GPS data is included but not the native GPS record. If you work with software that supports GPS but does not understand XMP, you may need to copy the native GPS record too.
When you set up versioning and propagation, IMatch performs the propagation when you modify the master file, and for all tag sets marked with a * in the What to Propagate list at the time of write-back.
If you set or change propagation options or modify your relation rules, metadata is not automatically propagated from the master to versions. Only when you change the master file later, propagation is performed.
To manually trigger metadata propagation after you changed the rules or propagation options, use the Propagate Data to Versions command in the Commands > Relations menu.
IMatch can apply different uses to a version. In your relation definition you can define that a version should be used for certain purposes, e.g., as a visual proxy.

A visual proxy ('As Visual') is used instead of the master file whenever the file is to be displayed, e.g., in the Viewer, the Slide Show or the Quick View Panel.
Visual proxies are helpful in the following situations:
Visual Proxies are used automatically for all features in IMatch which display or process the image, e.g. the batch processor (if no For Conversion version is configured, see below).
See Working with RAW Images for more information about working with RAW files in IMatch.
The master and it's versions automatically form a version stack. See Versions for more information. If you collapse a version stack, only the master file remains visible. But the master file may not be the best representation of a version set - often a version or the final file would be better. If you want to see a the thumbnail of a version for collapsed version stacks, enable this option. IMatch still shows the master file in the File Window, but uses the thumbnail of the version.
When you print a file from within IMatch, IMatch will use the version marked as for printing if available.
This version is used when you convert a file in IMatch, e.g. in the Batch Processor.
This version is used when you send files via email from within IMatch.
If there are multiple version files for the same use, IMatch sorts the versions by file name and uses the first file for the verb. For example, you set up a relation definition to link a RAW file to JPEG files. You configure the JPEG files as a visual proxy. If the relation yields multiple JPEG files for the same master (because you have created multiple variants), IMatch uses the first JPEG after sorting all versions by file name.
This method allows you to control which file becomes the file for a specific verb by choosing appropriate file names.