The keywords panel is specifically designed to allow you to view and edit keywords for your image files.
To display the Keywords panel, press F9,K or use the corresponding menu command View > Panels > Keywords.
You can also press Ctrl+E, K to open it from the File Window and start editing.
The Keyword panel hosts the powerful IMatch keyword editor. It has been designed to allow you to add and edit keywords in individual files or batches of files quickly and comfortably.
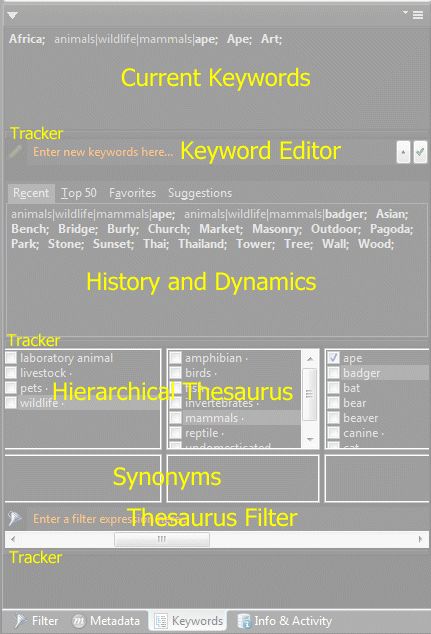
The keyword panel is divided into multiple sections, as shown in the following screen shot:

You can resize the Keyword Panel like any other panel. And you can resize each section within the panel to your taste. Just drag the divider bars between each section with the mouse up or down.
| Current Keywords | This section displays the keywords of the current file (or selection of files). |
| Tracker | Allows you to change the size of the area with the mouse. |
| Keyword Editor | Allows you to add new keywords. |
| History and Dynamics | Contains the Recent Keyword set, the Top 50 set, your personal keyword Favorites and also the list with automatic suggestions. |
| Hierarchical Thesaurus | Displays the contents of your keyword thesaurus. |
| Synonyms | If you use synonyms in your thesaurus, they are displayed here. When you assign a keyword from the thesaurus both the keyword and its (optional) synonyms are assigned. |
| Thesaurus Filter | Allows you to filter the thesaurus to find entries with specific contents |
Before we go into the details, here is a list of frequent tasks if you are in a hurry.
All changes you make to keywords are applied to all selected files. This allows you to add/remove/change keywords for any number of files at once.
| To | You do... |
|---|---|
Add a new keyword | Click into the Keyword edit field ('Enter new keywords here...') and start typing. IMatch presents you with an auto-complete list from your thesaurus. Press Enter to pick the first keyword from the list or press Cursor Down to select one of the other elements in the list, then press Enter. 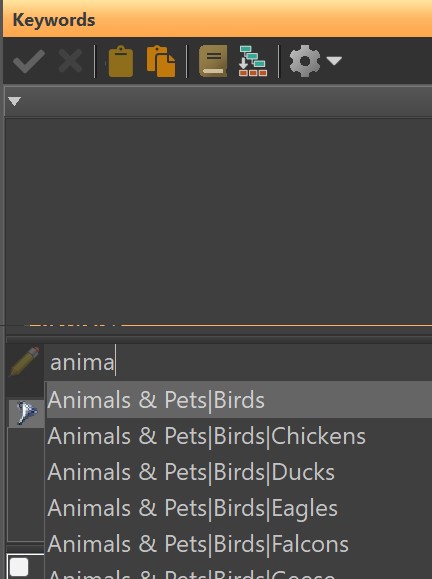 |
Add and Edit a keyword | Same procedure as above, but instead of Enter you press Tab. The selected keyword is then placed into the input field and you can change it before adding it to the file. |
Correct spelling | Delete the misspelled keyword with Ctrl+Left-click and then add a new keyword with the correct spelling. |
Delete a keyword | Ctrl+Left-click the keyword in the Current Keywords field. |
Un-delete a keyword | Ctrl+Left-click the keyword in the Current Keywords field again. |
Edit all keywords as text | Click on the arrow button next to the Keyword edit field to switch to full edit mode. In this mode you can also use the Windows clipboard to paste keywords as text, e.g. from other applications. |
Replace a keyword | Delete the old keyword with Ctrl+Left-click and then add a new keyword. |
Merge/Copy keywords | If more than one file is selected and the files have different keywords, these keywords are displayed in an italic font. When you click on one of these keywords, the keyword is added to all files which don't have it yet and the keyword is displayed in the normal font to indicate that. This mode can be used to merge keywords between multiple files. Or to copy selected keywords from one file to another. |
Set the same keywords for multiple files | Click the pen icon in front of the keyword input field. This marks all keywords as modified.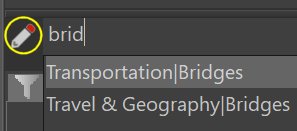 |
Windows Clipboard | You can use the Copy and Paste commands from the context menu in the Current Keywords pane to copy keywords between files. If you select multiple files and then use Paste, you can copy keywords from one file to many other files. After pasting keywords, you can make adjustments (e.g. removing unwanted keywords) before saving the changes. |
Delete all keywords | Use the Delete all keywords command from the context menu of the Current Keywords pane. |
Find files with the same keyword | From the context menu of a keyword in the Current Keywords pane, use the Find... command. |
Find files with the same combination and same order of keywords | From the context menu of a keyword in the Current Keywords pane, use the Find Combination... command. |
Recently used keywords | Use the Recent tab from the History and Dynamics pane to quickly access keywords you have used recently. Just click on any of the keywords shown in this pane to add the keyword to all selected files. |
Top-50 keywords | This tab in the History and Dynamics panel shows the 50 most often used keywords. Click on any keyword in this pane to add it to all selected files. |
Favorite keywords | This pane in the History and Dynamics pane shows the keywords which you have made a favorite. You can add keywords to favorites from the right-click context menu in the Current Keywords pane. |
Suggested keywords | This nifty pane in the History and Dynamics pane uses various criteria to create a list of keywords which may match the selected file(s). |
Save changes | Press Ctrl+S or the green hook button in the toolbar. |
Cancel changes | Click the X toolbar button. If you have already saved the changes, use the Undo command from the Edit menu. |
Open @Keywords category | IMatch mirrors keywords assigned to files automatically in the @Keywords category hierarchy. To open the category for a keyword, use the Goto Category command from the context menu of a keyword in the Current Keywords pane. |
You can use the keyboard shortcuts Ctrl+PageUp / Ctrl+PageDn to move the focus to the next/previous file in the file window. This allows you to add keywords to individual files without using the mouse.
All changes you make to keywords are applied to the current file (or selection of files) when you click on the green arrow button in the toolbar. To undo your changes and to revert to the keywords stored in the database, click the red X button.
If you switch to another file while there are unsaved changes in the keyword panel, IMatch will prompt you to save or cancel your changes.
There are buttons to copy and paste keywords to and from the Windows clipboard. These commands are also available via the context menu of keywords in the Current Keywords panel and the History panel.
The menu icon in the bar above the Current Keywords panel holds some additional commands.
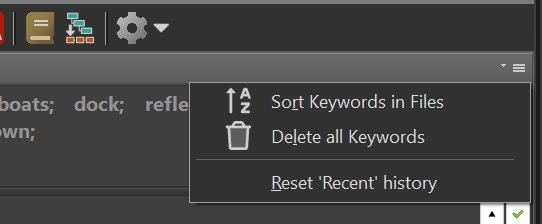
Drop-down menu in the Current Keywords Panel
Sort Keywords for Display | Keywords are per-definition not sorted (none of the metadata standard requires this, and some application out there require a specific sequence of keywords so IMatch does not change it deliberately). If the keywords in your files are not sorted and this disturbs you, you can make the Keyword Panel to show them sorted. |
Delete all Keywords | Deletes all keywords from all selected files. Use Edit > Undo to undo this operation. |
Reset 'Recent' history | This command removes all entries from the History Panel. |
This area displays a list of all the keywords assigned to the files in the current file window selection. Keywords are separated with a semicolon.
If more than one file is selected, the keywords from the files are combined (merged). Keywords common to all selected files are displayed in the normal font while keywords only assigned to some of the selected files are displayed in italics and underlined.

In the example above we have selected two files. The keywords Africa and Art are assigned to both files. The keywords Ape and Mask are assigned to one of the files.
If you want to assign one or more of the italic keywords to all files in the selection, just left-click on these keywords. IMatch will mark them as keywords assigned to all files and will update the files to include these keywords when you commit your changes.
This merge is only performed when there are less than 2,000 files selected. It would take too long to retrieve, compare and merge the keywords otherwise. IMatch displays a message box in this case.
If you right-click on a keyword, IMatch presents a context menu:
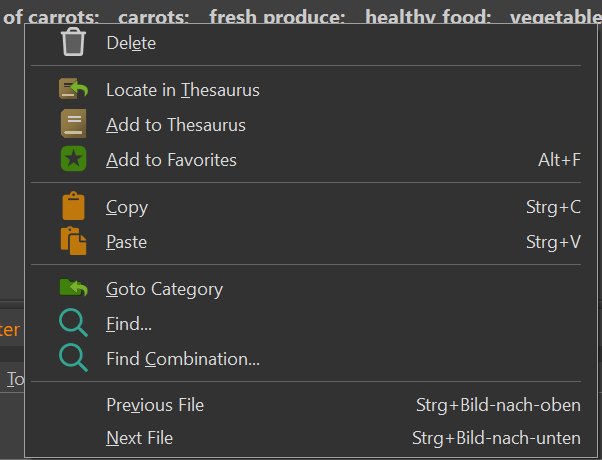
| Delete | Deletes the selected keyword. This does not immediately affect the database or the file on disk. Only when you apply your changes via the OK button in the toolbar will the keyword be removed from the database. |
| Locate in Thesaurus | Locates the selected keyword in the Thesaurus and scrolls it into view. |
| Add to Thesaurus | Adds the selected keyword to the thesaurus. If the keyword is hierarchical, all levels are automatically added unless they already exist. |
| Add to Favorites | Adds the selected keyword to your Favorites |
| Copy | Copies the selected keyword into the Windows clipboard. |
| Paste | If the Windows clipboard holds suitable data, it will be inserted as keywords. |
| Goto Category | If there is a matching @Keywords category for the selected keyword, you can jump right to this category in the Category View. |
| Find... | Finds all files having the same keyword and opens a result window with these files. |
| Find Combination... | Finds all files having the same keyword combination and opens a result window with these files. |
If you click somewhere in the free (not occupied by keywords) area of the Current Keywords panel, IMatch opens a different context menu. This menu provides the following commands:
| Copy | Copies all keywords into the Windows clipboard |
| Paste | If the Windows clipboard holds suitable data, it will be inserted as keywords. |
| Delete all Keywords | Deletes all keywords from all selected files. Use Edit > Undo to undo this operation. |
| Find Combination | Finds all files having the same keyword combination and opens a result window with these files. |
To delete a keyword, right-click and choose the Delete command. Alternatively, left-click the keyword while holding down the Ctrl key.

After a keyword has been deleted, IMatch displays it with a strike-through style in the list. You can undo the delete by Ctrl+left-clicking the keyword again.
Deleting a keyword also deletes the synonyms of this keyword.
If you work with hierarchical keywords, IMatch displays them using the standard IMatch notation for hierarchical keywords. The image below shows a hierarchical keyword: animals|wildlife|mammals|ape.

Click on the edit field below the keyword list. To add multiple keywords, separate them with a semicolon ';'.
IMatch supports keywords containing spaces.
To end the edit press Return on the keyboard or the OK button next to the edit field.

Press Esc to end the current edit and delete the input in the edit field.
If you click the Open Editor button on the right of the keyword editor you switch to the full edit mode.
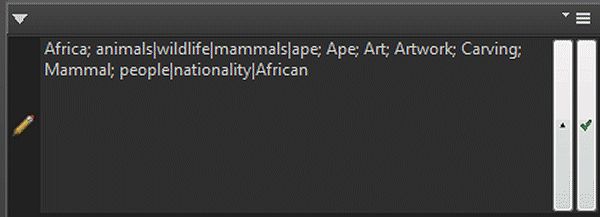
In this mode, the edit field occupies the entire height of the keyword editor and allows you to edit all keywords in plain text form. You can add, edit and delete keywords by just typing or deleting text. Individual keywords must be separated with a semicolon, spaces before and after keywords are ignored. To end the full edit mode click on either the Return button or the Open Editor button again. Or just press Return on the keyboard.
The text edit mode is ideal to quickly add or remove several keywords, or to paste text data from the clipboard and use it as keywords. In this mode, the IMatch Spell Checker is active.
To enter a hierarchical keyword, use the pipe symbol | to separate the individual levels of the keyword:
location|beach|south beach
See the topic on the Universal Thesaurus for details about hierarchical keywords.
If you left-click a keyword in the current keywords list, this keyword is copied into the editor. You can now change it and add it as a new keyword. If you want to replace a keyword with a modified or corrected version, delete the old keyword after adding the corrected version.
The keyword editor also serves as a filter for the Current Keywords, History and Dynamics area. When you type in some text in the editor, these lists show only contents matching the text you typed in the editor. This makes it easier to find a specific favorite or recent entry.
This area is divided into four sections. Each section is represented by a tab and you can switch to that section by clicking on the tab.
This list displays the last 50 used keywords in last recently used order. To add a keyword from this list to the current set of files, just click on it. Right click on any keyword in this list to open a context menu with additional options.
This list shows the 50 most frequently used keywords in a so-called cloud view. The more often a keyword was used, the larger it shows up in the list. To assign a keyword from this list, just click on it. Right click on any keyword in this list to open a context menu with additional options.
This list contains your personal Favorites. To assign, just click on keyword. Right click on any keyword in this list to open a context menu with additional options.
Since images nearby often get identical or at least similar keywords assigned (e.g., all images in a shooting) IMatch can make assumptions about which keywords you most likely want to assign to an image.
To determine which keywords are most likely, IMatch uses proximity and other features of the "surrounding" images. In many cases you will be able to pick the keywords you want from this list. The most likely keywords are shown near the top of the list.
IMatch uses a universal hierarchical thesaurus concept for all metadata, including keywords. The contents of the keywords thesaurus are shown in the keyword panel using a special hierarchical control, designed for quick access to even very large thesauri.
This control displays one list for each hierarchy level in your keyword thesaurus.

When you click on an element in a level, the list on the right displays the children of that element. In the example above, the element "family" is a child element of the "people" element. The small dot at the end of the name indicates that this element has child entries.
Elements which have the group flag set in the Thesaurus (Group Elements) are displayed enclosed in [ and ]
Elements with child elements show a · after the keyword.
To add a keyword from the thesaurus to the Keywords Panel, click the check box in front of the list entry. Keywords already assigned show a check mark. If an entry is assigned to only some of the files in the current selection, it shows an intermediate checkbox (similar to how the Keywords Panel indicates keywords not set for all selected files). Click the checkbox to assign the keyword to all files in the current selection.
To remove a keyword, uncheck the corresponding entry in the thesaurus.
If you assign/un-assign keywords and thesaurus has synonyms for these keywords, the synonyms are also assigned/unassigned.
If a keyword is marked as a group level keyword in the Thesaurus, it does not become part of the keyword assigned to the file.
Group level keywords are indicated by [square brackets] in the thesaurus panel.
Thesaurus elements can have synonyms. If you select an element in the thesaurus, the synonyms are displayed in the separate lists below each of the levels. Synonyms are added or removed together with their parent keyword.
Use the Thesaurus Manager to add, edit, rename and delete keywords and synonyms.
You can open the Thesaurus Manager from the Edit menu, the Keywords Panel toolbar or the Command Palette.
If you work with a large keyword thesaurus containing hundreds or even thousands of entries, it is often faster to directly search for an entry than to locate it by expanding levels over levels. The keyword panel supports this. Type in the word you are looking for and the thesaurus displays all elements containing that word.
If there is exactly one element matching your search term, the thesaurus locates this element and expands all levels. If there are multiple matches, they are presented as a list. Right-click an entry to open a context menu with additional options. Check or uncheck the check box to add/remove the corresponding keyword.
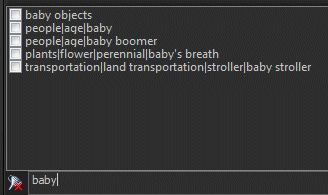
Right-click into one of the panels to open the context menu (or press the context menu button on your keyboard).
Open in Thesaurus Manager | Open the Thesaurus Manager and select the same element. Use this command if you want to add, remove or rename elements or synonyms. |
Add to Favorites | Add the element to your Favorites. |
Goto Category | Switch to the Category View and select the @Keywords category for the clicked element. |
Find... | Find all files with the same keyword |
Find Path... | Find all files with the same keyword, considering the full hierarchical path |
To see all files with the same keyword, go to the corresponding @Keywords Category in the Category View.
To filter files shown in the File Window by one or more keywords use the Category Filter for @kKeywords.
IMatch automatically propagates (copies) hierarchical keywords into flat keywords (IPTC keywords and XMP-dc:Subject) whenever you use the Keyword Panel. How IMatch flattens hierarchical keywords is controlled by the settings you make under Edit > Preferences > Metadata and your Thesaurus, e.g., the options for group levels and excluding.
When you make changes to the metadata or thesaurus options, these changes only affect keyword assignments done in the future.
Flat keywords already in your files (or the database) are not updated. To manually propagate hierarchical keywords into flat keywords in order to incorporate new options and thesaurus settings, click on the corresponding toolbar button in the Keyword Panel:

This command processes each selected file. It propagates the hierarchical keywords of each file into the flat keywords, applying the now active metadata options and thesaurus settings.
Use this command when you change e.g. group levels or exclusions in the thesaurus. Or when you change how IMatch flattens keywords.
Click on the Gear button in the toolbar to open the drop-down menu with additional commands and configuration options.
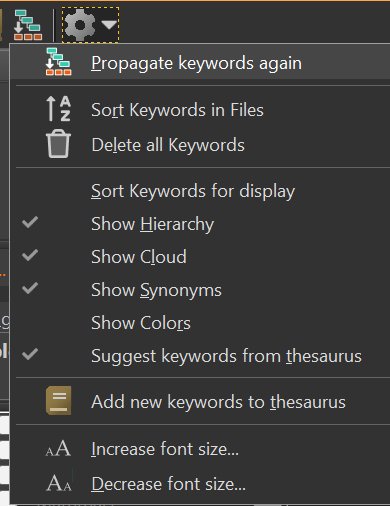
Propagate Keywords again | When you make changes in the way IMatch flattens keywords, you can run this command to flatten keywords using the current settings. This command operates on all selected files. |
Sort Keywords | This keyword sorts the keywords in all selected files alphabetically (hierarchical and flat keywords). IMatch by default retains the order of keywords imported from files. If the keywords are not sorted, but you want them sorted, run this command. |
Delete Keywords | This command deletes keywords. If only one file is selected, this command makes the keywords in the Keywords Panel as deleted. You can then commit the changes. If multiple files are selected, the command deletes the keywords for these files in the database directly. Use Edit > Undo to undo the changes if you make a mistake. |
| Option | Description |
|---|---|
| Sort keywords for display | Displays keywords in alphabetical order in the Keywords Panel. |
| Show Hierarchy | If this option is on, IMatch displays hierarchical keywords in the Current Keywords panel. Otherwise only the leaf keyword is shown. |
| Show Cloud | Enables Cloud display for the Current Keywords and History and Dynamics panels. In this mode, IMatch uses a larger font for keywords used more often or more recently. This is an additional visual clue to allow you to find keywords faster. Cloud View and normal List View for the Top 50 list |
| Show Synonyms | Also show synonyms in the thesaurus display. |
| Show Colors | This option colors keywords with matching @Keyword categories in the color used for the corresponding category. This is a great way to highlight certain keywords as an additional visual clue. For example, if your keywords contain project or client codes, use a different color for each client or project type. Or, if you use WHAT, WHEN, WHY... classification, give each root keyword a different color and let the children inherit the color (default). Then you can easily see if one of the W keywords is missing because the color is not there.  Keywords from @Keywords displaying in color |
| Add new keywords to thesaurus | If this option is enabled, new keywords added in the Keyword Panel are automatically added to the Universal Thesaurus. In addition with the feature to import all keywords from the database into the thesaurus once, this allows you to keep your thesaurus in synch with the keywords you add to your files. |
| Suggest keywords from thesaurus | If this option is enabled, the Keyword Panel looks up keywords matching what you type in the keyword input field and displays them in a list. By pressing Cursor Down you can select one of the suggestions and with Return you can copy it to the input field. Alternatively you can use the mouse and just double-click the list entry you want to use. Press Esc to close the list control.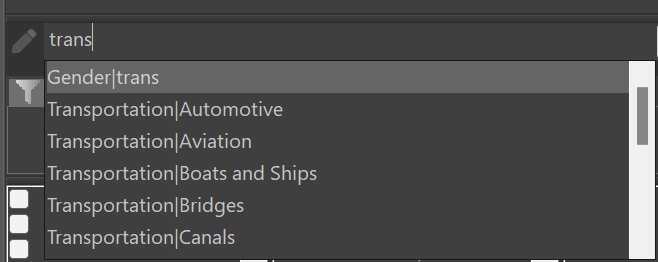 Keywords from @Keywords displaying in color |
| Increase/Decrease Font Size | See below. |
If you edit keywords often or for longer periods of time you may find it easier to increase the font size in the keyword panel. This makes it easier to read the information and puts less strain on your eyes. To increase or decrease the font size, click on the arrow button next to the Configure button in the toolbar and choose one of the font menu commands.
The larger font size is also applied to the contents of the input fields in the Metadata panel.
All other font sizes used by IMatch are based on the font sizes used by Windows itself. These depend on your screen resolution, theme and settings you make in the Windows Control panel. IMatch automatically adapts to the font sizes and screen metrics used by Windows.