Filters in IMatch combine filter and search functions using the same set of easy-to-use features and controls.
The Filter Panel offers a powerful way to refine the contents of your active File Window. With this feature, you can filter by a wide range of criteria, performing complex operations that aren't available in the standard File Window Search Bar. By using the Filter Panel on its own or in combination with the search bar, you'll gain even more flexibility and control over your file searching and filtering experience.
If the Filter Panel is not visible, you can show it via View > Panels > Filter or the associated keyboard shortcut F9, L.
Filters are a very important feature for DAM applications like IMatch. You will often need to find files having certain attributes quickly. Whether you just want to tell the File Window to show only files with a red label or you want to see only files with a specific combination of metadata and timestamps ‐ the Filter Panel can do this and a lot more.
Filters work with the current scope. The current scope is whatever is currently displayed in the File Window. This can be a folder, a category, a collection, timeline node, or all files in your database. The scope is active even when the File Window is paused.
See File Window Basics for more information about the File Window, and the topic on the hierarchical display mode.
You select a folder containing 500 files in the Media & Folders View. You apply a filter that shows only files with a rating of 3 or better. 20 files with this rating remain visible in the File Window, all other files are hidden.
Filtering by Rating & Label can also be done with the Quick Filter in File Windows.
You let IMatch apply a "Work to Do" label to all new files. Use the Rating, Label & Collections filter to see only files with that label.
You use the Metadata Value filter to see which headlines were used for the files in the File Window, and then filter for files with a specific headline.
While working with categories, you use a Date filter to see only files taken during a specific date range.
You work with @Keywords categories and want to see only files associated with specific Events or Persons.
You use the Orientation and Dimension filter to see only files in portrait orientation in a File Window.
Whatever filter (or combination of filters) you use, it will always work with the current File Window contents (scope). Bring the files you want to search (filter) into the File Window, then apply the filter(s).
Filters ignore stacks. If files are hidden in the File Window because they belong to a currently collapsed stack, these files are still considered by the filter.
If the Filter Panel is not visible, you can show it via F9, L or View > Panels > Filter Panel.
The Filter Panel is composed of the Filter Manager at the top and about a dozen optional filter panels covering a wide range of filter functionality. You can show or hide these filter panels as needed.
IMatch stores the settings of the Filter Panel automatically and restores them when you restart IMatch. If the panel is docked and visible, the filter is automatically applied to the current File Window when IMatch starts. If the Filter Panel is closed or in auto-hide mode, the filter is applied when you first open/show the Filter Panel.
A filter can be as simple as "Show me all files with a rating of 3 stars or better" or it can include combinations of multiple filters, e.g., one or more Ratings, Keywords and Date Ranges.
You can save filter definitions for later reuse so you don't need to set all the options again. And you can combine these stored filters later by just enabling them in the Filter Manager. This allows you to create a set of standard filters you often use, and then apply them with a single mouse click.
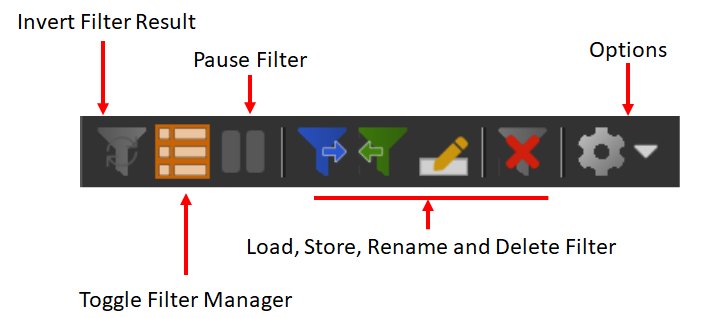
Invert | Inverts the result of the filter. The File Window shows files not matching the active Filter. Example: if your Filter is set to show only files with a rating of 5, clicking this button changes the filter to show only files which don't have a rating of 5 (including unrated files). Another example: If you want to see all files not linked to a specific person, enable that person in the People Filter and combine that with the Invert option to show only files not linked to that person (or persons, when you check multiple persons in the People filter). |
Toggle Filter Manager | Shows or hides the Filter Manager panel. Hiding the panel when not in active use saves precious screen space. |
Pause | Clicking this button pauses (disables) the filter. The File Window shows all files again. The current state of all filters is preserved. Click the pause button again to unpause the Filter Panel. If you configure complex filters, pause the Filter Panel. The Pause button is disabled unless at least one filter is enabled (check box ticked in the filter caption). |
Options | Add or remove additional filters, clear all filter settings, etc. |
| These buttons are only available when the Filter Manager is visible: | |
|---|---|
Store | Stores the current Filter Panel settings under a name. This allows you to create custom filters you can later apply with a single mouse-click. |
Load | Loads a previously stored filter into the Filter Panel, updating all panels to show the settings of that filter. This allows you to see what it does and to change it. |
Rename | Renames a stored filter. |
Delete | Deletes a stored filter. |
See the following sections for more details about these commands and features.
The Filter Manager displays a list of all stored filters available in your database. You can use this manager to apply one or more filters to the File Window and also to create, modify and delete stored filters.
The first entry in this list is special. It is named Filter Panel and represents the currently active filters in the Filter Panel. The settings you make in individual filters are only applied to the file window when this entry is enabled. Usually you keep this enabled, unless you want to use only stored filters.
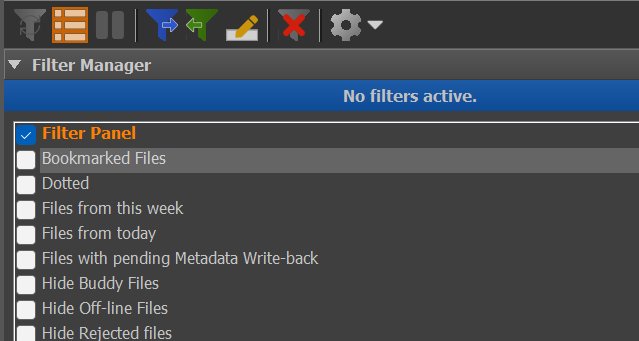
The Filter Manager with the orange Filter Panel entry and a number of stored filters like Bookmarked Files or Files from this week.
You can change the height of the Filter Manager list by dragging the track bar at the bottom of the panel up and down.
You can activate stored filters via the check box shown in front of them in the Filter Manager list. IMatch applies activated filters in the order they appear in the Filter Manager list, combining the results of each filter via the Boolean AND operation. The File Window shows only files that have passed all enabled filters.
If you enable both the Filter Panel and one or more stored filters, IMatch combines the current settings in the Filter Panel with the enabled stored filters. Uncheck the Filter Panel entry to apply only stored filters.
The screenshot above shows a number of stored filters created earlier. We can activate each of these filters individually, or combine them with the Filter Panel entry and other stored filters. This gives us quite a number of options to filter the File Window contents with a few mouse clicks.
We can, for example:
When the Filter Panel is active (at least one filter is enabled), the File Window caption changes to indicate that a filter is active:
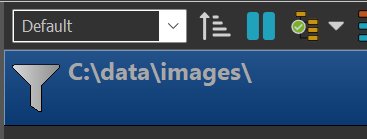
A filter is only applied when the check box in its caption is enabled:

Disabled and enabled filters.
This allows you to temporarily disable a filter or parts of a filter without changing its settings.
You can temporarily pause (disable) the Filter Panel via the Pause button in the toolbar or via the keyboard shortcut Ctrl+F6.
If the Filter Panel is paused, none of the filters are applied and the File Window shows all files in the current scope. All filter settings are retained and you can reactivate the filter at any time by pressing Pause again.
Pausing allows you to quickly disable all filters, to see all files in the current scope.
With the Invert toolbar button you can invert the result of the Filter Panel. The File Window then shows only files which are filtered out.
To save a filter for later reuse, click the Save button in the Filter Panel toolbar. This stores the current Filter Panel settings under a name. If you enter the name of an existing filter it will be replaced with the current settings. The new filter shows up in the Filter Manager list immediately.
To review or edit an existing filter, you can load it into the Active filter with the Load button in the toolbar. This command replaces the settings in the Active filter with the settings in the loaded filter. If you make changes you can save them back via the Save button.
To delete a stored filter, select it in the Filter Manager list and click on the Delete button in the toolbar.
When you click on the Configure button in the Filter Manager toolbar, you can choose the filters you want to show in the Filter Panel. This way you don't waste screen space with filters you never use. This menu also has commands to show and hide all filter panels at once, and to clear the active filter back to default values.
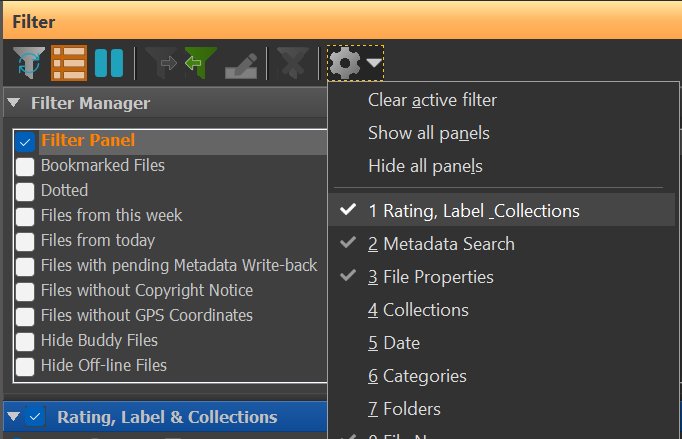
To quickly access a filter in this menu, use the capital letter or digit displayed in front of the filter name.
The following section explains the filters available in IMatch and how to use them.
Only the filters with an enabled check mark in the filter's caption are applied by the Active filter.

If you check the box in the filter caption, the caption bar changes to a different color to indicate that the Filter Panel is active.
This feature enables you to temporarily disable some filters, while keeping other files applied. Use the Pause button in the ribbon to temporarily disable the entire Filter Panel.
This filter is probably the most frequently used. It allows you to quickly filter by rating, label and collection.
You use this filter for things like:
"Show only files with 3 or more stars"
"Show only files with a yellow label"
"Show only rejected files"
"Show flagged files with a blue dot"
"Show only files without a rating or label"

The Filter Panel displays direct access buttons for every collection and the XMP rating and label.
To include files with a specific rating, label or collection membership, just click the corresponding button. If you are unsure about the meaning of a button, just point the mouse at it and wait for a second to see the tooltip with additional information. Note that there are extra buttons for the "not set" state which makes it easy to filter for files without a specific collection, rating or label.
Filtering by Rating & Label can also be done with the Quick Filter in File Windows.
By default the filter uses the Boolean AND operation, which means that only files with exactly the combination of collections you enable are returned. If you switch to OR mode, the filter returns all files matching at least one of the included collections. To invert the result of the filter, enable the Invert check box.
IMatch always uses OR within the elements of the groups formed by rating, label, bookmark, flag, dot, and pin. This means that when you enable rating 1, 2, 3 IMatch returns all files with a rating between 1 and 3. If you enable the red and green dot, IMatch returns all files with a red or a green dot.
The results of these individual groups are then combined with the results of other groups using the OR / AND option in the filter. This allows you to filter by criteria like
The undo arrow button at the end of the collection button list resets the filter back to default settings.
Use this filter to find images with specific colors or color combinations.
This filter uses the same data that is also used by visual queries. When you select one or more colors it filters all files in the current scope by these colors. The best n matching images are returned. You can control the number of returned images via the slider in the Filter Panel.
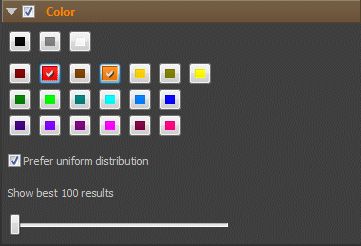
When you select more than one color, the Prefer uniform color distribution option becomes available. If you enable this option, files which have a similar amount of all selected colors are considered better matches.
Use this filter to quickly hide files with certain properties.
This filter is a collection of various useful filters based on specific file properties or states. You can, for example, hide all offline files or rejects. You can show or hide masters and versions, stacked files etc. Many of the options are rarely needed, but extremely useful to solve specific problems.
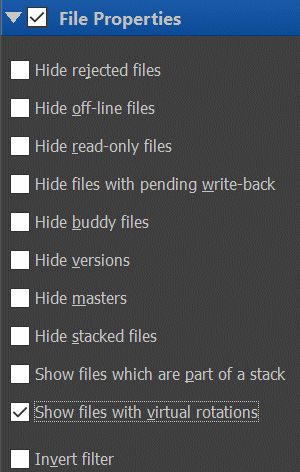
The options Hide stacked files and Show files which are part of the stack sound similar but do slightly different things:
| Hide stacked files | Hides all stacked files, but keeps the stack tops and non-stacked files. This gives you the same view you have when all stacks are collapsed. |
| Show only files which are part of a stack | This option shows only files which are part of a stack: stack tops and stacked files. Combine this with invert option to display non-stacked files in the current scope. |
The Invert filter option inverts (negates) the result of the filter.
If you enable Hide offline files in combination with Invert filter the filter returns only offline files.
This is useful to find files moved, renamed or deleted outside of IMatch.
You will use this filter quite often.
It is useful to answer things like:
"Show only files added today"
"Show me all files I have looked at this week"
"Which files have changed since yesterday"
"Show me all master files in this folder"
This is a very powerful filter which allows you to filter by all the collections you have created or which are automatically maintained by IMatch. Note that this filter has some overlap with the Rating, Label & Collections Filter described above but gives you access to all collections in the database.

If you use both Rating, Label & Collections and this filter, make sure you are not filtering the same things twice. Results may not be what you expect.
The filter is easy to use. Just check the collections you want to include in the filter. If you select more than one collection you can either combine them via the Boolean OR operation (returns files belonging to at least one selected collection) or the Boolean AND (returns files belonging to all selected collections).
Via the Invert option you can invert the result of the filter. This can be useful e.g. to hide all files with a red dot or to show only files which are not masters, not versions or not versioned at all.
You can filter on the individual collections (e.g. a specific rating or a specific relation master), but not on entire collection hierarchies. If you try to change the check box for one of the non-selectable items, IMatch plays a beep sound.
The number behind each collection name indicates the number of files in the current scope belonging to that collection. If you see something like Red (10) this means that there are 10 files with a red label in the current scope.
This filter allows you to filter files based on their File.DateTime (derived from date subject created or similar).
See How IMatch uses Date and Time Information for more information.
Use this filter to:
Quickly find files taken in a specific year and month
Find files taken in one or more selected months (e.g., find all files taken during April and May)
Find files from a certain date or date range
Show only files created within the last week
Find all files taken on the same day(s) as one or more selected files
...
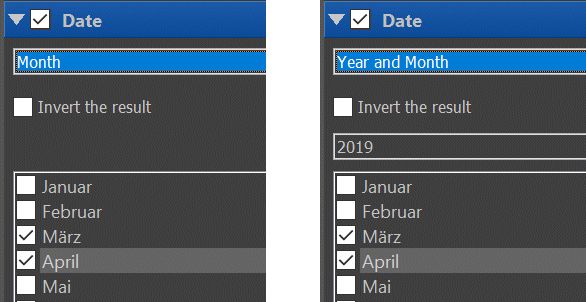
These two filters allow you to find files taken during a specified year and one or more months. The Month filter does not use a year. Use it to find all files taken during one or more months. Very handy e.g., to quickly see all photos taken during spring time or fall.
This filter is ideal to filter the current scope for all files taken on a specific day in a month, without considering the year.
Combine it with a People filter to see files taken on the birthday of a person.
These quick filters allow you to filter for files taken within a specific number of days, relative to today's date.
This filter allows you to input a start and end date and shows all files created over that time span.
The Timeline View organizes your files by year, month and day.
In the drop-down combo box, select one of the available date ranges. If you select the From-to mode, IMatch displays two calendar controls which allow you to pick a from and a to date (inclusively). This makes it easy to select date ranges, entire years and larger date ranges.
If you see only one calendar control, you have made the Filter Panel too narrow and Windows cannot fit the calendars into the available space. Make the Filter Panel wider in this case. IMatch automatically adapts and shows as many calendar controls as will fit:
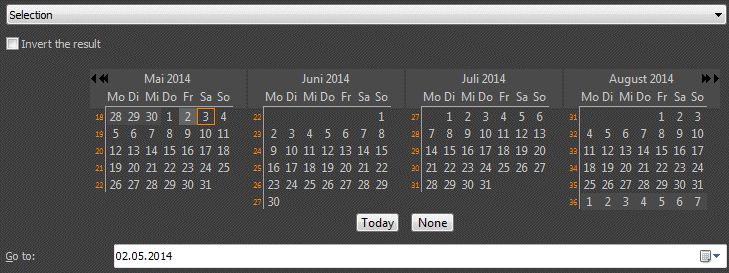
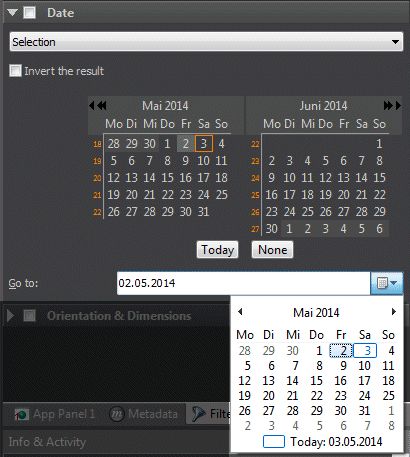
If you select the date range Selection, IMatch displays a calendar control with two separate month calendars. Select days, weeks, or months in this control by clicking, Shift-clicking, and Ctrl-clicking. To select a different month, use the arrow buttons. Click on the Year caption and drag the mouse to quickly move to a certain month and year.
Using the two buttons in the calendar control (> and >>) you can quickly find today's date and reset the selection. The separate calendar control allows you to quickly select a specific date or year. The Go to control allows you to position the calendar to specific dates.
IMatch uses a standard Windows calendar control in the Filter Panel. This means you can zoom out by clicking on the year several times. This makes it easy to switch to specific dates, even if they are decades in the past.
If you work with IMatch Events, you can use this filter to restrict the current scope to files associated with one or more events.
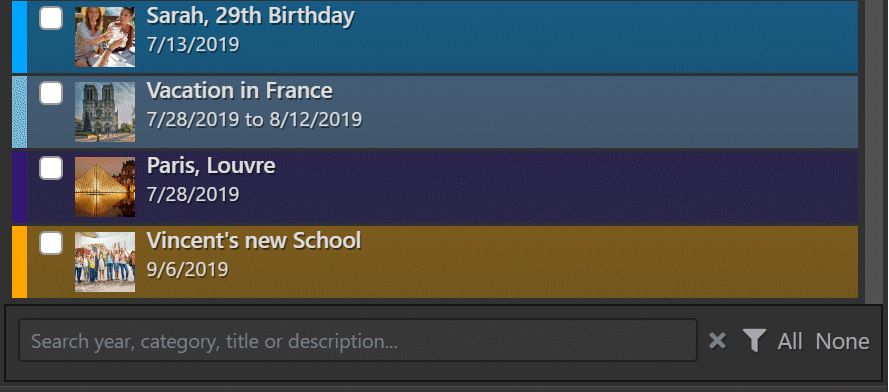
This is a pretty simple filter, without any options. Just tick the boxes in front of the events which you want to use to filter the current scope.
The filter only shows events which contain at least one file in the current scope.
If you have many events, you can use the search field at the bottom to search for specific events.
The icon allows you to invert the filter - to see only files from events not checked in the list. If the invert option is on, the filter shows an orange outline to avoid confusion.

Use the All / None buttons to select all events in scope or to clear the selection.
If your database contains many events, remember that you can change the height of the filter panels with the track bar at the bottom of each panel. This way you can make room for longer lists.
This filter enables you to filter the current scope for images containing one or more persons. It uses the face and person data managed by the IMatch People feature.
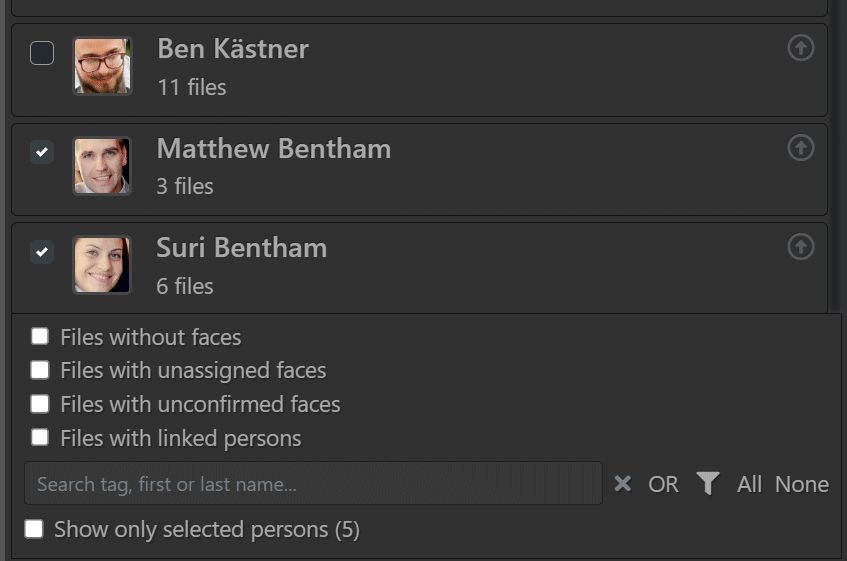
At the top the filter displays a list of all persons with at least one file in the current scope. Tick the boxes in front of one or more persons to see files with any or all of these persons.
Click the little up-arrow available for each person in the list to see the files with that person in the People View.
With the OR/AND button at the bottom of the panel, you control how multiple persons are combined. When the mode is set to OR, the File Window shows all files with at least one selected person. When you click on OR to change it to AND, the File Window shows only files with all selected persons.
Use OR to see images with Paul and Mary in the same or different images.
Use AND to see images which show both Paul and Mary in the same image.
Use the search box to quickly find people in the current scope.
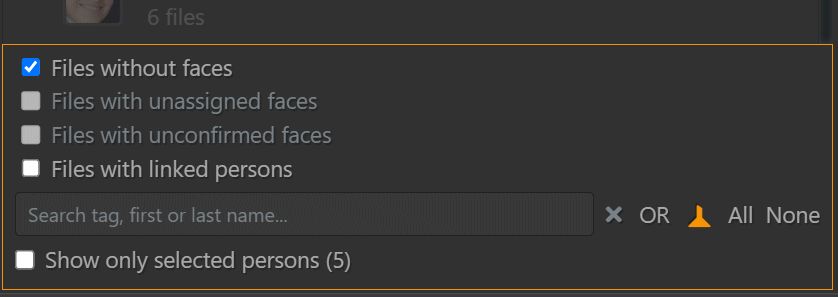
When you click on the icon at the bottom of the panel, the results of the filter are inverted. For example, if you enable the files without faces option and you invert the filter, the File Window then only shows files with faces.
To indicate that the filter is inverted, the Filter Panel shows an orange border and an orange and flipped funnel icon:
Quick Tip: If you are looking for incorrectly assigned persons in the current scope, enable the correct person in the People Filter list and then invert the filter. You now see only files for other persons (and files without faces/persons) and you can correct them as needed.
Below the person list there are several check boxes to search for files with specific states:
| Files without faces | Enable this option to see only files where IMatch did not detect faces. This can be helpful to identify files for which you might want to check for faces manually. Or to hide all files with faces, in combination with the invert switch. When you enable this filter, the person list is deactivated. |
| Files with unassigned faces | Shows all files with faces for which no person could be identified. Use this filter to identify files for which you need to assign persons manually. |
| Files with unconfirmed faces | Shows you all files which have unconfirmed faces. Use this filter to quickly identify files that need your confirmation. This option works differently, depending on whether or not you also select one or more persons. If one or more persons are selected, the option uses a Boolean AND operation. The filter returns all files with unconfirmed faces for the selected persons. Else the filter returns all files with unconfirmed faces. |
| Files with linked persons | This filter allows you to find files with directly linked persons (persons not linked to faces but to files). |
These buttons select/deselect all persons in the list.
This filter allows you to show or hide files assigned to one or more categories.
You use this filter to:
Show only files assigned to one or more categories
Show only files not assigned to one or more categories
Show only files having specific keywords (using the @Keywords category)
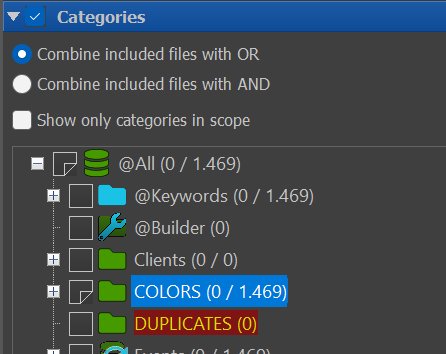
The category filter allows you to combine the selected categories via the Boolean OR and AND operators. Choose OR if you want the filter to return files which are assigned to at least one of the selected categories. Use AND if you only want to see files which are in all selected categories.
The check box in front of each category supports up to 5 states:
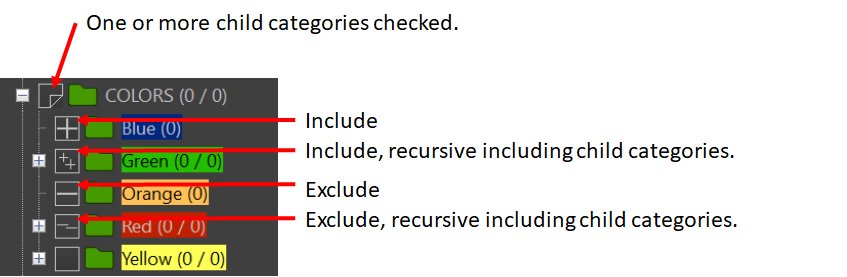
You switch between the states by clicking the check box several times. If the check box is empty, the category does not participate in the filter.
Ctrl+Left-click resets the state of the check box.
You can use the filter box to show only categories matching the text you enter into this box. This makes it easy to find specific categories when your category set is large. The Find box automatically expands the tree as needed to show categories matching the search term.
If you enable this option, the Category Filter switches to a list view:
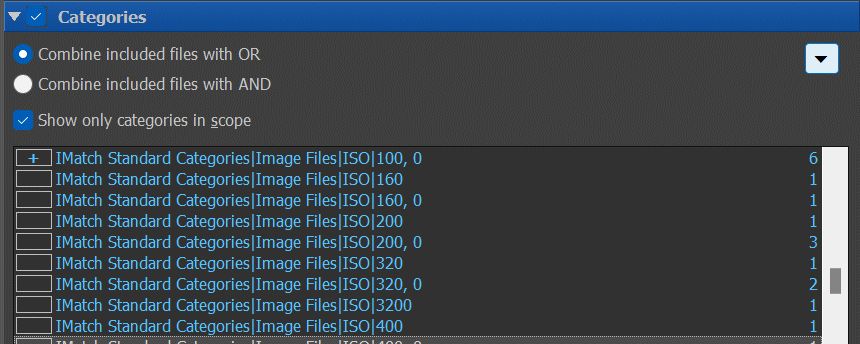
This list only shows categories to which at least one of the files in the current scope is assigned. Again, you can choose to ignore, include/exclude and include/exclude recursively each category.
Via the drop-down menu (next section) you can choose whether or not you include data-driven and @Keywords categories in the list.
Click on the menu button at the top right to open a menu with additional options.
| Use categories of selected files | This command uses the currently selected files to set the check boxes in the tree. You can use this command if you want to find all files with the same categories as the currently selected file(s). This command considers only direct category assignments, no data-driven categories, no @Keywords. First, select the file you want to use as the original file. In the Category Filter panel, click the menu button and choose this command. IMatch fills the check boxes in the tree to include all categories of the selected files. If the filter is active, only files in the current scope with the same categories as the source file are shown. Switch to other scopes (e.g. @All) to find all files with the same categories as the original file. |
| Toggle data-driven Categories | This option controls whether or not data-driven categories are included in the list view. |
| Toggle @Keywords Categories | This option controls whether or not @Keywords categories are included in the list view. |
This filter allows you to filter files in the File Window based on the folder these files are contained in. You use this filter in the category, timeline, or collection view to show only files from one or multiple folders.
The folder filter works exactly as the Category filter explained above, but for folders. See there for details.
An empty folder does not participate in the filter process. If the subfolders of the folder contain files, make sure you use the recursive mode (++ or = displayed in the check box) to include the files in the subfolders as well.
This filter allows you to filter the File Window contents based on all or part of the file name.
You use this filter to:
Show or hide only files containing a specific word or part of a word
Show or hide only files with names matching a regular expression
Show or hide all files with a specific extension
...
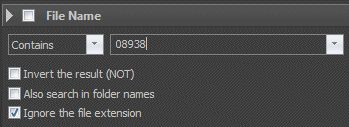
The filter supports multiple modes from which you can choose with the drop-down list at the front. The search is not case-sensitive.
| Is | Returns all files with a file name matching the given search pattern. |
| Contains | Returns all files where the file name contains the search pattern. |
| Starts with | Returns all files where the file name starts with the search pattern. |
| Ends with | Returns all files where the file name ends with the search pattern. |
| Regular Expression | This is the most flexible search mode. It uses Perl regular expressions for pattern matching. Please see the topic on Regular Expressions for detailed information about regular expressions in IMatch. |
To invert the result of the filter (all files not matching your search expression), check the corresponding option. You can also search in folder names and ignore or include the file extension in your search.
If you often search for file names matching a specific pattern you should save this as a filter setting so you can reuse it later.
This filter allows you to filter for specific file formats.
You use this filter to:
Show or hide files in one or more formats
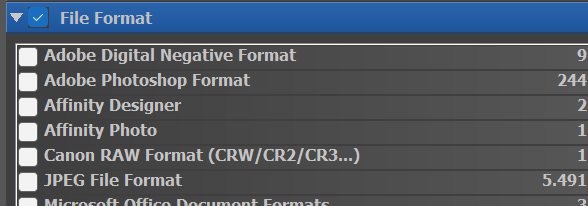
The filter displays a dynamic list with all file formats used in your database. The files used in the current scope are highlighted and a count tells you how many files with that format are in the current scope. Check the boxes in front of the file formats you want to include. Activate the Invert the result option to see files having a format that is not selected in the list.
You can search for files by their file extension in the File Window Search Bar, e.g. by searching for .jpg.
This filter allows you to filter files based on the size they occupy on your hard disk.
You use this filter to:
Find files within a certain size range
Find files larger or smaller than a given value
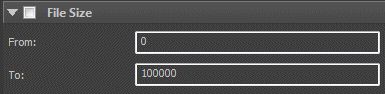
Enter a from and to value in bytes. You can leave either field blank, which allows you to find files smaller (use To only) or larger (use From only).
This filter allows you to filter files based on their orientation, aspect ratio and physical size.
You use this filter to:
Find all files with a certain orientation (portrait, landscape, square)
Find all files with a given aspect ratio (e.g. 4:3 or 16:9)
Find all files larger than a predefined pixel size / resolution
Find all files larger or smaller than a certain value
Find all files with a long edge of at least 1920 pixels
This filter uses the recorded width and height of the images as maintained by the IMatch database. The filter works on all files for which IMatch can determine these values, including most video formats. This filter is not designed to work with text, HTML, Office or similar formats.

To find files with a specific orientation use one of the options provided here.
This section allows you to quickly filter for images with specific aspect ratios. Often used for pre-production and pre-print workflows.
Here you work with the actual image dimensions. Use one of the predefined sizes in the drop-down list or enter custom values.
If you enable the Relative mode, the filter becomes a Search filter. It looks at each selected file and returns all files with similar dimensions. The result of the filter is directed into a separate result window.
This filter enables you to find and filter files based on their GPS data.
Use this filter to
Find images based on their GPS coordinates
Find images within the area covered by one of your Locations
Find images at specific coordinates
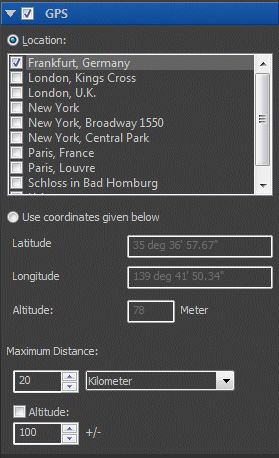
This filter works in one of two modes:
Select one or more locations to see only files within the areas covered by the selected locations.
If you search for locations, the Maximum Distance controls are disabled. Instead the filter uses the radius configured for the selected locations for the filter process. You can configure the location radius in the Map panel, which also displays the location radius as a yellow circle.
See Locations for more information.
Enter a coordinate pair and optionally an altitude to use as the basis for the filter.
You can copy the coordinates of the currently focused file in the File Window by clicking the button. This makes it easy to find a certain distance to the focused file.
This controls the radius around the GPS coordinates specified by the selected mode to consider for the filter.
You can use the Map Panel to search for files at specific locations or in specific areas.
This filter allows you to search Attributes you have defined for your database. You can also search Attributes via the File Window Search Bar.
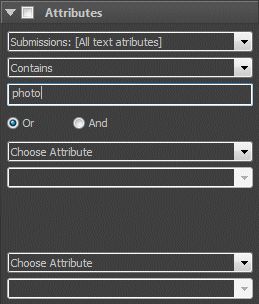
You can filter by up to three Attributes simultaneously. These filter groups are combined via OR or AND by clicking the corresponding options. Each filter group can search one Attribute Set, and you can filter by different Attributes from the same set or by Attributes from different sets.
The first drop-down control lists all available Attributes by Attribute Set. For the sample database used in the Attributes topic the list would contain the following Attributes:
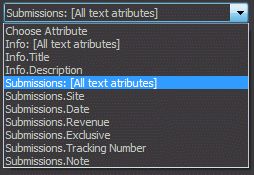
The special [All text attributes] entry represents all text Attributes (data types Text and Hyperlink) in an Attribute Set and makes it very easy to search all text.
The second drop-down list allows you to choose how Attributes are searched. From simple Contains to Regular Expressions, many methods are available. The no value method allows you to find files without a value for the given Attribute.
The Between search mode is available for numeric and date/time Attributes. It allows you to specify a range of values, e.g. to find all files with a date Attribute between two specific days.
When filtering for date and time, make sure you use the standardized ISO format YYYY-MM-DD and HH:MM:SS to input your search term. For example to find all files with the Attribute date value of May, 2. 1970, you enter the date as 1970-05-02.
This filter displays the unique values for any chosen metadata tag in your database. You can then select one or more of these values for the filter.
You use this to:
See all unique values for any given metadata tag (e.g., keywords, camera model, ISO)
Select one of more of the values to filter out all files matching or not matching these values
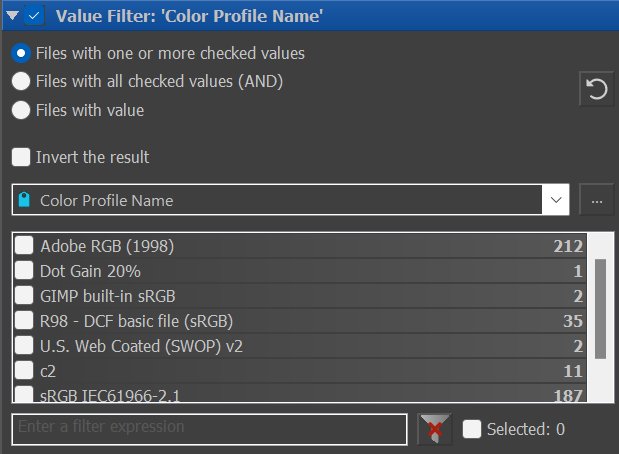
The screenshot above shows the Value Filter with the metadata tag Color Profile Name selected.
IMatch has retrieved the color profile name for each image in the current selection and displays the results. To see only files with an Adobe RGB profile in the File Window, check the box in front of this value. If you check more than one value, the additional controls above the last come into play.
The Invert the result option allows you to invert/negate the result of the filter, finding all files not matching one of the checked values.
To find files without a value for a metadata tag (e.g., to find files without a headline or files without keywords) enable the Files with value mode and invert the result.
Since you can do this even for your entire database this is a great way to check for missing metadata or files not yet captioned properly.
If the tag you have selected yields many values, you can use the filter box to search for specific values in the list. Just type in word to see only the values containing that word.
If you check the Selected check box at the bottom, the list shows only the values which you have selected. Use this option if you have selected values in different sections of the list and you want to see these values all at once. This makes it easier to review the filter or to uncheck entries in long lists.
The check box in front of each value can be in one of three states:
| State | Meaning |
|---|---|
| Off | The value is ignored |
| Checked | Only files with the given value will be returned by the filter. Use this to tell IMatch which files you want to see in the File Window. |
| Intermediate | The value is excluded. You can use this to explicitly exclude values if the files may have multiple values for the metadata tag you use for this filter. |
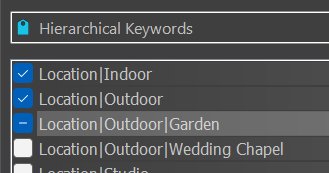
The three check box states
In the screenshot above you see all three check box states. The first two keywords are used for filtering, files with the third keyword are excluded and the other keywords are ignored.
The filter shows all files with the keyword food but only if these files do not also have the keyword nature.
To find files which have no data for a specific tag, combine the Files with value with the Invert the result option.
The first option finds all files with (whatever) data for the tag, and the second option then inverts the result, showing only files without data for the tag.
The Filter Panel can use up to five value filters. This allows you to filter based on different metadata tags at the same time, e.g., for camera models and lens types or by keywords and license type.
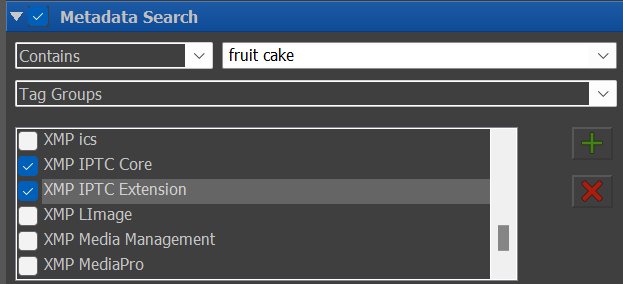
This filter works with the metadata stored in your database. It can either search the entire database or selected tag groups or individual tags.
You use this filter for search tasks like:
"Show me all files containing the word beach"
"Show me all files containing the keywords sport and car"
"Show me all files with the word license somewhere in the IPTCCore metadata set"
"Hide all files containing the word blurred"
"Show only files taken with a Nikon camera"
This filter offers some specific options which allow you to handle very special search and filter tasks.
For standard cases, the File Window Search Bar is easier to use.
The metadata search gives you access to all the metadata stored in your database. It supports multiple search modes and regular expressions. The filter has some overlap with the Value filter but gives you more control, e.g. you can limit the search to certain tag groups or even tags.
For many metadata-based searches the Value Filter often does the same job as search, but with much less typing.
The text you're looking for. Depending on the search mode the pattern is treated differently.
The search modes control how the filter works:
| Contains | Searches the full metadata for tags containing the search pattern |
| Is | Searches the full metadata for tags matching the search pattern exactly |
| Starts with | Searches the full metadata for tags starting with the search pattern |
| Ends with | Searches the full metadata for tags ending with the search pattern |
| The same search modes are also available in inverted form "Contains not", "Is not",... | |
| Regular Expression | This is the most flexible search mode. It uses Perl regular expressions for pattern matching. Please see the topic on Regular Expressions for detailed information about regular expressions in IMatch. |
| Not Regular Expression | Same as above, but the result is inverted (negated). This is much simpler than thinking up a regular expression which does this ;-). |
By default, IMatch searches in all metadata stored in your database (Everywhere).
To speed up the search in large database or to limit the search only to certain metadata groups or tags, choose either Tag Groups or Selected Tags in this drop-down list. Then either select from the tag groups shown or use the Tag Selector to pick out individual tags.
This filter is designed to return results immediately. While you type the search expression the filter prepares and as soon as you stop typing, the filter executes the database operations to produce the result.
If this feels uncomfortable for you, you can either disable the filter via the check box in the filter caption bar or you can temporarily pause Filter Panel. The changes you make on the filter are then processed when you unpause the filter.
This filter is designed to handle very specific or complex filter tasks, based on a variable expression. Since variables make all metadata and Attributes accessible and provide powerful formatting and processing functions, this filter can be used to implement very tricky filter conditions.
To use this filter, enter a variable expression in the input field at the top (or use the button to open the Variables Selector). When done, press Enter or click on Apply.
IMatch evaluates the variable for each file in the current scope and fills the list with distinct values found and the number of files for each value. By clicking one or more of the check boxes, you can filter the current scope.
You can try out the variable first in the VarToy app and then copy & paste it into this filter.
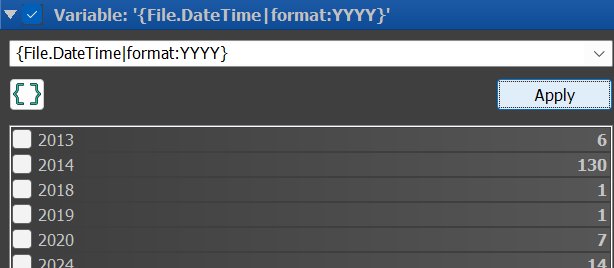
The Variable Filter with a complex variable expression.
The filter in the image above groups the files in the current scope based on the first four digits in the date returned by File.DateTime. A very easy way to quickly filter for files from a specific year in the current scope.
The following filter uses substr to group files based on the first 3 letters in the file name:
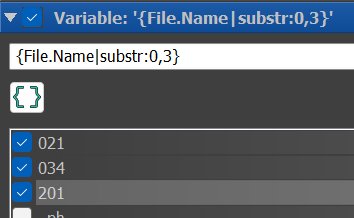
This is a not uncommon filter type in certain environments, e.g. when your file naming schema encodes a project code or customer id in the first 3 letters of the file name. Or use 4 characters when your file names contain a date code like YYYY-MM-DD.
The Variable filter works very similar to the Metadata Value filter described above, especially the way how the check boxes in the result list and the filter work.
This filter supports all file-based variables File.*, but no IMatch or user-defined variables.
The filter automatically remembers the last 20 variables used. You can access them again via the drop-down list control at the top. If you need to remember/recall more than 20 variables, consider storing them in the IMatch Notepad app included in IMatch.
This filter may perform slower than other filters for large sets of files (scopes).