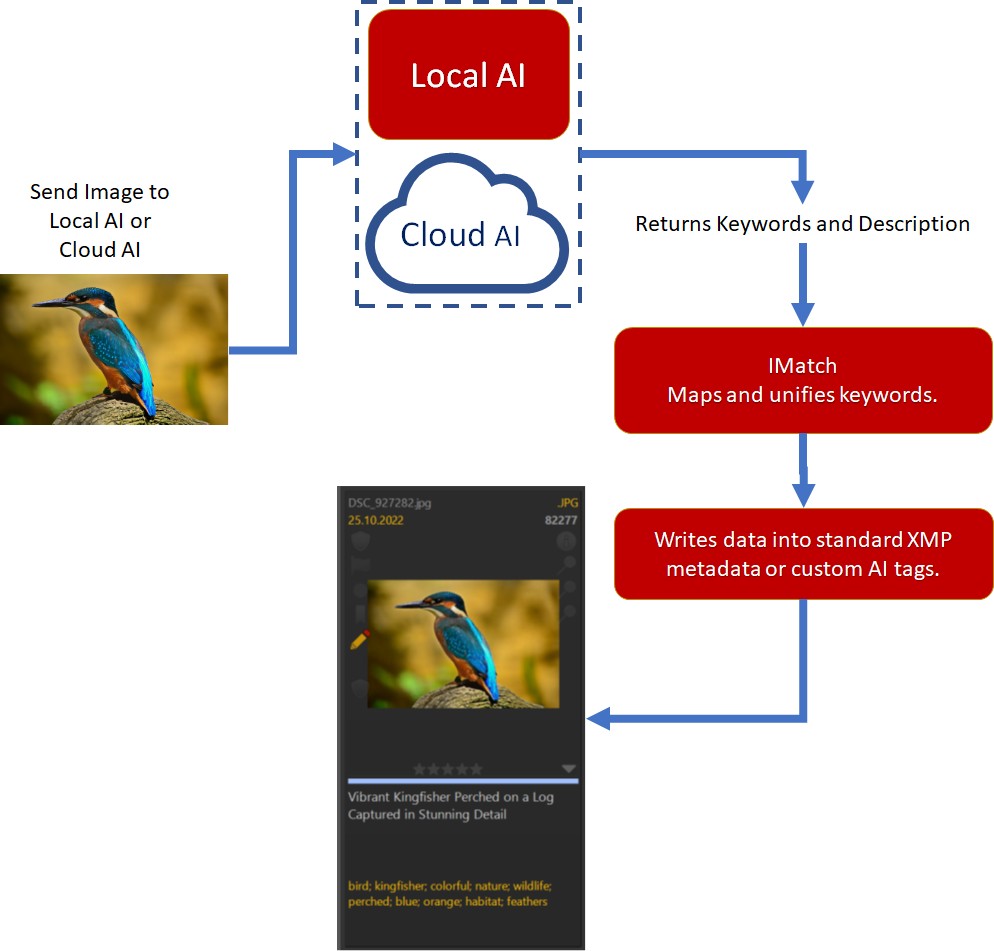
How Does It Work?
When you use AutoTagger on a set of images, IMatch sends small versions of the images to the AI (local or cloud). The AI generates keywords and a description for each image, which are then processed by AutoTagger and stored in the IMatch database.
Privacy Notice
When using AutoTagger with a cloud-based AI, IMatch sends data to a remote server and retrieves data from these servers. The data sent includes the images to process and an API key. As with all Internet-related operations, the IP address of your computer is transmitted to the receiving server.
IMatch sends only data required to use a specific service. Make sure you have read and understood the terms of service and privacy settings of the service you use with AutoTagger.
If you use a locally running AI like Ollama, your images are processed on your PC. No privacy issues and full offline capability.
Why Use It?
AutoTagger can quickly process hundreds or thousands of files, adding keywords and descriptions to each file automatically. This immediately makes your files searchable and, by using data-driven categories, groups files with similar properties together automatically.
Without the need to manually add keywords and descriptions.
For institutional or corporate IMatch users, this feature may be the most efficient way to process large volumes of files without requiring extensive manual tagging and categorization, which would otherwise take months to accomplish.
How Effective Are AI Keywords and Descriptions?
If you meticulously craft descriptions and keywords for each image, focusing on style, length, and wording, the AI might not match your standard. However, it will be significantly faster.
Despite this, AutoTagger offers custom prompts, allowing you to influence the style and length of AI-generated descriptions. You can even provide examples of desired output, helping align AI results with your expectations. For more information and examples, see prompting.
With AutoTagger's Keyword Mapping, you can transform, translate, fold, map, or blacklist (ignore) AI-generated keywords. This is especially useful for consolidating similar keywords into a preferred single keyword or integrating AI keywords into your keyword hierarchy using the Thesaurus.
Utilizing these advanced features can yield acceptable or even excellent results without manually tagging each image. If you begin with a mid-sized or even large collection lacking descriptions and keywords, AutoTagger is likely your best option unless you have weeks to dedicate to manual input.
Separate AI-generated and human-created Metadata
As an alternative to using regular XMP tags, IMatch offers dedicated AI tags to store data produced by AI. This enables you to separate AI-generated data from human-created metadata. Use AI content safely without polluting regular XMP keywords and descriptions.
If you normally add keywords and descriptions by hand, try running your images through AutoTagger. This will add a description and 5-10 extra keywords to the AI.description and AI.keywords tags. It will significantly improve searchability and help organize your files automatically using data-driven categories.
A First Look
Here are some examples of AI-generated descriptions and keywords. We've used the basic settings for Mistral and Open AI, with simple prompts:
Describe this image in the style of a news caption. Use factual language.
Return ten to fifteen keywords describing this image.
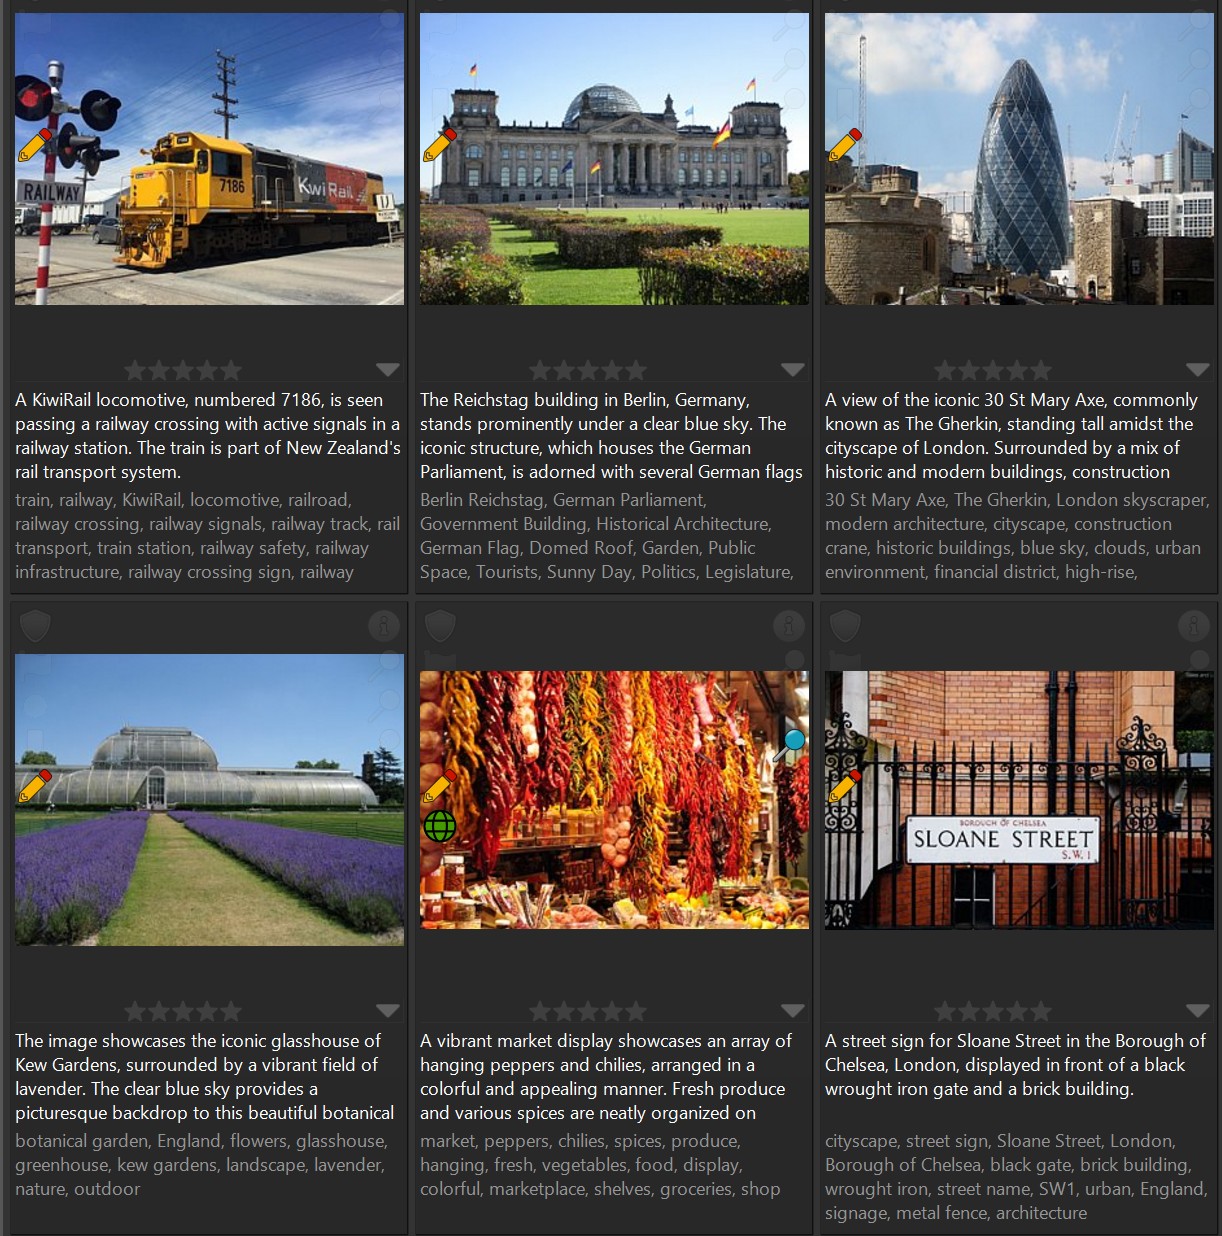
The screenshot shows the descriptions and keywords as delivered by the AI; no additional editing or mapping was performed. You can impact the style of the description with a more specific prompt, like asking for a short description or a specific style. We explain this in the AutoTagger Prompting help topic, with many examples.
Note that the AIs not only recognized the train company and train number, but also recognized the buildings and even the borough of London where the street sign was photographed! And that the green house is in Kew Gardens, London.
When you look at the keywords produced, you'll notice that these images are now immediately discoverable by searching keywords for terms like Berlin, train or London.
A Different Style of Description
If you prefer a more-to-the-point description, you can just tell AutoTagger to use this prompt, or something similar:
Return a short headline for this image.
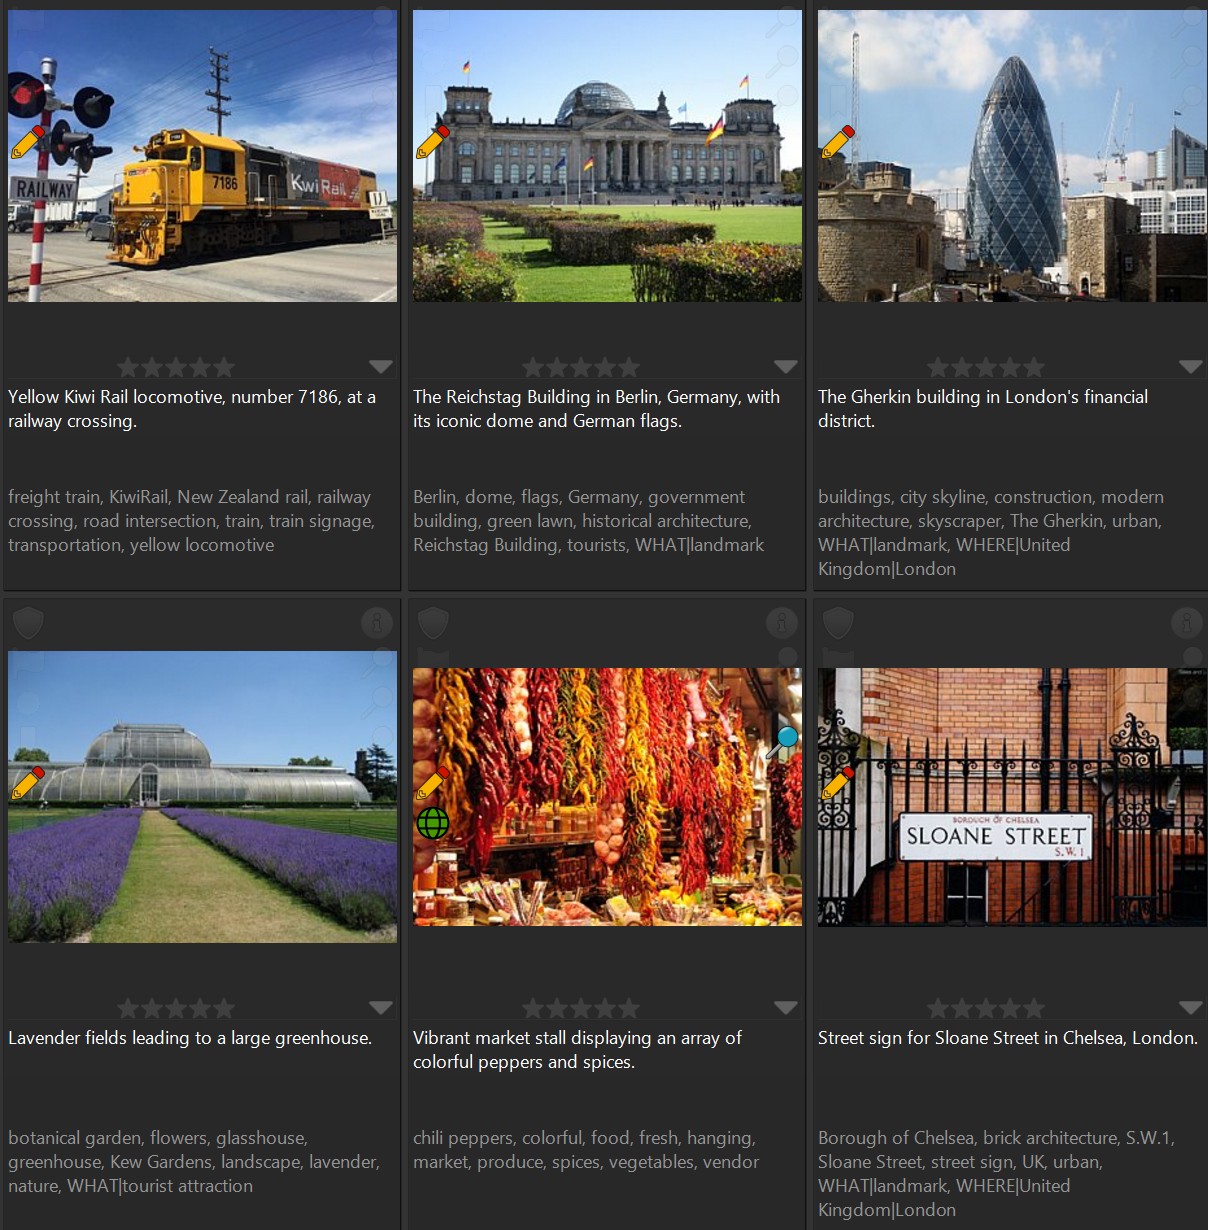
The screenshot shows how a different prompt impacts the style and length of the description the AI produces. This gives you a lot of control the descriptions you want to use. And this is only a simple example, there is a lot more that can be done.
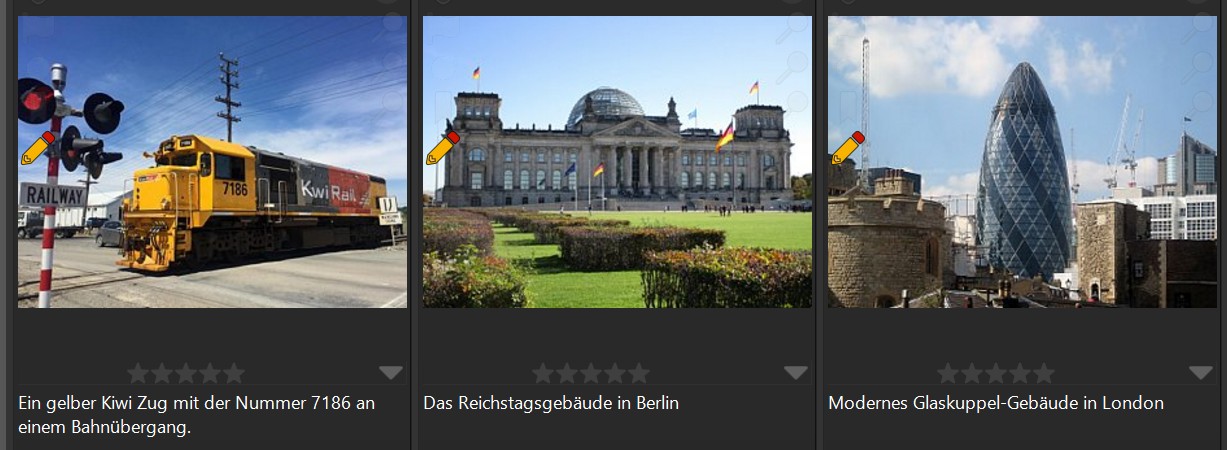
Support for Different Languages
Current models been trained with many European languages. If you want the description in German, for example, change the prompt to:
Return a short headline in Deutsch for this image.
The same works also for keywords and traits, of course:
Return five to ten keywords in German for this image.
You can even request keywords in multiple languages, with a prompt like this:
Return five to ten keywords each in both German and English for this image.
You can create separate settings for each language you work with and then run the setting for the language you need at the moment.
If you run both a setting for e.g. German and English keywords successively, IMatch merges the keywords automatically, unless you enable the option to replace existing contents.
This gives you a lot more flexibility when you work in multiple languages.
Write Prompts in Your Language
Larger local models and all cloud-based models understand input in multiple languages. For example, in German:
Erstelle eine detaillierte Beschreibung dieses Bildes in zwei bis drei Sätzen.
Caveats
Note that not all AI models available today can produce consistent output in different languages. It depends on how the model was trained and the language you want to use. In general, bigger models are often better at multiple languages. Bigger as in too big to run on my local PC.
Why Different AIs?
IMatch offers flexibility in choosing an AI service based on budget, data privacy concerns, local regulations, and expected result quality.
If your computer has a suitably fast graphics card, you can use an AI running on your PC. Else, you rent computing power from one of the supported cloud services. AutoTagger will work and look the same with either option.
Classic AIs and Modern LLM AIs
While AutoTagger keeps supporting classic AI services from Google, Microsoft, Clarifai and Imagga, the focus is now on modern AI based on Large Language Models (LLM) as offered by OpenAI (cloud from the U.S.), Mistral (cloud, from France) and open source systems like Ollama, which allow you to run AI on your PC.
The classic AIs give you very little control over how the keywords and descriptions are created. With LLM AIs you can use prompts to tell the AI how you would like to have the keywords and descriptions created and in which style.
With IMatch AutoTagger, you can also provide additional context to the AI, which often greatly improves the quality of the results. For example, if you are about to process a couple of hundred photos taken in Paris, you can tell the AI that these photos were taken in Paris and it will consider this when producing keywords and descriptions.
See Prompting in AutoTagger for detailed information and many examples.
Paid or Free?
Paid
The commercial cloud-based AIs all charge for use. Some are more affordable than others, and some are actually very affordable, even for private use. If you're faced with the task of adding descriptions and keywords to 50,000 or 100,000 images, spending 20$ or 50$ to let an AI do the work is nearly irresistible. Even for private users who add a few hundred or thousand files per month to their collection, letting an AI create descriptions and keywords can be time-saving, enriching, and helpful. For the image volumes typically encountered by private use, the cost is probably a couple of cents per month.
The big advantage of cloud-based AIs is that they provide the processing power, aka super-fast hardware and huge models (bigger models mean better results). Cloud-based AIs typically respond in a second or two, and AutoTagger can process multiple images in parallel for even better performance.
Free
There are now several free open source applications which allow you to run powerful AI models on your own PC. AI companies like Meta, Mistral, and Microsoft release AI models under a permissive license, which gives everyone access to AI for free.
This comes with a caveat, though.
Running an AI locally requires a fast graphics card (GPU) or a dedicated AI processor (NPU) with sufficient video RAM (VRAM) to work fast. If you have a suitable graphics card (NVIDIA recommended) or powerful NPU, excellent. You can run AIs locally using the free software Ollama for IMatch AutoTagger.
The Ollama software uses whatever graphics card and processor you have and it will work. It might just take 10 or 30 seconds instead of 2 or 5 to generate keywords for one image if your graphics card is very old or basic.
To give you an idea, a 2023 laptop with an 8 GB NVIDIA 4060 graphics card takes 1 to 5 seconds to produce a description and ten keywords using AutoTagger and Ollama (depending on the prompt). A five-year-old NVIDIA 2070 Super graphics card (8 GB VRAM) takes maybe 3 to 10 seconds per image.
If you need only keywords or a description, it's about twice as fast.
IMatch runs AutoTagger in the background, so this is not really a huge problem.
You can continue using IMatch while AutoTagger processes images, and AutoTagger will finish eventually.
Since Ollama is free to use, you can just give it a try in IMatch and see how it goes. If it is too slow for your taste, consider using a cloud AI instead.
See this topic for instructions on how to install Ollama.
Unless you're an avid gamer, spending 400 US$ or more (in 2025) on a mid-range graphics card that handles AI loads makes not much sense in most instances. This makes little sense if you can rent the processing power from a cloud AI when needed for a few cents. Auto-tagging the 1,000 photos from your last vacation or wedding costs a few cents and will save you hours of work.
Why Size Matters
In simple terms, the larger an AI model is, the more powerful it is. The size of a model is usually specified in the number of parameters used to train it. 7b (7 Billion), 11b, 33b, 72b up to 500b parameter models exist.
Bigger models can handle more complex tasks, or, for the purpose of IMatch, may know more details about things, like names of landmarks or known tourist spots, scientific names for plants or animals, etc.
Running models with 33b and more parameters is impossible for normal computers at this time. Even fancy 2,000 US$ graphics cards don't have enough memory to run these. You'll need a data center and multiple 30,000 US$ graphics cards and terabytes of memory to run them. That's what companies like OpenAI, Mistral or Anthropic do. You utilize this power when you use a cloud-based AI for AutoTagger.
Luckily, many free and powerful AI models work well on mid-range graphics cards (GPUs), even on laptops. With Ollama, you can use these models locally to generate image descriptions, keywords, and traits with AutoTagger.
AutoTagger makes it easy to use both cloud-based and locally installed AIs. The user interface and how things work for you is always the same.
IMatch's AI Tags
IMatch can store AI-generated descriptions, keywords and landmarks in the standard XMP description and keyword tags, or in dedicated AI tags.
If you want to persist AI-generated data in files, store it in regular XMP tags. IMatch AI tags are stored safely in the database like all other metadata, but are not written back into image files.
You can copy AI data into regular tags using a Metadata Template when needed.
What Are AI Tags?
To optionally separate human-made content and AI-generated content, IMatch 2025 introduced a set of special AI tags:
AI.descriptionAI.keywordsAI.landmarks
Using these special tags gives you the benefit of modern AI without polluting manually written descriptions and keywords.
AI tags can be used like any other tag: display them in the Metadata Panel, search their contents, use them in filters, data-driven categories, display them in File Windows or use them via variables with all features supporting variables. For example, you can access the AI-generated description using the variable {File.MD.AI.description}.
Even if you usually add keywords manually, running your images through AutoTagger to add a description to AI.description or 10 additional keywords to AI.keywords will improve searchability and provides an additional way to organize your files automatically.
Displaying AI Tags
IMatch ships with a Metadata Panel Layout named AI that displays the three default AI tags mentioned above. If you create additional AI tags for traits, you can add them to this layout or create your own layout.
You can display and format AI tags like any other tag in File Window Layouts and use them via variables everywhere.
AI Tag Propagation
When you autotag a master file, IMatch automatically propagates changes made to AI tags across all versions of that master.
This process differs from how IMatch handles the propagation of changes to regular tags (e.g., XMP description or XMP hierarchical keywords), which occur during write-back.
AI Tags are stored only in the database and do not encounter the complexities associated with regular tags, such as needing to be mapped into multiple other tags when updating metadata within image files.
Configuring AutoTagger
Before you can run AutoTagger, you have to configure it. For example, it needs to know which AI to use and where to store the data produced by the AI.
Open Edit menu > Preferences > AutoTagger to configure AutoTagger options.
When configuring AutoTagger, you select the AI to use, provide your personal API key (when required) and tell AutoTagger which type of content to retrieve from the AI. The standard content types for AutoTagger are description, keywords and landmarks.
Not all of the classic AIs (Google, Microsoft, Clarifai, Imagga) support all of the standard content types. Some provide keywords only. If an AI does not support a feature, it is disabled or hidden in the configuration dialog box.
For fee-based AIs, requesting more than one content type (e.g. description and keywords) costs more than requesting just one content type. Only enable the content type you actually want to use. See the documentation of the AI you use for details.
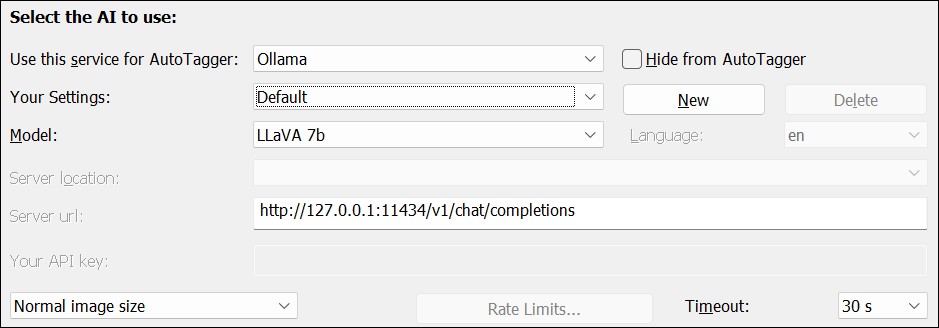
The upper section of the AutoTagger configuration dialog box.
| Element Name | Description |
|---|---|
Use this service for AutoTagger | In this section, you choose the AI service you'd like to use. AutoTagger provides several options. Your choice depends on whether you hold a license key for any of them or if Ollama is installed. |
Your Settings | Settings allow you to store different configurations and to run them later with AutoTagger. See Settings for details. |
Hide from AutoTagger | If you check this option, the AI is not listed in the AutoTagger dialog box. Use this to hide AIs you don't use: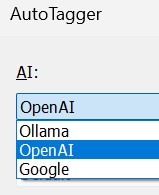 The AutoTagger dialog box only shows AIs that are not hidden. |
New Delete | Create a new setting or delete the selected setting. You cannot delete the Default setting. When you create a new setting, the configuration of the current setting is duplicated into the new setting. |
Model | If the selected AI offers multiple models (e.g. specialized models for wedding or food photography), select the model you want to use. IMatch does not necessarily support all models offered by AI service providers. You can create settings for different models and run them later in AutoTagger, depending on which model best fits the selected images. |
Language | If a model supports different languages for responses, you can select the language you want here. See Keyword Mapping for other ways to translate keywords. |
Server Location | The Microsoft Azure cloud AI offers different server locations. Use the server location matching the one activated for your API key. |
Server URL | This setting is used for Ollama. The default setting usually works. Change it when Ollama runs on a different port on your system or when you want to connect to an Ollama instance running on a different computer. Running Ollama on a powerful workstation PC or server and then accessing it from AutoTagger remotely is a good way to work with AutoTagger on laptops or other PCs without a powerful graphics card or NPU. |
Your API key | Enter the API key provided by the cloud AI service. See API Keys for more information. |
Image Size | AutoTagger offers different image sizes in order to support different content types. The actual image sizes in pixels depend on the selected AI and AutoTagger handles that internally. The normal image size is usually between 386 and 512 pixels and works well for most scenarios. When an image contains small details or you use prompts to extract text from images, or explain contents of graphics, using a larger image size may produce better results. Note that using larger image sizes may result in slower response times and more network traffic for cloud-based AIs. Some AI services (e.g. OpenAI) require a surcharge for larger images. See the documentation of the AI you use for details. Use the smallest image size that works for your purposes. ThumbnailThe Thumbnail option tells AutoTagger to use the thumbnail stored in the database. Use this setting if the AI has no problems returning sensible results for thumbnail-sized images or if you have to work with offline files without cache images. IMatch creates the image sent to the AI in-memory. The image contains no metadata except the standard metadata included in all JPG images (like width and height). If you want to provide metadata to the AI model, include variables in your prompt. |
Timeout | This setting controls how long AutoTagger waits for a response from the AI before aborting. The default of 30s is plenty. Cloud-based AIs typically have response times between 2 and 10 seconds. When to ChangeIf you run a local AI (Ollama) on a system without a powerful graphics card or dedicated NPU, response times will be much longer than those of cloud-based AIs. If the local AI takes longer than 30s to respond to an AutoTagger request, increase this timeout to prevent AutoTagger from aborting the request before the AI had time to answer. |
Rate Limit | Most AIs specify a rate limit, e.g. how many requests an application like AutoTagger can make per minute. The defaults used by IMatch for the rate limit option are usually correct and you don't need to change them. OpenAI Rate LimitsOpenAI is a very popular service and in high demand. In order to protect their infrastructure from abuse, they assign different Tiers to user accounts. Each tier has different rate limits. The longer your use OpenAI and the more money you spend, the higher your usage tier becomes. Currently, the entry-level "Free Tier" assigned to new users is limited to 3 requests per second and a certain number of requests per day. It also limits the input and output tokens per minute and day quite severely. AutoTagger uses these Free Tier rate limits as the default, assuming you have just created an OpenAI account. The Free Tier allows AutoTagger to make 3 requests per minute, which means it can process one image about every 20 seconds. When you have used OpenAI for a couple of days and spent a few dollars, they will move you into Tier 1, which has much higher rate limits. At the time of writing, these are 500 requests per minute, 10,000 requests per day and a generous amount of per-minute and per day tokens. When you use OpenAI, keep an eye on your limits in the OpenAI Dashboard. When your usage Tier changes, change the rate limit in the AutoTagger configuration accordingly. With 500 (or more) allowed requests per minute, AutoTagger will process large quantities of images in parallel very quickly. AutoTagger automatically takes care to stay within the allowed rate limits, pausing processing as needed. These are the Tier 1 rate limits as of January 2025: 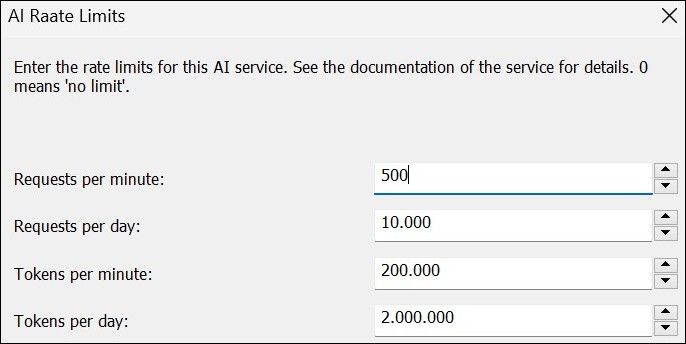 Hitting a Rate LimitWhen AutoTagger runs into a rate limit (requests per day or similar), it pauses processing automatically and displays a message in the notification area and a new symbol in the status bar: 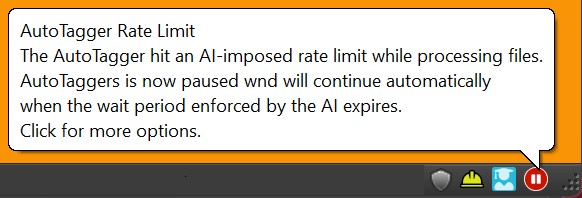 By clicking this button you can cancel images in the AutoTagger background processing queue and you can force AutoTagger to retry immediately, if you see a reason for this. AutoTagger automatically continues processing images when the wait time requested by the AI expires. You can close IMatch. AutoTagger automatically continues when you start IMatch the next time. |
Your Settings
You can configure any number of settings for each supported AI. For example, if an AI offers different models, you can create a setting for each model and then select the setting/model to use when you run AutoTagger.
If you sometimes want only keywords and sometimes both descriptions and keywords, create two settings. One where only keywords are enabled, and another one where both keywords and description are enabled. Then select the appropriate setting when running AutoTagger.
Prompts
If you use Ollama or OpenAI or another AI which uses prompts, you can set up different settings with different prompts, e.g. for vacation photos, weddings, sports or food. Later run AutoTagger with the settings suitable for the images you are processing.
Traits
When you use IMatch Traits, you can run individual or combinations of Traits by creating different settings. Then you can choose which traits to produce when you run AutoTagger.
Creating Settings
To create a new setting, click New. The options of the current settings are duplicated into the new setting. Now change what you want to change. The changes are automatically saved to the active setting.
You can create any number of settings per AI.
Deleting Settings
To delete a setting, select it in the drop-down list and click Delete. There is no prompt since you can just close the dialog box with Cancel to undo the delete of a setting.
You cannot delete the Default setting.
Telling the AI What to Do
In the middle of the AutoTagger configuration dialog box you see the settings for the standard content types: description, keywords, and landmarks.

For each of the three content types you can choose what to do.
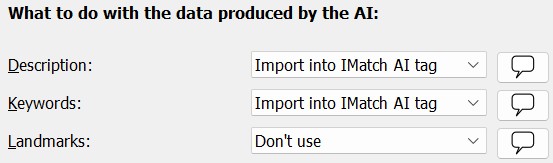
Description | Not all AIs support descriptions. If the AI supports descriptions, you can save the description either in the standard XMP::dc\description\Description tag or the dedicated AI.description tag.Or tell AutoTagger not to ask the AI for a description with the Don't use setting. The XMP description tag is the same tag you work with when you use the Metadata Panel. Storing the AI description in this tag makes it visible in the Default layout in the Metadata Panel and writes the AI description to the XMP metadata in the image file during write-back. If you store the AI-generated description in the AI tags are stored in the database but not written to the image file. To see and edit the tag values, use the AI Metadata Panel layout, which shows AI tags and traits. You can use a Metadata Template to copy data from AI tags into regular XMP tags. |
Keywords | This setting allows you to store keywords returned by the AI in either the standard hierarchical keywords tag (the same used by the Keywords Panel) or in the dedicated AI.keywords tag.AutoTagger supports many options for transforming, mapping and translating AI keywords. See the this section for more information and examples. |
Landmarks | This content type is designed to work with the Classic Google AI, which can often return the names of known landmarks, tourist spots and even buildings. Landmarks can be stored either as regular For prompt-based AIs like OpenAI or Ollama, you can ask the AI to return the names of known landmarks, buildings, and tourist spots. The results depend on the AI and model used. |
Content Type Settings
Click on the button next to each content type drop-down to configure additional options. This opens a dialog box with these options:
Fill only if target tag is empty. | If this option is enabled, AutoTagger does not overwrite/replace existing data in the target tag. For example, if you let AutoTagger produce descriptions, but a file already has a description and this option is enabled, AutoTagger will not prompt the AI for a description for this file. |
Merge with existing target tag values | This option is only available for repeatable tags like keywords and landmarks. By default, AutoTagger replaces existing contents in the target tag. Enable this option to merge new keywords / landmarks with existing keywords / landmarks. AutoTagger avoids adding duplicates. Duplicates may still appear when there are differences in spelling (e.g. 'beach' and 'Beach'). You can avoid this by letting AutoTagger automatically transform keywords / landmarks into a specific case. |
Pre-flight Checks
When the option to only fill empty tags is enabled for one or more content types, AutoTagger conducts a pre-flight check to determine if any data needs to be fetched from the AI.
If you've enabled description and keywords for auto-tagging, but the selected file already has data in both tags, AutoTagger skips it entirely. This saves unnecessary costs and improves performance by avoiding AI requests and processing.
Prompting
When you select a modern LLM-based AI like Ollama, OpenAI or Mistral, the button behind the drop-down controls changes to a prompt icon:
These buttons open the Prompt Editor where you input the prompts which tell the AI what you expect it to do.
See Prompting in AutoTagger for detailed information and many examples.
Using AutoTagger
To run AutoTagger, select the files you want to process in a File Window and then use the Commands menu > Image > AutoTagger command or press the corresponding keyboard shortcut F7.
Select the AI to use and the setting you want to run and click on OK to add the selected files to the background processing queue. AutoTagger processes the files while you continue to work with IMatch.
Press Ctrl + Enter to close the dialog box and run AutoTagger. This works whether the OK button is focused or not.
When you hold down Alt when clicking OK or when also pressing Ctrl + Enter, IMatch resets the state of the Run Once option and empties the context placeholder for the next run.
This is useful when you want to use the placeholder or the Run Once option only for the current set of images.
With Alt + F7 you run AutoTagger directly for all selected files, applying the most recently used options and context. No dialog box is displayed, which makes this very quick and convenient. If you press Shift + Alt + F7, AutoTagger combines this with Run Once.
Seeing AutoTagger Progress
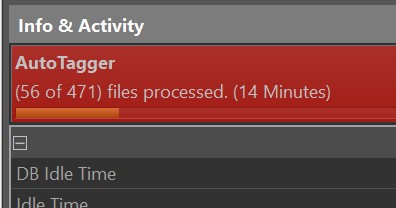
IMatch provides feedback about tasks running in the background in several places: the status bar, the Info & Activity Panel and the IMatch Dashboard show AutoTagger's progress.
AutoTagger progress indicator in the Info & Activity Panel.

AutoTagger progress in the status bar.
Files currently in the AutoTagger processing queue indicate this with a special icon:

The AutoTagger icon in File Windows.
You can place any number of files in the processing queue, even using different AIs and settings. AutoTagger processes them in the order in which they were scheduled.
If you use Ollama, the processing of the first image can take a few extra seconds when Ollama has to load the model into memory first. Ollama unloads models after 10 minutes of no usage to free memory on the graphics card.
Under some conditions, Ollama may become unresponsive, resulting in AutoTagger reporting timeouts. In this case, just quit Ollama via its taskbar icon and start it again.
AutoTagger automatically retries to access AIs when they stop responding for a reason, and it will continue shortly after you have restarted Ollama with the remaining images in the processing queue.
API Usage
At the top right you see the approximate number of requests (and tokens, when used) made to the AI since the last reset. You can use this as a noncommittal hint to remind yourself of how many requests you have made if you use a paid AI. If the AI uses tokens to calculate cost, the AutoTagger dialog box lists the approximate number of tokens used too:
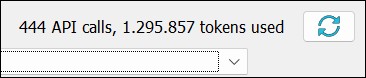
The request and token counts AutoTagger calculates may (and often do) differ from what the service actually calculates. If you use a paid AI service, it is your responsibility to use the customer portal / dashboard of the service to keep an eye on the total cost accumulated.
For OpenAI you can deposit a couple of dollars and then disable the automatic renewal option. If your deposit is used up, OpenAI will stop processing requests unless you deposit more money into your account. Full cost control, very user-friendly.
See AI Service Providers for information on how to create an account with OpenAI or other AI service providers supported by AutoTagger.
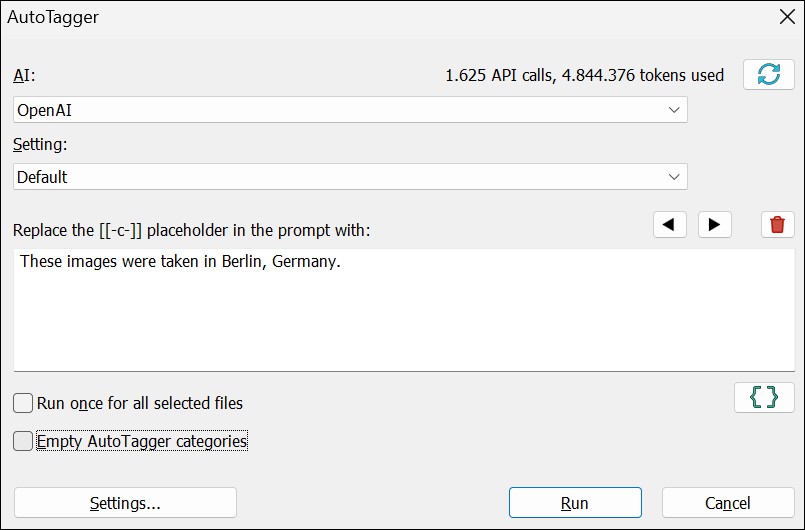
The Context Placeholder
If the AI uses prompts and you have used the context placeholder, enter the additional context information you want to provide to the AI. This feature often improves the quality of descriptions and keywords significantly.
Recently Used Contexts
AutoTagger remembers the last 20 contexts you have entered. This saves typing.
With the buttons at the top of the context placeholder input field you can move forwards and backwards in the placeholder history. With the trash can button you delete the currently visible entry from the history.
Using Variables in Context Placeholders
For additional flexibility, you can include variables in context placeholders.
Click on the { } button to select variables to include. The context placeholder help topic lists many examples for using variables with prompts.
Run Once
When you enable this option, AutoTagger sends only the focused file (or the first selected file, when there is no focused file) to the AI and applies the returned description, keywords and traits to all selected files.
This is faster and cheaper, and can create more consistent results.
AIs analyze each image sent to them individually and respond with a description and a set of keywords. Due to the way AIs work, images very similar in appearance to us may produce slightly different descriptions and keywords. Even if you send the same image to the AI, it will respond with slightly different descriptions and keywords ‐ depending on the AI, the prompt and the settings for creativity.
Individual description and keywords for each image (left) and unified description and keywords when using Run Once (right).
With the Run Once feature, AutoTagger enables you to select a set of similar images you want to assign the same AI-generated description and keywords to.
Maybe you have a series of images showing the Atomium in Brussels. Select them all, the one you want to use for AI last to make it the focused image. Then run AutoTagger with the Run Once option enabled. The description and keyword created for the focused file are applied to all other selected files. If you don't like the result, just run AutoTagger again. This is a fast and interactive way to caption and tag images with AutoTagger.
The keyboard shortcut Shift + Alt + F7 runs AutoTagger with the last used settings and context and the Run Once feature enabled.
Empty AutoTagger Categories
Enable this option to empty the categories AutoTagger optionally uses for collecting successfully processed and failed images.
The Settings button in the lower-left opens the AutoTagger Configuration dialog box, allowing you to quickly check and alter AutoTagger settings.
Cancelling AutoTagger
If you want to cancel auto-tagging for some reason, you can do this using one of these methods.
Open the Info & Activity Panel and click into the progress bar for AutoTagger:
Or click into the AutoTagger progress bar in the status bar at the bottom of the IMatch window:
Both methods open the Processing Queue management dialog box where you can then use the option to clear the AutoTagger queue:

This removes all files awaiting auto-tagging from the queue and places them into a category for review or a later auto-tagging operation.
See Clear Processing Queues for more information.
Keyword Mapping and Transformations
AIs return flat, non-hierarchical keywords only. The spelling and case often also vary, like in Beach vs. beach or beach vs. beaches. To deal with these issues, AutoTagger includes features to transform, sort and map keywords.
AutoTagger's advanced capabilities, including keyword transformation and mapping, set it apart from other tools that rely solely on artificial intelligence-generated keywords.
Sorting and Unifying
You can optionally let AutoTagger sort keywords (with or without respect to case). Keyword unifying allows you to transform keywords into your preferred case: 'city trip', 'City trip' or 'City Trip'.
Sorting and unifying is performed as the first step.
Limiting the Number of Keywords
You can control the maximum number of keywords to produce with the slider at the bottom. If the AI returns more keywords than configured here, AutoTagger trims them before sorting and unifying keywords. This is done that way because AIs typically report keywords in order of importance, so AutoTagger keeps the most important keywords.
For prompt-based AIs like OpenAI and Ollama, you can try to specify the number of keywords to return in the prompt, e.g. like in "Return ten to fifteen keywords for this image.". If the AI respects that, set the maximum keywords slider to its maximum and control the number of keywords via the prompt.
Mapping Keywords
This is a very flexible and powerful feature and in typical IMatch fashion makes AI-generated keywords so much more versatile. Mapping enables you to:
- map flat AI keywords into hierarchical keywords via your thesaurus
- fold multiple keyword variants (beach, beaches) into one keyword (beach)
- blacklist keywords to prevent them from being added to your files
- translate keywords into a different language
- create variants (e.g. when the AI produces
beach, you tell AutoTagger to addbeach,beaches,StrandandStrände)
Click on this button to open the Keyword Mapping settings:

Mapping Keywords With the Thesaurus
If you have a well-maintained thesaurus, you can use it to map flat keywords delivered by the AI into your standard keyword hierarchy.
Consider the AI has returned the following keywords beaches, boat and vacation for one of your images. Without any mapping, these keywords will be added as delivered to the standard hierarchical keywords tag or the AI.keywords tag.
If you enable the options to map AI keywords with your thesaurus, and your thesaurus has a hierarchical keyword like this:

AutoTagger adds the hierarchical keyword Nature & Environment|Beaches instead of the flat keyword beaches to the image.
If the keyword appears multiple times in different sections of your thesaurus, as shown in this image:
AutoTagger adds all matching keywords. In this case: Nature & Environment|Beaches and Beaches.
Note that for the second match, the Travel & Geography keyword is a group-level keyword and does not become part of the actual keyword added to the file. Also note that due to the mapping, the lower-case beaches keyword delivered by the AI is changed to the mixed-case Beaches keyword found in the thesaurus.
Letting AutoTagger map AI keywords with the thesaurus is an effective way to unify spelling and to transform simple AI keywords into fully hierarchical keywords, curated by your controlled vocabulary. This is one of the features that sets AutoTagger apart from other software, which just applies keywords as produced by the AI.
Dealing with Different Spellings, Singular and Plural Forms
It is not uncommon for today's AIs to return variations of keywords, for example, beach and the plural form beaches. A common way to handle this is to use the singular form keyword in the thesaurus and the plural form as a synonym:

To get accurate results, ensure that the "Also search in synonyms" option is enabled. This will allow you to find both the singular and plural forms of words, regardless of the form produced by the AI.
The same technique also helps to fold different variations of a keyword you consider identical together. Maybe the AI sometimes produces bike and sometimes bicycle and you want to combine these two variations into the common Vehicles|bicycle keyword. In this case, you would just add bike as a synonym to Vehicles|bicycle.
Having your thesaurus in order, including spelling variations and synonyms, is also very helpful when IMatch imports flat keywords written by other applications. A goods thesaurus makes it possible for IMatch to automatically convert flat keywords into hierarchical keywords during import.
Manual Mapping
Maybe you don't use a thesaurus or you don't want to modify the thesaurus to deal with certain AI-produced keywords or variations. The AutoTagger keyword mapper also offers a direct way to map keywords.
This is a very powerful feature, enabling you to integrate AI keywords into your personal keywording schema, convert them, translate them, add hierarchies and more.
Priming the Mapping
The first step for successful mapping is to allow AutoTagger to fill the list of mappings from keywords produced by AI. In the Keyword Mappings dialog box, make sure this option is checked:
AutoTagger adds all new keywords produced by an AI to the mappings list. After auto-tagging a number of images, revisit the mapping list to create your mappings. Repeat until all mappings you need are in place.
Mapping is performed before keyword lookups in the thesaurus.
The main area of the Keyword Mapping dialog box is reserved for a list of A → B keyword mappings.
On the left side is the incoming keyword produced by the AI, and on the right side is the mapped (outgoing) keyword.
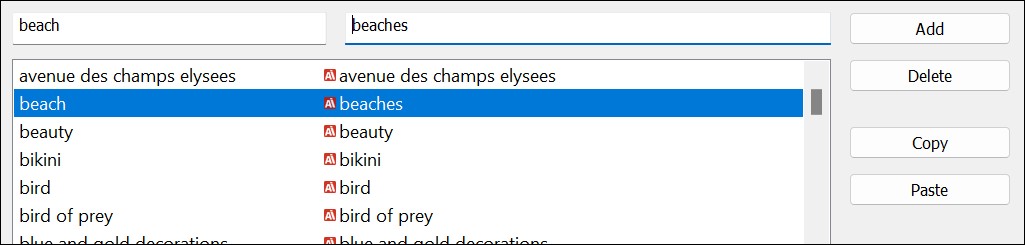
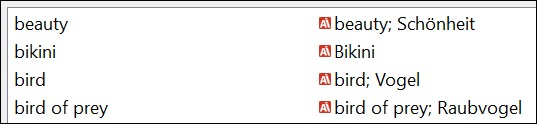
In the screenshot above, the keyword beach is mapped to beaches. If the AI produces the keyword beach, the keyword beaches is added to the image.
Mapping One Keyword Into Many
You can map one incoming keyword to multiple outgoing keywords. Separate the outgoing keywords with a semicolon:
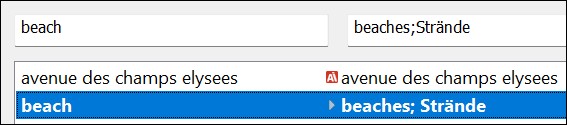
In this example, we map the keyword beach into the English beaches and the German translation Strände.
Creating Hierarchical Keywords
If you have no thesaurus, or not all of the keywords created by the AI are in your thesaurus, you can of course use mappings to produce hierarchical keywords:
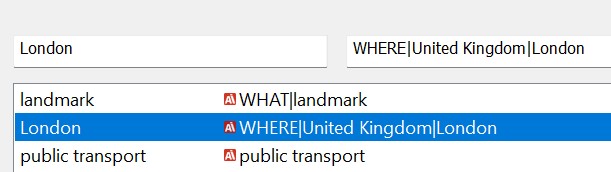
Here the keyword London is mapped to the hierarchical keyword WHERE|United Kingdom|London.
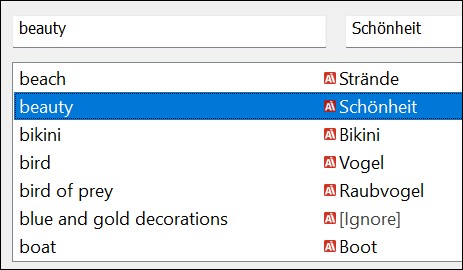
Ignoring / Blacklisting Keywords
If you don't want to add specific keywords produced by the AI to your database, you can clear the mapping by removing all text:

If the mapping is empty, AutoTagger ignores the keyword and does not assign it.
Translating Keywords
Some AI services support keywords in different languages. Prompt-based AIs like OpenAI and Ollama can be coerced into delivering non-English keywords, depending on the model. It's a bit hit-or-miss at this time, though.
If you want to take translation into your own hand to get it right, you can use mappings to translate the incoming English keyword into the translated keyword. In this example, we translate from English into German:
Multiple Languages
Of course you can keep the English keyword and translate into one or more additional languages using the same technique:
Finding Keywords
To search for keywords, use the find box below the keyword list.
With the Show only mapped keywords you can temporarily hide all keywords without user-defined mapping.
Don't Import Unmapped Keywords
This option is designed to reject keywords which can neither be mapped via the thesaurus and also have no user-defined mapping in the mapping list.
If you use the thesaurus for mapping and/or user-defined mappings, you might want to enable this option to ensure only mapped keywords are added to files.
Base Keyword
If this option to not import unmapped keywords is off, you can use this option to use a common top-level keyword for all unmapped keywords. If you want, for example, add all unmapped AI-generated keywords under the top-level keyword AI, enter AI into this input field. An unmapped keyword like lovely garden is then added as AI|lovely garden to the image.
Add Unmapped Keywords to this List
This option is especially helpful when you start adding keywords with AI. If enabled, it adds all yet unseen keywords to the mapping list, with a neutral keyword → keyword mapping.
This quickly fills the list with keywords produced by the AI, which then enables you to map, translate and ignore keywords as needed.
After a short while all common AI-generated keywords will be in the list, since the number of words AIs use is finite.
Adding and Deleting Mappings
To add a new mapping, enter an incoming keyword and the mapping into the two input fields above the keyword mapping list and click on the Add button or press Alt + A:

Adding keyword mappings manually can be used in addition to automatically importing new keywords produced by the AI.
To delete a mapping, select the mapping in the list and press the Delete button.
Batch Editing
Using the Copy and Paste buttons allows you to modify keyword mappings in external applications or to import already existing mappings you keep elsewhere.
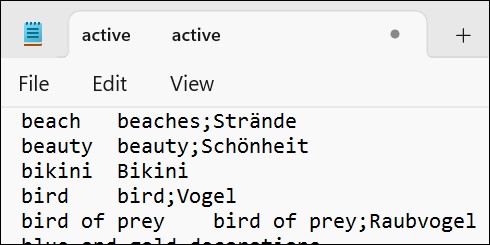
When you copy the keyword mapping list into the clipboard, the result is plain text, in this format:
incoming keyword[tabulator]mapped keyword(s)
This is how keyword mappings look in Windows Notepad:
And in Microsoft Excel:
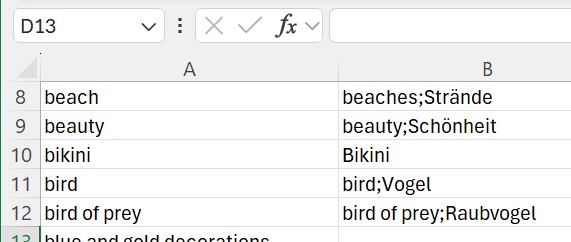
To re-import the keyword list after editing or to import an external list, just copy it into the clipboard and then paste it into the Keyword Mapping dialog box. The expected format is the same format as the format produced when you copy the list into the clipboard with the Copy button.
Some users probably find it easier to edit keyword mappings in an external tool for large-scale editing. Or they have an existing list they can import that way.
You can also use this method to transfer mappings to another database or keep a backup copy of your mappings e.g. in Excel or Notepad.
Add AutoTagged Files to a Category
When this option is enabled (default), AutoTagger assigns processed files to a category. The name of the category depends on the user interface language you use. For the English user interface, the name of the category is simply "AutoTagger".
If AutoTagger encounters problems while processing a file (e.g. a timeout or an error message from the AI), it assigns affected files to a child category named "Files with Problems".
In many cases it is sufficient to select failed files and run them again at a later time (in case of the AI not responding or running into timeouts).
If you use a LLM-based AI like OpenAI, Mistral or Ollama, try changing the creativity setting or your prompt slightly when the AI did not return a useful response before.
Organizing Files with Categories Using AI Tags
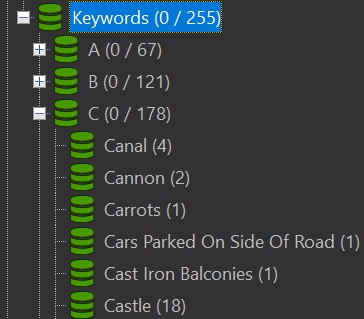
The @Keywords category automatically organizes your files based on their hierarchical keywords. You can achieve the same for files with data in the AI Keywords tag (or any other AI tag) by creating up a data-driven category.
For example, to organize your files based on AI Keywords, a data-driven category setup like this works very well:
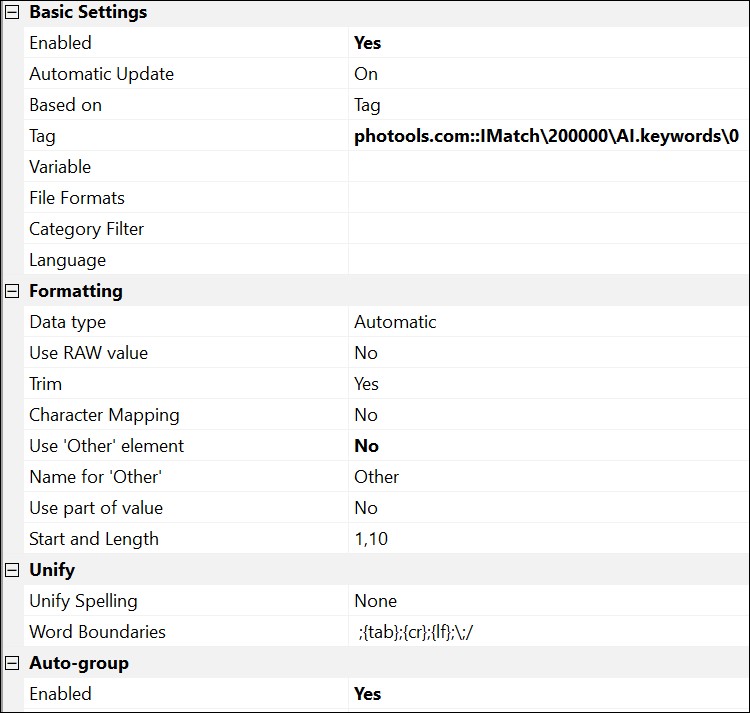
Properties to change are displayed in bold.
We have disabled Other (not interested in files without AI Keywords) and enabled the option to group the resulting child categories by their first letter. The result looks something like this:
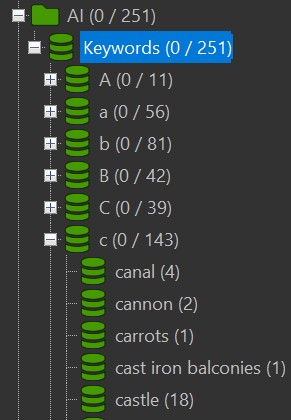
Categories created from the AI Keywords tag.
In this example, we did not let AutoTagger unify AI keywords, so we have both keywords starting with an upper-case (A) and lower-case (a) letter. This shows in the first level of the category.
We can remedy that by letting the data-driven category unify spelling. Enable this option for the category:

Now all child categories start with an upper-case letter, and so does the dynamic group level:
You can set up similar data-driven categories for AI Landmarks or any AI Traits Tag you create.
Selecting AI Tags
To find the standard AI tags provided by IMatch or AI Trait Tags created by you, search for the group imatch and tags containing AI in the Tag Selector:
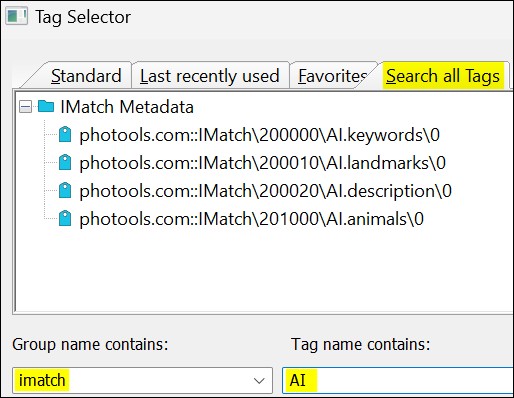
Searching for AI Tags in the Tag Selector dialog box.
Add the tags as Favorites in the Tag Selector if you use them often.
Performance Tip
We recommend to create a top-level category (we use the name AI) and then create data-driven categories for AI tags below that, like so:

The reason for this is that when you close the top-level AI category, IMatch doesn't always have to refresh the data-driven child categories all the time ‐ because they are not visible. This keeps things snappy even for large databases. This tip applies to all data-driven categories.
Displaying AI Tags in File Window Layouts
There is no difference between regular and AI Tags in File Window layouts. If you want a layout that e.g. displays AI Description and AI Keywords, just create a new File Window Layout and add the tags.
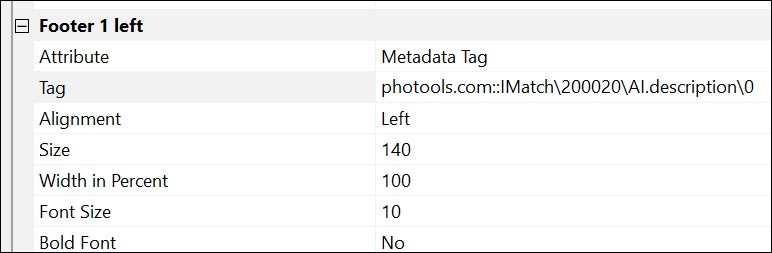
This layout displays the contents of the AI Description tag in the footer. It uses the full width and a size of 140 pixels to provide room for longer descriptions.
For keywords you would set up the layout in a similar fashion. Set font size, color, size/height etc. based to your taste and the number of keywords usually assigned to images.
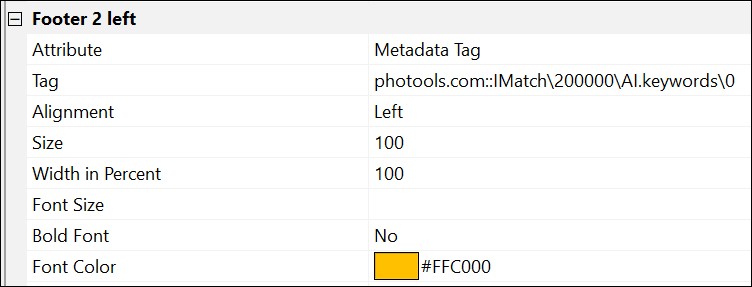
This layout produces output like this:
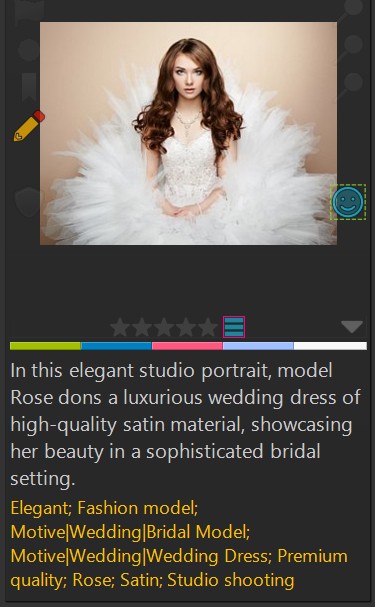
A layout displaying AI description and AI keywords.
Prompting
If you use modern LLM AIs like OpenAI, Mistral or Ollama, you use prompts to tell the AI how to describe an image and how to produce keywords. After learning how to use AutoTagger in this help topic, learning how to prompt AIs is the next step.
Next: Learn about prompting if you plan to use OpenAI, Mistral or Ollama.
Tip: Place AutoTagger into the File Window Ribbon
If you are using AutoTagger very often and you prefer clicking over remembering keyboard shortcuts like F7, you can add an AutoTagger button to the File Window Ribbon via a Favorite.
Create an Automation Favorite and configure it to show in the File Window Ribbon. The AutoTagger icon is part of the system icon list available for all Favorites.

AutoTagger Favorite icon in a File Window Ribbon.
Automatically Applying a Metadata Template
AutoTagger offers the possibility to apply a Metadata Template after AutoTagger has processed a file:

This feature allows you to do many useful things. For example:
- Set or change a label after running AutoTagger on a file.
- Add data to one or more metadata tags.
- Inspect, modify, append to, or copy the metadata that AutoTagger just produced.
- Add auto-tagged files to a collection, or remove them from a collection.
Example: Reset Label after Auto-Tagging
A simple example is using a Metadata Template to clear (or change) the label assigned to the files processed by AutoTagger. This clearly indicates that the files have been processed, and allows you to easily filter them with the Quick Filter Ribbon.
To do this, create a new Metadata Template with a name of your choice and configure it to delete the contents of the XMP Label tag:
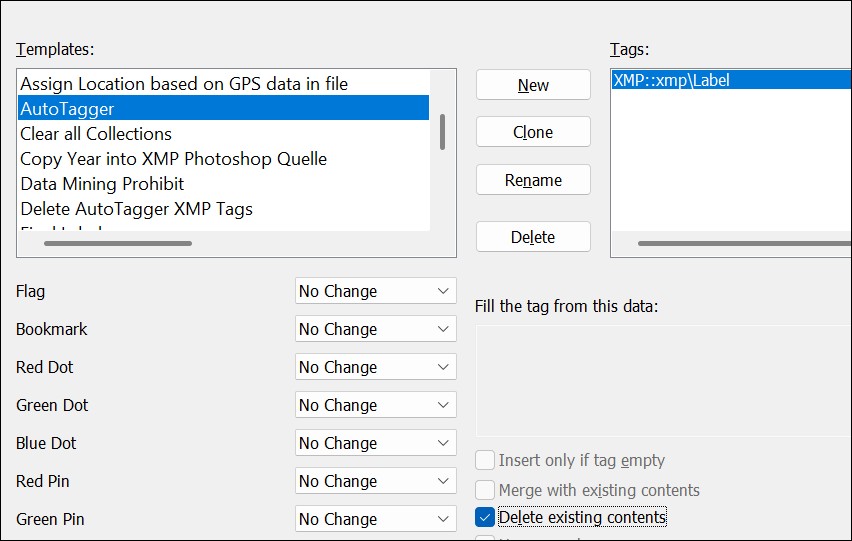
Now, select this Metadata Template for any AutoTagger setting you want to use:
Example: Add a Keyword
Maybe you find it useful to know when metadata has been added by AutoTagger and add a corresponding keyword. This is how you would do it:
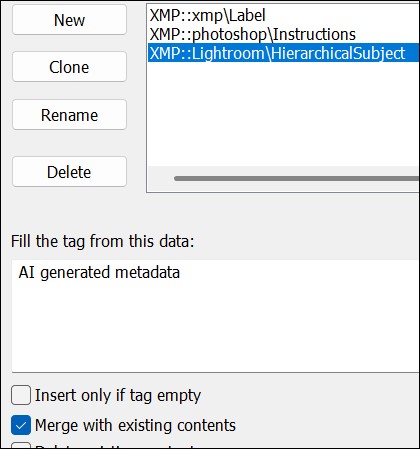
This Metadata Template adds the keyword AI generated metadata to the existing keywords (note the enabled Merge with existing contents option).
If you don't want to add this information as a keyword, the same setup can be used for any other tag.
Example: Re-add Person Keywords
If you let AutoTagger replace existing keywords instead of adding to them, maybe you want to re-apply person keywords afterwards again.
You would use the same setup as in the above keyword example, but instead of adding a fixed keyword, you would use the variable {File.Persons.Keywords.Confirmed} as the source.
Each AutoTagger setting has its own Metadata Template. This allows you to create different settings, each using a specific (or no) Metadata Template.
The Metadata Template used by AutoTagger can also use variables from the {File.*} and {IMAT.*} groups to access data stored in tags or Attributes, allowing you to perform a wide variety of tasks.
IMatch AutoTagger Variables
These special variables only exist in the context of AutoTagger running. AutoTagger makes them available to provide a way to access information about AutoTagger, the prompt, and AI-specific details.
You can only access these variables within the Metadata Template you run from AutoTagger.
How to Use AutoTagger Variables
If you want to record which AI and model were used to auto-tag an image, or when you ran AutoTagger for an image, you can use the AutoTagger variables in a Metadata Template to store this information in a regular XMP tag or AI tag.
Consider this expression based on multiple variables in a Metadata Template:
AI {IMAT.AI.Name} with model {IMAT.AI.Model}.
Date: {Application.DateTime|format:YYYY-MM-DD}.
Input tokens: {IMAT.AI.Tokens.Input}.
Output tokens: {IMAT.AI.Tokens.Output}.
Runtime: {IMAT.AI.ResponseTime}ms.
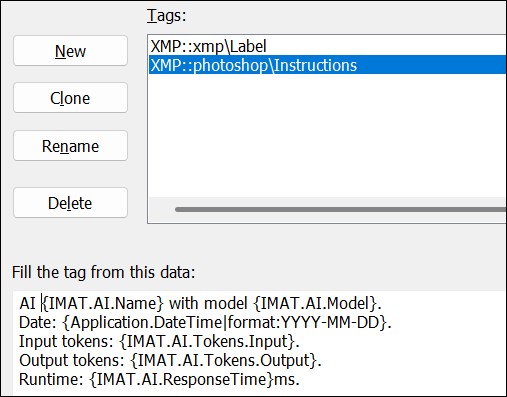
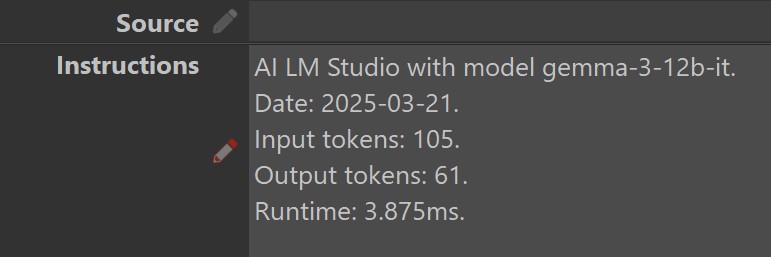
stores relevant data about the AI and model used, the date AutoTagger was run, the tokens used, and the runtime in the XMP::photoshop\Instructions tag. In the Metadata Panel, the result looks similar to this:
You can store this data in any XMP tag you like. It will be written to the image during the next write-back.
Caption Writer
Maybe you want to make it official who wrote the description. This Metadata Template will do it:

It fills the Caption Writer (Description Writer in the default Metadata Panel layout) tag XMP::photoshop\CaptionWriter\CaptionWriter with the the AI name and model used to create the description.
Store the information in an AI Trait tag if you only want to store it in the database.
AutoTagger Variables List
| Variable | Description |
|---|---|
IMAT.AI.Name | Returns the name of the AI used by AutoTagger (e.g., "Ollama", "Mistral AI", "LM Studio"). This is the same name you see for the AI in the AutoTagger settings. |
IMAT.AI.Id | Returns the internal id used by IMatch for each supported AI. |
IMAT.AI.Model | Returns the name of the model used (e.g., "gemma3:12b", "LLaVa 13b"). This is the same model name you see in the AutoTagger settings. |
IMAT.Setting | Returns the name of the setting used. |
IMAT.Seed | The seed value. |
IMAT.Creativity | The creativity (temperature) value. |
IMAT.MetadataTemplate | The name of the metadata template applied (optional). |
These Prompt. variables return the prompt you have provided, and the parsed prompt produced by AutoTagger by resolving variables, adding the context placeholder etc. The .Parsed prompts are what is sent to the AI. | |
IMAT.Prompt.Description | The description prompt as provided by the user. |
IMAT.Prompt.Description.Parsed | The description prompt after processing. |
IMAT.Prompt.Keywords | The keywords prompt as provided by the user. |
IMAT.Prompt.Keywords.Parsed | The keywords prompt after processing. |
IMAT.Prompt.Landmarks | The landmarks prompt as provided by the user. |
IMAT.Prompt.Landmarks.Parsed | The landmarks prompt after processing. |
IMAT.Prompt.Trait:Name | A trait prompt as provided by the user, for example: {IMAT.Prompt.Trait:Headline} |
IMAT.Prompt.Trait:Name.Parsed | A trait prompt after processing. |
IMAT.AI.Response | The complete response returned by the AI. Note that the AI response is in JSON format and contains |
IMAT.AI.ResponseCode | The numerical response code of the AI. Numbers varies by AI. |
IMAT.AI.ResponseMessage | The optional response message (error message) returned by the AI. |
IMAT.AI.HTTPStatusCode | The numerical HTTP status code of the AI request. 200 means "OK". |
IMAT.AI.ResponseHeaders | A list of all response headers the AI returned. This is for technically-inclined users and for debugging purposes. |
IMAT.AI.Requests.Used | The number of AI requests used by AutoTagger to process a file. This is usually 1. |
IMAT.AI.Tokens.Input | The number of input tokens as calculated by the AI. For cloud-based (paid) AIs, the number of tokens processed impacts the cost of a request. |
IMAT.AI.Tokens.Output | The number of output tokens (response tokens) as calculated by the AI. For cloud-based (paid) AIs, the number of tokens processed impacts the cost of a request. |
IMAT.AI.ResponseTime | The response time of the AI in milliseconds (1,000 Milliseconds = 1 second). This measure indicates how 'fast' the AI can process prompts. It often varies considerably for cloud-based AIs, depending on their current workload. Also, larger and more complex prompts require more work and increase response time. |