File Window Layouts enable you to customize what you see in File Windows.
Different users have different needs and requirements. Sometimes you want a clean look at your images, without any distractions caused by data display. Later you're working on the metadata in the files, and it is important to see as much metadata per file as possible. This, again, differs from a client session, where a rather large thumbnail with only the file number is usually best.
The File Window concept in IMatch has been designed to handle all these cases, and more. File Windows use layouts to define the look of the File Window, the size and arrangement of the files within the File Window, and the amount and type of data displayed. You can create as many layouts as you like and recall them at any time. Different views can use different File Window layouts.
IMatch ships with a set of predefined File Window layouts you can use, change or delete.
Use them as a starting point for your own File Window layouts.
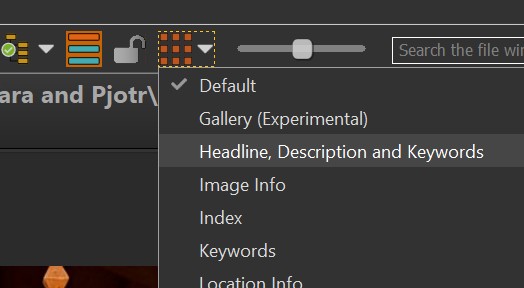
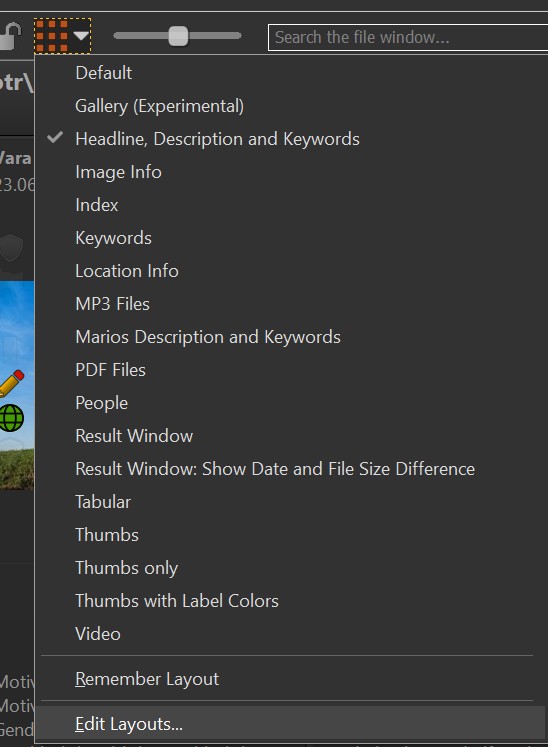
You select the File Window layout to use via the drop-down menu in the File Window ribbon:
The following screen shots demonstrate some of the layout options you can control.
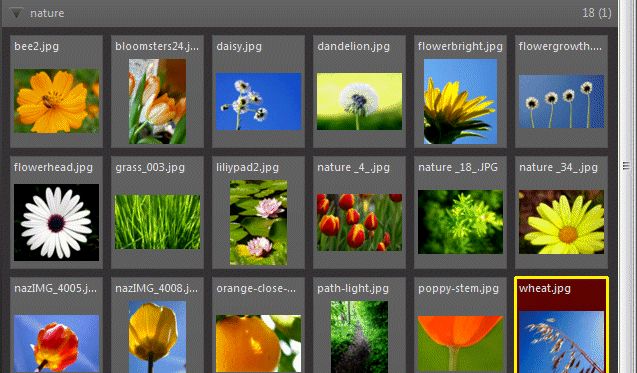
File Window showing only small thumbnails without any metadata. The thumbnail panel background is set to pick up the image colors for fill. Even in this mode, the File Window Tip allows you to see metadata when you point at the upper right corner of a thumbnail.
This layout uses larger thumbnails and displays the file name in the header of each panel.
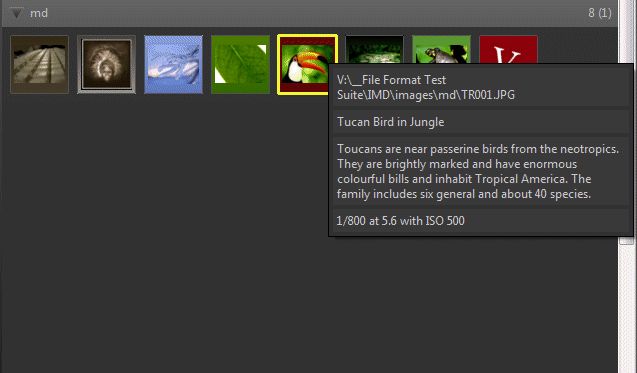
A very informative layout, displaying a wide range of metadata in each panel.
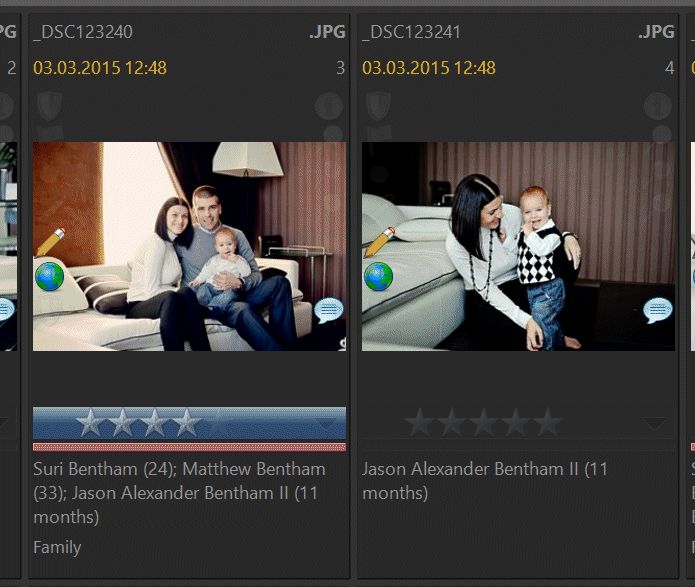
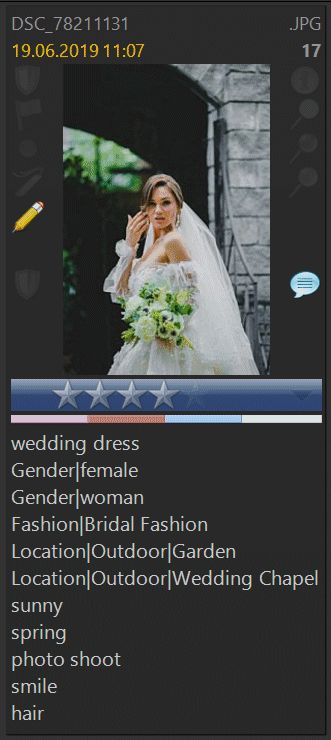
The default People layout displays the labels of persons shown in the image, keywords, file name, extension and date & time.
The default Video layout shows the file name and video duration.
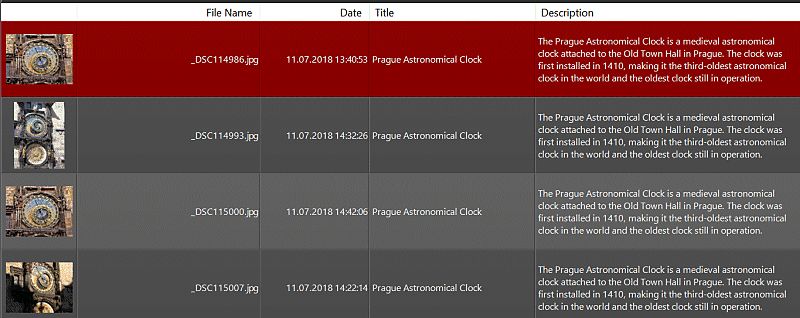
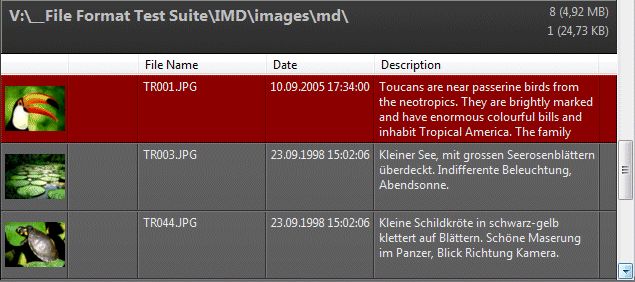
File Window layout using tabular mode. This layout shows the thumbnail, the file name, date & time and the description of each image. You can include up to 20 columns in your layout.
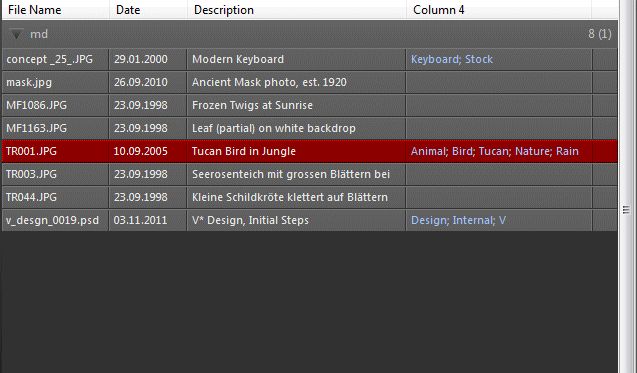
Tabular Mode, without thumbnails. This layout shows file name, date, headline and keywords.

The Gallery Layout.
See The File Window Gallery for more information.
These examples should give you an impression of what can be achieved by configuring the File Window. The next section explains how you can choose from existing layouts and how to define your own File Window layouts.
To select a File Window layout, click on the layout button in the File Window ribbon (Shortcut: Ctrl + L).
Choose a layout from the list to apply it to the File Window. Or select Edit Layouts... to open the File Window Layout Editor to edit your layouts.
You can select the first 9 layouts directly via the keyboard shortcuts Ctrl+L,1 to Ctrl+L,9. (Press Ctrl+L, release. Then press 1 to 9 within one second). You can also load File Window layouts from the Command Palette by searching for layo.
If you enable this option, IMatch remembers the selected layout, sort profile and reverse sort order setting for the current context (folder, category, ...).
This feature is very useful when you work with different file types (images, videos, PDF documents, ...) and you want to fix a specific layout for folders with different file types.
A File Window can display files in one of two modes:
In the thumbnail mode, each file is represented by a thumbnail panel which encloses a thumbnail of the file and optionally displays metadata, collection icons, label and rating bar, category bar and other visual elements. You can dynamically change the size of the thumbnail panels via a slider in the File window ribbon; IMatch automatically adapts the layout of the File Window to the size you choose for your thumbnails.
In the tabular mode, each file is represented by one row in a list. You can choose which icons to display, whether you include a thumbnail and the metadata fields you show per row. The tabular mode is ideal to see as much metadata as possible, e.g., while checking your data entry.
The maximum size of thumbnails in the File Window is determined by the thumbnail size configured for your database (Edit > Preferences > Database). You can configure IMatch to scale the thumbnails beyond 100% under Edit > Preferences > Application. This may produce slightly blurry thumbnails, however.
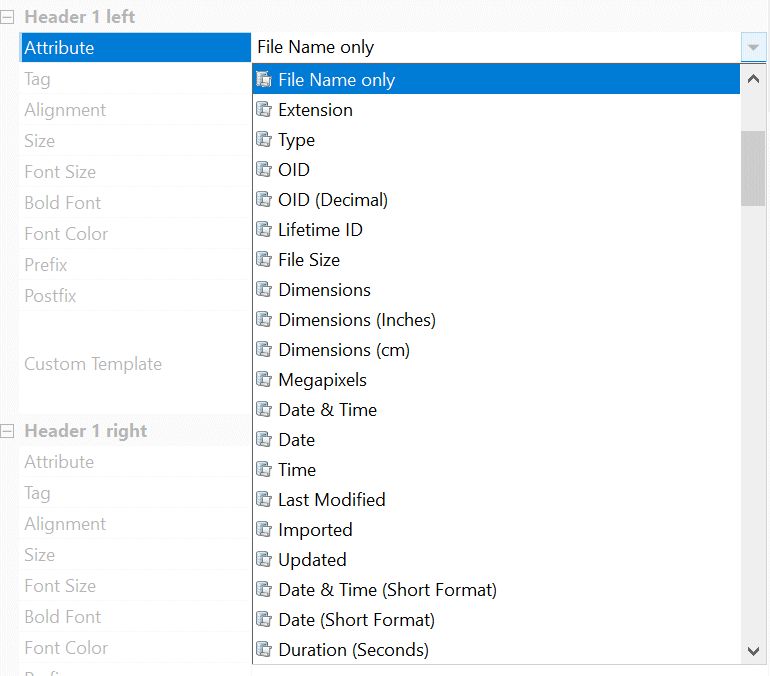
This editor allows you to select the data to display in each available header and footer field from a list. You can easily customize the data IMatch displays in the File Window.
To open the editor, left-click into the header or footer area of a thumbnail panel.
Alternatively you can also access it via the File Window Layout button drop-down menu in the ribbon.
Tip: Hold down Ctrl when selecting this command to directly open the Full Layout Editor.
If the Icon Lock is enabled, you have to hold down the <Alt> when clicking to open the layout editor.
Pick the data you want to see in a header or footer from the corresponding drop-down list in this dialog box. The list includes all available IMatch File Window attributes and all standard tags. Tags are indicated with a small dot following the tag name.
The following screen shot shows the simple layout editor:
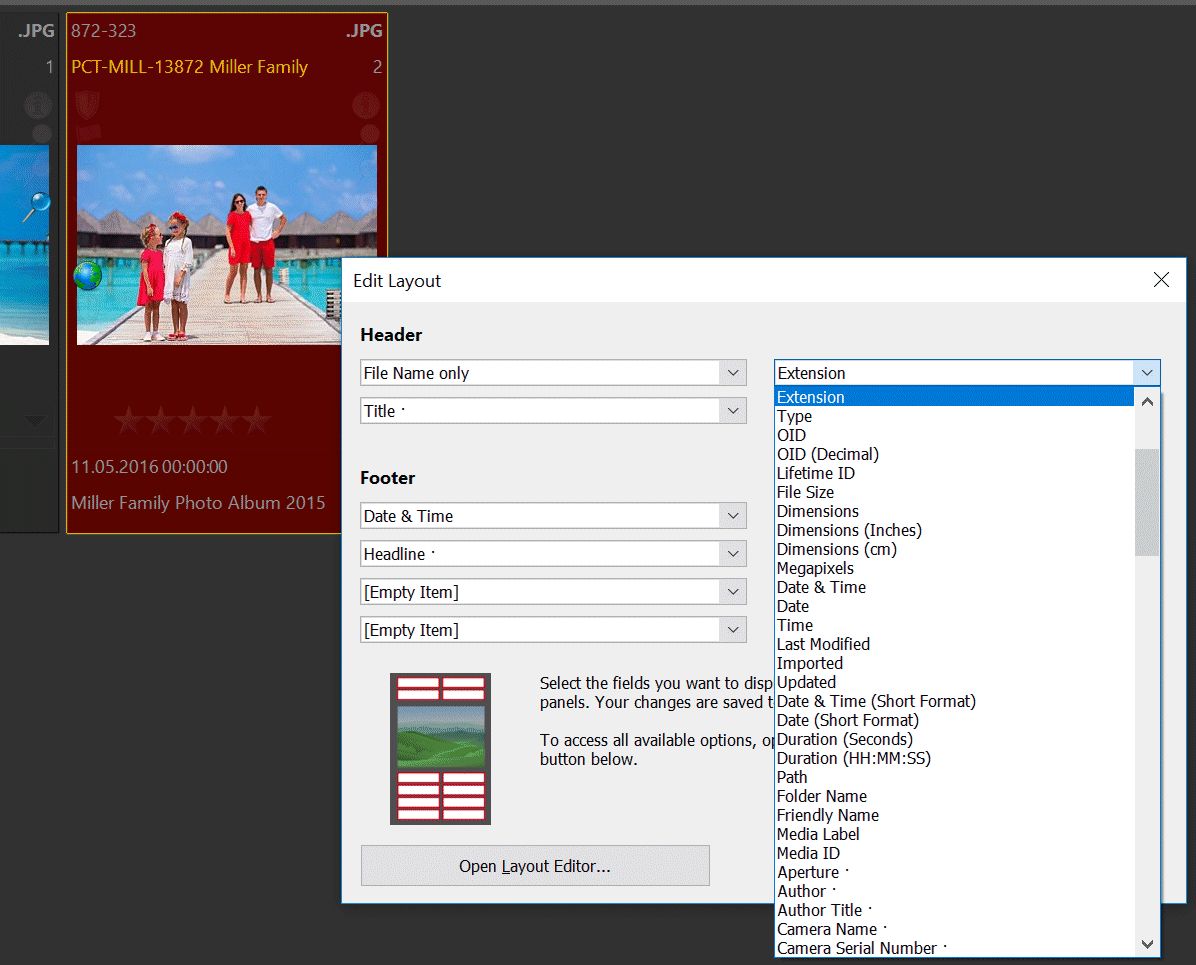
To access all options available for File Window layouts, switch to the full layout editor by clicking the corresponding button in the simple layout editor dialog box.
The simplified editor is only available for thumbnail layouts. To modify tabular layouts, use the full editor.
If you often accidentally click into the header and don't want IMatch to open the layout editor in this case, you can disable this feature under Edit > Preferences > File Window.
The full layout editor allows you to create, edit and delete File Window layouts. It also provides access to all available options and features for layouts.
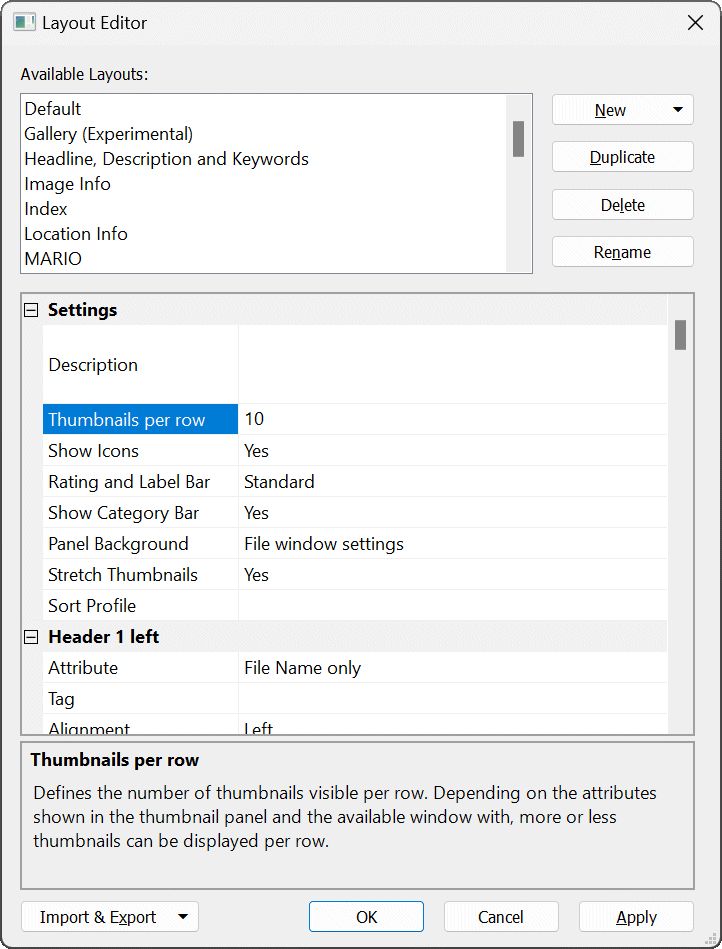
At the top of the dialog box you see the list of layouts you have created. The buttons at the right allow you to create, duplicate, rename and delete layouts.
Below the list you see a property grid where you can configure each element of the layout. This grid shows different elements, depending on the layout mode (thumbnail or tabular) of the selected layout.
Click on any row to see a description of the property in the help area near the bottom of the window.
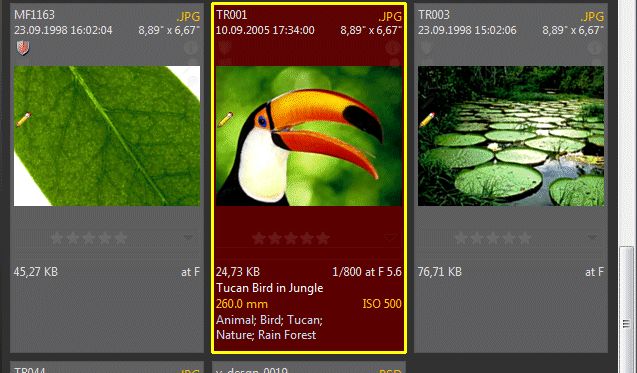
A thumbnail panel has two header rows with up to two columns each, and up to four footer rows with up to two columns each. This allows you to display up to 12 different information items on every single thumbnail panel.

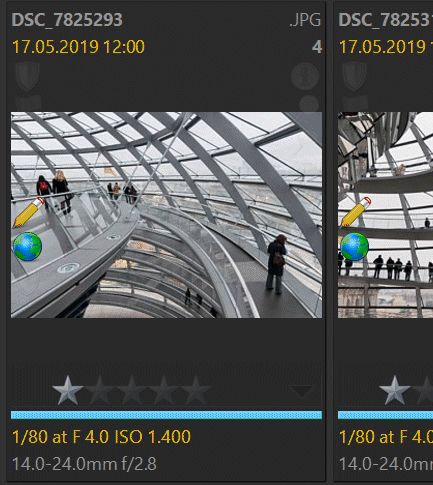
The thumbnail panel in the picture above shows the file name, extension, date & time and dimensions in the header. The footer shows the file size, shutter speed and aperture, the IPTC headline (occupying the entire 2nd footer row), the focal length and ISO and the keywords assigned to the image. The different header and footer sections have been visualized with light green background for this screen shot. You don't see this in the 'real' thumbnail panel.
This rather extreme example shows how customizable File Window layouts are. You not only can control which metadata fields you want to display, but also the font size, color, alignment, row height, etc. You can use a custom prefix (like the "ISO" prefix used to indicate what the 500 means) and a postfix, e.g., to add a unit to a metadata value.
Each row in the header and footer has two columns. By default, each column has a 50% width. A row by default has a height of 1, meaning it fits one row of text.
If you display attributes or metadata tags with longer text, like title, description, headline or file names, the text may be clipped and an ellipsis shows to indicate that:
Using the Size property of the corresponding column (in pixels) in the header / footer, you can create more room for the text:
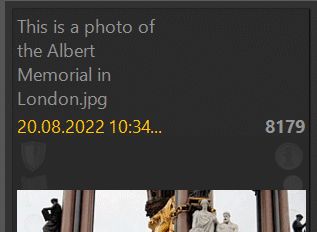
Using a row height of 100 pixels to allow the text to wrap.
If you enter a Size larger than 0 for a column, the text in that column automatically wraps into multiple rows.
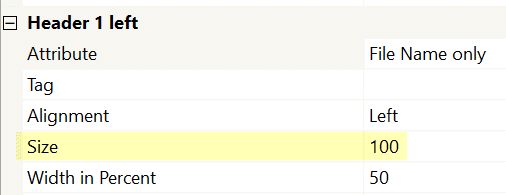
With the Width in Percent property, you can set a ratio to give one of the columns more room. Here we used a 80%/20% ratio:
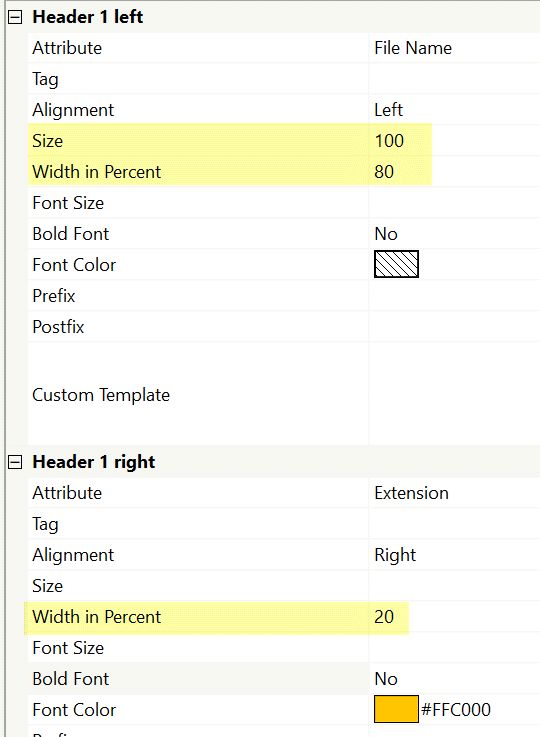
which leaves enough room to show the file extension but allocates as much room as possible for the long file names used in this example:
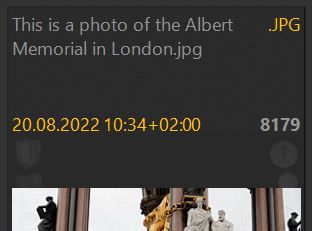
We've also set a 70/30 ratio for the second row, to allow the date and time to show in full.
If a cell is set to [Empty Item], the other column gets a 100% width, independent from the column width specified for the empty cell.
You can select from a wide range of standard attributes (fields) to display in your layout. The available fields include file and folder names, several date and time values, dimensions, runtime, and more. Just pick the attribute from the drop-down list.
Selecting an Attribute to display in the first left header.
These attributes compare the file size, date & time and width/height of matches with the corresponding properties of the original file. They are only filled for search results which are based on original files (e.g. duplicate or copy search, visually similar images, ...).
These attributes are very useful for layouts used in Result Windows when searching duplicate files, making it much easier to decide which duplicate to keep.
See Finding Duplicate Files for more information.
If the standard attributes don't include the metadata value you want to display, select the special Metadata Tag attribute and then select a metadata tag to use in the row below. You can choose from all metadata tags available in the database.
For repeatable tags which can hold multiple values (e.g. keywords, AI.keywords), the Sort option controls whether or not IMatch sorts the values before displaying them in a File Window.
For some users who work for certain stock photo agencies, the order of keywords is important. Other users prefer to display keywords sorted. With the Sort option you have full control. By default it is off, displaying the tag values in their natural order.
If this is not sufficient or you want to use special formatting or combine multiple metadata tags, you can use a Custom Template attribute.
In tabular mode, you can configure up to 20 columns to be shown in the File Window. The tabular mode is ideal if you want to see as much information as possible per file, or when you work with longer descriptions and you need more space for each file so you can see the entire description.
The example layout above uses three columns per file and includes a thumbnail too.
The first column contains the file name, the second column the file date and time and the third column shows the file description. By adjusting the row height in the layout or later via the zoom slider in the File Window, you can control how much room you allocate for each row. The column width can be set in the layout and later changed by dragging the columns with the mouse.
For a detailed description of each configurable attribute in File Window layouts, please refer to the help texts shown in the layout editor dialog box.
You can change the colors used by the File Window and all other File Window options under Edit > Preferences > File Window. See the corresponding help topic for details.
If you enable this option (on by default), the caption bar displays the color of the selected folder / category in a small color bar at the bottom. See Categories and Media & Folders for more information about color-coding.
This is the most flexible way to format File Window panel contents. You specify the contents of a header/footer field by mixing IMatch variables and literal text. You can use XAML formatting to format and highlight text, display custom icons, create tables and more.
See the articles Fun With Custom File Window Layouts and Using Custom Icons in the File Window in the IMatch knowledge base for some examples.
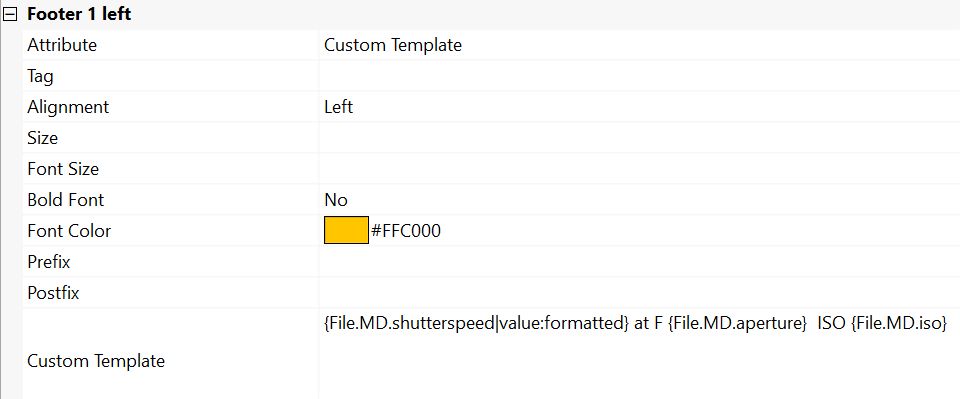
The Image Info standard layout included with IMatch uses custom templates to display shooting and lens information in the footer:
The template for the first footer looks like this:
For the lens info in footer 2, the custom template uses:
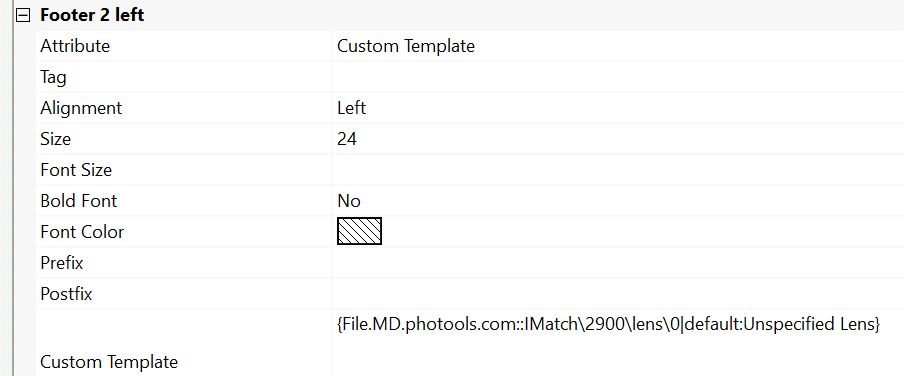
Note how the template anticipates that there might be no lens data for a file and uses the default formatting function to display Unspecified Lens in that case.
The default Keywords layout uses a custom template to display the hierarchical keywords assigned to a file in the footer.
The variable used for Footer 1 is:
{File.MD.XMP::Lightroom\hierarchicalSubject\HierarchicalSubject|replace:~;=={lf}}It replaces the ; which is used to separate keywords with a {lf} (line-feed), causing the keywords to wrap into individual lines.
See Formatting functions for variables for more information.
Sometimes it may be helpful to display the number of elements of repeatable values like keywords or attributes.
The following variable returns the number of keywords assigned to a file:
{File.MD.XMP::Lightroom\hierarchicalSubject\HierarchicalSubject|count:true}To display Attributes in File Window panels, use a custom template in combination with Attribute variables.
For example, the variable {File.AT.Notes.Note} displays the contents of the Attribute Note from the Notes set.
Sometimes it might be useful to see how many keywords you have assigned to a file. Use this variable:
{File.MD.hierarchicalkeywords|count:true}in combination with a custom template to achieve that.
The variable uses a Metadata Tag ShortCode for a more concise syntax. The count:true formatting function counts the keywords and returns the result.
The Using Custom Icons in the File Window article in the IMatch knowledge base demonstrates how to add custom icons to File Window panels.
The ability to display custom icons for various purposes and conditions can be quite helpful in certain workflows.
IMatch supports a number of variables which can be used exclusively in custom templates.
| Variable | Description |
|---|---|
{FW.Index} | This variable returns the index of the currently processed file. This variable matches the Index attribute you can select in the layout editor. |
{FW.FileCount} | This variable returns the number of files in the File Window. It considers files hidden by filters and stacks, and its result matches what you see in the File Window caption bar. |
{FW.FileSize} | This variable returns the total size of all files in the File Window. It considers files hidden by filters and stacks, and its result matches what you see in the File Window caption bar. |
{FW.ShowsStackedFiles} | Returns 1 if stacked files are shown, else 0. |
{FW.FilterActive} | Returns 1 when a filter is active, else 0. |
{FW.SearchActive} | Returns 1 when the search bar is active, else 0. |
{FW.ShowsHierarchy} | Returns 1 when hierarchy levels are shown, else 0. |
{FW.SortProfile} | The name of the currently active sort profile. |
You can use these variables in custom templates, e.g. to display n of m:
{FW.Index} of {FW.FileCount}
You can export all or individual layouts and then import them into a different database. Or maybe you want to share your layouts with other users or create a backup before manipulating your layouts.
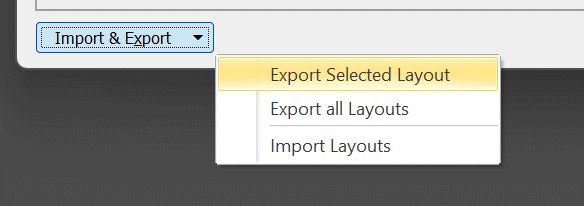
When you export layouts, IMatch asks for the name of the file to store the layouts in. The layout file format can contain one or many layouts, depending on whether you choose to export only the selected layout or all layouts.