
The Renamer enables you to rename and distribute sets of files.
Files can be renamed to produce all kinds of file names using a sequence of steps. In addition, the Renamer can distribute files by copying or moving them into existing or dynamically created folders.
You can access the Renamer via the Tools > Renamer command or the corresponding keyboard shortcut Ctrl+F2.
If you run the regular Rename command (F2) from a File Window context menu and more than one file is selected, IMatch asks you if you want to run the Renamer instead:

To make this simple, the Renamer uses steps to produce the destination file name from the original filename.
Steps are simple operations like "Remove the text _DSC" or "Append a unique number."
The following chart shows 3 sequences of steps which produce different results for the original filename _DSC29123.RAW
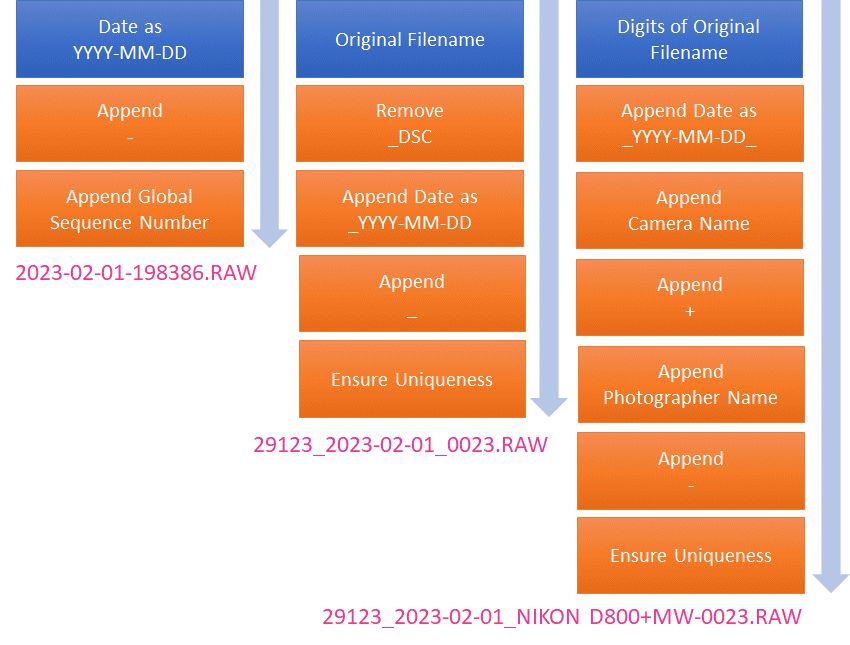
Steps are performed from top to bottom and in the sequence you arrange them in the step list.
Each step receives (uses) the output of the steps above it. Multiples steps can be combined to produce the required destination file name. IMatch uses the term Processing Instructions for a list of steps to perform.
By the way, these processing instructions would do nothing:
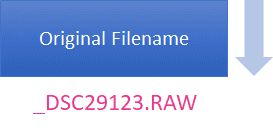
This single step would just rename the file to the same name as before and the Renamer would just ignore this.
The Renamer supports about 50 step types which you can combine like building blocks to produce exactly the file names you need. Combinations of steps and other options can be stored as Renamer Presets, which you can later recall and run.
You can create Favorites from Renamer Presets. This allows you to conveniently rename files with a single mouse click or keyboard shortcut.
To rename files and to add or edit Renamer presets you open the Renamer dialog box via Tools > Renamer or Ctrl+F2. Let's have a look at this dialog:
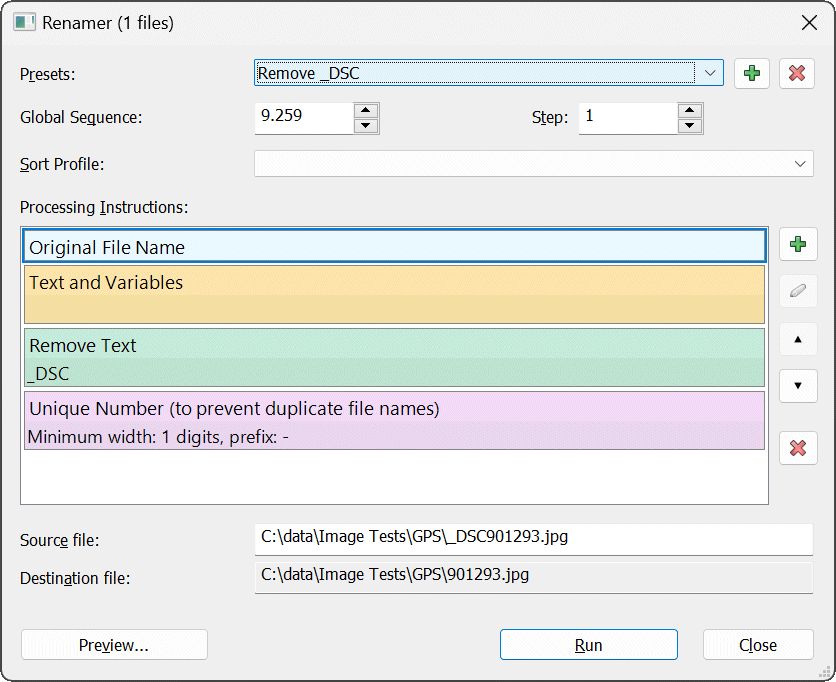
Presets | This drop-down list contains all available presets. You can add or remove presets via the + and X buttons next to this list. A preset stores all steps, the selected sort profile and all other options under a user-defined name. |
Global Sequence | The Global Sequence Number Step uses a global number to produce unique file names. It automatically increments the sequence number shown here for each file name by the step size you input here. In this example, the next sequence number used would be 9259 and it would be incremented by 1 afterwards, producing files with sequence numbers 9259, 9260, 9261, ...You can change the global sequence number it if you want, e.g. to start a fresh batch of files with an even number. Use this step if you want to add unique numbers to your file names. If you enter a lower value for the global sequence number, the Renamer may produce duplicate file names when you rename files in the same scope you have renamed files before. |
Sort Profile | The Renamer by default works with the current selection of files in the File Window. If you do not select a sort profile in the Renamer, files are renamed in the order in which they appear in the File Window. If you want to sort the files differently in the Renamer before renaming them, select a sort profile from this list. Some of the steps below depend on the sort order of files. Make sure the files are the correct order in the File Window, or set a sort profile here explicitly. |
Processing Instructions | This list shows all the steps the Renamer executes to produce the destination file name from the original file name. On the right side of this list you have buttons to add, edit and remove steps. The arrow buttons allow you to move steps up and down in the list. IMatch processes steps from top to bottom. Depending on which steps you use, the order of the steps may be important. The Move and Copy steps (if used) are always the last in the list and cannot be moved. |
Source file | The fully qualified (path and file name) of the first selected file. This file name is used as a live example for the results of the processing instructions. You can edit this name to try your Renamer preset against different input file names. |
Destination file | The destination file name resulting from applying all processing instructions to the Source file. This is only a simulation. |
Preview | Press this button to run a simulation of the rename on all files in the selection. This allows you to check if the resulting file names are as you expect them. The preview performs all steps, resolves file name collisions etc. as the real rename operation would do. |
Run | This button actually performs the rename. If you don't want to perform a rename, click Close to close the dialog box. Changes made to Renamer Presets or Global Sequences are saved either way. |
You control the output of the Renamer (the resulting file name) by the steps you include in the processing instructions.
To add a new step after the currently selected step, press the + button right of the Processing Instructions list. A dialog box opens with all available steps:
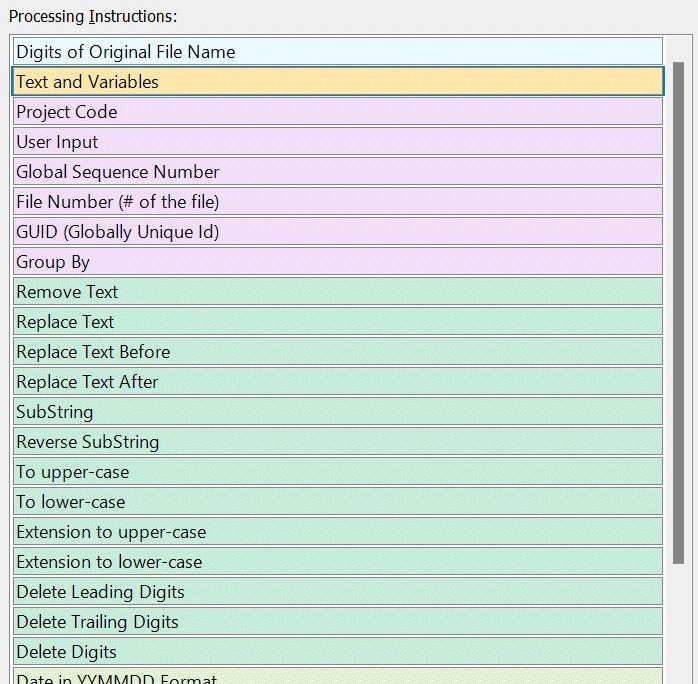
Select a step and click OK or double-click on a step to select and return to the Renamer dialog box.
The step will be inserted after the currently selected step. If the step requires additional parameters, IMatch will bring up another dialog box where you can edit the step.
Some step types, e.g. the Move step, can be used only once per preset. These steps will not show up in this list if they are already used in your preset.
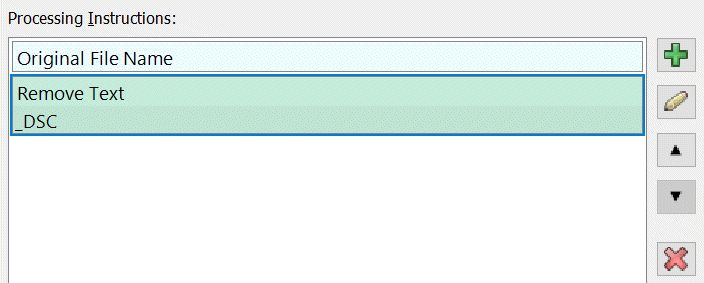
In this example we use two steps. The first step adds the original file name. The second step is of type Remove Text and we use it to remove the unwanted _DSC prefix from our file name.
If the original file name is _DSC218900.RAW the result after applying these two steps is 218900.RAW.

In this example, we again use two steps. This time we don't use the original file name at all but instead create a new file name from the date & time of the file. We use a step which produces file names like formatted as YYYYMMDD.
For a JPG file created on January, 16. 2023 the file resulting file name would look like this: 20230116.jpg.
In a second step we add a unique number to ensure that all output file names are unique. If the selection you rename contains multiple files taken on the same day, this step ensures that all output are different.
For example, if you rename two files taken on November, 25. 2023, the output file names would be 20231025-0001.jpg and 20231025-0002.jpg. The unique number step produces the -0001 and -0002 postfixes for the output file names.
The Unique Number step does nothing unless there are name collisions caused by duplicate file names.
If you always want to append a number to your file names, use the Global Sequence Number step instead.
By using one or more steps (there are about 50 step types available) you can produce any imaginable file name. With the special Move and Copy steps you can move and copy files, and there are also steps for filtering files before renaming.
To edit a step from the Processing Instructions list, just double-click or press the Edit button on the right of the list. Not all steps have additional parameters or support editing. Simple steps like "to upper case" can only be added, moved or removed.
To remove a step, click on the X button on the right side of the list.
IMatch processes the steps from top to bottom. For some steps the order in which they are processed is important. The results can be different, depending on their position within the Processing Instructions list.
To move steps up and down, use the Arrow buttons on the right of the list. The Copy and Move steps cannot be moved.
While the Renamer dialog only shows the results for one file name, the Preview simulates the results for all file names in the current selection. This allows you to check up-front if your processing instructions would produce duplicate or invalid file names or if the Move and Copy steps use the right folders.
Click on Preview to start the process. Depending on the number of files in the current selection and the complexity of your processing instructions, the dialog may require a few seconds to open.
In the following example we have used two steps. The first step uses the original file name and the second step removes the prefix _DSC from it:

The destination file name is the same as the original file name, minus the _DSC prefix.
If we make a mistake, e.g., set up processing instructions which produce duplicate file names, the Preview feature shows that as well:

The Preview highlights the differences between the original file name and the destination file name by using a bold font.
By changing your processing instructions and controlling the result in the Preview dialog, you can easily set up even complex Renamer Presets.
If this check box is enabled, the Preview displays the file names with their fully qualified path. If you are only interested in seeing the file name and extension, disable this option.
IMatch supports over 50 different step types you can combine them freely in your presets.
When the Renamer executes the processing instructions it produces the resulting file name by executing every step, from top to bottom. Every step either adds something to the output of the previous step, changes it or removes something from it.
The file extension is protected and never changed.
In the following table the term current file name refers to the original file name during the processing, including all changes made by previous steps.
| Step Name | Function |
|---|---|
Original file name | This step just emits the original file name and extension. |
Digits of original file name | Uses only the digits from the original file name. It searches for the first digit, starting at the beginning of the file name and returns all following digits. The first non-digit stops the scan. This step is convenient if you want to keep only the numerical part of the original file name. Example: _DSC1234.jpg => 1234.jpgYou can use a Text step with a variable like {File.Name} together with the substr or substrr formatting functions to access or extract selected parts of the original file name. Maybe you want to keep only the first 5 characters or the last 4 of the file name, or some characters in the middle. |
| Text and Numerical Steps | |
Text and Variables | The Text step is one of the most flexible and powerful step type because it allows you to freely mix text and variables. You can use Text steps to add text at any location in the resulting file name. Often Text steps are used to add separators like - or _ to a file name. A simple text step to add a minus sign to the output filename. But that's only the beginning. You can use variables in text steps as well. To insert variables, copy and paste them from elsewhere (e.g. the Metadata Panel) or click on the Variables button in the Text step editor.  A text step using a variable and a custom format. This step uses the date and time information of an image to produce a file name containing a timestamp formatted like _20130516-120102 If you want to include only parts of the original file name in the output, use the {File.Name} variable in combination with a substr formatting function. The following example extracts four characters starting at position 4 of the original file name: {File.Name|substr:4,4} If the file name is _DSC1234bla.RAW, the text step returns 1234 and this will be written to the output file name. |
Project Code | This is a special step because it will bring up a dialog box whenever you run a Renamer preset. See Project Code below for more info. |
User input | This step is similar to the project code. It open a text input dialog box whenever you run a Renamer preset. Use it to make your renamer presets more dynamic. |
Global Sequence Number | This step inserts the current value of the Global Sequence number and then increments it by the Step size defined in the Renamer dialog box. Use this step if you want to add unique numbers to your file names. When you just simulate a rename in the Preview, the Global Sequence is reset back to their original value when the preview closes. |
File Number | The consecutive number of the file in the current selection (after applying the optional sort profile). This number will be 1 for the first processed file, 2 for the second and so on. |
Day Sequence Number | This step starts at 1 and then counts up on every use during the current run. It resets back to 1 when the day of the file date&time changes, and on each Renamer run. This step allows you to count 'files per day', from 1 to n. For each day, files get a unique number between 1 and n.For this step to work best you should sort your files in the Renamer by date. |
Unique Number | This step appends a unique number if, and only if, the file name is a duplicate. Optionally you can configure a prefix that is added when the number is added. Typically you add this step as a safety to your processing instructions, to make sure that no duplicate file names are produced. Example: If your rename steps produce duplicate file names like beach-201606.jpg beach-201606.jpg beach-201606.jpg and you have included the Unique Number step, IMatch will automatically add numbers to the duplicate file names to make them unique: beach-201606.jpg beach-2016061.jpg beach-2016062.jpg |
GUID | A GUID is a globally unique id like 728955FA-97CC-43B0-93ED-78E684F55B19. Use this if you need truly unique file names. See this Wikipedia article for more information about GUIDs. |
| Text Manipulation | |
Remove Text | Removes a given text from the current file name, optionally using a regular expression. This step can be used to remove unwanted prefixes like "_DSC" from a file name. You can use literal text or variables, or a mixture of both. |
Replace Text | Replaces text with other text, optionally using a regular expression. You can use literal text or variables or a mixture of both for both the pattern and the replacement text. |
Replace Text Before | Replaces text before the first occurrence of the specified text. The replacement also replaces the specified text. Variables are supported for the search text and the replacement text. For example, replace the text before - with NNN in this file name: ABC-28920.jpg.Result: NNN-28920.jpg |
Replace Text After | Replaces text after the first occurrence of the specified text. The replacement also replaces the specified text. Variables are supported for the search text and the replacement text. For example, replace the text after Z with -NNN in this file name: ABC-28920Z098.jpg.Result: ABC-28920-NNN.jpg |
SubString | This step allows you to extract a part of the current file name. |
Reverse SubString | Like SubString, but starting at the back, left of the extension dot. You can use this to extract a substring from the back of the file name. |
To upper-case | Converts the current file name to upper-case. All change case steps only work if the file name is actually changed (you add/rename something with another step). Just doing case-conversion is not possible. This is due to the 'file exists' checks IMatch needs to perform in the Renamer and because Windows file names are not case-sensitive. |
To lower-case | Converts the current file name to lower-case. |
Extension to upper-case | Converts the current file extension to upper-case. |
Extension to lower-case | Converts the current file extension to lower-case. |
Delete leading digits | Deletes leading digits from the current file name. |
Delete trailing digits | Deletes trailing digits from the file name. This step starts at the extension dot and searches backwards. |
Delete digits | Deletes all digits from the current file name. |
| Date and Time | |
These steps insert date and time information in various formats. They use the global File.DateTime timestamp maintained by IMatch and emit the date and time in your local time zone. See How IMatch uses Date and Time Information for detailed information.If you want to include date and time, just add two steps - one for the date and one for the time. Add a separate text step with a SPACE or - to separate the date and time. If you want to include other date and time information or you need custom formats, time-zone offsets, UTC date and time and similar, just add a Text and Variables step and enter the variables that produce the desired result. Examples:
| |
Group By | This is a very powerful step and it can solve many tricky renaming challenges. Typical Use Cases:
These are only some of the potential uses for this flexible step. Here is how it works: In the dialog you choose whether you want to group files by a fixed number (e.g., 3 files per group) or based on a variable expression (e.g., the date in YXYYY-MM-DD format). 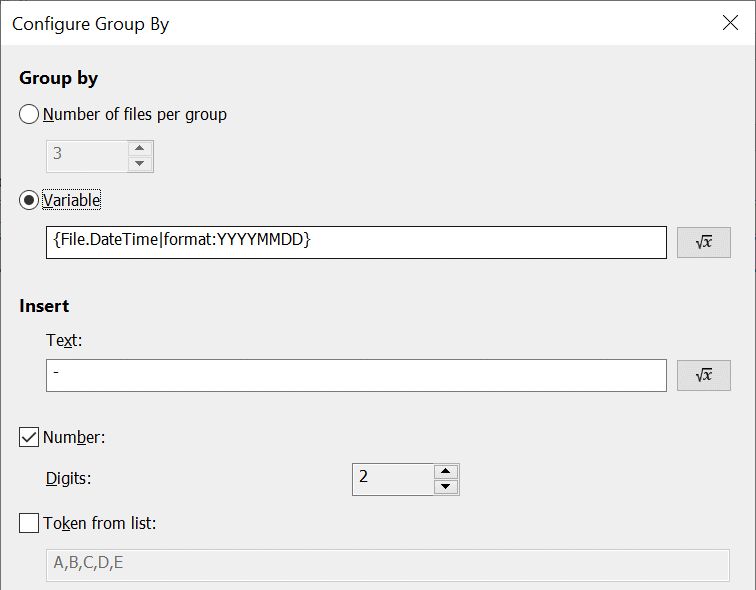 Then you enter the (optional) text to insert and whether or not you want to append a sequential number and/or a token from a list. Example 1For this example we combined the Group By step with a previous Date step in YYYY-MM-DD format: 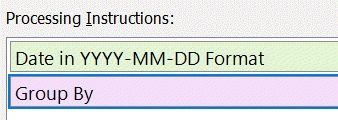 Applying this to a number of files, we produce the result in the following image. The files are grouped by their date and numbered sequentially: 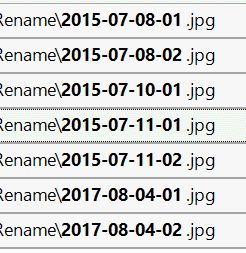 Make sure you sort the files by date so the Group By step sees them in the correct sequence and can group them properly. A wrong sort sequence will not produce the correct grouping. Example 2Another example which uses only the Group By step. We group files by YYYY-MM and produce the destination file name solely with the parameters available for the Group By step: 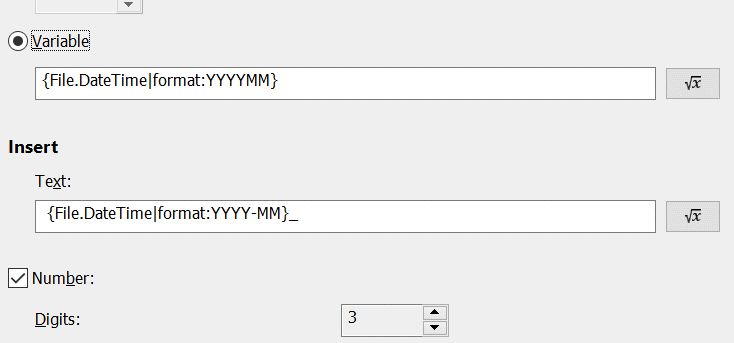 The resulting file names look like this: 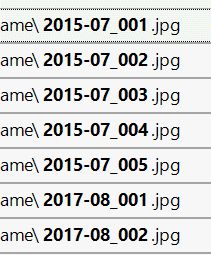 The files have been renamed by the year and month they were taken and a sequential number ensures that the file names are unique. Example 3In this advanced example we group the files by the contents of the XMP city tag combined with the date in YYYY-MM format. The file name is also composed from the city and date and we append a token from the list of tokens: 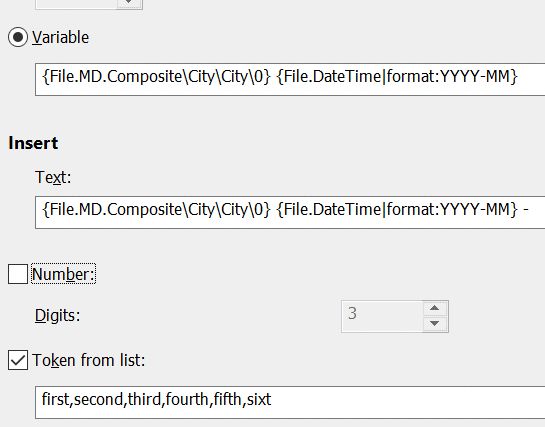 This produces the following output. All files are named by the city in which they were taken and have an alphabetic suffix: 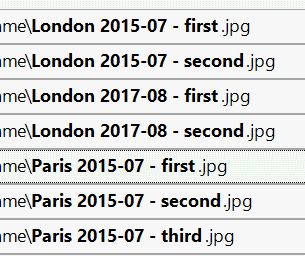 Make sure you sort the files by the same criteria you group them by (this means that you may need to create a new sort profile). The Group by step needs to see the files in the correct sequence to group them properly. These examples should give you some ideas for how you can solve normally tricky rename and grouping problems with this powerful step type. Example 4 - Handling Duplicate File NamesIMatch has dedicated steps to avoid duplicate file names. Sometimes these steps are not satisfying, because they kick in only when the first duplicate file name is encountered. This produces file names with different lengths, like You can use a Group By step to avoid duplicate file names. This works if you can use a variable which produces duplicate values for duplicate file names. For example, you rename files using a date and time step to produce file names in the format YYYY-MM-DD HH-MM-SS. This creates duplicate file names for all files taken at the same time. When we add a Group By step based on the variable 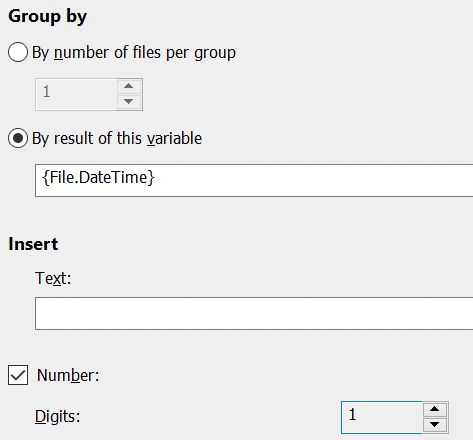 |
The project code is a special step because it causes IMatch to display a text input dialog at the time the Renamer preset is executed. The last used project code is used as the default:
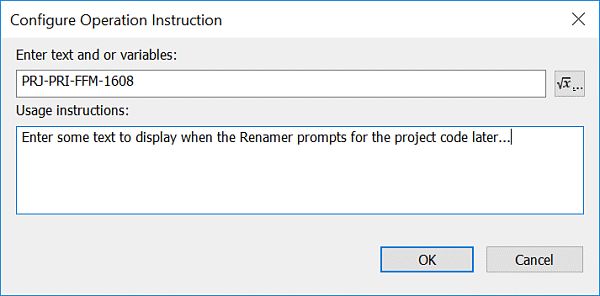
You can add a step of this type if you want to include a specific project code, model name, client id or similar in your file names. Using a project code creates dynamic presets which you can customize at runtime. The Renamer allows any number of project codes. IMatch will show the input dialog for each project code in the same order in which they appear in the processing instructions.
The usage instructions field can be used to add information about which codes to use, your own codes or whatever. The text you enter here is later displayed when the Renamer prompts for the project code.
The special {Renamer.ProjectCode} variable can be used everywhere you can use variables, including Text, Replace, Move and Copy steps. This allows you to move files into new folders based on a project code. Very neat if you keep your files organized in "per-project" folders. See Moving Files below for more info.
{Renamer.ProjectCode} represents all project codes found in the processing instructions. If you only have one project code, you can use this variable directly. If you have more than one project code, you need to specify which of the project codes you want to use by adding an index formatting argument:
{Renamer.ProjectCode|index:n}where n is the 1-based index of the project code. For example, to access the second project code, use {Renamer.ProjectCode|index:2}.
The Renamer remembers the last 20 project code inputs for each preset and project code step. You can simple select from recently entered project codes instead of typing them every time.
Each preset and step remembers its own recent list. If you have project code steps in multiple presets, each has its own recent list. If you combine multiple project code steps in a single preset, each step remembers its own recent list.
This step works identical to the project code. It exists to allow you to differentiate between project code input (with a certain format) and free text user input.
Works identical to the Project Code variables, but is accessible via {Renamer.UserInput}.
The Renamer remembers the last 20 user inputs for each preset and user input step. Same behavior as for project codes.
We start with a file name _DSC12345.
| Step Type | Parameter |
|---|---|
| Original File Name | |
| Remove | _DSC |
Removes the _DSC prefix from the file original file name. Resulting file name: 12345.
| Step Type | Parameter |
|---|---|
| Project Code | (dynamic) |
| Text | _ |
| Original File Name |
Inserts a project code followed by an _ before the original file name. IMatch prompts for the project code when you run the Renamer with this preset. For a project code like CODE, the file name becomes CODE_DSC_12345.
| Step Type | Parameter |
|---|---|
| Digits of Original File Name | |
| Unique Number | - |
Uses only the numeric part of the original file name. Appends - followed by an increasing number to guarantee file name uniqueness if needed. Our file name becomes 12345-1.
| Step Type | Parameter |
|---|---|
| Date in YYYYMMDD Format | |
| Text | <SPACE> |
| Time in HH-MM-SS Format | |
| Text | - |
| 1/100 Second in SS Format | |
| Unique Number | - |
Produces file names like 20120101 10-21-01-49.
If the renamed file has no 1/100 second information in the EXIF record this step will return 00. To avoid duplicate file names in this case, a unique number is appended.
The Text step is very powerful because it allows you to work with variables. For example, to include the last four characters of the original file name in your resulting file name, you can use a Text step like this:
{File.Name|substrr:0,4}For a file name like _DSC1234 this returns 1234.
Or maybe you want to include the first four letters of your file names at some other place of the resulting file name. No problem. Just add a Text step at the appropriate position and use this variable:
{File.Name|substr:0,4}You can also access metadata variables in text steps. Often the make, model or camera serial number is useful in file names. Or the unique photographer id stored somewhere in the EXIF comment. All this can be easily archived:
| Step Type | Parameter |
|---|---|
| {File.MD.Exif::Main\271\Make\0} | |
| Text | _ |
| {File.MD.Exif::Main\272\Model\0} | |
| Text | - |
| Global Sequence Number | Min. 4 digits |
This produces file names like NIKON CORPORATION_D4-0123. OK but not really satisfying. To make this more readable, we add another step to shorten the NIKON CORPORATION maker note:
| Replace | "NIKON CORPORATION" with "NIK" |
This results in file names like NIK_D4-0123 which is shorter and easier to read.
Some cameras provide a shutter count or number of shutter actuations value somewhere in the metadata. This tag can be conveniently used to produce (semi-)unique file names. For example, Nikon cameras record how often the shutter was released in the following metadata tag:
Nikon::Main\167\ShutterCount\0
You can find this tag in the Metadata Pane and then use the Copy as Variable command from the context menu to copy it into the clipboard and paste it into the Text step:
{File.MD.Nikon::Main\167\ShutterCount\0}This variable returns the current shutter count of your camera. Please note that there may be a problem, caused by the numeric formatting of the variable. If the shutter count is larger than 1000, IMatch or ExifTool may insert a thousands separator, depending on your country and locale settings in Windows.
This may cause the variable to return a value like '40.204' and if you use this in a file name, you'll end up with an additional dot - Not good.
To solve this, use the numformat variable formatting function:
{File.MD.Nikon::Main\167\ShutterCount\0|numformat:int,06}This neat function formats the variable to be a minimum of six digits, but without a thousands separator. The result will look like '040204' now, which is perfectly valid for a file name.
Other camera models may also record a shutter count or similar useful value. Search in the Metadata Panel (Browser layout) and see if you find something that can be used.
In addition to the {Renamer.ProjectCode} variable explained above, the Renamer supports the following variables:
| Name | Description |
|---|---|
{Renamer.TargetFileName} | The target (destination) file name at the current time. The contents of this variable may vary, depending on in which step you use it. It always reflects the current stage of the renaming process. |
{Renamer.Group.Index} | Only valid in the Group By step. 1-based index of the current file in the current group. |
{Renamer.Group.Count} | Only valid in the Group By step. Number of groups produced so far. This is 1 for the first group and then increases. |
{Renamer.Group.FileNames} | Only valid in the Group By step. The file names created for the current group so far. This is an array of strings and you can use the index variable formatting function to access individual file names.For example, {Renamer.Group.FileNames|index:first} returns the name of the first file in the current group. You can use this for things like naming all files in a group based on the first file or similar tasks. |
If you travel a lot, including the country name (or country code) and city in file names may be useful. A file name like 20150801-USA-New York-01234.ext is both unique and descriptive.
| Step Type | Parameter |
|---|---|
| Date in YYYYMMDD Format | |
| Text | - |
| {File.MD.countrycode} | |
| Text | - |
| {File.MD.city} | |
| Text | - |
| Global Sequence Number | Min. 5 digits |
These steps use variables to access geo-location data contained in your files. We use the short codes instead of the full variable name because they are move convenient.
You can add GPS coordinates to your files using the Map Panel and the reverse geocoding tools in IMatch.
So far we have only renamed files in-place. The files remained in their original folder. The special Move step allows you to move a file to another folder on your disk. This folder may already exist or it is created on-the-fly by the Renamer.
This opens up a wide range of possibilities for distributing files on your hard disk:
To make all this possible, the Move step combines several IMatch features like variables and folder patterns.
The Move parameter dialog takes one Destination Folder parameter which can contain literal text, folder patterns and IMatch variables in any combination.
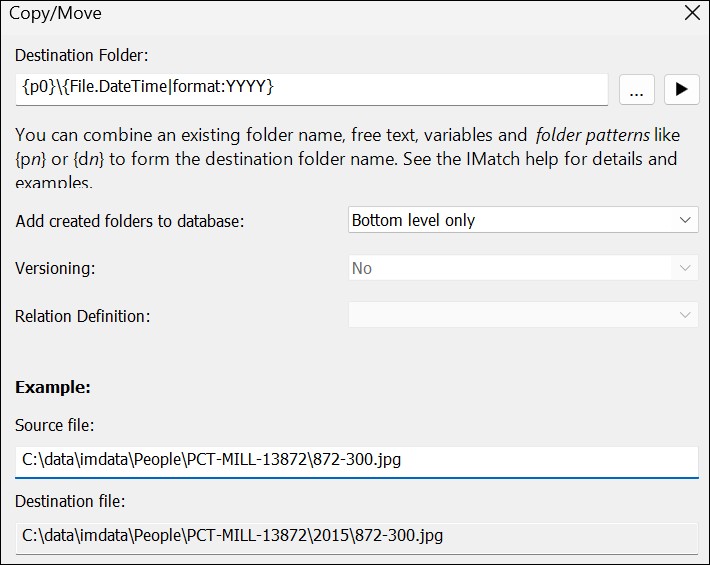
Moving files into a folder dynamically constructed from the source folder and the four-digit year of the date the images was taken.
If you want to move files into folders based on the Year/Month the file was created (even the day, if you like), you can use a simple variable expression to specify the destination folder:
{p0}\{File.DateTime|format:YYYY\MM}This variable moves files into sub-folders of the folder containing the file `{p0}`. The name of the sub-folder is created from the year and month of the file date. For example: ...\2020\03 or ...\2020\11. If you prefer to use the full month name, change the variable to:
{p0}\{File.DateTime|format:YYYY\MMMM}which produces folder names like ...\2020\March and ...\2020\November.
If you want to move the files into a specific (fixed) folder, just use the ... button to select this folder. The Target folder will then look something like
c:\images\project
If you want to move the file into a sub-folder of the current folder you can use a folder pattern in combination with some text. For example, if the image is contained in
c:\images\2012
and you want to move it to
c:\images\2012\Summer Vacationyou use this pattern:
{p0}\Summer Vacation{p0} is the folder pattern which returns the fully qualified path of the image file. This pattern will always work, independent from the actual folder the image is in. The Renamer combines the current folder of the file as specified by the {p0} folder pattern with Summer Vacation to form the destination folder name. If the folder does not exist, it is created.
You can also create multiple levels of folders, for example:
{p0}\Summer Vacation\HawaiiTo make this even more flexible, you can combine folder pattern with IMatch variables. To move files into sub-folders based on the year they were taken you could use this pattern:
{p0}\{File.DateTime|format:YYYY}This pattern uses {p0} to refer to the folder containing the file and combines it with the value of the EXIF date and time in YYYY format, for an image taken in 2010 with this name:
c:\images\archive\suze.jpg
the result of the above pattern would be:
c:\images\archive\2010\suze.jpgIf you run this Renamer preset on files from different years, the Renamer creates one "year" folder under c:\images\archive\ and moves the images into their matching folder.
If you instead want to move the image to a different disk or your backup server, you can do that too. Assuming your backup server can be addressed as \\NAS\Backup you can use this pattern:
\\NAS\Backup\{d0}\{File.DateTime|format:YYYY}For the above file, this would end up in:
\\NAS\Backup\archive\2010\suze.jpg
The folder pattern {d0} resolves into "Archive" and {File.DateTime|format:YYYY} into "2010".
See the topic on Folder Pattern for more information on patterns like {p0} and {d0}.
The Renamer makes the current project codes available in the {Renamer.ProjectCode} variables. These variables can be used to move images into folders based on a project code:
c:\images\{Application.DateTime|format:YYYY}\{Renamer.ProjectCode}This pattern moves the files from their original folder into a folder under c:\images. The first level is based on the current year and the second level is based on the project code. If you run this Renamer preset in the year 2012 and with a project code "ABC", the files are moved to:
c:\images\2012\ABC
If you want to use the Project Code only for the Move or Copy but not as part of the file name, add a Remove step and use {Renamer.ProjectCode} to specify the text to remove. This way the project code is not used to rename the file, but it is still available for the Move and Copy steps.
The Move and Copy steps optionally allow you to add newly created folders to the database.
For Move you usually want to do this because otherwise IMatch will move the files out of the database, which means all associated information like collections, categories, etc., is removed too. For the Copy step you can disable this if you don't want to include the copies in your database too.
The option to add all levels to the database can add many folders to your database, e.g. when you move a file to another disk. If you instruct IMatch to add all levels, it will add all folders, starting at the root folder. Usually adding only the bottom level (the folder to which the file is moved/copied) is the right choice.
Copying files works similarly to Move, except that the files are copied and not moved (Duh!). Use a Copy step to automatically copy your files to a backup location. This is especially useful if you rename your files before you start editing them.
You can use Copy during the ingest phase of your workflow, for example. Rename your original files to your standard naming schema and make a backup copy of the result to another folder on another disk or system. Since both files have the same name you can easily identify and rollback to the backup copy if your working copy becomes damaged or lost.
When you copy a file, IMatch enables additional options to automatically version the file. You can make the copy a version of the source file, or even the source file a version of the copy. The copy becomes the master in this case.
You can use this feature if you want to keep track of the copy, or link the copy to the source file. In our backup copy example above, using a manual version link between the backup and the original allows you to find the backup at any time. You can see the backup in the Version panel and you can let IMatch propagate changes to metadata from the original to the backup if you wish.
These options are only applied if the target folder is indexed by the database or you have enabled the option to add it to the database. IMatch cannot version files not included in the database.
See the topic on Versioning for details about IMatch File Relations.
You can use the Renamer as a smart Move/Copy tool as well.
If you combine an Original File Name step with a Move or Copy step you can distribute files on your system without renaming them:

The Renamer notices that original and destination file name are identical and skips the rename step. The Copy step is executed, copying the source file under its original file name to the destination folder.
Like the normal Rename command, the Renamer respects your File Relation definitions for buddy files. When files are renamed, copied or moved, the Renamer ensures that buddy files stay with their master files.
To create a new preset, click the + button next to the Preset drop-down combo box. IMatch asks you if you want to create a copy of the current preset. If you decline, the new preset is created with two default steps.
To delete the current preset, click the - button next to the Preset drop-down combo box.
Sometimes it may be useful to skip files which have already been renamed during a Renamer operation. Or maybe you want to keep the names of files where one or more specific condition are true.
Usually you use a filter or the File Window Search Bar to filter out files you don't want to be renamed before running the Renamer.
As an extra precaution against accidentally renaming the wrong files and especially when automatically running the Renamer after ingesting files, the following two steps come in handy:
If you include this step in your processing instructions, IMatch consults the File History to see if a file has already been renamed after entering the database.
If this is the case, the file is not renamed again.
This step evaluates a variable and when this variable returns a truthy value (one of true, yes, or 1), the file is not renamed.
{File.Name|contains:ABC,true,false}This variable returns true when the file name contains the term ABC and then the file will not be renamed.
{File.MD.label|is:Final,true,false}This variable checks if the file label is Final. If this is the case, the file is not renamed.
Basically anything that can be accessed and tested via a variable can be used for this step, allowing you to skip renaming files using a wide range of criteria.
Using one or both of these steps in Renamer Presets you use for
automatically running the Renamer after ingesting new files is a good idea.